
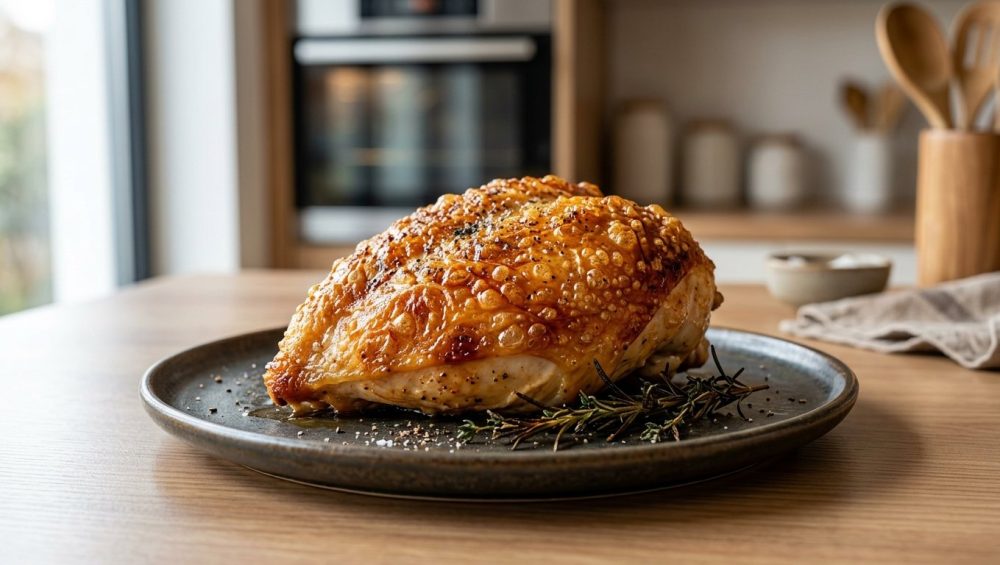
We have all been there. You spend your hard-earned money on a beautiful, premium cut of bone-in, skin-on chicken. You season it lovingly. You roast it until the kitchen smells like a rustic French bistro. You pull it out of the oven, plate it up, and take that highly anticipated first bite—only to find yourself gnawing on a casing that has the exact textural profile of a wet rubber rain boot.
It is a culinary tragedy, and frankly, it is entirely preventable.
As home cooks, we are often led to believe that we need a commercial deep fryer or a culinary degree to achieve perfectly crispy skin. That is absolute nonsense. You do not need pretentious chef-speak, and you certainly do not need a vat of boiling peanut oil to get a shatteringly crisp, glass-like crunch on your weeknight poultry. What you actually need is a basic understanding of high school chemistry, a little bit of patience, and a common pantry staple that is probably sitting in your baking cabinet right now.
Today, we are leaving absolutely no stone unturned. We are going to dive deep into the thermodynamics of oven roasting, the molecular biology of poultry skin, and the exact, scientifically validated methodology required to banish soggy, chewy chicken skin from your kitchen forever.
The Science of the Sogginess: Why Your Chicken Skin is Defeating You
To defeat the enemy, you must first understand the enemy. And in the kitchen, the ultimate enemy of a crispy crust is moisture.
Chicken skin is a complex biological matrix composed primarily of fat, collagen (connective tissue), and a massive amount of water. According to USDA nutritional data, raw chicken skin is composed of roughly 40% water, 40% fat, and 20% protein. When you take a raw piece of chicken directly from its plastic packaging, season it, and throw it straight into a hot oven, you are not actually roasting it. You are steaming it.
Here is where the thermodynamics come into play. Water is a stubborn molecule. It requires an immense amount of thermal energy to change its state from a liquid to a gas. As long as there is liquid water present on the surface of your chicken, the temperature of that skin physically cannot exceed 212°F (100°C), which is the boiling point of water. The ambient heat of your 400°F oven is entirely wasted on evaporating that surface moisture, rather than crisping the meat.
This thermal bottleneck is the exact reason you end up ruining perfectly good chicken breasts. You leave the chicken in the oven longer and longer, praying the skin will finally crisp up, but all you are doing is driving the internal temperature of the meat past the point of no return, resulting in chalky, dry protein.
The Maillard Reaction: The Holy Grail of Flavor
The reason that 212°F barrier is so devastating is because of a little thing called the Maillard reaction. Discovered in 1912 by French chemist Louis-Camille Maillard, this is the non-enzymatic browning process where amino acids (proteins) and reducing sugars undergo a complex chemical transformation when exposed to high heat.
The Maillard reaction is responsible for everything that tastes good in the culinary world. It is what gives a seared steak its savory crust, what makes toasted bread taste infinitely better than raw bread, and what transforms pale, flabby chicken skin into a deeply browned, savory, umami-rich masterpiece.
However, the Maillard reaction operates on a strict set of rules. It does not even begin to occur at a rapid, noticeable pace until the surface temperature of your food reaches between 280°F and 330°F (140°C to 165°C).
If your chicken skin is bogged down by its own natural water weight, it remains trapped at 212°F. The Maillard reaction is completely blocked. The collagen in the skin just sits there in a steam bath, melting into a chewy, gelatinous nightmare. This exact same principle of surface moisture is also food sticking to stainless steel in your skillets. Moisture is the enemy of browning. Period.
The Magic Bullet: Why Baking Powder is Your New Best Friend
So, how do we forcefully evict the moisture and accelerate the Maillard reaction? The answer is a brilliant, science-backed technique heavily popularized by the culinary nerds at Serious Eats and America’s Test Kitchen: the baking powder dry brine.
I know what you are thinking. Baking powder belongs in pancakes and biscuits, not on your savory dinner. But stick with me, because this is where the food science gets incredibly fun.
When you dust your chicken skin with a mixture of kosher salt and baking powder, you are launching a two-pronged chemical attack on that rubbery skin.
The pH Shift and Peptide Bonds
Chicken skin is naturally slightly acidic. Baking powder, on the other hand, is mildly alkaline (basic). When you apply baking powder to the surface of the chicken, you actively raise the pH level of the skin.
Why does this matter? Because the Maillard reaction is highly sensitive to pH levels. In an alkaline environment, the amino groups in the proteins are deprotonated, making them highly reactive. Furthermore, the alkaline environment physically weakens the peptide bonds—the microscopic links holding the amino acids together. By breaking down these structural proteins, the skin loses its tough, chewy resilience and becomes primed to brown exponentially faster.
The Carbon Dioxide Micro-Blisters
Baking powder is a leavening agent. It is composed of sodium bicarbonate (an alkaline base), a powdered acid (like cream of tartar), and a starch (usually cornstarch) to keep them separated. When baking powder comes into contact with the natural moisture of the chicken skin, the acid and the base react, creating tiny bubbles of carbon dioxide gas.
As the chicken roasts, these microscopic gas bubbles expand within the skin, creating thousands of tiny blisters. This significantly increases the total surface area of the skin. In the world of thermodynamics, more surface area equals more direct exposure to the oven’s ambient heat, which translates directly to a shatter-glass crunch.
A Crucial Warning: Baking Powder vs. Baking Soda
Do not—under any circumstances—confuse baking powder with baking soda for this technique. I have seen rookie cooks make this mistake, and the results are disastrous.
Baking soda is pure sodium bicarbonate. It is aggressively alkaline. While it will definitely raise the pH of the meat (and is actually a great trick for tenderizing tough ground beef), using it as a dry rub on chicken skin will leave your dinner tasting like a mouthful of metallic, soapy pennies.
Baking powder is the perfect tool because it contains its own neutralizing acid. It raises the pH just enough to break down the proteins and accelerate browning, without leaving behind any foul, bitter chemical residue. Just ensure you are buying aluminum-free baking powder to guarantee a perfectly clean flavor profile.
The Methodology: The “Set It and Forget It” Dry Brine
Now that we understand the chemistry, let’s talk about execution. As a busy professional, I am a massive advocate for letting the refrigerator do the heavy lifting for you. dry brining your poultry is the ultimate weeknight life-hack because it requires about three minutes of active prep time, completely eliminating the stress of weekday cooking.
Here is the definitive, step-by-step masterclass on how to execute the baking powder dry brine for flawless chicken every single time.
Step 1: The Paper Towel Pat Down
Remove your chicken (whether it is a whole bird, thighs, or wings) from the packaging. Take a stack of heavy-duty paper towels and aggressively blot the skin. You want to remove as much surface moisture as physically possible before we even begin the chemical process.
Step 2: The Magic Ratio
In a small bowl, mix your dry brine. The scientifically validated golden ratio is 1 part aluminum-free baking powder to 3 parts kosher salt. For a standard batch of chicken wings (about one pound), you will want exactly 1 teaspoon of baking powder and 1 tablespoon of kosher salt.
A quick note on salt: Always use kosher salt (like Diamond Crystal or Morton). Table salt is much denser and saltier by volume, and it often contains anti-caking agents containing iodine, which can impart a bitter taste.
Step 3: The Dusting
Sprinkle the salt and baking powder mixture evenly over all surfaces of the chicken skin. You are not trying to cake it on like a heavy barbecue rub; you just want a light, even dusting. If you want to add black pepper, smoked paprika, or garlic powder at this stage, feel free, but the salt and baking powder are the active chemical agents.
Step 4: The Refrigerator Dehydration Chamber
This is the most critical step of the entire process. Place your seasoned chicken on a sturdy wire cooling rack that has been set inside a rimmed baking sheet.
Place this entire setup into your refrigerator, completely uncovered, and walk away. Leave it alone for a minimum of 12 hours, up to 24 hours.
Here is what is happening while you sleep or work: The kosher salt immediately begins drawing liquid out of the chicken through osmosis. This liquid dissolves the salt and the baking powder. Over the next several hours, the meat reabsorbs the salty, seasoned liquid, deeply flavoring the flesh all the way to the bone. Meanwhile, the modern frost-free refrigerator acts as a giant commercial dehydrator. The cold, continuously circulating air aggressively evaporates the surface moisture.
When you pull that chicken out of the fridge the next day, the skin will look tight, translucent, and incredibly dry. It will feel like parchment paper. That is exactly what you want. You have successfully bypassed the 212°F thermal bottleneck.
The “No-Go” Rule: Stop Roasting on Toxic Garbage
We need to take a brief, brutally honest detour to talk about your equipment. I have a very strict, zero-tolerance policy when it comes to toxic, low-quality kitchenware, and if you are going to put the effort into mastering the chemistry of your food, you need to ditch the toxic kitchenware that is actively sabotaging you.
Far too many home cooks are trying to roast chicken on cheap, dark, non-stick roasting pans or flimsy cookie sheets they bought for five dollars at a big-box store.
First of all, non-stick coatings (like Teflon or other PFAS-based chemicals) are not designed for high-heat roasting. When you blast these pans in a 425°F oven, the chemical bonds in the coating begin to degrade. Not only are you destroying your nonstick coatings, but that peeling, flaking synthetic polymer is off-gassing into your kitchen and leaching directly into your dinner. It is a massive health hazard, and it has absolutely no place in a modern home kitchen.
Secondly, thin, cheap pans warp under high heat. Have you ever heard that loud BANG from your oven, only to find your pan has twisted itself into a metal pretzel? Those flimsy metal baking sheets possess terrible thermal mass. They cannot hold heat, they cook unevenly, and they actively prevent proper fat rendering.
The Holy Trinity of Safe Roasting Gear
To cook like a pro, you only need three safe, durable, lifetime-guaranteed pieces of equipment for this job:
- A Heavy-Duty Bare Aluminum Half-Sheet Pan: Aluminum is a phenomenal conductor of heat. A commercial-grade, heavy-gauge bare aluminum sheet pan will not warp, it contains no toxic non-stick coatings, and it provides a massive, even heating surface.
- A Stainless Steel Wire Rack: This is non-negotiable. If you place your chicken directly on the flat surface of a pan, the fat and juices will render out and pool around the meat. The bottom of your chicken will literally boil in its own juices, resulting in a soggy, flabby underbelly. Elevating the chicken on a stainless steel rack allows the hot oven air to circulate 360 degrees around the bird, ensuring the bottom gets just as crispy as the top.
- A Stainless Steel Roasting Pan (For Whole Birds): If you are tackling a whole Sunday roast chicken, invest in a heavy-clad stainless steel roasting pan with a sturdy V-rack. It is virtually indestructible, completely non-toxic, and can easily be transferred to the stovetop to make a pan sauce from the drippings.
Temperature and Technique: Bringing the Heat
You have dried the skin. You have altered the pH. You have your non-toxic, heavy-duty cookware ready to go. Now, it is time to apply the heat.
The Maillard reaction requires high, sustained temperatures. You cannot achieve shatteringly crisp chicken skin in a 350°F oven. You need to push the dial up to 400°F, or even 425°F depending on the cut of the bird.
At 425°F, two magical things happen simultaneously. First, the intense ambient heat rapidly melts (renders) the subcutaneous fat trapped just beneath the chicken skin. As this fat liquefies and pushes through the pores, it essentially begins to shallow-fry the skin from the outside in.
Second, because you already eliminated the surface water during your 24-hour fridge rest, the pan’s thermal energy immediately goes toward browning rather than evaporation. The alkaline baking powder accelerates the breakdown of the proteins, the carbon dioxide bubbles expand to create a micro-blistered texture, and within 40 minutes, you have a mahogany-brown crust that shatters when you tap it with a fork.
The Convection Advantage
If your oven has a convection setting (a fan that circulates the hot air), use it. In a standard conventional oven, the moisture evaporating from the food creates a microscopic, invisible “halo” of steam that hovers directly over the meat. This steam halo acts as an insulating blanket, slightly lowering the temperature at the surface of the food.
A convection fan violently blows this steam halo away, continuously blasting the chicken with dry, aggressive heat. This accelerates the rendering of the fat and speeds up the Maillard reaction significantly. Just keep an eye on your food, as convection ovens generally cook about 25% faster than conventional settings. And please, invest in a reliable internal oven thermometer; the digital display on your oven is lying to you, and precision is key when chasing the perfect crust.
Troubleshooting: Where Rookie Cooks Still Mess Up
Even with the immutable laws of physics and chemistry on your side, human error can still ruin a perfectly good dinner. If you have followed the baking powder dry brine method and your chicken skin still turns out chewy, you likely committed one of these cardinal culinary sins.
1. You Used Expired Baking Powder
Baking powder has a shelf life. The acid and base compounds eventually lose their potency, especially if stored in a humid environment. If your baking powder is dead, it will not produce the carbon dioxide bubbles necessary for that blistered texture.
The Fix: Test your baking powder before using it. Drop a half-teaspoon into a small bowl of hot water. If it violently fizzes and bubbles immediately, it is good to go. If it just sits there looking cloudy, throw it in the trash and buy a new tin.
2. You Overcrowded the Pan
This is the number one mistake I see weekend hobbyists make. If you cram twelve massive chicken thighs onto a single sheet pan so they are all touching shoulder-to-shoulder, you have effectively created a swamp. As the chicken cooks, it releases moisture. If there is no negative space between the pieces of meat for that moisture to escape into the oven’s exhaust system, the moisture gets trapped. The chicken pieces end up steaming each other. This is the exact same reason you end up with soggy roasted vegetables.
The Fix: Give your food some personal space. Leave at least an inch of breathing room between every piece of chicken on the wire rack. If you are cooking for a crowd, use two separate sheet pans on two separate oven racks.
3. You Basted the Chicken
I do not know who started the rumor that you need to constantly open the oven door every fifteen minutes to spoon liquid over a roasting chicken, but they need to be stopped. Basting is the enemy of crispy skin. You just spent 24 hours meticulously dehydrating the surface of your poultry to bypass the 212°F boiling point barrier. Why on earth would you open the oven and dump a ladle full of watery, un-rendered pan juices right back on top of it?
The Fix: Keep the oven door closed. Trust the process. The dry brine already locked the moisture inside the meat muscles. Let the skin crisp in peace.
4. You Covered It in Foil After Baking
You did everything right. The chicken looks like a glossy, blistered masterpiece. You pull it out of the oven, set it on the counter to rest, and then you tightly tent it with aluminum foil to “keep it warm.”
Congratulations, you just ruined your dinner in five minutes.
The chicken is still incredibly hot, meaning it is still releasing steam. When you trap that steam under a tight layer of foil, it rains right back down onto the skin, instantly rehydrating the crust and turning it back into a rubber tire.
The Fix: Let the meat rest uncovered. A properly roasted piece of chicken has enough thermal mass to stay piping hot for the 10 to 15 minutes it takes for the internal juices to redistribute.
The Final Verdict
Cooking is not magic. It is not an exclusive club reserved for people who went to culinary school in France. Cooking is simply applied physics and chemistry that you get to eat.
When you understand the mechanics behind the ingredients—when you realize that moisture is a thermal barrier, that alkaline environments break down peptide bonds, and that high-quality, heavy-gauge aluminum conducts heat better than cheap toxic non-stick—you take complete control of your kitchen.
The baking powder dry brine is the ultimate testament to the power of the home cook. With three minutes of prep time, a cheap pantry staple, and the patience to let your refrigerator do the work, you can absolutely obliterate the curse of rubbery chicken skin. So throw out that peeling roasting pan, check the expiration date on your baking powder, and get ready to experience the most mind-blowing, shatter-crisp poultry of your life. You’ve got this.






