Listen to me, you beautiful, well-intentioned weekend warriors. I love you, but we need to have a serious talk about what you are doing to your ground beef.
Americans consume an estimated 50 billion burgers each year. You would think, given that astronomical number, that we would have collectively mastered the art of cooking them. Yet, weekend after weekend, I watch otherwise competent home cooks absolutely obliterate perfectly good ground beef before it even hits the pan. With beef production costs having jumped about 32% since 2023 and restaurant burger prices rising by 14%, going out for a premium pub burger has become an absurdly expensive endeavor. You literally cannot afford to be ruining your meat at home.
I firmly believe that professional-level results are achievable in a standard home kitchen without a culinary degree. You do not need to be a Michelin-starred chef to make a mind-blowing burger. You just need to understand a tiny bit of food science, and you need to stop self-sabotaging with bad habits. The biggest, most catastrophic habit of them all? Salting your ground beef too early.
If you want to achieve tender, melt-in-your-mouth burgers instead of tough, overworked rubber pucks, you need to understand the chemistry of meat. Class is in session.
The Great American Burger Tragedy: Why We Keep Getting It Wrong
Let’s set the scene. It is a beautiful Saturday afternoon. You have invited friends over for a backyard barbecue. You went to the butcher and spent good money on a beautiful blend of freshly ground chuck, brisket, and short rib. You place that pristine meat into a giant mixing bowl.
And then, the tragedy begins.
You want to impress your guests, so you start treating your ground beef like a blank canvas for your spice cabinet. You dump in a heavy handful of kosher salt, some black pepper, garlic powder, onion powder, and maybe a splash of Worcestershire sauce. Then, you plunge your hands into the bowl and start aggressively kneading the meat, squishing it through your fingers until the spices are “perfectly incorporated.”
Congratulations. You have just made a meatloaf.
It is one of the most common beginner cooking mistakes, and it is the exact moment your burger dies. A burger is not a meatloaf, and it is certainly not a meatball. A great burger should be an unadulterated celebration of beef. When you bite into it, it should yield effortlessly, crumbling slightly as the rendered fat and juices coat your palate. When you mix salt directly into the raw ground meat and massage it, you are triggering a chemical reaction that actively destroys that delicate texture.
The Science of the Meat Puck: Meet Myosin
To understand why mixing salt into ground beef is a culinary crime, we have to look at the microscopic structure of the meat itself. Beef is composed of muscle fibers, fat, and connective tissue. Inside those muscle fibers are specific proteins responsible for muscle contraction. The one we care about today is called myosin.
What is Myosin, Anyway?
Myosin is a primary binding protein found in all muscle tissue. When a cut of beef is whole—like a ribeye steak—the myosin is locked safely inside the intact muscle fibers. You can salt a whole steak hours or even days in advance (a process known as dry-brining) and it will only improve the flavor and tenderness.
However, grinding meat changes the physical structure entirely. The grinder chops and tears the muscle fibers, exposing the internal proteins, including myosin, to the outside environment. On its own, this is fine. The meat is loose and jagged. But when you introduce sodium chloride (salt) to the equation, everything changes.
The Sausage Effect and The Emulsification Trap
Salt acts as a powerful solvent on exposed muscle proteins. When salt comes into contact with the ground beef, it begins to dissolve the myosin. This dissolved myosin turns into a highly sticky, glue-like substance.
As you mix the salted meat with your hands, that sticky myosin acts as an emulsifier, binding the fat and the meat particles together. The dissolved proteins cross-link with one another, forming a tight, interconnected web. This is a process known as “myosin extraction,” and it is the foundational technique of sausage making. Sausage makers intentionally add salt and aggressively mix their ground meat because they want a snappy, bouncy, cohesive texture.
But you are not making a bratwurst. You are making a burger.
When you mix salt into the meat and knead it, you are accelerating this cross-linking process. The proteins form a tight, unyielding web. As this dense matrix hits the heat of the pan or the grill, the proteins contract violently, which is exactly why your burgers always shrink into thick pucks that are tough to chew. The fat is trapped inside this rubbery matrix, meaning it cannot render properly to baste the meat, leaving you with a dry, dense, springy disaster.
The J. Kenji López-Alt Drop Test: Proof That Timing Is Everything
If you think I am just being a pretentious culinary snob, let’s look at the hard, reproducible data. Food scientist J. Kenji López-Alt famously demonstrated this in his rigorous Burger Lab experiments.
He wanted to see exactly how the timing of salt application affected the final texture of a burger. He took identical batches of ground beef and tested three different methods:
- Beef that was salted before it was even ground.
- Ground beef that had salt mixed into it before forming the patties.
- Ground beef that was formed into patties and only salted on the exterior immediately before cooking.
The results were staggering. The patties where salt was introduced early or mixed into the meat became incredibly dense and rubbery. To visually prove the difference in texture, he performed a “drop test.” When he dropped the pre-salted, mixed patties onto a hard surface, they literally bounced like rubber balls. They held together perfectly because the extracted myosin had glued the entire structure into a solid mass.
When he dropped the patty that was only salted on the outside right before cooking, it shattered and crumbled. That lack of structural integrity is exactly what you want in your mouth. You want the meat to break apart effortlessly when you bite into it. Controlled moisture-loss trials have further proven that salting too early causes myosin to leach out, reducing the juiciness of the final cooked burger by up to 37%.
The Moisture Migration Problem: Osmosis and The Maillard Reaction
Beyond the structural nightmare of myosin cross-linking, salting your ground beef too early introduces a secondary problem: moisture migration.
Osmotic Pressure Dynamics
Salt is hygroscopic, meaning it attracts and holds water. When you apply salt to the surface of a burger patty and let it sit for 10, 15, or 30 minutes, osmotic pressure goes to work. The salt draws the internal moisture of the meat out to the surface. If you let a salted patty sit on your cutting board, you will quickly notice a pool of red-tinted liquid forming on top of the meat.
This is a catastrophe for your crust.
The Enemy of the Sear
The ultimate goal of cooking a burger is to achieve a deep, dark, crispy crust on the outside while maintaining a juicy, tender interior. That beautiful crust is the result of the Maillard reaction—a complex chemical reaction between amino acids and reducing sugars that occurs at high temperatures (typically above 300°F).
Here is the immutable law of thermodynamics: water cannot exceed 212°F (100°C) at sea level. It simply boils and turns to steam. If the surface of your burger is covered in a layer of extracted water, that liquid has to evaporate before the temperature of the meat can rise enough to trigger the Maillard reaction. Instead of frying in its own rendered beef fat, your meticulously sourced ground beef steams instead of browning.
By the time all that surface water finally boils off and the meat begins to sear, the interior of your burger is completely overcooked and dry.
The Sassy Sous-Chef’s Masterclass: How to Actually Form and Season a Burger
Alright, we have covered the science of what not to do. Now, let’s talk about how to do it right. If you want to make a burger that makes your friends weep tears of culinary joy, follow these steps with absolute precision.
Step 1: The Cold Grind and Gentle Shaping
Heat is the enemy of raw fat. If you handle ground beef with warm hands for too long, the fat begins to melt and smear. Smeared fat coats the muscle fibers, preventing them from binding properly, and it renders out immediately when it hits the pan, leaving you with a dry, crumbly mess.
Keep your meat in the refrigerator until the exact moment you are ready to form the patties. When you take it out, handle the ground beef like it is a delicate, fragile pastry dough. Do not knead it. Do not squeeze it through your fingers. Gently toss the meat back and forth between your hands just enough to form a loose puck. You want to maintain the jagged, airy structure of the grind. Those tiny pockets of air inside the patty are what will capture the melting fat and juices as the burger cooks, creating a tender, melt-in-your-mouth texture.
Step 2: The Dimple Trick
As we discussed earlier, meat shrinks when it cooks. The collagen fibers tighten and contract under heat. Because the edges of the burger cook faster than the center, the edges contract first, acting like a belt that squeezes the center of the patty upward. This creates the dreaded “meatball” effect, where your flat patty turns into a swollen dome.
To counteract this, use your thumb to press a shallow dimple into the center of the raw patty. As the burger cooks and the edges contract, the dimple will push upward, leveling out the meat and leaving you with a perfectly flat patty that can actually hold a slice of cheese without it sliding off into the abyss.
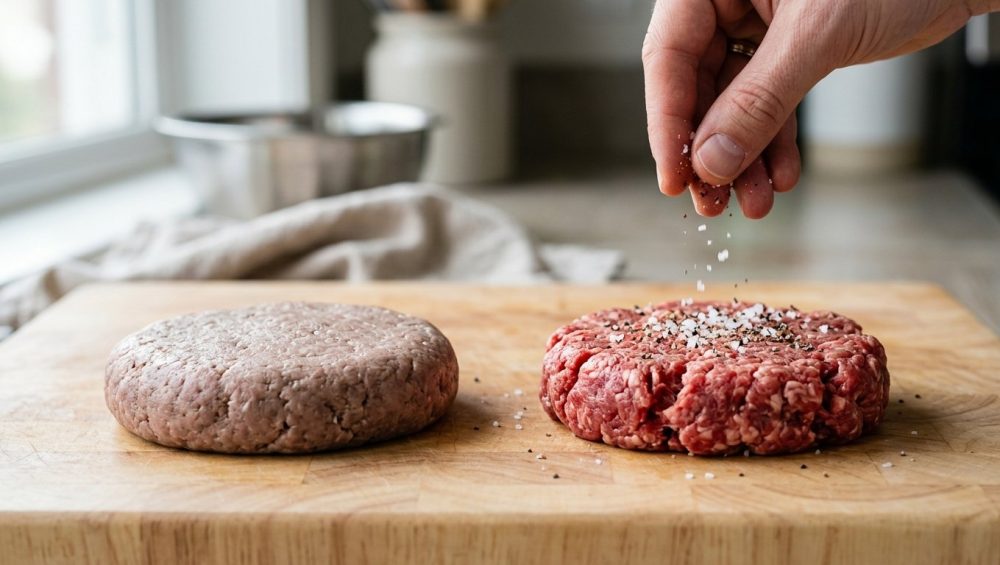
Step 3: The Last-Minute Salt Shower
This is the climax of our entire scientific journey. Your pan is screaming hot. Your patties are gently formed and dimpled. Now, and only now, do you reach for the salt.
Generously shower the exterior of the patty with kosher salt. Do not use iodized table salt; the grains are too fine, it tastes metallic, and it is far too easy to over-salt. Kosher salt provides a beautiful, textured crunch. Once salted, immediately place the patty into the hot pan. The salt will season the meat as it cooks, mixing with the rendering fat and the Maillard browning to create a savory, deeply flavored crust, all while the interior remains loose, tender, and incredibly juicy.
Step 4: The Flip and The Cheese
Do not constantly flip your burger. Let it sit undisturbed so it can develop that glorious crust. When you see the edges browning and the juices pooling slightly on the top, slide a thin metal spatula underneath, scraping hard against the pan to keep the crust attached to the meat, and flip it once. Add your cheese immediately so it has time to melt while the second side cooks.
Step 5: The Temperature Check
Do not guess when your meat is done by poking it with your finger. Unless your cheap, outdated meat thermometer is lying to you, you should be aiming for an internal temperature of about 130°F to 135°F for a perfect medium-rare. Remember that carryover cooking will raise the temperature by a few degrees after you take it off the heat, so pull the burgers just before they hit your target temp.
The “Toxic Pan” Rant: Where You Cook It Matters
As your favorite snarky culinary guide, I have a strict, uncompromising “No-Go” rule when it comes to toxic kitchenware. If you are trying to sear a beautiful, high-quality beef burger in a cheap, lightweight, scratched-up non-stick skillet, we need to have an intervention right now.
Polytetrafluoroethylene (PTFE) coatings are simply not designed for the screaming high heat required to properly sear beef. When you heat these pans past 500°F—which is incredibly easy to do when preheating a pan for a burger—the chemical coating begins to break down. It releases invisible, toxic fumes that can literally kill pet birds and cause flu-like symptoms in humans. I do not know about you, but I prefer my dinner without a side of aerosolized forever chemicals.
Furthermore, high heat permanently degrades the non-stick surface. This is the exact reason why your supposedly foolproof pans are always losing their slip after just a few months of use. You must understand that cooking spray is the enemy of a good sear and the absolute assassin of your cookware, leaving a polymerized, sticky residue that ruins whatever non-stick properties the pan had left. Throw the cheap pans in the trash where they belong.
Cast Iron and Carbon Steel: The Holy Grail of Crust
If you want the ultimate crust, you need to look at heavy-duty carbon steel pans or classic cast iron.
These materials possess incredible thermal mass. They take a while to heat up, but once they are hot, they stay hot. When you drop a cold half-pound of ground beef into a flimsy aluminum pan, the temperature of the pan plummets, causing the meat to steam. When you drop that same beef into a preheated cast iron skillet, the temperature barely flinches. The pan violently sears the meat, rendering the fat and creating an unparalleled crust.
If you are using a high-quality stainless steel skillet, you can absolutely achieve a flawless sear, provided you know how to manage your heat. You must allow the pan to preheat properly so you can utilize the Leidenfrost effect to prevent protein sticking. When the pan is hot enough, the moisture from the meat vaporizes instantly, creating a microscopic layer of steam that allows the burger to sear without fusing to the metal.
A Note on Smash Burgers
If you are venturing into the glorious world of the smash burger, the rules of myosin and salt still apply, but the technique shifts slightly. You aren’t forming a patty at all; you are forming a loose, jagged meatball. You place that unseasoned meatball into a screaming hot skillet, and then you obliterate it. You smash it as flat as humanly possible to maximize surface area.
But here is the trick: you need the right tool. A flimsy plastic spatula will snap in half. You need heavy-duty metal. A vented chef’s press is a phenomenal tool for this, allowing you to apply immense, even pressure without trapping escaping steam that would otherwise turn your crispy crust into a soggy mess. Once the burger is smashed flat, that is when you aggressively salt the exposed top layer.
The Weekday Efficiency Angle: Less Prep, Better Dinner
I am a busy professional, and I know you are too. During the week, time is money. I do not have the patience to spend an hour prepping dinner on a Tuesday night, which is why I am so deeply passionate about this scientific approach to burgers.
Think about the traditional, flawed method of making burgers at home. You have to pull out a mixing bowl, measure out half a dozen spices, chop onions, mince garlic, mix it all together, wash your raw-meat-covered hands, form the patties, and then wash the bowl. It is a messy, time-consuming chore.
When you embrace the science of the unseasoned patty, you eliminate all of that.
You take the meat out of the package. You gently form it into loose pucks directly on a piece of parchment paper. You wash your hands once. You get the pan smoking hot, salt the meat, and cook it. The entire prep process takes less than three minutes. When you eliminate the unnecessary steps of measuring out a dozen spices, aggressively kneading the meat, and letting it “marinate,” you are left with an incredibly streamlined process. This minimalist, science-backed approach is the ultimate cure for your weeknight cooking anxiety.
You get a restaurant-quality, mind-blowingly juicy burger on the table in under ten minutes. It is the ultimate weekday life hack, masquerading as a gourmet culinary technique.
The Sassy Sous-Chef’s Final Word
Cooking is not magic. It is just applied physics and chemistry with a side of good taste. You do not need to be intimidated by the kitchen, and you certainly do not need to settle for mediocre, rubbery food just because you are cooking at home.
By understanding how myosin reacts to salt, you have unlocked the secret to the perfect burger. You now know that overworking the meat is a sin, that salt is a powerful solvent that should only be applied at the last possible second, and that cheap non-stick pans belong in the garbage.
So, the next time you fire up the stove or the grill, leave the mixing bowls in the cabinet. Treat your ground beef with the gentle respect it deserves. Get your heavy metal pan screaming hot, give that patty a heavy shower of kosher salt right before it hits the heat, and prepare to bite into the juiciest, most tender burger of your life.
You’ve got this. Now go cook something amazing.


