
Picture this: It is a beautiful Sunday morning. You have invited your favorite people over for a weekend brunch. You are feeling ambitious, channeling your inner culinary deity. You pour the batter into the iron, the indicator light turns green, and you pull out a glorious, golden, perfectly crisp waffle. You set it on a plate, feeling incredibly proud of yourself, and turn back to make the next one. Ten minutes and three waffles later, you hand that first plate to your guest. They take a bite, and instead of a resounding, satisfying crunch, their teeth sink into a floppy, sad, soggy disc of culinary regret.
What happened? You didn’t burn it. You didn’t undercook it. You simply fell victim to the unforgiving laws of thermodynamics.
As a home cook who has set off the smoke detector more times than I care to admit, I can tell you that weekend cooking is a sacred ritual. During the week, I am all about ruthless efficiency and time-saving hacks. But on the weekend? We have the time to be absolute perfectionists. You do not need a culinary degree to make mind-blowing food, but you do need to understand the basic science of what happens to your food the second it leaves the heat source. Today, we are going to master the mindful waffle bar, and we are going to start by fixing the exact reason your waffles keep losing their crunch.
The Waffle Conundrum: Why Good Brunches Go Bad
To understand why a waffle goes limp, you have to understand what a waffle actually is. Unlike a pancake, which is essentially a fluffy cake cooked on a flat surface, a waffle is a structural marvel. It is a highly engineered grid designed to maximize surface area.
The Science of the Sog: Moisture Migration Explained
When you pour batter into a screaming hot waffle iron, the heavy metal plates rapidly transfer heat into the liquid. The moisture on the very surface of the batter flashes into steam and evaporates almost instantly. This rapid dehydration is what creates that beautiful, rigid, crispy outer crust. Meanwhile, the interior of the waffle remains soft, fluffy, and full of trapped moisture.
The moment you remove the waffle from the iron, a ticking clock starts. The inside of your waffle is essentially a steamed sponge, and the outside is a dehydrated shell. Nature hates an imbalance. Through a process known as moisture migration, the water molecules trapped in the fluffy center immediately begin moving outward toward the dry crust. If you just toss that hot waffle onto a room-temperature ceramic plate, the steam escaping from the bottom hits the cool plate, condenses back into water, and is immediately reabsorbed into the crust. Congratulations, you have just steamed your own waffle to death.
The Starch Retrogradation Factor
But moisture isn’t the only enemy here; we also have to talk about starch. When the starches in your flour are heated in the presence of water (your milk or buttermilk), they swell and gelatinize. This is what gives the inside of the waffle its tender crumb. However, as the waffle cools down, those gelatinized starches begin to re-crystallize and firm up in a process called starch retrogradation.
If the waffle cools down rapidly in a humid environment—like sitting flat on a plate trapped in its own steam—that retrogradation results in a texture that is tough, chewy, and leathery. If it cools slightly in a dry, well-ventilated environment, the starches set up firmly, maintaining that brittle, satisfying crunch. This is the fundamental science of why your make-ahead brunch is failing, and it is exactly what we are going to fix.
The Anatomy of a Crispy Waffle: It Starts with the Batter
Before we even talk about how to hold your waffles for a crowd, we have to ensure your batter is actually capable of producing a crispy crust in the first place. A soggy waffle is often the result of a fundamentally flawed recipe.
Fat, Moisture, and the Maillard Reaction
For a waffle to crisp up, it needs the Maillard reaction. This is the complex chemical process where amino acids and reducing sugars brown under high heat, creating hundreds of new flavor compounds and a hardened exterior. To achieve this, your batter needs the right balance of fat and sugar. If you use too little fat (like oil or melted butter), the waffle will stick to the iron and tear. If you use too much sugar, it will burn on the outside before the inside is fully cooked.
You also need baking powder to provide the necessary lift. When the batter hits the hot iron, the leavening agents create expanding gases that push the batter into every single crevice of the grid. This maximizes the surface area touching the hot metal, which directly translates to more crispy edges.
The Cornstarch Hack You’re Probably Ignoring
If you are using 100% all-purpose wheat flour for your waffles, you are fighting an uphill battle. Wheat flour contains gluten-forming proteins (glutenin and gliadin). While gluten is great for a chewy sourdough loaf, it is the mortal enemy of a light, crispy waffle.
To achieve a shatteringly crisp exterior, you need to cut your all-purpose flour with pure starch. Cornstarch is my absolute favorite secret weapon for this. By replacing about a quarter of your flour with cornstarch, you drastically reduce the overall gluten content of the batter. Cornstarch is pure carbohydrate with zero protein, meaning it crisps up beautifully under heat without adding any heavy, chewy structure. It creates a delicate, “short” crust that shatters when you bite into it and acts as a much stronger barrier against moisture migration.
The Gentle Fold and the Resting Phase
I cannot stress this enough: treat your waffle batter with respect. When you mix the wet ingredients into the dry, you must be gentle. I highly recommend that you stop using a hand mixer to combine your primary batter. Aggressive mixing develops the gluten strands, turning your waffle into a dense, rubbery hockey puck.
Mix the batter just until the dry ingredients are moistened. Much like the magic of lumpy batter when making pancakes, a few streaks of flour in your waffle mix will work themselves out during the cooking process. Once mixed, walk away. Utilizing the power of a short rest—about 10 to 15 minutes—allows the starches to fully hydrate and gives the gluten time to relax. This resting period is non-negotiable if you want a tender interior crumb.
The Holding Zone: How to Keep Waffles Crispy for a Crowd
Now we reach the critical juncture. You have perfected the batter, and the waffle is hot out of the iron. You have six guests sitting at your dining table, and you need to serve them all at the exact same time without anyone eating a soggy waffle.
The Oven-Rack Method (Your Waffle’s Best Friend)
The absolute best way to hold waffles for a crowd is the oven-rack method. Before you even plug in your waffle iron, preheat your oven. You want a low, steady heat. Grab a heavy-duty rimmed baking sheet (a cheap, flimsy one is a bad idea because you will watch those baking sheets warp and pop violently under prolonged heat).
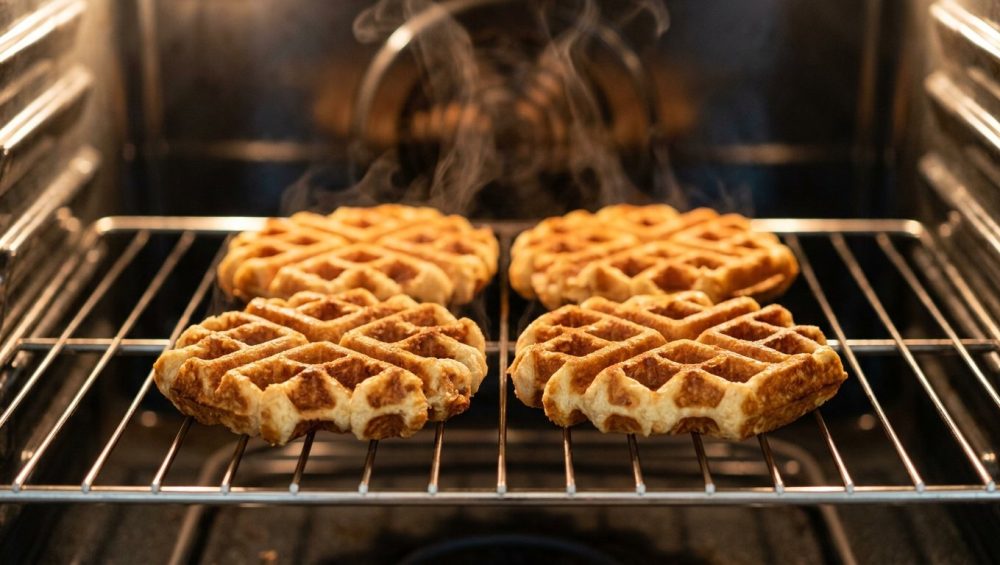
Place a stainless steel wire cooling rack directly inside the baking sheet. As each waffle finishes cooking, immediately transfer it to the wire rack in the oven. The wire rack is the crucial element here. It elevates the waffle, allowing the hot, dry air of the oven to circulate completely around it, carrying away the escaping steam before it can condense and ruin the crust.
Why Stacking is a Cardinal Sin
If you take only one piece of advice from this entire masterclass, let it be this: Never, under any circumstances, stack your warm waffles.
When you stack waffles on top of each other, you are creating a steam trap. The heat and moisture radiating from the bottom waffle rise directly into the waffle above it. Within three minutes, the entire stack will compress under its own weight, the cell structure will collapse, and the crispy exteriors will turn to mush. Always place them in a single, uncrowded layer on your wire rack. If you are making a massive batch, use two baking sheets.
Temperature Control: Hitting the Sweet Spot
What temperature should that oven be? The scientific sweet spot is between 200°F and 250°F (95°C to 120°C).
If you set the oven any lower than 200°F, the environment isn’t hot enough to evaporate the migrating moisture, and the waffles will still get soggy. If you set it higher than 250°F, you will actively continue the baking process. The waffles will dry out entirely, turning into giant, waffle-shaped croutons. At 200°F, the oven acts as a perfect thermal holding zone. It provides just enough ambient heat to keep the exterior dry and the interior warm, allowing you to hold the waffles in a state of suspended animation for up to 30 minutes while you finish the rest of the batch.
Gear Check: Ditch the Toxic Iron
We need to have a serious talk about the equipment you are using. I am fiercely protective of the home cook, and I have absolutely zero tolerance for cheap, toxic kitchenware that poisons your food and ends up in a landfill after a year.
The Danger of Peeling Non-Stick and “Mystery Metals”
Take a hard look at your current electric waffle maker. Is the black coating flaking off? Does it smell like burning plastic when you plug it in? If so, throw it in the trash immediately.
Most budget waffle makers are coated with PTFE (commonly known as Teflon) and manufactured using PFAS, which are toxic “forever chemicals”. When these cheap heating elements inevitably malfunction and overheat, those non-stick coatings degrade and release toxic fumes into your kitchen. Furthermore, when the coating starts to scratch and peel, those chemical flakes end up directly embedded in your breakfast.
To make matters worse, people often try to preserve these dying machines by spraying them with canned cooking spray. The danger of aerosol cooking sprays is that they contain soy lecithin and propellants that polymerize under high heat, creating a sticky, impossible-to-remove residue that actually ruins the non-stick surface faster. We are officially banishing toxic kitchen gear from our lives today. You deserve better.
What to Buy Instead: Cast Iron and Ceramic Alternatives
If you want a waffle maker that will outlive you, buy a stovetop cast iron waffle iron. Brands like Rome Industries make fantastic, rugged cast iron waffle makers that you heat directly over your gas or induction burner. Yes, there is a learning curve to controlling the heat manually, and yes, you will need a chainmail scrubber to safely clean out the deep grids without stripping your hard-earned seasoning. But once perfectly seasoned, cast iron is naturally non-stick, completely non-toxic, and produces a crust that electric models can only dream of.
If you absolutely demand the convenience of a plug-in electric appliance, you must seek out a ceramic-coated waffle maker. Brands like GreenPan make excellent electric waffle irons coated with Thermolon, a sand-derived ceramic non-stick surface that is entirely free of PFAS, PFOA, lead, and cadmium. They heat evenly, release the waffles effortlessly, and won’t off-gas toxic chemicals into your home.
Structuring the Mindful Waffle Bar
You have the science, the technique, and the safe gear. Now it is time to execute the brunch. Hosting a weekend gathering should not mean you are sweating over a hot iron while your friends are in the living room having all the fun.
Pre-Game Prep: Efficiency is Everything
Mastering the art of effortless hosting requires doing the heavy lifting before your guests even arrive. If you are making a yeast-raised Belgian waffle batter, do it the night before and let it ferment in the fridge. If you are doing a standard baking powder batter, whisk your dry ingredients together in one bowl, and mix your wet ingredients in another. Do not combine them until right before you are ready to start cooking.
Set up your oven holding zone in advance. Have your wire rack and baking sheet ready. When the doorbell rings, you should only have to plug in the iron, mix the wet into the dry, and start the batch cooking.
Staging the Toppings: From Compotes to Crunch
A mindful waffle bar is all about the toppings, but you have to treat them with the same respect as the waffles themselves.
First, warm your maple syrup. Pouring cold, refrigerator-temperature syrup over a hot, crispy waffle instantly drops the temperature of the fat in the waffle, making it taste greasy and dull. Gently warm the syrup in a small saucepan on the stove.
Second, serve room-temperature, spreadable butter. A cold, hard pat of butter will just sit on top of the waffle, refusing to melt, while simultaneously crushing the delicate grid structure when your guests try to aggressively spread it with a knife.
Finally, offer a variety of textures. You have the crispy waffle and the liquid syrup; now add a vibrant, acidic fruit compote to cut the richness, and toasted nuts or cacao nibs for a contrasting crunch.
The Flow of the Brunch: Keeping Guests Happy and Out of Your Way
To prevent a traffic jam in your kitchen, set up the waffle bar in a logical, linear progression. Start with the plates at one end of the counter. Next, place the warm waffles (pulled fresh from your 200°F oven holding zone). Follow that with the softened butter, the warm syrup, and finally the fruit and textural toppings.
This creates a seamless flow that naturally moves your guests away from your cooking station, allowing you to easily replenish the waffles from the oven without bumping elbows.
Troubleshooting Waffle Disasters
Even with the best preparation, things can occasionally go sideways. Here is how to handle the two most common waffle crises without losing your cool.
The “Stuck in the Iron” Crisis
You open the iron, and the waffle splits entirely in half, with the top sticking to the lid and the bottom cemented to the base. This is a nightmare. It usually happens for one of three reasons:
- Your iron was not fully preheated. The batter needs a shock of high heat to instantly set the crust. If the iron is warm but not hot, the batter acts like glue.
- There is not enough fat in your batter. Waffle batter requires significantly more melted butter or oil than pancake batter to help it release from the intricate grid.
- You opened the iron too early. When a waffle is cooking, it releases a steady stream of steam. As long as you see heavy steam billowing out the sides, do not open the lid. Wait until the steam slows to a mere trickle. That is your visual cue that the crust has formed.
The “Burnt on the Outside, Raw on the Inside” Dilemma
If your waffles look like charcoal on the outside but ooze raw batter on the inside, your heat is simply too high for the sugar content of your batter. Sugar caramelizes rapidly. If you are using a sweet batter, you must lower the temperature setting on your iron to give the interior time to cook before the exterior burns. If your iron doesn’t have a temperature dial, reduce the sugar in your batter and rely on the maple syrup to provide the sweetness at the table.
Conclusion: Brunch Like a Boss
Hosting a weekend brunch does not have to be a stressful, chaotic event that leaves you exhausted and your guests eating subpar food. By understanding the science of moisture migration, utilizing the pure genius of the oven-rack holding method, and refusing to cook on toxic, peeling equipment, you instantly elevate your cooking from amateur to expert.
You don’t need a professional kitchen to make restaurant-quality food. You just need to respect the ingredients, understand the physics of heat, and maybe have a glass of mimosa in hand while you do it. Now go plug in that iron, preheat that oven, and show your friends what a real, shatteringly crisp waffle is supposed to taste like.






