
Listen, I survive Monday through Friday on sheer willpower and sheet pan meals that take exactly twelve minutes of active prep. During the week, my kitchen is a factory of ruthless efficiency, and my guiding philosophy is that time is money. But when Saturday morning rolls around? That is my time. The weekend is when I transform from a stressed-out professional into an absolute culinary perfectionist. I will happily spend six hours crafting the perfect Swiss meringue buttercream and leveling delicate sponges. Mastering the art of the home kitchen means understanding that baking is a precise, unforgiving science, not a whimsical guessing game.
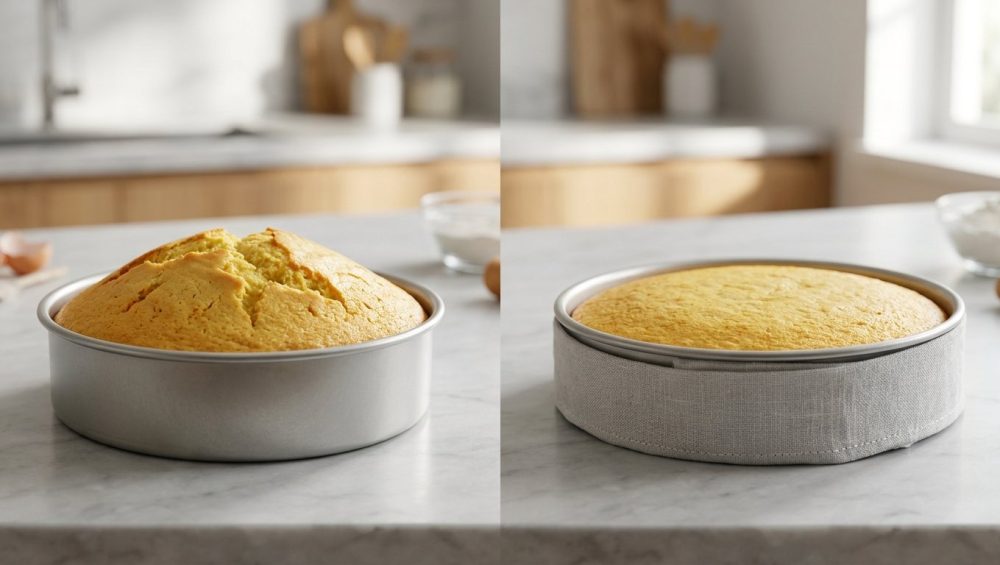
But let me tell you what completely ruins my weekend zen: pulling a meticulously mixed, perfectly flavored layer cake out of the oven, only to discover it has erupted into a cracked, lopsided, domed volcano.
If you are a home baker, you know exactly what I am talking about. You follow the recipe to the letter, you gently fold in your dry ingredients, you divide your batter evenly, and yet, your cakes emerge looking like miniature mountains. To stack them, you are forced to pay the “leveling tax”—taking a serrated knife and aggressively sawing off the top third of your beautiful cake just to get a flat surface. It is tragic, it is wasteful, and frankly, it is completely unnecessary.
You do not need a degree from Le Cordon Bleu to achieve bakery-perfect, dead-flat cake layers. You just need to understand a little bit of thermal physics, banish your terrible baking pans, and embrace the absolute magic of insulated cake strips.
Grab a cup of coffee (or a glass of wine, I don’t judge), because we are going to leave absolutely no stone unturned. This is your definitive, brutally honest masterclass on why your cakes dome, the thermodynamics of your oven, and how a simple piece of wet fabric is about to change your baking life forever.
The Thermodynamics of a Baking Cake (Or, Why Your Batter Betrays You)
To understand how to fix the dome, we have to understand why the dome happens in the first place. Baking a cake is a complex series of chemical reactions that rely entirely on heat transfer. When you slide a pan of room-temperature batter into a 350°F (175°C) oven, a high-stakes race against time begins.
How Heat Transfers in Your Oven
Your oven utilizes three methods of heat transfer: convection (the hot air circulating around the oven cavity), radiation (the heat radiating invisibly from the oven walls and heating elements), and conduction (the direct transfer of heat from the hot metal pan into the batter).
Metal is an incredibly efficient conductor of heat. When you place your cake pan in the oven, the metal absorbs the ambient heat almost instantly and transfers it directly to the batter touching the sides and bottom of the pan.
The Edges vs. The Center: A Race Against Time
Because the metal pan gets so hot so quickly, the outer edges of your cake batter heat up at a drastically accelerated rate compared to the center. The center of the cake is insulated by the surrounding batter, meaning it takes much longer for the heat to penetrate all the way to the middle.
As the edges of the batter rapidly heat up, a sequence of structural changes occurs. The butter melts, the sugar dissolves, and the chemical leaveners (baking powder and baking soda) react to the heat by aggressively producing carbon dioxide gas. By the time the outer edges hit about 160°F (71°C), the starches in the flour begin to gelatinize and the proteins from the eggs begin to coagulate. This means the outer edge of your cake physically “sets” and locks into place.
But what is happening in the center? The center is still a lukewarm, liquid pool of batter. As the heat finally reaches the middle, the leavening agents activate and produce gas. But because the outer edges of the cake have already set and formed a firm crust, that expanding gas in the center has nowhere to go but up. The center acts like a chimney, violently pushing the remaining liquid batter upward, creating that massive, frustrating dome. If the pressure is high enough, the surface will literally split open, leaving you with a deep, ugly canyon across the top of your cake.
The Maillard Reaction and Crust Formation
Simultaneously, the extreme heat on the edges triggers the Maillard reaction—a chemical reaction between amino acids and reducing sugars that gives browned food its distinctive flavor. While a nice golden crust is great on a loaf of sourdough bread, it is the enemy of a soft, delicate layer cake. The rapid heating of the pan’s edges causes the sides of your cake to overbake, dry out, and turn tough before the center has even finished cooking. If you pull the cake out too early in a panic, the center won’t be fully set, and your beautiful layer inevitably sinks in the middle.
The Tragic Consequences of the Unchecked Dome
You might be thinking, “Who cares if it domes? I can just cut it off.” Oh, sweetie, no. We are better than that. The unchecked cake dome causes a cascade of structural and textural nightmares that ruin the integrity of your weekend baking projects.
Wasted Cake (The “Leveling” Tax)
When you use a serrated knife to slice off a massive dome, you are effectively throwing away 20% to 30% of the cake you just spent good money and precious time making. Sure, you can eat the scraps over the sink like a feral raccoon (we’ve all been there), but you are sacrificing the glorious height of your cake. A towering, majestic three-layer cake quickly becomes a squat, sad, two-and-a-half-layer cake once the leveling tax is paid.
Structural Instability and the Leaning Tower of Frosting
Flat layers are absolutely essential for properly assembling and decorating a multi-layer cake. If you try to stack domed cakes without leveling them, you are building a house on a slanted foundation. The top layers will slide around, creating the dreaded Leaning Tower of Pisa effect. To compensate for the gaps between the domed layers, amateur bakers will often spackle the empty spaces with a gallon of buttercream. This creates a structurally compromised cake that will inevitably bulge, buckle, or completely collapse under its own weight.
Dry Edges and Gummy Centers
Because the edges baked so much faster than the center, the texture of a domed cake is inherently uneven. The outer inch of the cake will be dry, crumbly, and overbaked, while the center might be dense, heavy, or borderline gummy. A truly perfect layer cake should have a unified, pillowy, moist crumb from the dead center all the way to the outer edge. Cheap, flimsy pans are notorious for warping in the oven, which throws off your batter distribution and makes the doming even worse.
The Sassy Sous-Chef’s Golden Rule: Ditch the Toxic Gear First
Before we even discuss how to insulate your cake pans, we need to have a very serious conversation about the pans themselves. If you are using terrible equipment, no amount of baking hacks will save you.
I have zero patience for peeling non-stick coatings or mystery metals; banishing toxic kitchen gear from your life is the mandatory first step to better baking.
The Danger of Dark Non-Stick Pans
If you are baking your cakes in dark, black, or dark-gray non-stick pans, you are actively sabotaging your own bake. Dark colors absorb and radiate heat much more aggressively than light colors. Think about wearing a black t-shirt on a blazing hot summer day versus a white t-shirt. The black shirt absorbs the sun’s radiation and cooks you alive.
When you put a dark pan in the oven, it absorbs the oven’s heat rapidly and blasts the edges of your cake batter with intense radiation. This drastically accelerates the setting of the crust, virtually guaranteeing a massive dome and scorched, tough edges. Furthermore, cheap non-stick coatings inevitably degrade, scratch, and flake toxic chemicals into your food. Throw them away.
The Problem with Glass and Ceramic
If you are still using glass baking pans for your delicate layer cakes, we need to have a serious intervention. Glass is an insulator, not a conductor. It takes a very long time to heat up, but once it gets hot, it holds onto that heat with a terrifying vengeance. This means your cake will take forever to start baking, but once it does, the glass will continue to aggressively bake the edges of your cake long after you pull it out of the oven, leading to dry, overcooked borders.
The Only Pan You Should Be Using
You need high-quality, light-colored, anodized aluminum cake pans. Light-colored aluminum reflects excess heat rather than absorbing it, allowing for a much gentler, more even bake. The anodized finish means the metal has been electrochemically treated to be non-reactive, so it won’t leach metallic flavors into acidic batters (like lemon cake or buttermilk chocolate cake). Aluminum conducts heat beautifully and predictably, giving you the best possible baseline for a flat cake.
The Savior: What Are Insulated Cake Strips?
Now that you have the right pans, let’s introduce the hero of our story: the insulated cake strip.
An insulated cake strip is a band of thick, heat-resistant fabric (often containing cotton and an aluminized outer layer) that you soak in cold water and securely wrap around the outside of your metal cake pan before baking.
It looks incredibly simple, almost suspiciously so. But the science behind it is absolutely flawless.
The Science of Evaporative Cooling
When you wrap a soaking wet fabric strip around your cake pan and put it in a 350°F (175°C) oven, you are introducing the magic of evaporative cooling (specifically, the latent heat of vaporization).
Water cannot exceed 212°F (100°C) under normal atmospheric pressure. When the intense heat of the oven hits the wet cake strip, that thermal energy is entirely consumed by the process of converting the liquid water into steam. Because the water is absorbing all that heat energy to evaporate, the temperature of the cake strip—and by extension, the metal edges of the cake pan it is touching—cannot rise above 212°F (100°C) until the fabric completely dries out.
This is a massive game-changer. Instead of the pan’s edges instantly shooting up to 350°F and scorching the outer ring of batter, the edges are held at a gentle, boiling-water temperature for a significant portion of the bake.
Because the edges are kept cool, the outer ring of batter does not set prematurely. It remains fluid and rises at the exact same pace as the center of the cake. The entire cake bakes uniformly from edge to edge, resulting in a stunningly flat top with zero doming, zero cracking, and perfectly tender, “blonder” edges that aren’t tough or overbaked. Make sure your bowls and tools are impeccably clean; there is nothing worse than discovering your silicone spatulas taste soapy right as you fold your delicate vanilla batter.
A Step-by-Step Masterclass: How to Properly Use Cake Strips
Using cake strips is not rocket science, but I see home bakers mess this up constantly because they rush the process. If you want professional results, you have to follow the steps with precision.
Step 1: The Pre-Soak (Timing is Everything)
You cannot just run a cake strip under the kitchen faucet for three seconds and expect it to work. The fabric needs time to absorb the maximum amount of water possible. Place your strips in a bowl of cold water and let them soak for at least 5 to 15 minutes. I usually throw my strips into a bowl of water right before I start measuring out my dry ingredients. By the time my batter is mixed, the strips are perfectly saturated. Just like how your expensive knives go dull so fast when you abuse them on a glass cutting board, your cake strips will fail if you don’t soak them properly.
Step 2: The Squeeze (Finding the Goldilocks Zone)
Once the strips are fully soaked, you need to remove the excess water. Gently run your fingers down the length of the strip to squeeze out the water. You want the strip to be thoroughly damp, but not actively dripping. If the strip is dripping wet when you put it in the oven, water will pool on your baking sheet or oven floor, creating an excess of ambient steam that can alter the texture of your cake’s crust.
Step 3: The Wrap and Pin
Wrap the damp strip tightly around the outside circumference of your prepared, un-filled cake pan. Most commercial strips come with built-in fabric loops. Thread the end of the strip through the loops and pull it snug so it sits flush against the metal. Using both loops is essential; the second loop keeps the tail end of the strip tucked away so it doesn’t flop down and touch the blazing hot metal heating elements of your oven, which is a fire hazard. Once the strip is securely fastened, pour your batter into the pan.
Step 4: Adjusting Your Bake Time (Crucial!)
This is the step everyone forgets, and then they wonder why their cake is raw in the middle. By wrapping a cold, wet blanket around your cake pan, you are actively insulating it and drastically slowing down the rate of heat transfer. Because the edges are baking slower, the overall bake time of the cake will naturally increase.
As a general rule, you must add 5 to 15 minutes to the recipe’s stated bake time when using insulated strips. Do not blindly trust the clock on your microwave. You must rely on your baker’s intuition. The cake is done when a wooden skewer inserted into the dead center comes out clean (or with a few moist crumbs attached), and when the center of the cake springs back gently when lightly pressed with your finger.
DIY vs. Store-Bought: Which Strips Reign Supreme?
If you are reading this on a Saturday morning and you already have cake batter sitting on your counter, you might not have time to wait for a two-day delivery of commercial cake strips. Fear not, you can absolutely hack this with things you already have in your kitchen.
The Foil and Wet Paper Towel Hack
You can create a highly effective DIY insulated strip using aluminum foil and paper towels.
- Tear off a sheet of aluminum foil that is long enough to wrap completely around your cake pan with a couple of inches of overlap.
- Take a long strip of paper towels, fold them horizontally so they are about the height of your cake pan, and soak them in cold water.
- Squeeze out the excess water so they are damp but not dripping.
- Lay the damp paper towels flat in the center of the aluminum foil, and fold the top and bottom edges of the foil over the paper towels, completely encasing the wet paper in the foil.
- Wrap this foil-and-towel belt tightly around your cake pan and crimp the ends together to lock it in place.
Why Investing in Reusable Cotton Strips is Better
While the DIY method works perfectly in a pinch, I highly recommend buying a set of commercial, reusable cake strips (brands like Wilton make excellent ones). They cost less than fifteen dollars, they last for years, and they save you the massive headache of measuring, cutting, and folding foil and paper towels every single time you want to bake a cake. As I said earlier, time is money. Do your future self a favor and buy the proper tools.
Advanced Baking Variables That Affect Your Cake’s Rise
While insulated cake strips are practically magic, they cannot fix a cake that was doomed by poor fundamental technique. If you are using strips and your cakes are still acting possessed, you need to audit the rest of your baking process.
Oven Calibration and the Myth of 350°F
I am going to tell you a harsh truth: your oven is lying to you. The digital display may say 350°F, but the actual internal temperature could be 325°F or 385°F. Ovens are notoriously inaccurate and cycle through massive temperature swings to maintain their heat. If your oven is running way too hot, the extreme heat will overpower the evaporative cooling of the cake strips, and your cake will dome anyway. You must buy an inexpensive, analog oven thermometer and hang it from the center rack. Bake based on what the thermometer says, not what the digital dial claims.
The Importance of Precision (Weigh Your Ingredients)
Baking is chemistry, and chemistry requires precision. If you are still measuring your flour by scooping a plastic measuring cup into a densely packed bag of all-purpose flour, you are adding up to 30% more flour to your batter than the recipe intended. This excess flour creates a heavy, dense batter that struggles to rise properly and throws off the delicate ratio of wet to dry ingredients. If you aren’t using a digital kitchen scale to weigh your flour, you are basically playing a game of chance with your crumb structure.
The Role of Chemical Leaveners
Baking powder and baking soda are the engines that make your cake rise. If your baking powder is expired, your cake will be a flat, dense hockey puck. Conversely, if you accidentally add a tablespoon of baking powder instead of a teaspoon, the batter will experience a violent, rapid rise in the oven, creating a massive dome before inevitably collapsing in on itself. Always double-check your leavening measurements and ensure your powders are fresh.
Overmixing the Batter
Once you add your dry ingredients (flour) to your wet ingredients, the clock starts ticking on gluten development. Gluten is a structural protein that gives bread its satisfying chew, but it is the enemy of a tender cake. If you aggressively beat your cake batter for five minutes after adding the flour, you will develop a massive network of tough gluten strands. Overmixing your batter develops too much gluten, which is exactly how you end up with a tough pie crust or a rubbery, dense cake. Mix the batter on low speed just until the last streak of flour disappears, and then stop immediately.
Batter Temperature
While chilling your dough is a non-negotiable, mandatory step for perfect cookies, cake batter needs to go into the oven immediately after mixing. If you let cake batter sit on the counter for an hour while you run errands, the chemical leaveners will exhaust their rising power in the bowl instead of in the oven. Mix the batter, pour it into your strip-wrapped pans, and bake it immediately.
Frequently Asked Questions About Cake Strips
Do they work on square and rectangular pans?
Absolutely. While they are most commonly used on round 6-inch, 8-inch, and 9-inch layer cake pans, you can easily use them on square or rectangular pans. If your pan is larger than a single strip, you can simply thread two or three strips together end-to-end to create one massive super-strip that will fit around a 9×13 sheet pan.
Can I use them for brownies, blondies, and quick breads?
Yes! If you are the kind of person who hates the crusty, overbaked edges of a brownie pan and wants every single square to be as fudgy and soft as the center pieces, wrapping a cake strip around your brownie pan will give you edge-to-edge perfection. It also works beautifully for banana bread or pound cakes baked in loaf pans, preventing the edges from drying out before the dense center cooks through.
Will they catch fire in the oven?
If used correctly, no. The strips are specifically designed to withstand standard baking temperatures (up to 400°F/200°C). Because they are soaked in water, they will not combust. However, you must ensure that no loose fabric tails are dangling down and touching the exposed electric heating elements at the bottom of your oven, as direct contact with a 1000°F heating coil will obviously cause burning.
Reclaiming Your Weekend Baking Glory
There is a profound, almost arrogant satisfaction in pulling a cake out of the oven and seeing a surface so perfectly flat you could use a spirit level on it. It saves you time, it saves you from wasting delicious cake, and it instantly elevates the final aesthetic of your frosted masterpiece.
You don’t need to be a professional pastry chef to make a jaw-dropping cake. You just need to respect the science of the kitchen, protect your pans from the harsh radiation of your oven, and harness the simple, undeniable magic of evaporative cooling.
So, this weekend, ditch the cheap dark pans, soak your cake strips, and bake with the confidence of someone who actually knows what they are doing. Your buttercream will thank you, your guests will be in awe, and you will never have to pay the leveling tax ever again. Happy baking.






