Listen, we need to have a serious talk about what is happening in your skillet. I know you are busy. I know it is a random Tuesday night, you are tired, and you just want to get dinner on the table. But if you pull one more sad, gray, boiled-looking piece of chicken out of a frying pan and try to convince yourself that it is “pan-seared,” I am going to personally come over and confiscate your spatulas.
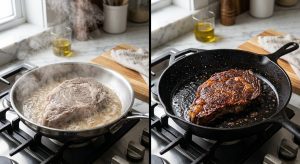
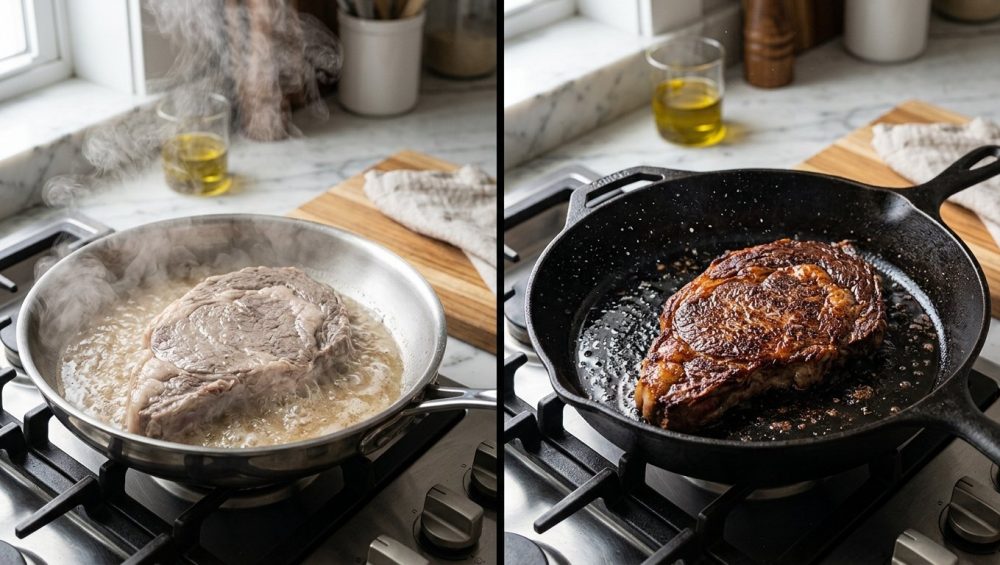
You bought the expensive cuts of meat. You heated the pan. You added the oil. You laid the protein down, expecting that glorious, aggressive sizzle that signals the creation of a restaurant-quality crust. Instead, you got a pathetic, sputtering hiss. The meat immediately started leaking opaque grayish fluids. Within minutes, you were left wondering why steaks turn out gray and rubbery, sitting in a puddle of their own lukewarm juices.
You didn’t sear your dinner, my friend. You steamed it. And the culprit is the most common, easily avoidable rookie mistake in the culinary world: surface moisture.
If you want to cook like a professional without spending four years in culinary school, you have to understand the fundamental physics of heat transfer. Today, we are stripping away the pretentious chef-speak and diving deep into the thermodynamics of your frying pan. We are going to explore exactly why your meat won’t brown, the absolute necessity of removing surface water, and how a simple paper towel can transform your weeknight dinners from depressing to mind-blowing.
The Science of the Sear: Meet the Maillard Reaction
Before we can fix your soggy meat problem, you need to understand what you are actually trying to achieve when you sear a protein. You are not just “cooking” it; you are acting as a chemist, initiating one of the most beautiful and complex chemical processes in the culinary arts: the Maillard reaction.
First described in 1912 by French chemist Louis Camille Maillard, this reaction is a form of non-enzymatic browning. It is the exact same chemical process that gives a golden crust to baked bread, turns roasted coffee beans dark and complex, and makes toasted marshmallows taste incredible.
The Maillard reaction occurs when the nucleophilic amino groups of amino acids (the building blocks of your meat’s protein) react with the carbonyl groups of reducing sugars under high heat. This isn’t a single reaction, but rather a cascading chain of chemical events. It begins with an initial stage where sugars and amino acids form Amadori products. These intermediate compounds then break down and undergo complex polymerizations, eventually creating high-molecular-weight nitrogen-containing polymers called melanoidins.
Melanoidins are the magic compounds responsible for that deep, mahogany-brown color on a perfectly seared steak. But more importantly, this chain reaction produces hundreds of volatile flavor molecules. We are talking about pyrazines that give off roasted notes, furanones that taste sweet and caramelized, and thiophenes that provide that deeply savory, meaty flavor.
Here is the catch, and it is a massive one: The Maillard reaction is highly temperature-dependent. While it can technically occur at very low temperatures over years (like in the aging of balsamic vinegar), in a cooking environment, it requires a minimum surface temperature of roughly 280°F to 330°F (140°C to 165°C) to proceed rapidly enough to form a crust.
If the surface of your meat does not reach that critical 280°F+ threshold, the Maillard reaction simply will not happen in the time it takes to cook the food. You will get zero browning, zero complex flavor development, and a thoroughly disappointing meal. And the number one thing preventing your meat from reaching that temperature is water.
The Enemy of Flavor: The Thermodynamics of Surface Moisture
To understand why wet meat ruins your dinner, we have to talk about the physics of water. I promise to keep the math painless, but you need to grasp this concept because it is the single biggest bottleneck in your kitchen.
Water is a thermal bully. It has an extraordinarily high specific heat capacity, meaning it takes a massive amount of energy just to raise its temperature. But the real problem occurs when water reaches its boiling point.
At sea level, liquid water boils at 212°F (100°C). Because of the laws of physics, liquid water cannot exceed 212°F. If you apply more heat to boiling water, it doesn’t get hotter; instead, that thermal energy is used to force a phase change, turning the liquid water into steam.
This phase change requires a staggering amount of energy, a concept known in physics as the “latent heat of vaporization”. To put this in perspective: it takes exactly 1 calorie of heat energy to raise one gram of liquid water by 1 degree Celsius. But to turn that same gram of water at 212°F into steam at 212°F? It takes a massive 540 calories of energy (roughly 2260 kJ/kg).
The Energy Bottleneck
Now, let’s apply this to your frying pan. You have preheated your skillet to a beautiful, searing-hot 400°F. You take a steak straight out of the vacuum-sealed plastic packaging—dripping with water and myoglobin (that red liquid that isn’t blood)—and you throw it directly into the hot pan.
What happens? The thermal energy in your skillet aggressively attacks the surface of the meat. But because the meat is covered in water, all of that pan’s heat energy is instantly hijacked. Instead of heating the meat’s surface to the 280°F+ required for the Maillard reaction, the pan’s energy is entirely consumed by the monumental task of boiling off the surface water.
This creates a massive energy bottleneck. The surface of your meat is physically trapped at 212°F (the boiling point of water) until every single microscopic drop of moisture has evaporated. No matter how high you turn up your stove dial, the temperature of the meat’s surface cannot rise above 212°F while liquid water is present.
Because 212°F is well below the 280°F Maillard threshold, your meat is literally steaming in its own juices. The inside of your steak or chicken breast continues to absorb heat and cook, but the outside refuses to brown. By the time the pan finally manages to evaporate all the surface water and the temperature can finally climb past 212°F, the internal temperature of the protein has skyrocketed. The inside is completely overcooked, leaving you with dry and rubbery chicken or a well-done, gray steak.
You didn’t lack cooking skills; you just lost a fight against the latent heat of vaporization.
The Simple Magic: Paper Towels and the Art of Patting Dry
The solution to this thermodynamic nightmare is so laughably simple that most home cooks skip it because they don’t believe it matters. But as we’ve just established, it is the most critical step in the entire cooking process. You must physically remove the moisture before the meat hits the pan.
Enter your kitchen’s unsung hero: the humble paper towel.
When you take your protein out of its packaging—whether it is chicken thighs, pork chops, scallops, or a ribeye—you need to aggressively pat it dry. I do not mean a gentle, polite dab. I mean you need to take a wad of high-quality paper towels and press firmly into the surface of the meat. Flip it over and do the other side. Do the edges. If the paper towel gets saturated, throw it away, grab a dry one, and do it again. The surface of the meat should feel tacky and matte to the touch, not slick and glossy.
By spending ten seconds doing this, you are manually removing the water that would have otherwise stolen your pan’s thermal energy. When this dry meat hits the hot oil, there is no water to boil off. The pan’s energy is immediately transferred to the protein, rocketing the surface temperature straight past 212°F and right into the 300°F+ Maillard zone. The result? An instant, aggressive sear, a gorgeous crust, and a perfectly cooked interior.
This rule applies to almost everything. If you are making a quick weeknight stir-fry, make sure your sliced beef or chicken is patted completely dry before it hits the wok, so your ground beef steams instead of browning is a tragedy of the past. If you are searing scallops—which are notorious for holding excess water—patting them dry is the absolute difference between a golden crust and a rubbery, white eraser.
Leveling Up: The Unbeatable Magic of Dry Brining
If you want to graduate from a weekend hobbyist to a true kitchen master, patting your meat dry with paper towels is just step one. Step two is utilizing the absolute magic of dry brining.
Dry brining is the process of generously salting your raw meat and leaving it uncovered in the refrigerator for anywhere from one to twenty-four hours before cooking. No liquids, no marinades, just salt and cold air.
Here is the science of why this is the ultimate hack for a perfect sear:
When you first apply salt to the surface of the meat, osmosis draws moisture out of the muscle fibers. For the first ten to fifteen minutes, the meat will actually look wetter as the water pools on the surface. But if you leave it alone, a second scientific miracle occurs. The salt dissolves into that extracted moisture, creating a highly concentrated brine. Over the next few hours, the meat reabsorbs this salty liquid deep into its muscle fibers.
This internalizes the seasoning, flavoring the meat all the way through rather than just on the surface. Furthermore, the salt alters the structure of the proteins (denaturation), causing them to unwind and swell. This prevents the muscle fibers from contracting too tightly when heated, which means the meat retains significantly more of its natural juices during cooking.
But the biggest benefit of dry brining happens on the exterior. Because the meat is sitting uncovered in the refrigerator, the cold, continuously circulating air acts as a gentle dehydrator. Over a few hours, the surface of the meat dries out completely, forming a slightly tacky, translucent skin known as a pellicle.
When you take a dry-brined steak or chicken breast out of the fridge, the surface is entirely devoid of liquid water. You don’t even need a paper towel. When that perfectly desiccated surface hits a hot pan, the Maillard reaction begins almost instantaneously. You will achieve a crust so thick, dark, and flavorful that it will rival any high-end steakhouse in your city.
The Gear Check: Why Your Pan is Sabotaging Your Sear
You can pat your meat as dry as a desert, but if you are using the wrong equipment, you are still going to fail. We need to talk about your cookware, and I am going to institute a strict “No-Go” rule right now.
The Rant Against Toxic Gear
If you are trying to sear a steak in a cheap, scratched, lightweight non-stick skillet, I need you to stop immediately. I despise cheap, toxic kitchenware, and you should too.
Traditional non-stick pans are coated with PTFE (Polytetrafluoroethylene, commonly known as Teflon). These pans are fine for gently scrambling eggs on low heat, but they are an absolute disaster for searing meat. To achieve a proper Maillard reaction, your pan needs to be rocket-hot—often exceeding 400°F to 500°F.
At temperatures above 500°F, PTFE coatings begin to break down and degrade. As they break down, they release toxic, invisible fumes into the air. Inhaling these fumes can cause a condition known as “polymer fume fever,” which mimics severe flu-like symptoms. Furthermore, these fumes are highly lethal to pet birds. You should never, under any circumstances, expose a non-stick pan to the high heat required for browning meat.
If you are throwing out pans every year due to degrading non-stick pan coatings, you are wasting your money and risking your health. It is time to upgrade by banishing toxic kitchen gear from your life for good.
The Power of Thermal Mass
To achieve a flawless sear, you need a pan with high “thermal mass.” Thermal mass is a material’s ability to absorb and store heat energy.
When you drop a piece of room-temperature (or fridge-cold) meat into a hot pan, the temperature of the pan instantly drops. If you are using a thin, cheap aluminum pan, it doesn’t have enough stored heat energy to recover quickly. The pan’s temperature plummets below the Maillard threshold, and you end up steaming the meat.
You need heavy, thick cookware that holds onto heat like a vault.
- Cast Iron: The undisputed king of thermal mass. It takes a long time to heat up, but once it gets hot, it stays hot. When you drop a thick steak into a cast iron skillet, the temperature barely flinches.
- Carbon Steel: The professional chef’s best friend. It operates similarly to cast iron but is slightly lighter and more responsive to temperature changes. You must understand carbon steel pan thermodynamics to maintain heat, but once seasoned, it provides an incredible, safe, naturally non-stick sear.
- Multi-Clad Stainless Steel: A heavy, tri-ply or 5-ply stainless steel pan (with an aluminum or copper core sandwiched between steel) is phenomenal for searing. It heats evenly, holds heat beautifully, and leaves behind “fond”—those caramelized browned bits stuck to the bottom of the pan that you can deglaze with wine to make an incredible pan sauce.
If you are worried about meat sticking to stainless steel, you just need to perform the water drop test to ensure the pan has reached the correct temperature (the Leidenfrost effect) before adding your oil and meat.
The Sassy Sous-Chef’s Masterclass: Step-by-Step to the Perfect Crust
Alright, you understand the chemistry, you respect the thermodynamics, and you have thrown your scratched Teflon pan in the trash. It is time to put it all together. Here is your foolproof, step-by-step masterclass for achieving a flawless sear on any protein, whether you are making pan-seared salmon or a thick ribeye.
Step 1: The Dry-Down
Remove your protein from the fridge. If you didn’t dry brine it overnight, take your paper towels and aggressively pat every square inch of the meat until it is bone dry. Season it generously with kosher salt right before it goes into the pan (if you salt it too early without giving it time to dry brine, the salt will pull moisture to the surface, defeating the purpose of drying it).
Step 2: The Pre-Heat (Patience!)
Place your heavy cast iron, carbon steel, or stainless steel pan on the stove over medium-high heat. Let it sit there. Do not rush this. A heavy pan takes 3 to 5 minutes to properly and evenly heat up. Hover your hand a few inches above the surface; you should feel intense, radiating heat.
Step 3: The Right Oil
Once the pan is hot, add your fat. Do not use extra virgin olive oil or butter for high-heat searing; their smoke points are far too low (butter burns around 300°F), and they will scorch, leaving an acrid, bitter taste on your food. Use a high-smoke-point fat like avocado oil, grapeseed oil, ghee (clarified butter), or beef tallow. You want just enough oil to lightly coat the bottom of the pan. When the oil shimmers and you see the very first wisp of faint white smoke, it is go-time.
Step 4: The Lay-Down
Carefully place your dry meat into the pan. Always lay the meat down away from you. If the oil splatters, it will shoot toward the back of the stove, not onto your shirt. You should immediately hear a loud, aggressive sizzle. If it hisses weakly, your pan wasn’t hot enough.
Step 5: The Leave-It-Alone Phase
This is where most beginners panic. Once the meat is in the pan, take a step back and do absolutely nothing. Do not poke it. Do not press down on it with a spatula (you are just squeezing out the juices). And for the love of all things culinary, do not try to flip it after thirty seconds.
The Maillard reaction takes time. As the proteins and sugars bond and caramelize, the meat will naturally release itself from the pan. If you try to lift the meat and it feels stuck, it is not ready. The crust has not fully formed. Give it another minute. When a proper crust has developed, the meat will release cleanly with minimal resistance.
Troubleshooting: Why You’re Still Messing It Up
If you patted the meat dry, used a heavy pan, and still ended up with a mediocre sear, you likely committed one of these secondary cooking sins:
1. You Overcrowded the Pan
This is the classic weeknight rush mistake. You try to cook four massive chicken breasts in a 10-inch skillet at the same time. Even with a heavy pan, dumping that much cold mass into the skillet will crash the temperature. Worse, as the meat cooks, it releases internal moisture. If the pan is crowded, that moisture has nowhere to evaporate. It gets trapped between the pieces of meat, turning your skillet into a steam bath. You must leave at least an inch of space between your proteins. If necessary, cook in batches. You must stop boiling your stir-fry in a crowded pan and give your ingredients room to breathe.
2. You Believed the “Room Temperature” Myth
Many old-school recipes tell you to leave your steak on the counter for an hour to come to room temperature before searing. Food scientists have thoroughly debunked this. An hour on the counter will only raise the internal temperature of a thick steak by a few degrees; it remains essentially fridge-cold in the center. What actually helps is that sitting on the counter allows the surface to dry out a bit more. But from a safety and time-management perspective, it is a waste of time. Just pat it aggressively dry right out of the fridge, and you will get the exact same crust.
3. You Fiddled With It
Cooking requires confidence. Stop shaking the pan. Stop lifting the edge of the steak every ten seconds to check the color. Every time you lift the meat, you break the contact with the heat source and interrupt the Maillard reaction. Put it down, trust the process, and let the heat do its job.
The Final Word
Professional cooking isn’t about having a culinary degree or a kitchen full of expensive gadgets. It is about understanding the basic rules of how food interacts with heat, and then respecting those rules.
Water is the enemy of browning. The latent heat of vaporization is a law of physics that you cannot outsmart, no matter how high you turn up your stove. By taking ten seconds to thoroughly dry your meat before it hits the pan, you are eliminating the energy bottleneck, unlocking the Maillard reaction, and guaranteeing a deeply flavorful, restaurant-quality crust.
So grab a roll of paper towels, ditch the toxic non-stick pans, and go sear something spectacular. You’ve got this.