
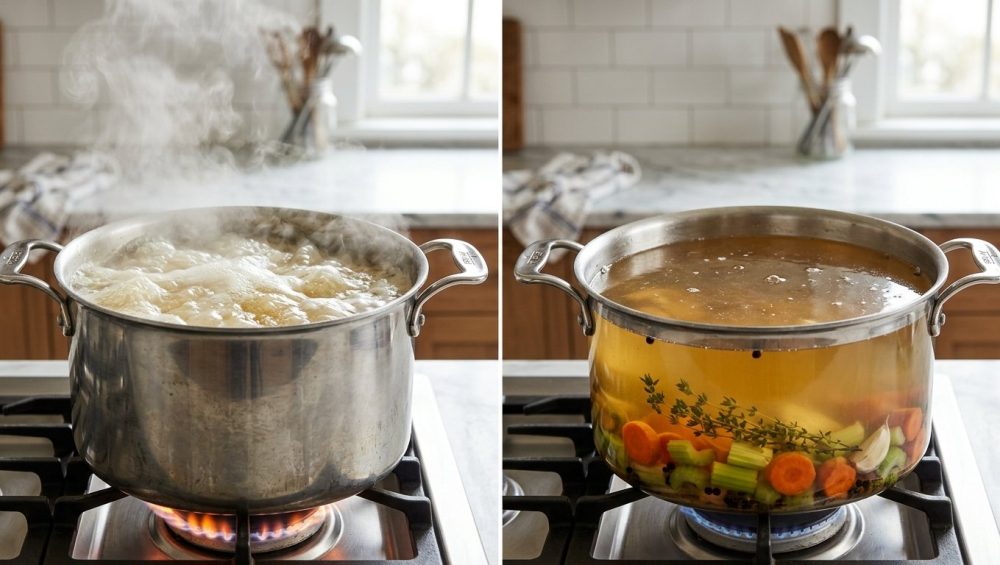
Listen up, weekend culinary warriors. We need to have a serious, sit-down conversation about what is happening in your kitchen on Sunday afternoons. You bought the expensive organic chicken or the beautiful, marrow-filled beef bones. You responsibly saved your vegetable scraps all week like a functional adult, and you dedicated your precious day off to making a foundational, life-altering batch of homemade stock. You envisioned ladling out jars of crystal-clear, liquid gold that would make a French grandmother weep with pride. But then, you got impatient. You cranked the heat, walked away to binge-watch a true-crime documentary, and returned to a pot of murky, greasy, gray liquid that looks less like culinary perfection and more like leftover dishwater.
Congratulations. You have just fallen into the most notorious trap in home cooking.
I firmly believe that absolutely anyone can cook like a seasoned expert without spending tens of thousands of dollars on a culinary degree. I survive the chaos of weekdays using clever, time-saving hacks, which buys me the time to be an absolute, unapologetic perfectionist with my elaborate weekend projects. Stock-making is one of those projects. It is the bedrock of incredible soups, stews, pan sauces, and risottos. But if you want to keep it clear, clean-tasting, and professional, you have to understand the science of what is actually happening inside that pot.
We are going to dive deep into the thermodynamics, the protein chemistry, and the exact physical reactions that separate a masterful broth from a greasy disaster. Grab a coffee, pull up a chair, and let’s decode the hidden culinary trap that is ruining your soup.
The Anatomy of a Stock Disaster: Why Your Broth Looks Like Dishwater
To understand how to fix your broth, you first have to understand what went wrong. When you look at a perfectly executed traditional French-style stock (often referred to as a chintan in Japanese culinary traditions), you should be able to read a newspaper through it. It is translucent, beautifully amber or golden, and possesses a clean, focused flavor that tastes distinctly of the ingredients you used.
When you look at a failed stock, it is opaque. It has a milky, cloudy, or downright gray appearance. Worse than the visual offense is the texture on the palate. A cloudy stock feels heavy, greasy, and muddy in the mouth. The flavors are muted and confused, rather than sharp and distinct.
The culprit behind this culinary tragedy is almost always impatience. You let the water come to a violent rolling boil.
Many home cooks mistakenly believe that boiling water is just hot water doing its job faster. They assume that the more aggressively the water bubbles, the more flavor is being extracted from the bones and vegetables. This is a fundamental misunderstanding of heat transfer and food chemistry. Boiling is not just a temperature; it is a violent mechanical action. And in the delicate environment of a stockpot, that mechanical action is highly destructive.
The Food Science of Emulsification: What Actually Happens When Water Boils
To fully grasp why a heavy boil destroys your stock, we have to look at the physics of the pot and the chemistry of the ingredients.
When you simmer bones, three primary things are being extracted into the water:
- Collagen: The connective tissue in the bones and joints, which slowly converts into gelatin through the application of heat and moisture.
- Fat: The lipids stored in the marrow and attached to the meat, which melt and rise to the surface.
- Impurities: Soluble cell proteins, trace blood, and minerals that coagulate when heated.
In a perfectly calm, gently heated pot, these three elements remain separated. The gelatin dissolves invisibly into the water phase, giving the stock its rich, lip-smacking body. The fat, which is naturally lighter than water, floats peacefully to the very top in large, distinct pools. The coagulated proteins cluster together in large clumps (scum) that can be easily removed.
But when you introduce a hard boil, you introduce violent turbulence.
The Physics of a Rolling Boil
At 212°F (100°C), water transitions rapidly from a liquid to a gas. The heat source at the bottom of the pot creates massive pockets of steam that aggressively force their way to the surface. This creates strong convection currents—a literal whirlpool of kinetic energy tearing through your ingredients.
Fat, Protein, and the Emulsion Trap
Here is where the chemistry turns against you. Fat and water naturally hate each other; they are immiscible. However, the violent mechanical agitation of a hard boil physically shatters those large, floating pools of rendered fat into millions of microscopic, suspended droplets.
If it were just fat and water, they would eventually separate once the liquid cooled down. But your stockpot is full of an incredibly powerful natural emulsifier: gelatin. Gelatin is a protein that possesses both hydrophilic (water-loving) and lipophilic (fat-loving) properties. As the roaring boil violently smashes the fat into microscopic droplets, the dissolved gelatin rushes in and coats each individual droplet, permanently suspending it within the water phase.
This is the exact same chemical process that occurs when you slowly whisk oil into egg yolks to create mayonnaise. You have accidentally created a meat mayonnaise.
The milky, opaque appearance of a boiled stock is simply the result of light scattering as it hits these millions of permanently suspended, gelatin-coated fat droplets. Once this emulsion occurs, it is practically impossible to reverse through normal straining. The fat is locked into the liquid, resulting in a greasy, muddy-tasting broth that coats your tongue and dulls the flavor of your final dish.
A quick note for the ramen lovers: This emulsification process is actually how Japanese chefs intentionally create paitan (white soup) broths, like the famously rich tonkotsu ramen. They boil pork bones at a rolling boil for 12 to 18 hours specifically to force this fat-gelatin emulsion. It is a brilliant technique when done on purpose for a specific dish. But if you are trying to make a clear, versatile chicken or beef stock for your weeknight soups and pan sauces, this emulsification is a catastrophic failure.
Saponification, Scum, and the Art of Depouillage
Fat isn’t the only thing ruined by a rolling boil. We also have to talk about the “scum.”
When you first apply heat to raw bones and meat, you will notice a grayish-brown foam rising to the surface of the water. I have zero patience for pretentious chef-speak, but the classical French culinary term for removing this foam is depouillage. It translates roughly to “skimming the gross stuff.”
What is the Scum?
Despite the terrifying name, this foam is not toxic waste. It is primarily composed of denatured proteins—specifically myoglobin from the muscle tissue and albumin from trace amounts of blood left in the bones. As the water heats up, these soluble proteins unfold (denature) and tangle together (coagulate), trapping tiny air bubbles and floating to the surface.
If you maintain a gentle heat, these proteins form large, raft-like clusters that sit politely on the surface, waiting for you to casually scoop them away with a spider skimmer or a fine mesh ladle.
The Boiling Consequence
If you let the pot come to a rolling boil before you skim, the violent turbulence will shatter those protein rafts into thousands of microscopic, gray particles. The convection currents will drag these tiny particles back down into the depths of the stock, dispersing them permanently throughout the liquid.
These micro-particulates not only contribute to the cloudy, dishwater-like appearance of the stock, but they also impart a distinctly bitter, metallic, and “off” flavor to the final broth. You want your stock to taste like roasted chicken or rich beef, not boiled blood proteins. Skimming early and preventing a boil is the only way to keep these impurities out of your final product.
The “No-Go” Rule on Toxic Gear: Choosing the Right Stockpot
Before we get into the exact temperature control required to master stock, I need to address the equipment you are using. As a staunch advocate for the home cook, I absolutely despise cheap, toxic kitchen gear.
If you are using a flimsy, paper-thin aluminum pot, or worse, a cheap pot with a peeling, scratched non-stick coating, throw it in the garbage immediately. Aside from the obvious health hazards of ingesting mystery chemical flakes, cheap cookware is the enemy of temperature control.
Why Thermal Mass Matters
Making a crystal-clear stock requires holding a large volume of water at a very precise, very low temperature for several hours. Thin, cheap pots have zero thermal mass. They react instantly to the heat source beneath them. This means the bottom of the pot gets scorching hot, causing localized boiling and burning, while the top of the pot remains lukewarm. You will find yourself constantly fiddling with the stove dial, driving yourself insane trying to maintain a steady simmer.
You need a heavy-bottomed stockpot made from high-quality, fully clad stainless steel or enameled cast iron. These materials possess excellent thermal mass. They absorb the heat from your stove, distribute it evenly across the entire base of the pot, and release it gently and consistently into the water. A heavy pot does the temperature-control work for you, buffering the harsh heat of the burner and allowing for a lazy, undisturbed extraction.
Do not ruin eight hours of your weekend and twenty dollars’ worth of organic ingredients because you refused to invest in a safe, heavy, reliable stockpot.
The Holy Grail of Stock-Making: The “Barely-There” Simmer
Now that we understand the physics of emulsification and the chemistry of scum, we can discuss the actual technique. The secret to a clear, clean-tasting stock is temperature control. Specifically, you want to achieve what I call the “barely-there” simmer.
Defining the Perfect Temperature
Water boils at 212°F (100°C). We want to stay far, far away from that number. The ideal temperature range for extracting collagen and flavor without triggering violent turbulence or emulsifying fat is between 185°F and 205°F (85°C to 96°C).
According to food science research, maintaining a temperature just a whisper below the boiling point allows the heat-and-water hydrolysis process to efficiently break down the connective tissues into gelatin, while keeping the fat distinctly separated on the surface. If you drop below 180°F (82°C), the extraction process slows to a crawl, and you risk dipping into the bacterial danger zone if you aren’t careful.
If you are the kind of nerd who loves precision (and I highly encourage this), use a digital meat thermometer to periodically check the temperature of your liquid.
The Visual Cues of a Perfect Simmer
If you don’t want to play with thermometers all day, you must learn to read the visual language of the water.
A true gentle simmer looks almost entirely still. You should see a single, lazy bubble slowly detach from the bottom of the pot, drift to the surface, and quietly pop. “Bloop.” Then, one or two seconds should pass before another bubble breaks the surface. “Bloop.”
If the surface of the water is constantly rippling, you are simmering too hard. If bubbles are rapidly chasing each other to the top, you are at a low boil. If the liquid is churning and rolling, you have already ruined the clarity of the stock.
Remember: Heat extracts flavor; turbulence destroys clarity. Keep it lazy. Keep it slow.
Step-by-Step Masterclass: Crafting Crystal-Clear, Liquid Gold
Let’s put all of this food science into practice. Here is your definitive, no-nonsense, step-by-step masterclass on brewing the perfect, translucent stock.
Step 1: The Cold Water Start
Never, ever start your stock with hot or boiling water. Always place your bones (whether raw, blanched, or roasted) into the pot and cover them with cold, preferably filtered, water.
Why? Because the proteins we want to remove (the albumin and myoglobin that form the scum) dissolve best in cold water. If you drop bones into hot water, the sudden shock of heat instantly cooks and seals the exterior of the bones, trapping those impurities inside. Later, as the bones slowly break down, those impurities will leak out into the hot liquid, where they will immediately shatter into microscopic, cloud-inducing particles.
Starting with cold water gives those soluble proteins time to gently leach out into the liquid. As the temperature slowly rises, they coagulate together into large, easily skimmable rafts.
Pro Tip: This is also the time to prep your aromatics (onions, carrots, celery). Make sure you aren’t fighting your ingredients with dull knives; clean, sharp cuts prevent the vegetables from turning to mush and clouding the broth later. However, do not add your vegetables yet! Vegetables give up their flavor in about an hour. If you boil carrots and celery for eight hours, they will disintegrate into mush, turning your stock sweet and cloudy. Save the aromatics for the final stretch.
Step 2: The Initial Heat and the Skimming Phase
Place your cold pot on the stove over medium heat. Do not use high heat to rush the process. We want a gradual, controlled climb in temperature.
As the water approaches 160°F (71°C), you will see the gray foam begin to gather on the surface. Stand by the stove with a ladle or skimmer and a bowl of water. Gently—without stirring or disturbing the liquid—skim the foam off the top and discard it. Rinse your ladle in the bowl of water between scoops.
Continue this depouillage process for the first 30 to 45 minutes of heating. You want to remove as much of this coagulated protein as humanly possible before the water reaches a simmer.
Step 3: The Long, Lazy Simmer
Once the water reaches that magical 195°F to 205°F (90°C to 96°C) threshold and you see that first lazy bubble break the surface, immediately turn your burner down to its lowest possible setting.
If your stove runs hot and even the lowest setting causes too much bubbling, you have a few options. You can slightly offset the pot so it is only partially over the burner. You can use a heat diffuser plate. Or, my personal favorite trick: you can transfer the entire heavy-bottomed pot, uncovered, into a 200°F (93°C) oven. The ambient heat of the oven provides a perfectly stable, surround-sound heating environment that will never reach a boil.
Let the bones simmer gently. For chicken bones, 4 to 6 hours is plenty. For large beef or veal bones, you are looking at 8 to 12 hours to fully extract the collagen. Add your vegetable mirepoix and aromatics (peppercorns, bay leaves, thyme) only during the last hour or two of cooking.
Do not stir the pot. Stirring agitates the ingredients, breaks apart the fragile cooked bones, and forces fat and impurities back into the liquid phase. Leave it alone. Let the heat do the work.
Step 4: The Gentle Strain
After hours of perfect temperature control, do not ruin your stock at the finish line by aggressively dumping it through a colander.
Use a pair of tongs to carefully remove the large bones and vegetable pieces from the pot. Then, set a fine mesh strainer (lined with cheesecloth if you want to be extra meticulous) over a large, clean heat-proof container.
Use a ladle to gently transfer the liquid from the pot into the strainer. Do not pour the stock from a great height, as the splashing will force fat into the liquid. And whatever you do, never press down on the cooked vegetables or bones in the strainer. Pressing forces cloudy, starchy vegetable mush and tiny bone fragments directly into your pristine broth. Let gravity do the work. What drains naturally is your liquid gold; sacrifice the few extra tablespoons of liquid trapped in the vegetables for the sake of clarity.
The Clarification Rescue Mission: What to Do If You Already Ruined It
Let’s say you are reading this article a little too late. Your stock boiled while you were watering your houseplants, the fat emulsified, the scum shattered, and you are currently staring at a pot of greasy, opaque sadness.
Is it ruined? Not entirely. You can’t un-boil water, but culinary science has provided us with a few brilliant rescue missions to clarify a broken stock.
The Egg White Raft (The Consommé Technique)
This is a classic French technique used to turn regular stock into crystal-clear consommé. It uses the very proteins you failed to skim earlier to act as a vacuum cleaner for your broth.
- Strain your cloudy stock to remove all large solids, and let it cool completely. Use a fat separator or chill the stock overnight in the fridge to peel off the solidified fat cap.
- In a separate bowl, vigorously whisk together 2 or 3 egg whites, a splash of cold water, and a teaspoon of lemon juice. (You can also crush the eggshells and throw them in; the calcium helps the raft form).
- Whisk this egg white mixture directly into your cold stock.
- Place the pot over medium heat and stir gently but constantly. As the liquid heats up, the albumin in the egg whites will begin to denature and coagulate.
- Stop stirring the moment the liquid reaches a simmer. The cooked egg whites will float to the top, forming a solid, gray “raft.” As they coagulate, they act like a microscopic net, trapping the suspended fat droplets and floating impurities.
- Poke a small hole in the center of the raft to allow steam to escape, and let it simmer gently for 20 minutes.
- Carefully ladle the newly clarified, crystal-clear stock through the hole in the raft, leaving the gross egg-white filter behind.
The Ice Filtration Method (Gelatin Clarification)
If the egg raft sounds too intimidating, modern food science offers a foolproof, completely passive method, popularized by molecular gastronomy chefs.
Because your stock is rich in naturally extracted gelatin, it will turn into a solid meat-Jell-O when chilled in the fridge.
- Freeze your strained, cloudy stock until it is a solid block of ice.
- Line a strainer with a few layers of cheesecloth or a coffee filter, and set it over a large bowl.
- Place the frozen block of stock into the strainer, and put the whole setup in the refrigerator for 24 to 48 hours.
As the stock slowly thaws in the fridge, the gelatin acts as a microscopic molecular net. The pure water and flavor compounds will melt and drip through the filter, but the gelatin network will hold onto all the fat droplets, large proteins, and impurities. You will be left with a bowl of flawlessly clear, intensely flavored liquid, and a strainer full of gross, gray sludge.
The Weekend Warrior’s Payoff: Why This Matters
I know this sounds like an exhausting amount of science and rules just to make soup water. But this is the difference between cooking and craftsmanship.
When you respect the ingredients, when you understand the thermodynamics of your cookware, and when you control the heat rather than letting the heat control you, you elevate your food from mundane to extraordinary. A perfectly clear, gently simmered stock has a luxurious, velvety mouthfeel that coats the palate without leaving a greasy film. It provides a pure, unadulterated canvas for your culinary creativity.
So this weekend, buy the good bones. Use the heavy stainless steel pot. Start with cold water. Skim the scum with prejudice. And for the love of all things culinary, turn down the heat. Keep that simmer lazy, and you will never suffer through a bowl of cloudy, boiled dishwater again. Now go make some liquid gold.






