Listen, I know exactly why you are here. You spent your hard-earned money on a beautiful whole chicken, you diligently chopped your celery and carrots, and you waited patiently for hours, only to lift the lid on your stockpot and find a murky, greasy, dishwater-gray puddle staring back at you.
Do not panic, and put down the wooden spoon. You have not ruined your life, but you have fundamentally misunderstood how water and heat interact with animal fats.
If you are tired of your chaotic cooking routine resulting in subpar weekend meals, it is time to face the music. Making a pristine, restaurant-quality, liquid-gold chicken broth does not require a culinary degree. It does not require a French vocabulary, and it certainly does not require you to stand over a stove for twelve hours while neglecting your family. What it does require is a basic understanding of fluid dynamics, temperature management, and the absolute self-control to keep your hands off the burner dial.
According to a 2026 State of Home Cooking Report, a staggering 93% of Americans expect to cook as much or more at home this year than they did last year, driven by economic pressures and a desire for better health. Furthermore, 2026 market data from Mintel shows that soup consumption is steadily growing as people crave comfort and affordable nutrition. But here is the brutal truth: if you are going to invest your precious time into making from-scratch chicken soup, you owe it to yourself to do it right. No more cloudy slop. No more greasy mouthfeel. Today, we are mastering the gentle simmer.
The Fluid Dynamics of Broth: Why Boiling Ruins Everything
Let us get one thing straight: boiling is the enemy of broth. I will repeat that because it is the single most important rule in soup-making. Do not boil your stock. Ever.
When you toss a chicken carcass into a pot of water, you are dealing with three primary elements: water, proteins (like albumin), and fats (lipids). Fat and water, as you likely remember from middle school science class, do not naturally mix. Left to their own devices, the fat will simply float to the top of the water in a distinct, separate layer.
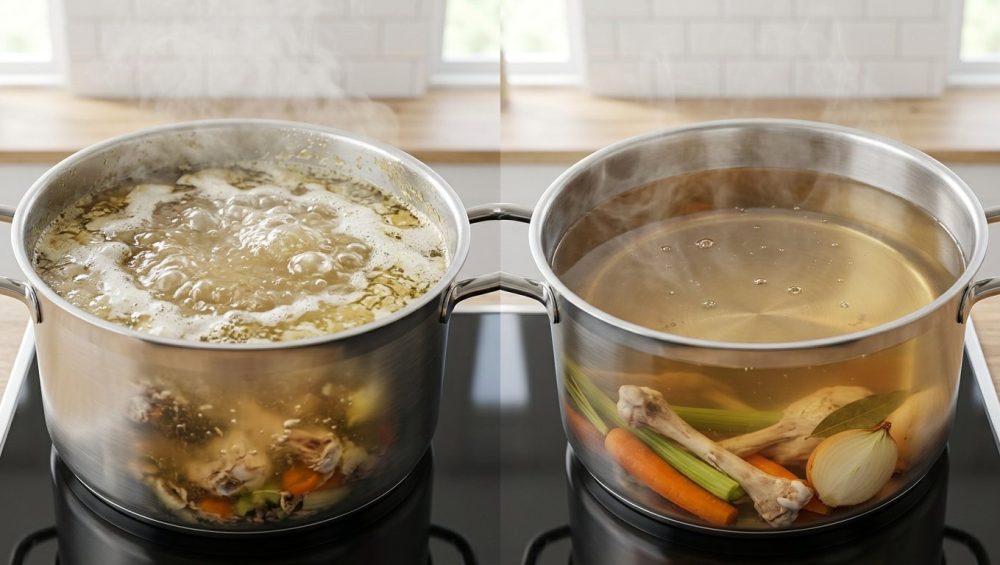
However, when you crank the heat on your stove to high and bring that water to a rolling, violent boil (212°F or 100°C), you are essentially turning your stockpot into a giant, aggressive blender. The rapid, churning convection currents of boiling water forcefully smash the floating fat droplets into microscopic particles and violently whip them into the water.
In the culinary world, this process is called emulsification. It is the exact same mechanical action that turns oil and egg yolks into thick, opaque mayonnaise. When you boil chicken stock, you are emulsifying the chicken fat and coagulated proteins directly into the water. The result? A cloudy, opaque, milky-looking liquid that feels heavy and greasy on the palate.
If you have ever wondered why your pot boils over when making pasta, it is due to starches trapping the steam bubbles of a rolling boil. In a stockpot, those same violent bubbles are trapping and suspending fat. To achieve that crystal-clear, amber-hued, pristine broth you see in high-end restaurants, you must prevent emulsification at all costs. You must control the heat.
The Anatomy of a Simmer: A Visual Guide to Temperature Zones
One of the biggest hurdles for the home cook is decoding vague recipe terminology. What exactly is a “gentle simmer”? How is it different from a “rapid simmer”? Let us break down the thermodynamics of your stovetop so you never have to guess again.
The Sub-Simmer or “The Quiver” (160°F – 180°F)
This is the temperature range used for poaching delicate proteins, like fish or eggs. At this stage, the water is hot, and you will see a wisp of steam rising from the surface, but there is virtually no movement in the water itself. You might see a few tiny bubbles clinging stubbornly to the bottom of the pot, but they do not rise. This is too cold for making chicken stock; at this temperature, the collagen in the chicken bones will not break down into gelatin efficiently, leaving you with a thin, watery broth.
The Gentle Simmer (185°F – 195°F)
Welcome to the holy grail of stock-making. This is your target zone. At a gentle simmer, you will see a slow, lazy, occasional bubble rise to the surface and gently pop. The liquid will have a slight convection—a slow, rhythmic rotation—but the surface remains mostly calm. This temperature is hot enough to slowly melt the collagen in the bones and connective tissues, transforming it into rich, lip-smacking gelatin, but it is gentle enough that the fats and proteins are not agitated into an emulsion.
The Rapid Simmer (195°F – 205°F)
At this stage, the bubbles are rising constantly and breaking the surface frequently. There is a continuous, active churning of the liquid. While a rapid simmer is excellent for reducing a sauce or cooking a hearty stew, it is too aggressive for a clear chicken stock. The constant agitation will begin to break apart your vegetables and emulsify the fat, leading to a murky result.
The Rolling Boil (212°F)
This is maximum heat. Large, violent bubbles are constantly erupting on the surface, and the liquid is churning aggressively. You cannot stop the bubbling even if you stir it with a spoon. This temperature is reserved exclusively for cooking dried pasta or blanching green vegetables. If your chicken stock reaches a rolling boil, you have already lost the battle for clarity.
The “Cold Water Start” Rule: Managing Albumin and Impurities
Now that we understand the temperature zones, we need to talk about how we get there. The biggest rookie mistake you can make is dropping your raw chicken or bones into a pot of hot or boiling water to “save time.”
Bones and raw meat contain a protein complex called albumin. When albumin is heated, it denatures and coagulates—meaning it clumps together and solidifies. You have seen this before; it is the gray, foamy scum that floats to the top of a boiling pot of meat.
Albumin is only soluble in cold water. If you drop your chicken into hot water, the albumin on the exterior of the meat seals and cooks instantly, trapping the rest of the impurities inside. As the stock cooks, those trapped proteins will slowly leak out into the hot water in microscopic pieces, permanently clouding your broth.
By starting with completely cold water, you allow the albumin and other impurities to dissolve gently into the liquid. As you slowly, patiently bring the temperature up to a gentle simmer, those dissolved proteins will begin to coagulate gradually. Because the water is heating slowly, the proteins bind together into large, cohesive masses that float cleanly to the surface. This creates a distinct “raft” of scum that is incredibly easy to skim off, leaving the liquid underneath perfectly clear.
Step-by-Step: Crafting Pristine, Liquid Gold Chicken Soup
We have covered the science; now let us put it into practice. Here is the definitive, no-nonsense method for making a masterclass-level clear chicken broth in your home kitchen.
Step 1: The Cold Plunge
Place your chicken (either a whole raw chicken, raw chicken parts, or leftover roasted bones) into a large, heavy-bottomed stockpot. Cover the chicken with cold, filtered tap water. You want the water to cover the bones by about two inches. Do not overfill the pot, or your broth will be diluted and flavorless. Do not add your vegetables yet.
Step 2: The Slow Climb
Place the pot over medium heat. Do not be tempted to crank the burner to high to speed things up. Remember, we want the albumin to coagulate slowly. Walk away and let the pot heat up gradually. Depending on the size of your pot and the power of your stove, this could take 30 to 45 minutes.
Step 3: The Skim
As the water approaches that 160°F mark, you will notice a grayish-brown foam beginning to gather on the surface. This is the coagulated albumin and impurities. Before the water reaches a simmer, you must remove this foam. If you wait until the water is bubbling, the bubbles will break the foam apart and stir it back into the broth.
Take a wide, shallow spoon and gently skim the foam off the top, discarding it in a bowl. For the absolute best results, you can easily lift them out using a stainless steel spider skimmer. Skim diligently until the surface is mostly clear.
Step 4: The Aromatic Drop
Once you have skimmed the scum and the liquid has reached a gentle, lazy simmer (185°F – 195°F), it is time to add your aromatics. The classic mirepoix consists of roughly chopped onions, carrots, and celery. You can also add garlic, fresh thyme, parsley stems, bay leaves, and whole black peppercorns.
Why do we wait to add the vegetables? Two reasons. First, if the vegetables are in the pot during the skimming phase, they get in the way, and you end up scooping out your precious thyme sprigs along with the scum. Second, vegetables give up their flavor much faster than meat and bones. If you boil carrots for six hours, they disintegrate into mush, clouding the broth and releasing a bitter, overcooked flavor. It is the exact same principle as turning burnt bits into sauce after searing; timing is everything when extracting flavor.
Step 5: The Gentle Babble
Now comes the hardest part: doing nothing. Adjust your burner to its lowest setting to maintain that perfect, gentle simmer—just one or two lazy bubbles breaking the surface every few seconds. Leave the pot uncovered. Covering the pot traps the steam, which drastically raises the internal temperature and will inevitably turn your gentle simmer into a rolling boil when you turn your back.
Let the stock simmer gently for 3 to 4 hours for raw chicken, or up to 6 hours for roasted bones.
Step 6: The Strain
When the time is up, the liquid should be a gorgeous, translucent amber. Turn off the heat. Do not aggressively dump the entire heavy pot into a colander. Dumping the pot will agitate the liquid and smash the soft, cooked vegetables through the strainer, instantly clouding all your hard work.
Instead, use a pair of tongs to gently remove the large bones and vegetables. Then, use a ladle to carefully scoop the broth through a fine-mesh sieve lined with cheesecloth (or a clean coffee filter) into a clean storage container.
The Gear: Stop Making Soup in Toxic Garbage
Let us have a very serious conversation about the equipment you are using. I do not care how perfectly you manage your heat; if you are cooking acidic, slow-simmering liquids in cheap, degrading cookware, you are sabotaging your health and your food.
I have a strict “No-Go” rule when it comes to toxic kitchenware. If you are currently making soup in a lightweight, aluminum pot with a flaking, scratched non-stick coating, throw it in the trash immediately. When you finally get around to banishing toxic kitchen gear from your cabinets, you will realize how much it was holding back your cooking.
Non-stick coatings (PTFE) are completely unnecessary for making soup, as nothing is going to stick to a pot full of water anyway. Worse, as these cheap pots degrade, they leach microplastics, “forever chemicals” (PFAS), and mystery metals directly into your food. This is the same reason you find your cheap skillets losing their slip so quickly; the coatings simply cannot handle sustained heat and friction.
To maintain a perfect, gentle simmer for hours, you need a pot with significant thermal mass. Thermal mass allows the pot to absorb heat evenly and distribute it gently across the bottom, preventing “hot spots” that cause localized boiling.
You don’t need a culinary degree, just some basic beginner kitchen tools that are built to last a lifetime. I strongly recommend investing in a heavy-bottomed, fully clad stainless steel stockpot (at least 8 to 12 quarts). Tri-ply stainless steel features an aluminum core sandwiched between layers of safe, non-reactive stainless steel, giving you the brilliant heat conductivity of aluminum without the toxic exposure. Alternatively, a large enameled cast-iron Dutch oven is phenomenal for making smaller batches of stock, as cast iron holds a low, steady temperature better than almost any other material on earth.
Weekday Cheats vs. Weekend Perfection
I am a realist. I know that while we all love the idea of tending to a gently simmering pot of homemade stock on a lazy Sunday afternoon, the reality of a Tuesday evening is vastly different. Time is money, and when you get home from work at 6:00 PM, you do not have four hours to wait for albumin to coagulate.
Learning this will help you survive without ordering takeout on a busy Tuesday. If you are making a quick, 45-minute weeknight chicken soup using store-bought broth and pre-cooked rotisserie chicken, the rules of clarity still apply, but we optimize for efficiency.
When utilizing store-bought broth, it has already been strained and processed, so you do not need to worry about skimming raw albumin. However, you still must avoid boiling the soup once you add your vegetables and chicken meat. Boiling cooked chicken breast will instantly seize the muscle fibers, squeezing out all the moisture and leaving you with chalky, stringy meat. If you want to know why your chicken is dry when you pull it from the broth, it is because you boiled it to death instead of gently warming it through.
For the ultimate weeknight cheat: sauté your mirepoix in a heavy-bottomed stainless steel pot until softened. Pour in your high-quality, low-sodium store-bought broth. Bring it to a rapid simmer just long enough to cook your noodles or rice. Then, turn the heat down to a gentle quiver (170°F), add your shredded rotisserie chicken and fresh herbs, and let it steep for just 5 minutes to warm the meat without toughening it. You get a clean, comforting bowl of soup in under 40 minutes, with zero greasy emulsion.
Troubleshooting the Murk: Can You Save a Cloudy Broth?
Let us say you messed up. The phone rang, the dog threw up on the rug, and you walked away from the stove for twenty minutes. You returned to find your stockpot at a violent, rolling boil, and the liquid looks like muddy dishwater.
First, take a deep breath. A cloudy broth is perfectly safe to eat. It will still taste like chicken, and it will still nourish you. This is a key part of surviving kitchen disasters and fixing your mistakes without throwing food in the garbage. If you are just making a hearty, rustic chicken noodle soup for yourself, you can absolutely just use the cloudy broth and call it a day. The starches from the noodles will likely cloud the soup a bit anyway.
However, if you are serving this at a dinner party, or if you simply demand aesthetic perfection from your weekend projects, you can perform an old-school culinary magic trick: The Egg White Raft.
This is the exact technique used by classical French chefs to create Consommé (a perfectly clear, highly clarified broth). Here is how you execute the cheat:
- Strain your cloudy broth to remove all the bones, meat, and vegetables. Let the liquid cool down to room temperature. It must be cool, or the trick will fail.
- In a separate bowl, vigorously whisk together three raw egg whites and a splash of cold water until they are frothy. (You can also crush the eggshells and toss them in, as the calcium helps the structure, but that is optional).
- Pour the cold, cloudy broth back into a clean, heavy-bottomed pot. Stir the frothy egg whites into the cold broth.
- Turn the heat to medium. Now, you must stir the pot constantly and gently, scraping the bottom so the egg whites do not stick and burn.
- As the liquid heats up, the egg whites will begin to cook and coagulate. Because albumin acts like a microscopic magnet for impurities, the cooking egg whites will physically trap the emulsified fats and microscopic particles that are clouding your soup.
- As the broth reaches a simmer, the egg whites will form a thick, gray, incredibly ugly “raft” that floats to the surface. Stop stirring immediately.
- Poke a small hole in the center of the egg white raft to allow steam to escape. Let the pot simmer gently (do not boil!) for 15 minutes.
- Turn off the heat. Carefully ladle the now crystal-clear broth through the hole in the raft, passing it through a coffee filter or cheesecloth. Discard the ugly egg raft.
You have just rescued your ruined stock and created a breathtakingly clear, professional-grade consommé.
The Final Ladle
Mastering a clear, pristine chicken soup is a rite of passage for the home cook. It is the ultimate exercise in patience, heat control, and respecting your ingredients. By understanding the fluid dynamics of a rolling boil, respecting the slow coagulation of albumin, and aggressively managing your stovetop temperatures, you elevate your cooking from amateur guesswork to culinary artistry.
Remember the golden rules: banish the toxic, thin-bottomed pots, always start with cold water, skim the scum before it boils, and treat the gentle simmer with the reverence it deserves. Your weekend cooking projects should be a source of pride, not frustration. Now get into the kitchen, turn the heat down, and start making the liquid gold you deserve. You’ve got this.


