
I see you. You’re staring at that gleaming, heavy-bottomed stainless steel skillet you got as a wedding gift three years ago, and you’re treating it like an unexploded bomb. It sits in the back of your dark cabinet, mocking your culinary insecurities, while you predictably reach for that scratched-up, peeling non-stick pan to cook your Tuesday night chicken breasts. You’ve convinced yourself that stainless steel is only for pretentious culinary school graduates, aggressive restaurant line cooks, and people who actively enjoy spending forty-five minutes scrubbing burnt carbon off metal with a Brillo pad.
Pour yourself a glass of wine, pull up a stool, and let’s have a brutally honest chat. You do not need a culinary degree to cook like a professional in your own kitchen. What you actually need is a basic understanding of high school physics, a little bit of patience, and the willingness to let go of your worst cooking habits. As a home cook who has set off the smoke detector more times than I care to admit, I promise you that mastering stainless steel is not only possible, it is the single most liberating skill you will ever learn. We are going to break down the exact science of why your food is fusing to your cookware, how a microscopic vapor barrier is about to become your best friend, and why you are officially breaking up with toxic non-stick pans forever.
The Toxic Truth About Your Favorite Pan
Let’s address the elephant in the room right away. You are clinging to your non-stick pans because they offer a false sense of security. But here is my absolute, non-negotiable rule as a home cook: I despise cheap, toxic kitchenware. Those lightweight, mystery-metal pans with the black coating are a chemical disaster waiting to happen, and I am officially banishing toxic kitchen gear from your life today.
The average lifespan of a standard PTFE (Polytetrafluoroethylene, commonly known as Teflon) coated pan is a dismal one to five years. Most people treat them as disposable commodities, tossing them into landfills the moment the surface starts to flake and buying a new twenty-dollar replacement. But the real horror story isn’t just the environmental waste—it’s the terrifying chemistry happening right under your nose. A 2022 study published in Science of the Total Environment revealed that a single microscopic surface scratch on a Teflon coating can release over 9,000 PTFE microparticles and nanoplastics directly into your food. You are literally seasoning your family’s dinner with synthetic fluoropolymers.
Furthermore, these pans are incredibly fragile when exposed to real heat. A standard gas stove can heat an empty non-stick pan to 500°F (260°C) in approximately two minutes. At that specific temperature, the chemical coating begins to thermally degrade, releasing invisible, toxic fumes into your kitchen. If you are trying to get a hard, restaurant-quality sear on a steak in a non-stick pan, you are not just failing at cooking; you are actively poisoning your kitchen environment. It is time to graduate to a tool that can handle the intense heat, last a lifetime, and give you the beautiful, caramelized crust you deserve without serving a side of microplastics.
The Microscopic Battlefield: Why Food Actually Sticks
Before we can fix the problem of sticking food, we need to understand the enemy. Why does food stick to stainless steel in the first place? To the naked eye, your stainless steel skillet looks perfectly smooth, like a polished mirror. But if you were to look at that exact same surface under a powerful electron microscope, you would see a rugged, jagged landscape full of microscopic hills, valleys, craters, and pores.
When you drop a cold, raw piece of protein—like a chicken breast, a delicate fish fillet, or a cracked egg—into a cold or inadequately heated stainless steel pan, you are initiating a disastrous chemical bonding process. Protein-rich foods are particularly prone to sticking because the proteins contain complex amino acids that desperately want to form bonds with the metal atoms, specifically the iron, in your pan.
As the pan slowly heats up with the food already sitting inside it, the raw proteins seep deeply into those microscopic valleys. Heat acts as a catalyst, causing the proteins to coagulate and form relatively weak Van der Waals forces, as well as incredibly stubborn covalent bonds, directly with the metal. By the time your food is fully cooked, it has essentially fused itself to the pan at a molecular level. When you try to force a spatula under it, your meat stubbornly refuses to flip, leaving half of your expensive dinner cemented to the steel. The secret to preventing this isn’t magic; it’s creating a physical barrier that prevents those proteins from ever touching the bare metal in the first place.
Enter the Leidenfrost Effect: Your Culinary Forcefield
This brings us to the absolute hero of our story: The Leidenfrost effect. It sounds like an obscure German death metal band, but it is actually a foundational principle of physics documented by a doctor named Johann Gottlob Leidenfrost in his 1756 tract on the qualities of common water. Understanding this concept is the master key to unlocking the true potential of your stainless steel cookware.
The Leidenfrost effect is a physical phenomenon that occurs when a liquid comes into contact with a surface that is significantly hotter than the liquid’s boiling point. Instead of immediately evaporating and boiling away, the bottom layer of the liquid instantly vaporizes upon contact. This rapid vaporization creates a microscopic, highly insulating layer of steam between the rest of the liquid and the hot surface.
Think of it like a miniature hovercraft. The steam barrier physically suspends the liquid (or the moisture-rich food) above the hot metal, preventing direct contact. When you harness this effect in your skillet, the natural moisture present in your proteins creates its own vapor shield. The food literally floats on a cushion of its own steam, completely bypassing the microscopic hills and valleys of the metal. This is exactly why preheating changes absolutely everything about your weeknight dinners. Without the proper heat, there is no steam barrier. Without the steam barrier, you get molecular bonding, a ruined meal, and a night spent scrubbing at the sink.
Mastering the Water Drop Test: A Foolproof Visual Guide
So, how do we know when the pan has reached the exact right temperature to trigger this magical forcefield? You don’t need an expensive infrared laser thermometer, and you certainly shouldn’t rely on the arbitrary numbers painted on your stove dial. You are going to use the Water Drop Test.
This test is the ultimate, foolproof visual cue to stop your food from sticking. It requires nothing more than a few drops of tap water and a little bit of patience. Here is the exact, step-by-step breakdown of how to read the thermal dynamics of your skillet like a seasoned professional. Place your dry, clean stainless steel pan on medium heat. Wait a minute or two, wet your fingers under the faucet, and flick a few drops of water into the center of the pan. You are looking for one of three distinct reactions.
Phase 1: The Sad Sizzle (Under 350°F / 175°C)
If you flick water into the pan and it immediately flattens out, bubbles furiously, sizzles loudly, and evaporates into thin air within a second or two, your pan is entirely too cold. The temperature is above the boiling point of water (212°F / 100°C), but it has not yet reached the critical Leidenfrost point. If you were to add oil and food right now, the moisture in the food would evaporate, but no protective vapor barrier would form. The proteins would sink into the pores of the metal and bond instantly. Keep waiting.
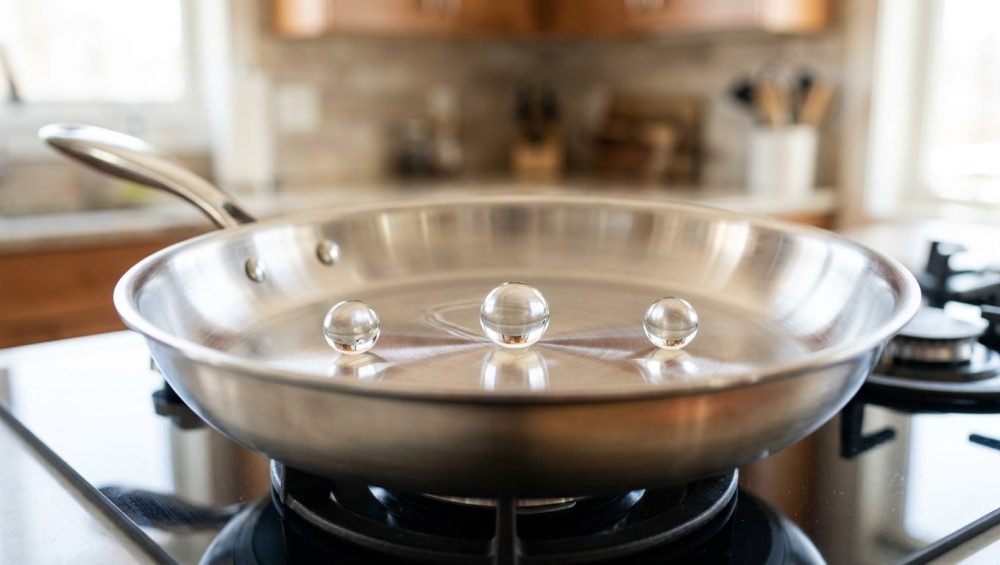
Phase 2: The Mercury Ball (The Sweet Spot – 437°F / 225°C)
Give the pan another minute and flick a few more drops of water. When the pan reaches the Leidenfrost point—which scientific testing places at approximately 437°F or 225°C—something magical happens. The water drops will not sizzle, and they will not immediately evaporate. Instead, they will instantly pull together into perfect, cohesive little spheres that look exactly like beads of liquid mercury.
These spheres will dance, glide, and skitter rapidly across the surface of the pan, completely frictionless. They might merge into one large water island that glides around like a puck on an air hockey table. This happens because the bottom of the water drop is vaporizing so quickly that it creates that insulating steam cushion we talked about. Congratulations, you have successfully preheated your pan. Wipe the water out with a paper towel, and you are ready for the next step.
Phase 3: The Shattering Explosion (Too Hot – Over 500°F)
If you get distracted by pouring another glass of wine and leave the pan on the heat too long, you will surpass the ideal temperature zone. If you flick water into a dangerously hot pan, the drops won’t form a smooth, gliding ball; they will instantly shatter into dozens of tiny, aggressive droplets that ping violently around the metal before vaporizing. If you add oil at this stage, it will instantly smoke, burn, and polymerize into a sticky, acrid mess. If this happens, simply take the pan off the heat for a minute and let it cool down before proceeding.
The Fat Factor: When and How to Add Oil
One of the most common rookie mistakes I see is pouring oil into a cold pan and heating them up together. Remember my rule: Time is money, but patience is a virtue you cannot afford to skip here. You must always heat the dry pan first, achieve the Leidenfrost effect, and then add your cooking fat.
Why? It comes down to viscosity and thermal degradation. Cold oil is thick and viscous. As oil heats up, it becomes significantly thinner and more fluid. If you add oil to a perfectly preheated pan, it will instantly thin out, shimmering and spreading rapidly to coat the entire surface, flowing smoothly into all those microscopic valleys we discussed earlier. This creates a secondary physical barrier between the food and the metal.
Furthermore, if you heat the oil slowly alongside the pan from cold to hot, the oil spends too much time breaking down. It can pass through temperature ranges where it begins to prematurely polymerize and turn gummy, which is the exact opposite of what you want for a slick cooking surface. And please, for the love of all things culinary, do not use aerosolized cooking sprays. The chemical propellants in those cans build up a sticky, invisible residue on your cookware, completely ruining your nonstick pans and turning your stainless steel into a nightmare to clean. Stick to pure, high-heat fats like avocado oil, clarified butter (ghee), or refined olive oil. Add the oil, let it shimmer for about ten seconds until it is just barely starting to whisper a wisp of smoke, and then drop in your food.
Protein Management and the Maillard Reaction
You have achieved the Leidenfrost point. You have added your oil. You carefully lay your protein into the pan, laying it away from you so the hot oil doesn’t splash back and ruin your evening. Now comes the hardest part of cooking for most beginners: Do absolutely nothing.
Do not touch it. Do not poke it with tongs. Do not try to lift the edge to see how it looks. When cold food hits the hot pan, it temporarily drops the surface temperature. The steam barrier forms, but a complex chemical process called the Maillard reaction is also kicking off.
The Maillard reaction is a magnificent form of non-enzymatic browning that occurs between amino acids and reducing sugars when exposed to high heat. This reaction typically thrives in the temperature range of 284°F to 330°F (140°C to 165°C). It is responsible for the deep, savory, complex flavors and the beautiful golden-brown crust on a perfectly seared steak, a smash burger, or a piece of roasted salmon.
As the Maillard reaction progresses, the proteins on the surface of the food undergo a structural change. They dehydrate, brown, and harden into a crust. Here is the golden rule of stainless steel: The pan will not let go of the food until the food is ready. If you try to force a spatula under a chicken breast too early, the proteins that are still chemically bonded to the metal will tear, ruining another dry chicken breast. But if you are patient, the crust will fully form, the chemical bonds will naturally break, and the meat will release itself from the pan with zero resistance. It should feel like it is gliding on ice.
Troubleshooting the Stick: Where Did You Go Wrong?
So, you did the water drop test, the mercury ball danced, but your food still stuck. Before you throw the pan out the window and order a pizza, let’s troubleshoot. Cooking is a science, and variables matter. If you missed a step, the physics will punish you.
Mistake 1: Your Food Was Sopping Wet
Water is the enemy of a good sear. If you take a steak straight out of a vacuum-sealed package and drop it into hot oil, the massive amount of surface moisture will instantly drop the temperature of the pan. Instead of searing, the food will boil and steam in its own juices. The Maillard reaction cannot occur in the presence of excessive water because water limits the temperature to 212°F (100°C), well below the 284°F required for browning. This is why thoroughly drying meat before you cook with paper towels is a mandatory, non-negotiable step for success.
Mistake 2: Fridge-Cold Protein
Throwing a 35°F piece of meat into a 400°F pan causes a massive thermal shock. The pan’s temperature plummets instantly, killing the Leidenfrost effect and stopping the Maillard reaction in its tracks. The proteins will bond to the metal before the pan has a chance to recover its heat. Pull your proteins out of the fridge twenty to thirty minutes before cooking to take the chill off. This simple act of tempering your meat is the secret to getting perfectly crispy chicken skin without it tearing and sticking to the skillet.
Mistake 3: The Wrong Burner Size
If you are using a massive 12-inch stainless steel skillet on a tiny 6-inch burner, the center of the pan will reach the Leidenfrost point while the outer edges remain lukewarm. Stainless steel is durable, but it is not the most perfect conductor of heat on its own (which is why high-quality pans have an aluminum or copper core). Always match the burner size to the base of your pan to ensure even edge-to-edge heating.
Mistake 4: Fidgeting and Premature Flipping
I mentioned this earlier, but it bears repeating because it is the most common sin in the home kitchen. Stop touching your food. When you place a piece of fish or meat into the pan, leave it alone. The natural release process takes time. If you try to move it before the crust has formed, you will tear the delicate flesh. Trust the process, trust the science, and let the pan do the heavy lifting.
Weeknight Efficiency: Time is Money
I know exactly what you’re thinking. “This sounds great for a lazy Sunday afternoon, but on a Tuesday night after a nine-hour workday, I don’t have time to stand around flicking water at a pan and waiting for mercury balls.” I hear you loud and clear. Time is money, and efficiency is how we survive the workweek without dialing for takeout.
The beauty of this method is that it requires passive time, not active time. When you walk into the kitchen to start cooking, the very first thing you should do is put your stainless steel skillet on the stove over medium heat. Do not put it on high heat to rush it—that will only warp the metal and burn your oil later. Put it on medium, and walk away.
While the pan is slowly coming up to the Leidenfrost point, you have three to five minutes of uninterrupted prep time. This is when you chop your onions, mince your garlic, dry off your chicken, and season your proteins. By integrating the preheating phase into your prep workflow, you lose absolutely zero time. Once you get the hang of it, you won’t even need the water drop test every single time. You will learn to recognize the subtle waves of heat radiating from the steel, ensuring you are never losing their non-stick slip to impatience. You’ll intuitively know when the pan is ready to deliver that perfect sear in a fraction of the time it takes to fuss over a ruined, stuck-on mess.
The Cleanup: Embracing the Fond
Finally, let’s talk about the aftermath. One of the biggest complaints home cooks have about stainless steel is the cleanup process. If you’ve seared a piece of meat properly, you will be left with a pan covered in brown, caramelized bits stuck to the bottom. Do not panic, and absolutely do not carry that pan to the sink to scrub it with soapy water.
Those brown bits are called the fond, and in the culinary world, fond equals pure flavor. It is the highly concentrated, delicious byproduct of the Maillard reaction. Instead of washing it away, you are going to deglaze the pan. While the skillet is still hot over a medium-low flame, pour in a splash of liquid—a dry white wine, a rich chicken broth, or even just a little bit of water. The liquid will immediately boil and bubble vigorously. Take a flat-edged wooden spoon and gently scrape the bottom of the pan. The fond will lift effortlessly, dissolving into the liquid and turning burnt bits into sauce. Simmer it for a few minutes, swirl in a tablespoon of cold butter, and you have just made a luxurious, restaurant-quality pan sauce while simultaneously cleaning your skillet.
For the rare occasions when you do accidentally burn oil onto the sides of the pan, causing a yellow or brown polymerized stain, skip the harsh abrasive steel wool. A simple sprinkle of Bar Keepers Friend (a mild, food-safe oxalic acid cleanser) and a soft sponge will melt away polymerized grease in seconds, restoring your pan to its original, mirror-like glory without breaking a sweat.
The Final Verdict on Stainless Steel
Transitioning to stainless steel cookware is a rite of passage for the home cook. It requires a slight adjustment in technique, a basic respect for thermal dynamics, and a little bit of patience. But the payoff is immense. By mastering the water drop test and understanding the Leidenfrost effect, you are taking complete control over your cooking environment.
You are protecting your health by ditching toxic chemical coatings, you are elevating the flavor of your everyday meals with proper browning techniques, and you are building real, foundational confidence in the kitchen. You don’t need to fear your cookware anymore. So dust off that heavy skillet, turn on the stove, let the water dance, and start cooking like the expert you are entirely capable of becoming. You’ve got this.






