
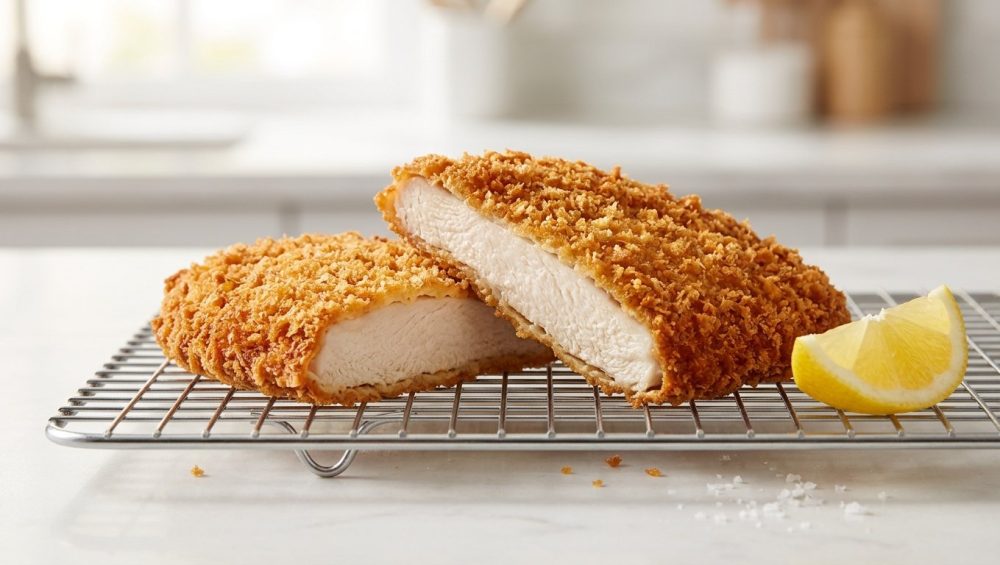
Picture this: It is a Tuesday night. You have successfully navigated the chaos of the workday, dragged yourself into the kitchen, and decided to treat yourself to a golden, crispy, pan-fried chicken cutlet. You set up your messy dredging station, you coat the meat, you heat the oil, and you carefully lay the chicken into the pan. It sizzles beautifully. You feel like a culinary genius. But then, the moment of truth arrives. You slide your spatula under the meat to flip it, and tragedy strikes. The entire beautiful, golden crust sloughs off into the hot oil like a wet sweater, leaving you staring at a pale, naked, aggressively unappetizing piece of poultry.
Bald chicken cutlets are a culinary crime, and if this has happened to you, you are not alone. It is one of the most maddening experiences in the home kitchen. But here is the good news: you do not need a culinary degree, a professional deep fryer, or some expensive specialty ingredient to fix this. You just need a little bit of science, a better pan, and exactly fifteen minutes of patience.
Welcome to the definitive, no-nonsense masterclass on why your breading always falls off, and the shockingly simple secret to making it stick for good.
The Anatomy of a Culinary Crime: Why Your Breading Fails
Before we can fix the problem, we have to understand the physics of the failure. Cooking is just edible chemistry, and when you are frying breaded meat, you are essentially managing a violent reaction between moisture and hot oil.
The primary enemy of a crispy, well-adhered crust is surface moisture. When a raw piece of chicken, pork, or fish hits cooking oil that is sitting at 350°F (175°C), the water on the surface of the meat rapidly boils and turns into steam. Because steam expands to roughly 1,700 times the volume of liquid water, it needs to escape immediately. If your breading has not properly bonded to the meat, that aggressively expanding steam will literally blow the crust right off the surface of the protein. You are left with a pocket of trapped air and a crust that separates the second you try to move it.
The second culprit is rushing the process. Most home cooks pull their meat out of the fridge, drag it through flour, dunk it in egg, coat it in breadcrumbs, and immediately toss it into the skillet. When you do this, you are not creating a cohesive crust; you are just stacking three distinct, unbonded layers of ingredients on top of a wet piece of meat. There is no structural integrity. The flour hasn’t absorbed the egg, the egg hasn’t gripped the crumbs, and the whole fragile mess is destined to fall apart.
Finally, we have to talk about your equipment. If your food sticks to your stainless steel pan because you didn’t preheat it correctly, the mechanical force required to scrape it off the bottom will tear the breading right off. Breading requires a frictionless release, which means your temperature control and your choice of cookware have to be on point.
The Science of the Rest: Hydration and Adhesion
If there is only one thing you take away from this entire masterclass, let it be this: the absolute magic of a quick rest changes everything.
After you have fully coated your meat in its final layer of breadcrumbs, you must place it on a wire rack and let it sit at room temperature for at least 15 minutes before it goes anywhere near a hot pan.
Why? Because of a beautiful scientific process called starch hydration and protein coagulation. When you let the breaded meat rest, the starches in the flour layer begin to absorb the moisture from both the raw meat and the liquid egg wash. As the flour hydrates, it swells and undergoes a mild form of gelatinization. It transforms from a dry, dusty powder into a thick, tacky paste.
Simultaneously, the proteins in the egg wash begin to slightly dry out and tack up, acting as a natural, edible glue that binds the flour layer to the breadcrumb layer. The gluten network in the flour also gets a moment to relax and link up, creating a microscopic, flexible net that holds the entire crust together.
By the time that 15-minute rest is over, you no longer have three separate layers of flour, egg, and crumb. You have a single, unified, hydrated shell that has essentially cement-bonded itself to the surface of the meat. When this hydrated shell hits the hot oil, it immediately hardens and fries as one solid piece, trapping the steam inside without blowing out the sides.
The Standard Breading Procedure (SBP): A Step-by-Step Masterclass
In the professional culinary world, there is a strict, non-negotiable protocol for coating food called the Standard Breading Procedure, often abbreviated as the FEB method (Flour, Egg, Breadcrumb). If you skip a step, or if you do them out of order, you are setting yourself up for failure. Let’s break down exactly how to execute this flawlessly in a standard home kitchen.
Step 1: The Aggressive Dry Pat
Before the meat even sees a grain of flour, it must be bone dry. Pull your chicken cutlets, pork chops, or fish fillets out of the fridge and attack them with paper towels. Press firmly to absorb as much surface moisture as humanly possible. If the meat is wet, the flour will instantly turn into a soggy, slippery sludge rather than a tight primer coat. This is also the moment to aggressively season your meat with salt and pepper. Do not rely solely on the breading for flavor; the protein itself needs to be seasoned.
Step 2: The Flour Primer
Set up your first shallow dish and fill it with all-purpose flour. This flour layer acts as the primer, much like painting a wall. The egg wash cannot stick to the slick, smooth surface of raw meat, but it can stick to flour.
Dredge your thoroughly dried meat in the flour, ensuring every single crevice is coated. Now, here is the critical part: shake off the excess. You want a translucent, microscopic dusting of flour, not a thick, cakey blanket. If you leave too much flour on the meat, the egg wash won’t be able to penetrate all the way through to the protein, creating a dry, powdery fault line where the crust will eventually break and fall off.
Step 3: The Binding Agent (The Egg Wash)
Your second shallow dish is the binder. Crack your eggs and whisk them until they are completely homogenous. You should not see any separate streaks of clear albumen (egg white) or thick yolk. To help thin the egg wash out so it coats the flour evenly without clumping, add a splash of milk or water.
If you want to elevate your flavor profile and add an extra layer of emulsifying binding power, this is where you can introduce the magic of dijon mustard. Whisking a tablespoon of mustard into your egg wash not only gives the cutlet a subtle, tangy bite, but the natural emulsifiers in the mustard help the egg grip the flour even tighter.
Dip the floured meat into the egg wash, turning it to coat completely. Lift it out and let the excess liquid drip off for a few seconds. If it is too wet, it will turn your breadcrumbs into a soggy paste.
Step 4: The Crumb Coat
Your third dish holds the texture. Whether you are using traditional fine Italian breadcrumbs, crushed butter crackers, or jagged Japanese Panko crumbs, the technique remains the same.
Lay the egg-coated meat into the crumbs. Scoop extra crumbs over the top so the meat is completely buried. Then, use the flat of your hand to firmly press the crumbs down into the meat. Do not just lightly toss it; you need to apply gentle physical pressure to force the jagged edges of the crumbs into the tacky egg wash. Shake off the loose bits.
Step 5: The Mandatory Rest
This is where the magic happens. Do not walk this breaded cutlet over to the stove. Instead, place it on a wire cooling rack set over a baking sheet. Leave it alone for 15 to 30 minutes at room temperature.
During this time, the hydration and gelation processes we discussed earlier are taking place. The white, dusty patches of flour will disappear, and the crust will start to look slightly damp and cohesive. That is the visual cue that your breading has successfully turned into edible glue.
Time is Money: Weeknight Efficiency vs. Weekend Perfection
I know what you are thinking. “I am cooking on a Tuesday night after a nine-hour shift. I do not have time to stand around watching chicken rest for 15 minutes.”
I firmly believe that time is money, and weeknight cooking requires ruthless efficiency. But here is the secret: you do not just stand there and stare at the chicken. You build the resting time into your workflow. The very first thing you do when you walk into the kitchen is bread your meat. Get it on the rack. While it rests, you have a solid 15 to 20 minutes to chop your vegetables, toss a salad, boil water for pasta, wipe down the counters, or pour yourself a well-deserved glass of wine. By the time your side dishes are prepped and your oil is hot, the meat has finished resting. You lose absolutely zero time.
Now, if it is the weekend and you are chasing absolute culinary perfection, you can extend the rest. For the ultimate shatteringly crisp crust, bread your meat and place it on the wire rack in the refrigerator, uncovered, for an hour (or even overnight). The cold, continuously circulating air in the fridge will aggressively dehydrate the outermost layer of the breadcrumbs. When that super-dry exterior hits the hot oil, the crunch it produces is absolutely mind-blowing.
The “No-Go” Rule on Toxic Gear: Why Your Pan Matters
We need to have a serious conversation about the equipment you are using to fry this beautiful, perfectly rested chicken. If you are reaching for a lightweight, scratched-up, cheap non-stick Teflon pan, I am going to have to ask you to stop immediately.
I have zero patience for toxic kitchenware. Cheap non-stick coatings are notorious for degrading under the high heat required for pan-frying. As the temperature pushes past 400°F (which happens easily if the pan is empty for even a few seconds), those synthetic coatings begin to break down, releasing toxic fumes and physically flaking off into your food. Teflon flakes are not a seasoning. Furthermore, these thin, mystery-metal pans have terrible thermal mass. The moment you drop a cold piece of chicken into them, the temperature of the pan plummets, ruining your fry.
You need a pan that can hold serious, sustained heat. A heavy-bottomed cast iron skillet is the gold standard for pan-frying. It has massive thermal retention, meaning the oil temperature stays stable when the meat goes in. A high-quality carbon steel pan or a heavy-clad stainless steel skillet are also phenomenal options.
And while we are talking about keeping your gear pristine, remember that aerosol cooking spray is the enemy of good cookware. Those sprays contain chemical propellants and emulsifiers (like soy lecithin) that polymerize under high heat, leaving a permanent, sticky, brown residue on your expensive pans that is nearly impossible to scrub off. Use real, high-quality liquid cooking oil. Peanut oil, avocado oil, or simple canola oil are perfect for frying due to their high smoke points.
Frying Dynamics: Managing the Oil
Even with a perfectly rested crust and a high-quality cast iron skillet, you can still ruin the dish if you do not respect the thermodynamics of frying.
For a pan-fry, you want your oil temperature to sit right around 350°F to 375°F (175°C to 190°C). If the oil is too hot, the breadcrumbs will instantly scorch and burn before the raw meat inside has a chance to cook. If the oil is too cold, the crust will not immediately sear and seal. Instead, the breading will act like a sponge, soaking up the lukewarm oil for ten minutes until your beautiful dinner turns out greasy, heavy, and soggy.
The biggest mistake rookie cooks make is treating their frying pan like a clown car. Do not overcrowd the pan. If you jam four massive chicken breasts into a 10-inch skillet, the ambient temperature of the cold meat will instantly crash the temperature of the oil. Fry in batches. Give each piece of meat at least an inch of breathing room so the moisture escaping from the chicken can vent away as steam, rather than getting trapped and boiling the neighboring cutlet.
When you place the meat into the pan, lay it down away from you so you don’t splash hot oil onto your shirt. And then—this is crucial—do not touch it. Do not poke it, do not nudge it, and do not try to peek underneath it. Let it fry undisturbed for at least 3 to 4 minutes. A proper crust needs time to polymerize and release itself from the metal naturally. If you try to force the flip too early, you will rip the breading off.
Advanced Troubleshooting & Expert Hacks
Even with the basics mastered, the home kitchen always throws curveballs. Here are a few advanced pro-tips to elevate your breading game and troubleshoot common disasters.
The Double Dredge for Maximum Crunch
If you want an impossibly thick, fast-food-style craggy crust, you need to double dredge. Go from the flour, to the egg, back to the flour, back to the egg, and then into the final breadcrumbs. This builds a massive, structural shell around the meat. Just remember that a thicker crust requires a slightly longer resting period—aim for 25 to 30 minutes to ensure all those heavy layers hydrate properly.
The Chemistry of Crunch
If you find that your crust is browning nicely but lacks that airy, shattering crispness, you might need baking powder. Whisking a half teaspoon of aluminum-free baking powder into your initial flour dredge works wonders. When the baking powder hits the hot oil, it reacts and releases tiny bubbles of carbon dioxide gas, creating microscopic pockets of air inside the crust that make it incredibly light and crunchy.
Avoiding the Dry Meat Dilemma
One of the most common complaints I hear is that by the time the crust is perfectly golden brown, the chicken breast turns out dry and chalky. This is a temperature mismatch. If your cutlets are too thick, the outside will burn before the inside cooks. Always pound your chicken breasts to an even half-inch thickness before breading.
Furthermore, you must pull the meat from the pan at the correct internal temperature. Chicken is done at 165°F (74°C), and pork is perfect at 145°F (63°C). Do not guess. Use a digital instant-read thermometer. And if you find your food is constantly overcooked despite using one, it is highly likely that your meat thermometer is lying to you because it has lost calibration. Upgrade to a high-quality, fast-reading digital thermometer and never eat dry chicken again.
The Wet Hand / Dry Hand Method
The Standard Breading Procedure is notoriously messy. If you use the same hand to dip the meat in the flour, the egg, and the crumbs, you will eventually bread your own fingers, resulting in a thick, sticky club-hand of dough.
Designate your left hand as the “dry hand” and your right hand as the “wet hand.” Use the dry hand to pick up the raw meat and drop it in the flour. Toss the flour over it, then use the dry hand to lift it and drop it into the egg. Now, switch. Use your wet hand to flip the meat in the egg wash, lift it out, and drop it into the breadcrumbs. Switch back to your dry hand to pack the crumbs on top and transfer the meat to the resting rack. Your hands will stay remarkably clean.
And when it is time to clean up the inevitable flour dust that has settled across your countertops, skip the wet sponge, which will just turn the flour into a smear of glue. To clean your prep station efficiently, you need a bench scraper. Simply scrape the dry flour directly into the trash can before wiping the counter down with a damp cloth. It takes five seconds and saves your plumbing.
The Final Takeaway
You do not need to be a Michelin-starred chef to make restaurant-quality pan-fried cutlets at home. You just need to stop fighting the science of the kitchen and start working with it.
Dry your meat. Use the three-step FEB method. Press the crumbs in firmly. And for the love of all things culinary, let the meat rest for 15 minutes. Let the starches hydrate. Let the proteins coagulate. Let the edible glue form.
Ditch the toxic, peeling non-stick pans, manage your oil temperature with respect, and never crowd the skillet. If you follow these simple, science-backed rules, you will never have to scrape a soggy, separated layer of breading off the bottom of a frying pan again. You will be serving up flawless, golden, shatteringly crisp cutlets every single time.
Now get in the kitchen, pour that glass of wine, and go show that chicken who is boss. You’ve absolutely got this.






