
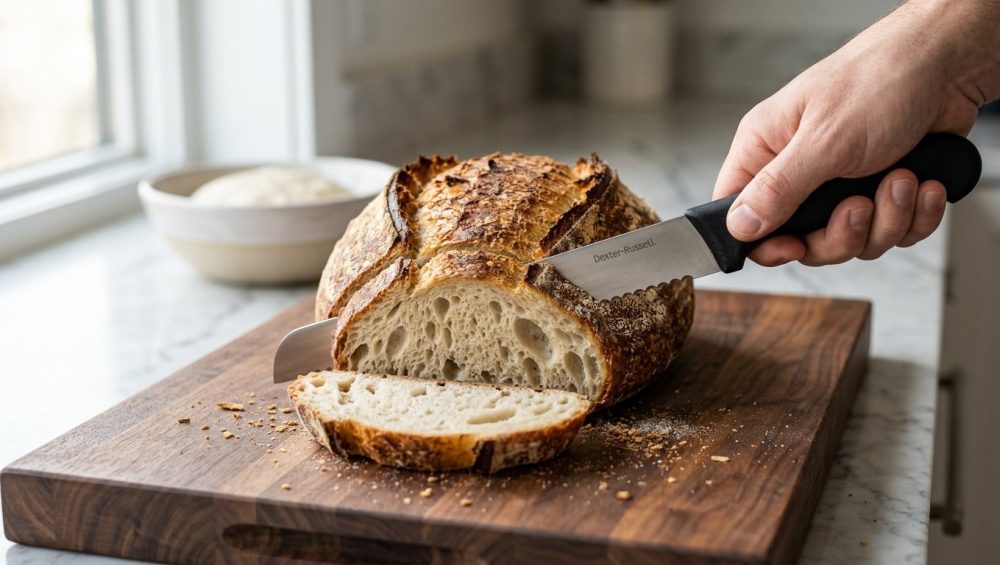
Listen to me closely. You have just spent the last twenty-four hours of your life coddling a sourdough starter, meticulously executing a series of stretch-and-folds, and nervously hovering by the oven light. You finally pull out a magnificent, golden-brown boule that crackles as it cools on the wire rack. It is a masterpiece of home baking. But then, the moment of truth arrives. You reach into your knife block, pull out a standard, straight-handled bread knife, and proceed to hack away at your beautiful creation like you are trying to fell a sequoia with a plastic spork.
By the time you are done, your kitchen counter is covered in a blizzard of crumbs, the airy crumb structure of the bread is compressed into a dense, gummy puck, and you have somehow managed to scrape your knuckles against the cutting board. It is an absolute tragedy. In 2024, U.S. consumer units spent an average of $779 annually on bakery products, and that does not even account for the premium organic flour and countless hours you invest in baking at home. You are wasting your time, your money, and your sanity by using the wrong tool for the job.
If you are wondering why your fresh bread goes stale so quickly, a massive part of the problem is exposing torn, jagged, mangled edges to the air instead of clean, smooth cuts. And please, for the love of gluten, if you are putting bread in the fridge to “preserve” those ruined slices, you are only accelerating the staling process. You deserve better. Your bread deserves better. It is time to talk about the greatest, most overlooked ergonomic upgrade you can make in your kitchen: the offset bread knife.
The Anatomy of a Bread-Slicing Disaster: Why Standard Knives Fail
Before we can appreciate the genius of the offset blade, we have to brutally analyze why the standard bread knife you bought in a cheap block set a decade ago is failing you. The traditional bread knife is designed with a fatal geometric flaw: the handle is in a perfectly straight line with the blade. This creates a cascade of ergonomic nightmares that ruin your food and strain your wrists.
The Knuckle Clearance Problem
Let us look at the basic physics of slicing a tall loaf of bread. As your blade descends through a six-inch-tall rustic boule, the hand gripping the handle must also descend. Because the handle is perfectly aligned with the cutting edge, your hand will inevitably hit the cutting board before the blade can sever the bottom crust.
What happens next? You stop cutting, leaving a frustrating hinge of uncut crust at the bottom of the slice, which you then have to brutally tear away with your bare hands. Alternatively, if your wooden cutting board keeps cracking under the immense pressure of you violently slamming your knuckles down to force the blade through, you are fighting a losing battle against simple geometry. You simply run out of physical clearance before the job is done.
The Awkward Sawing Angle
Because human beings are inherently problem-solvers, we subconsciously compensate for this knuckle-banging dilemma by angling the knife upward. Instead of keeping the blade parallel to the cutting board, you lift the handle toward the ceiling.
This completely destroys your mechanical advantage. By angling the knife, you are now only using the front two inches of the blade to do all the cutting. You lose the benefit of the long, sweeping strokes that a serrated edge requires to function properly. If you have ever wondered why your knives go dull prematurely, dragging the front tip horizontally across the cutting surface because of a terrible cutting angle is a primary culprit. You are forcing a tiny section of the blade to do 100 percent of the work, which quickly flattens the serrations.
The Compression Zone (RIP Soft Crumb)
Here is where the real culinary crime occurs. Because you lack the proper clearance and leverage with a straight knife, you instinctively substitute horizontal sawing motion with vertical pushing motion. You press down hard.
Bread is a delicate network of gluten strands trapping pockets of air (the alveoli). When you apply heavy downward pressure without efficient horizontal slicing, you compress that structure. You are literally squishing the air out of the bread you spent a whole day fermenting. The result is a slice that looks more like a dense, gummy pancake than a piece of artisanal baking.
Enter the Offset Bread Knife: A Masterclass in Kitchen Ergonomics
I do not have the patience for kitchen gadgets that only serve one highly specific, useless purpose, but an offset bread knife is not a gadget. It is a fundamental redesign of a core kitchen tool, built entirely around how the human body actually moves. I am begging you to upgrade your gear. Just like I constantly tell you to throw out those awful bamboo cutting boards that ruin your edges, you need to ditch the straight bread knife immediately.
What Exactly is an Offset Blade?
An offset bread knife has a distinct L-shaped or Z-shaped profile. The blade is dropped—or the handle is raised, depending on your perspective—a few inches above the level of the serrated cutting edge. It looks slightly aggressive, almost like a specialized woodworking saw, but that dropped blade is the secret to perfect slicing.
The Physics of Downward Leverage
By raising the handle above the cutting plane, the offset knife gives your hand complete and total clearance. You can slice all the way through a giant loaf of sourdough, a massive watermelon, or a dense head of cabbage without your knuckles ever coming close to clipping the wood beneath.
More importantly, it completely changes your leverage. With an offset handle, your wrist remains in a neutral, comfortable position, and your hand is positioned directly over the cutting line. This allows you to use gravity and your upper body weight to guide the knife, rather than relying on raw, awkward wrist strength. You can keep the blade perfectly parallel to the cutting board, utilizing the entire length of the edge from heel to tip in long, graceful strokes.
Protecting the Crumb Structure
Because you are using proper alignment and leveraging gravity, you no longer need to apply excessive downward pressure. You simply let the weight of the knife and the geometry of the teeth do the actual cutting. The bread retains its lofty, airy texture, and the crust is severed cleanly without shattering into a million pieces. Once you have your perfectly pristine slices, use a stainless steel bench scraper to scoop up your sandwich ingredients and transfer them to the bread without ever dragging and ruining your knife’s blade.
Serration Science: Not All Teeth Are Created Equal
If you think all serrated knives are exactly the same, we need to have a serious talk about blade geometry. The shape of the teeth on your bread knife dictates exactly how it will interact with different textures of food.
Pointed vs. Scalloped Serrations
There are two primary types of serrations you will encounter in the wild, and they perform very differently.
Pointed Serrations (The Aggressor): These feature sharp, aggressive, triangular teeth. They act like tiny pickaxes. When you drag a pointed serrated blade across a crust, the points dig in, fracture the hard exterior, and aggressively rip it apart. This is absolutely fantastic for a rock-hard baguette that could double as a baseball bat. However, when those same pickaxes hit the soft, delicate crumb of a brioche or a milk bread, they tear the gluten strands to shreds, leaving a jagged, messy surface and generating a massive amount of crumbs.
Scalloped Serrations (The Gentle Wave): Scalloped edges are inverted U-shapes. They do not have sharp points protruding downward; instead, the “points” are just the gentle peaks between smooth, sweeping valleys. When you slice with a scalloped edge, the valleys cradle the crumb, slicing cleanly through the gluten network without tearing it. Scalloped edges are the undisputed champions of soft sandwich breads, delicate cakes, and thin-skinned produce. Their only downside is that they can occasionally struggle to bite into a wildly thick, artisan sourdough crust without slipping initially.
For the ultimate home cook, a hybrid or “double-serrated” edge—which features a larger pointed tooth followed by smaller scalloped valleys—offers the absolute best of both worlds, piercing tough crusts while protecting the soft interior.
The Metallurgy of a Good Blade (No Mystery Metals Here)
I have a strict “No-Go” rule on cheap, toxic kitchenware. I absolutely despise mystery metals, stamped tin knives from the grocery store checkout aisle, and pastel-colored blades with cheap non-stick coatings that inevitably flake off toxic black specks into your food. You are feeding your family; act like it.
You need a blade forged or stamped from high-carbon stainless steel. German steel, such as X50CrMoV15, is incredibly popular for bread knives because it offers the perfect balance of edge retention and durability.
We also need to talk about the Rockwell Hardness Scale (HRC), which measures how much pressure it takes to indent the steel with a diamond cone. If your knives get dull so fast that they feel like butter knives after a month, you bought cheap, soft steel (usually under 52 HRC) that rolls and flattens upon impact.
However, you do not want an ultra-hard blade for a bread knife either. A premium Japanese chef’s knife might sit at a blistering 62+ HRC, which is incredibly hard and holds a razor-sharp edge. But hardness comes at the cost of toughness; hard steel is brittle. If you put a 62 HRC serrated edge against a rock-hard sourdough crust, those tiny, delicate teeth are highly prone to micro-chipping and shattering.
For a serrated bread knife, the optimal “Goldilocks” zone is an HRC of 55 to 58. It is hard enough to retain its biting edge for years of heavy use, but tough enough to absorb the brutal impact of sawing through dense crusts without snapping a tooth.
Beyond the Loaf: The Unexpected Versatility of an Offset Knife
The persistent myth that a bread knife is a single-purpose tool is entirely false. An offset bread knife is arguably the most versatile backup blade in your entire kitchen, precisely because its operating principle—teeth grip hard surfaces while valleys protect soft interiors—applies to far more foods than just baked goods.
The Ultimate Tomato Tamer
Tomatoes are notoriously difficult to cut because they possess a tight, slippery skin stretched over a soft, delicate flesh. A straight-edge chef’s knife, unless it is kept at a terrifyingly razor-sharp edge, will often skid across the surface and then crush the tomato when it finally breaks through. Using an offset serrated blade is the easiest way to stop crushing your tomatoes into a sad, watery puddle on your cutting board. The serrations grip the skin immediately, preventing skidding, while the offset handle allows you to slice cleanly down to the board.
Slicing Massive Sandwiches and Delicate Pastries
Have you ever tried to cut a towering, triple-decker club sandwich or a massive BLT with a standard knife? The downward pressure pushes all the meticulously layered fillings right out the back of the bread. The offset knife allows you to gently saw through the bacon, lettuce, and tomato without displacing a single ingredient. When you finally construct the ultimate grilled cheese, the last thing you want to do is smash it flat while cutting it in half.
Furthermore, if you bake layer cakes, an offset bread knife is the absolute standard tool for “torting” or trimming domed cake tops perfectly flat. The long blade spans the full width of the cake, and the offset handle keeps your knuckles out of the frosting.
Carving Melons and Tough-Skinned Produce
Pineapples, watermelons, cantaloupes, and tough butternut squashes are intimidating to break down. The serrations of an offset knife bite through tough rinds exactly the same way they bite through bread crust. The offset handle gives you the structural leverage to power through thick, fibrous skins safely, without the knife twisting dangerously in your hand.
How to Choose the Perfect Offset Bread Knife (And What to Avoid)
Not all offset knives are worthy of your kitchen. If you are going to upgrade, you need to know exactly what specifications to look for, because time is money, and buying cheap gear means you will just be buying it again in six months.
Blade Length Matters
Do not buy a 6-inch or 7-inch bread knife. It is practically useless for anything wider than a standard supermarket bagel. A proper sourdough boule can easily be seven or eight inches across. If you use a short knife, the tip of the blade will exit the bread on every single push stroke. When you pull the knife back toward you, the tip will snag on the crust, tearing the loaf and abruptly halting your momentum.
You need an 8-inch to 10-inch blade. A 9-inch blade is widely considered the undisputed sweet spot. It gives you a generous runway to make long, continuous sawing motions without ever losing contact with the bread.
Handle Materials and Grip
You will be handling this knife with hands covered in flour, butter, water, or olive oil. Avoid cheap, smooth ABS plastic handles at all costs; they get dangerously slippery when wet.
Instead, look for handles made from G10 (an incredibly durable, moisture-resistant fiberglass resin), Santoprene (a rubberized polymer that actually gets grippier when wet), or high-quality stabilized woods like Pakkawood or Mediterranean Olive Wood. Additionally, full-tang construction is non-negotiable. The steel of the blade must run all the way through the handle to the butt of the knife to provide proper weight, balance, and structural integrity.
The “No-Go” Rule on Flimsy Junk
I will say it again: step away from the infomercial knives. If a late-night television ad promises that a knife can cut through a solid tin can, a leather shoe, and then perfectly slice a tomato, turn off the TV. We do not cut leather shoes in this kitchen. We want precision culinary tools, not gimmicky, stamped-metal garbage that flexes and bends the moment it hits a tough crust. Invest in a reputable brand that transparently lists their steel type and Rockwell Hardness rating.
Proper Technique: Slicing Like a Pro Without the Culinary Degree
Even the greatest offset bread knife in the world will not save you if your technique is fundamentally flawed. You do not need a culinary degree to slice bread perfectly, but you do need to respect the mechanics of the tool.
Step 1: The Setup. Place your bread on a heavy, stable wooden or thick rubber cutting board. Never, under any circumstances, use a glass, marble, or ceramic cutting board. They will instantly destroy the teeth of your knife.
Step 2: The Grip. Hold the handle firmly with your dominant hand. Do not place your index finger on the spine of the blade to “guide” it—this destabilizes your wrist. Wrap all your fingers securely around the handle. Use your non-dominant hand to hold the bread using the “claw grip,” tucking your fingertips safely inward.
Step 3: The Bite. Place the middle of the serrated blade on the top crust of the bread. Do not push down. Instead, pull the knife backward gently toward your body. This allows the teeth to “bite” into the hard crust and establish a track.
Step 4: The Glide. Once the crust is breached, use the full length of the blade. Make long, sweeping, horizontal strokes. Let the weight of the knife do the downward work. Your arm is merely the engine moving the blade back and forth. If you find yourself pushing down heavily, stop and reset your motion.
Step 5: The Finish. As you reach the bottom crust, let the offset handle drop cleanly toward the board. The blade will seamlessly sever the bottom crust without your knuckles ever making contact with the wood.
Knife Maintenance: Keeping Those Teeth Biting
Serrated knives have a reputation for being disposable because people mistakenly believe they cannot be sharpened or maintained. This is a myth perpetuated by people who do not know how to care for their tools.
Honing and Sharpening Serrations (Yes, It’s Possible)
You cannot use a standard flat whetstone or a cheap pull-through sharpener on a serrated knife; you will grind the teeth flat and ruin the blade. However, you absolutely can sharpen them. You need a tapered ceramic honing rod. You simply match the diameter of the rod to the scallops (the valleys) of the knife, and gently pass the rod through each individual scallop a few times, pushing away from the edge. Yes, it takes about ten minutes to do the whole blade, but because serrated knives hold their edge so well, you only need to do this once every year or two.
Storage and Cleaning (Step Away from the Dishwasher)
The dishwasher is a medieval torture chamber for good kitchen knives. The harsh, abrasive detergents pit and corrode the high-carbon steel. The extreme heat warps and degrades the handle materials. The violent water jets rattle the delicate, pointed teeth against other silverware, causing micro-chipping.
Hand wash your offset bread knife with warm, soapy water immediately after use, and dry it completely with a towel before putting it away. Store it on a magnetic wooden knife strip or in a dedicated slot in a knife block. Do not throw it loosely into a utility drawer where it will bang against the garlic press and the ice cream scoop, dulling the blade and creating a hazard for your fingers.
The Final Crumb: Reclaiming Your Baking Glory
Cooking and baking at home should be a deeply rewarding, peaceful experience, not a frustrating battle against inadequate equipment. An offset bread knife is not a luxury; it is a mechanical necessity for anyone who respects the time, money, and effort they put into their food. It fixes the ergonomic flaws of straight-handled knives, protects your delicate crumb structures, and saves your knuckles from constant abuse.
Now that you understand the physics of downward leverage and the science of serrations, you can stop tossing stale bread that you accidentally mangled out of sheer frustration. Upgrade your blade, respect your ingredients, and start enjoying bakery-level perfection right in your own kitchen. You have done the hard work of baking the bread; now let the right knife do the work of slicing it.






