
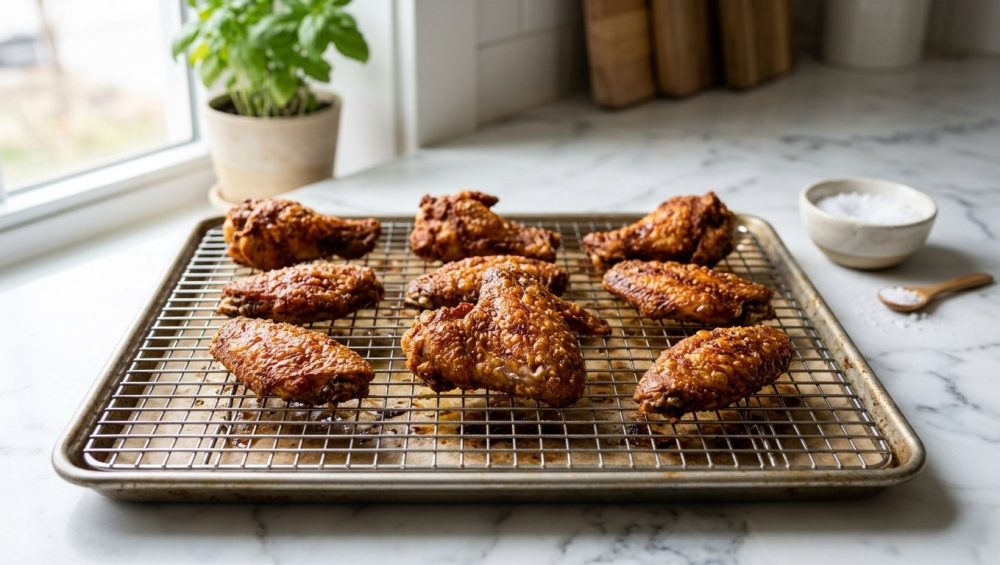
We have all been to a weekend gathering where someone proudly pulls a sheet pan out of the oven, sets it on the counter, and declares that the “game day food” is ready. You look down, and what do you see? A tragic, crowded tray of pale, flabby, rubbery chicken wings sitting in a puddle of their own un-rendered fat. It is a culinary travesty, and quite frankly, you and your guests deserve better.
The National Chicken Council projected that Americans would consume an absolutely staggering 1.48 billion chicken wings during the 2026 Super Bowl weekend. That is a monumental amount of poultry. But it begs a very serious question: how many of those wings were sad, oven-steamed disappointments? Far too many.
You have likely been lied to by pretentious restaurant chefs who claim that the only way to achieve shatteringly crisp chicken skin is to drop it into a vat of boiling oil. I am here to tell you that you do not need a culinary degree, a commercial kitchen, or a hazardous deep fryer to make mind-blowing food. You just need a little bit of high school chemistry, the right technique, and a pantry staple you probably currently have sitting next to your flour. Today, we are going to master the definitive, foolproof method for achieving restaurant-quality crispy baked wings using the absolute magic of baking powder.
The Soggy Wing Epidemic (And Why We Are Ending It Today)
Before we can fix the problem, we have to understand why so many home cooks fail at baking chicken wings. The fundamental enemy of crispy skin is moisture. When you place wet, un-prepped chicken into a hot oven, the ambient heat immediately goes to work boiling the surface water. That water turns into steam. Steam softens the skin, resulting in a chewy, gelatinous texture rather than a crisp, blistered crunch.
The Deep Fryer Delusion
Restaurants bypass this moisture problem by using commercial deep fryers. Deep-frying at 350°F to 375°F rapidly and violently drives moisture out of the chicken skin while the hot oil instantly initiates Maillard browning. The result is blistered, irregular skin with countless tiny pockets and ridges that are absolutely perfect for holding onto buffalo sauce.
However, you are a weekend culinary hobbyist, not a short-order cook. You do not have a commercial ventilation hood. Deep frying at home means dealing with gallons of expensive, volatile oil, a massive fire hazard, and a kitchen that will smell like a fast-food joint for the next three days. The cleanup alone is enough to make you swear off cooking entirely. We are going to achieve that exact same blistered, moisture-extracted texture in a standard home oven.
The Science of the Shatter: Why Baking Powder is Your New Best Friend
Chicken wings have the highest skin-to-meat ratio of any cut on the bird. This makes them the ideal candidate for crisping, provided you treat the skin correctly. Enter your new best friend: baking powder. Coating your raw wings in a precise mixture of baking powder and kosher salt fundamentally alters how the poultry skin behaves under heat.
Food science legend J. Kenji López-Alt famously popularized this technique during his extensive culinary testing for Serious Eats, proving that a simple alkaline coating can replicate a deep-fried texture. Let us break down exactly why this works, because understanding the “why” is what elevates you from a recipe-follower to a true home chef.
Raising the pH: The Chemistry of Crispiness
Chicken skin is naturally slightly acidic to neutral. Baking powder, on the other hand, is alkaline, naturally sitting at a pH level of around 8. When you coat the wings in baking powder, you significantly raise the pH level on the surface of the meat.
Why does this matter? An alkaline environment actively accelerates the Maillard reaction—the complex chemical process between amino acids and reducing sugars that gives browned food its distinctive, savory flavor. By raising the pH, you are essentially fast-tracking the browning process, allowing the wings to develop a deep, golden color long before the meat inside dries out.
Breaking Down Peptide Bonds
This is where the real magic happens. The proteins in chicken skin are held together by peptide bonds. When the alkaline baking powder raises the surface pH, these peptide bonds actually weaken and break down much faster than they would naturally.
By chemically breaking down these proteins, the skin loses its tough, rubbery elasticity. Instead of remaining chewy, the compromised protein structure allows the skin to render its fat efficiently and crisp up dramatically when exposed to the high heat of the oven.
The Moisture Extraction Process
As if breaking down proteins wasn’t enough, baking powder also acts as a powerful desiccant. The fine powders wick up surface moisture, drawing water out of the skin and up to the surface where it can rapidly evaporate in the oven.
Furthermore, as the baking powder combines with the natural juices of the chicken and the heat of the oven, a chemical reaction occurs. The sodium bicarbonate within the baking powder releases microscopic bubbles of carbon dioxide gas. As these tiny bubbles heat up, they expand, increasing the overall surface area of the skin. When these expanded bubbles dry and harden in the oven, they create a delicate, micro-blistered texture that perfectly mimics the exact crunch of a wing that has been plunged into a deep fryer.
Baking Powder vs. Baking Soda: A Crucial, Non-Negotiable Distinction
Let me be abundantly clear: you must use baking powder, not baking soda. If you use baking soda, you will ruin your dinner, and your guests will politely spit their food into their napkins.
Baking soda is pure sodium bicarbonate. It is intensely alkaline. If you coat your chicken in pure baking soda, it will taste like a metallic, soapy, bitter nightmare. Baking powder, however, is a carefully formulated mixture of sodium bicarbonate, a weak acid (such as cream of tartar or monocalcium phosphate), and a starch buffer (like cornstarch). The built-in acid neutralizes the harsh, soapy flavor of the bicarbonate while still providing the necessary pH lift and carbon dioxide reaction.
The Aluminum-Free Mandate
There is another massive caveat here: your baking powder absolutely must be aluminum-free.
Many standard, commercial baking powders found in grocery stores use an acidic compound called sodium aluminum sulfate. Manufacturers use this because it is a “double-acting” acid, meaning it reacts once when exposed to moisture, and a second time when exposed to the heat of the oven. While the FDA considers sodium aluminum sulfate to be “generally recognized as safe” (GRAS) as a food additive, your palate will strongly disagree.
When used in large quantities—like coating a massive batch of savory chicken wings—aluminum-based baking powders leave behind a highly unpleasant, lingering metallic and bitter taste. You must check your pantry labels. Brands like Rumford and Argo are naturally aluminum-free, utilizing alternative acids that will not poison the flavor profile of your hard work.
The “Sassy Sous-Chef” Masterclass Method for Flawless Wings
Now that we have covered the chemistry, it is time to execute. This method requires a little bit of forethought, but the actual active prep time is less than ten minutes.
Step 1: The Great Drying (Preparation is Everything)
Remove your wings from their packaging and aggressively pat them completely dry with heavy-duty paper towels. I cannot overstate this: get them as bone-dry as humanly possible. If you leave water on the skin, the baking powder will prematurely react and clump, and the oven heat will be wasted on evaporating water rather than rendering fat.
If you want to take this a step further, you can leverage the magic of dry brining by letting the salted wings sit in the harsh, circulating air of your refrigerator.
Step 2: The Magic Dusting (Ratios Matter)
Transfer your perfectly dried wings into a large, spacious mixing bowl. You need room to toss them aggressively so every square millimeter is coated.
The golden ratio, popularized by Kenji’s rigorous testing, is incredibly simple: for every one pound of chicken wings, you will use exactly 1 teaspoon of aluminum-free baking powder and 1 teaspoon of kosher salt.
Do not eyeball this. If you use too much baking powder, the wings will taste chalky. If you use too little, the pH won’t raise enough to break down the peptide bonds. Toss the wings in the bowl until they are evenly coated in the fine, powdery mixture.
Step 3: The Resting Phase (Patience Yields Crunch)
Line a heavy-duty, rimmed baking sheet with aluminum foil (for easy cleanup) and place a stainless steel wire cooling rack directly inside the pan. Arrange your dusted wings on the wire rack, ensuring there is a slight space between each piece. Do not let them touch; they need breathing room for the air to circulate.
Place the entire baking sheet into your refrigerator, completely uncovered, and let them rest for a minimum of 8 hours, up to 24 hours. This uncovered resting phase allows the salt to penetrate the meat, while the baking powder goes to work on the skin, drawing out residual moisture which is then evaporated by the cold, dry air of the fridge. By the next day, the wings will look slightly translucent, leathery, and incredibly dry. This is exactly what you want.
Step 4: The Two-Temperature Bake
When you are ready to cook, it is time to manipulate the thermodynamics of your oven. We are going to use a two-stage baking process.
First, preheat your oven to 250°F. Place the tray of cold wings on the middle rack. Bake them at this low temperature for 20 to 25 minutes. This low-and-slow phase gently raises the internal temperature of the meat and slowly renders out the thick layer of subcutaneous fat trapped under the skin without burning the exterior.
Once the 25 minutes are up, leave the wings in the oven and crank the heat up to 425°F or 450°F (depending on how hot your specific oven runs). Bake for another 30 to 40 minutes. This blast of high heat is where the magic happens. The rendered skin will fry in its own fat, the pH-altered proteins will rapidly brown, and the carbon dioxide bubbles will expand and harden into a shatteringly crisp crust. Flip the wings once with tongs about halfway through this high-heat stage to ensure even browning.
Ditching Toxic Gear for the Perfect Bake
I have zero patience for cheap, toxic kitchenware that ruins your food and compromises your health. To execute a 450°F high-heat roast, you need equipment that can actually handle the thermal stress.
If you constantly find that your baking sheets keep warping with a loud “pop” in the middle of the cooking process, you are using thin, cheap garbage. You need a heavy-gauge, bare aluminum half-sheet pan. Bare aluminum conducts heat beautifully and resists warping under extreme temperature changes.
The Danger of Cheap Non-Stick Pans
Do not attempt this recipe using a dark, non-stick baking sheet. At temperatures reaching 450°F, cheap PTFE (Teflon) and PFAS coatings can begin to degrade, releasing highly toxic fumes into your kitchen. Furthermore, dark pans absorb heat far too aggressively, which will cause the bottom of your wings to scorch and burn to a bitter crisp before the top has a chance to brown.
Additionally, never spray your pans with aerosol cooking sprays for this process. The soy lecithin and propellants in those cans cannot withstand high heat, which is exactly why your cooking spray ruins nonstick pans by polymerizing into a sticky, brown, impossible-to-remove lacquer.
The Stainless Steel Wire Rack Necessity
The wire rack is not optional; it is mandatory. If you place the wings directly on the flat baking sheet, they will sit in a pool of their own rendered fat and juices, effectively shallow-boiling the underside of the skin. Elevating the wings allows the convection heat of the oven to circulate a full 360 degrees around the poultry, ensuring the bottom crisps just as beautifully as the top.
Make sure your wire rack is made of 100% heavy-duty stainless steel. Cheap chrome-plated racks will eventually chip, rust, and flake heavy metals into your food.
Lastly, it should go without saying, but never use glass or ceramic casserole dishes for this high-heat, dry-roasting method. Glass is a terrible conductor of heat, meaning your wings will cook unevenly. More importantly, glass is highly susceptible to thermal shock. If hot rendered chicken fat hits a cooler spot on the glass, you will quickly find out why your glass baking dish shattered into a thousand dangerous pieces inside your oven. Stick to bare aluminum.
Troubleshooting Your Crispy Chicken Dreams
If you follow the science, this method is virtually foolproof. However, if you run into issues, it is almost always due to a skipped step or a lack of patience. Let’s troubleshoot the most common failures.
Why Did My Wings Taste Bitter?
If you bite into your beautifully browned wing and are immediately hit with an astringent, metallic, or soapy flavor, you made a critical error in your pantry selection. You either grabbed baking soda instead of baking powder, or you used a commercial baking powder containing sodium aluminum sulfate. Throw out the aluminum powder and buy a clean, aluminum-free brand.
Why Are They Still Rubbery?
If your wings look pale and the skin is chewy, you trapped steam in the oven. This happens for three reasons:
- You did not pat the wings dry, and you skipped the overnight refrigerator rest.
- You crowded the pan. If the wings are touching each other, the ambient heat cannot circulate, and the wings will steam each other.
- Your oven runs cold.
Many home ovens are wildly inaccurate, sometimes running up to 50 degrees cooler than the digital display claims. While relying on your meat thermometer is an absolute necessity for large, lean cuts of meat to prevent overcooking, chicken wings are incredibly forgiving.
In fact, if you constantly worry that your chicken always turns out dry, wings are the perfect protein for you. Because they contain such a high concentration of fat and connective tissue, they actually taste better when cooked to a higher internal temperature. While chicken breast dries out at 165°F, the collagen in chicken wings doesn’t fully break down into luscious, juicy gelatin until they hit an internal temperature of 185°F to 190°F. Do not be afraid to leave them in the oven a few minutes longer to achieve that perfect shatter.
Flavoring the Crunch: Sauces and Rubs
You have spent 24 hours meticulously altering the pH of your chicken skin and carefully rendering the fat to achieve a masterpiece of texture. Do not ruin it at the finish line.
Never apply wet sauces to your wings before baking them. The sugars in BBQ sauce, teriyaki, or honey mustard will burn to a bitter, blackened char in a 450°F oven long before the chicken skin has a chance to crisp.
The Post-Bake Sauce Toss
The correct way to flavor your wings is immediately after they come out of the oven. While they are still sizzling hot, transfer them to a large, clean mixing bowl.
For a classic Buffalo experience, gently simmer equal parts unsalted butter and Frank’s RedHot sauce in a small saucepan until the butter melts and emulsifies into the vinegar. Pour the warm sauce over the hot wings and toss them aggressively until coated. Serve them immediately. The blistered, micro-textured skin created by the baking powder will hold onto the sauce like a sponge while retaining its crunch.
If you prefer dry rubs—like lemon pepper, cajun, or garlic parmesan—you can actually add those dry spices directly to the baking powder and salt mixture during the initial dusting phase. The spices will toast and bloom in the rendered chicken fat during the high-heat bake. Just be warned: if your spices taste bland after baking, it is likely because you are using a dusty, expired jar of seasoning that has been sitting in your cupboard since 2019. Fresh spices make all the difference.
Beyond the Wing: Applying the Baking Powder Trick to Thighs and Roasts
Once you master this technique, you will realize that the alkaline magic of baking powder is not just limited to game day appetizers. You can apply this exact same chemistry to any poultry with the skin left on.
Tossing bone-in, skin-on chicken thighs in a light dusting of baking powder and salt the night before roasting will yield the crispiest weeknight chicken you have ever produced. It also works absolute wonders on a whole roasted turkey for Thanksgiving.
However, do not try to apply this alkaline trick to your side dishes. The peptide bond breakdown is specific to animal proteins. If you dust your broccoli with baking powder, you will just end up with soapy vegetables. If your roasted veggies are mushy, it is a temperature and crowding issue, not a pH problem. Stick to preheating your sheet pan and giving your vegetables room to breathe.
The Final Verdict: Reclaiming Your Kitchen
Cooking does not have to be an intimidating, messy, or chaotic chore. You do not need a deep fryer, and you certainly don’t need to settle for mediocre, soggy takeout. By understanding the basic chemistry of what happens to food when it meets heat, you can entirely eliminate your weeknight cooking anxiety and produce meals that rival your favorite local restaurants.
The baking powder method is the ultimate triumph of the home cook. It is safer, cleaner, healthier, and vastly superior in texture to the sad, soggy wings most people accept as normal.
So, buy the aluminum-free baking powder. Invest in a heavy-duty wire rack. Prep your wings the night before. And if you are buying whole wings to save money, make sure you don’t let your kitchen knives get dull, because a sharp blade will effortlessly glide right through the cartilage joint to separate the flats from the drumettes.
Trust the science, respect the resting time, and prepare to ruin restaurant wings for yourself forever.






