
Picture this: It is a beautiful Saturday afternoon. You have spent the better part of two hours meticulously cutting ice-cold butter into flour, gently hydrating your dough, chilling it to the exact right firmness, and rolling it out into a pristine, flawless circle. You have carefully draped it over your favorite pie dish, crimped the edges with the precision of a Renaissance sculptor, and placed it into a roaring hot oven. You pour yourself a glass of wine, feeling like an absolute culinary deity.
Twenty minutes later, you open the oven door, fully expecting a golden, structurally perfect pastry shell. Instead, you are greeted by a tragedy.
Your beautiful, fluted edges have melted and slumped down the sides of the dish. The bottom of the crust has bubbled up like a localized volcanic eruption, resembling a topographic map of the Himalayas rather than a flat surface for your delicate custard. The entire thing has shrunk by a solid two inches, leaving you with a greasy, deformed puddle of dough that couldn’t hold a filling if its life depended on it.
If this sounds familiar, take a deep breath and put down the wine glass. You are not a bad baker. You simply fell victim to the unforgiving laws of thermodynamics. Baking is, at its core, edible physics. And when it comes to pastry, understanding the science of heat transfer and investing in the essential tools every beginner needs is the difference between a masterpiece and a frustrating disaster.
Today, we are going to talk about blind baking. More specifically, we are going to dissect exactly why your pie crust shrinks, why the internet’s favorite “dry bean” hack is actively sabotaging your desserts, and why high-fired ceramic pie weights are the non-negotiable secret weapon you need to finally conquer the pastry arts. Grab your rolling pin, because class is officially in session.
The Science of the Slump: Why Your Pie Dough Hates You
To understand why pie crust misbehaves, we have to look at its anatomy. A classic flaky pie dough (pâte brisée, if we are feeling fancy, though I promised you no pretentious chef-speak) is fundamentally composed of three things: flour, fat, and a liquid (usually water).
When you mix these ingredients, two crucial things happen. First, the water hydrates the proteins in the flour (glutenin and gliadin), linking them together to form a stretchy, elastic network called gluten. Second, the cold fat (usually butter) is suspended in distinct, solid layers throughout this gluten network.
Now, let us introduce heat. When you put a raw, unweighted pie crust into a 425°F oven, a chaotic molecular battle begins.
Butter is not 100% pure fat; standard American butter is roughly 15% to 18% water. As the oven’s heat penetrates the dough, that water rapidly reaches its boiling point and converts into steam. Steam, as you might recall from high school physics, expands. It wants to rise. If there is no physical weight holding the dough down, that trapped steam acts like a microscopic hot air balloon, aggressively pushing the layers of dough upward and creating massive, uneven bubbles.
Simultaneously, the gluten network is reacting to the heat. Gluten is elastic, and like a rubber band that has been stretched out during the rolling process, it naturally wants to snap back to its original shape. As the proteins heat up, they contract, pulling the edges of your carefully crimped crust inward toward the center of the pan.
But wait, the betrayal gets worse. In order for a pie crust to hold its shape, the starches in the flour need to gelatinize (which happens between 140°F and 158°F) and the gluten proteins need to coagulate and set (around 150°F to 160°F). However, butter melts at a measly 90°F to 95°F.
This means that long before the structural integrity of the dough has time to lock into place, the glue holding it all up on the sides of the pan turns to liquid. Gravity takes over, and the dough slumps down the slippery, butter-greased sides of your pie dish. If you want to fix the seven most common baking disasters, you must learn to control this specific sequence of events. You have to force the dough to hold its shape while it bakes, counteracting both the steam expansion and the gluten contraction.
What Is Blind Baking (And Why It Is Absolutely Non-Negotiable)
Blind baking is the process of partially or fully baking a pie crust before you add the filling. The term “blind” simply refers to baking the shell empty, without its intended contents.
I often hear weekend hobbyists complain that blind baking is an annoying, fussy, extra step that they would rather skip. Let me be brutally honest with you: skipping the blind bake is not a shortcut; it is a guaranteed recipe for failure. If you are making a pie with a wet, liquid-heavy filling—think pumpkin, lemon meringue, chocolate silk, quiche, or a fresh fruit tart—blind baking is a thermodynamic necessity.
In professional kitchens, we refer to the “65% moisture rule”. If your filling exceeds 65% moisture, pouring it into a raw crust is a death sentence for your pastry. The wet filling will immediately soak into the raw flour. Because the liquid filling acts as a massive thermal buffer, the bottom of the crust will never reach the 150°F+ required for the starches to gelatinize and the crust to brown. Instead, you will be left with what the British notoriously call a “soggy bottom”—a pale, gummy, raw layer of dough that ruins the entire eating experience. Serving a dessert with a raw, gelatinous underbelly is the fastest way to stop ruining your dinner parties and send your guests home disappointed.
There are two types of blind baking:
- Partial Blind Baking (Par-Baking): The crust is baked just until its structure is set and the edges are pale blonde. You use this method when the pie will go back into the oven with a filling that needs to be baked (like a pecan or custard pie).
- Full Blind Baking: The crust is baked until it is deeply golden brown, crisp, and 100% fully cooked. You use this method for no-bake fillings, like a French fruit tart with pastry cream, or a chilled chocolate mousse pie.
In both scenarios, you cannot simply throw an empty crust into the oven. You need a structural surrogate to take the place of the filling. You need weight.
The Great Weight Debate: Why Makeshift Dry Beans Belong in the Trash
If you search the internet for blind baking tips, you will inevitably stumble upon thousands of articles and well-meaning grandmothers telling you to just line your crust with foil and dump in a bag of dried pinto beans or uncooked rice. It is touted as the ultimate, thrifty kitchen hack.
As a professional who values efficiency and actual science, I am here to tell you that this hack is garbage.
Let’s look at the physics. The goal of a pie weight is twofold: to physically hold the dough down (preventing steam bubbles and slumping) and to conduct heat evenly into the surface of the pastry so it bakes quickly and uniformly.
Dried beans and rice fail spectacularly at the second requirement. Legumes and grains have incredibly low thermal conductivity. For context, the thermal diffusivity of raw rice is roughly 0.18 mm²/s, whereas a proper ceramic weight clocks in around 0.72 mm²/s. When you fill a pie crust with dried beans, you are effectively insulating the bottom of your crust from the heat of the oven. The beans absorb the heat slowly, meaning the edges of your crust will burn long before the bottom has a chance to set and brown.
But the thermodynamic failure is only part of the problem. Beans and rice are organic, porous materials. As the butter in your crust melts and releases steam, that moisture (along with vaporized butterfat) is absorbed directly into the dried beans. When heated, the trapped moisture inside the beans turns to steam inside the grain, causing unpredictable expansion and uneven pressure against your delicate dough.
Furthermore, because they are absorbing aerosolized fats, reused baking beans eventually go rancid. They will begin to emit a foul, acrid odor of burnt oil every time you heat them, which can absolutely transfer to the flavor of your delicate pastry. Even more horrifying, NSF-certified microbial testing has shown that repeatedly heating and cooling moisture-laden organic grains like rice can lead to the growth of Aspergillus flavus—a nasty mold that produces toxic aflatoxins—after just a few baking cycles.
I am a huge advocate for banishing toxic kitchen gear and useless hacks from your life. Throw the dried beans in a chili where they belong, and upgrade your toolkit.
Enter the Hero: The Unrivaled Magic of High-Fired Ceramic Pie Weights
If we want to achieve professional-level, flawlessly structured, golden-brown pie crusts in a standard home kitchen, we need a tool explicitly designed for the job. Enter the high-fired ceramic pie weight.
Ceramic baking beads are small, spherical, non-porous weights that have been kiln-fired at incredibly high temperatures (often upwards of 2,200°F). They are the undisputed gold standard for blind baking, and for very good reason.
First and foremost, ceramic possesses massive thermal mass and phenomenal heat conductivity. When you place a layer of ceramic beads into a parchment-lined pie shell and put it in the oven, the ceramic rapidly absorbs the ambient heat and pushes it directly down into the surface of the dough. Instead of insulating the crust like dried beans do, ceramic actively cooks the crust from the inside out. This rapid, even heat transfer ensures that the starches in the flour gelatinize and the gluten network sets before the butter completely melts away. It is a foolproof method to cure cooking anxiety when dealing with finicky, temperature-sensitive pastry.
Secondly, ceramic is heavy. The dense physical weight of the beads provides an unyielding barrier against steam expansion. When the water in the butter vaporizes, the steam hits the heavy ceramic barrier and is forced to disperse laterally rather than bubbling up and ruining your flat bottom crust.
Finally, the geometry of ceramic pie weights is critical. Because they are small, smooth spheres, they seamlessly conform to the exact shape of your pie dish. When poured in properly, they pack tightly against the sloped side walls of the crust, acting as a physical retaining wall that completely prevents the dough from shrinking inward or slumping downward.
They are washable, infinitely reusable, non-toxic, and will never absorb rancid butter odors or harbor mold. They are a one-time purchase that will immediately and permanently elevate your baking game.
The “No-Go” Rule: Toxic and Cheap Alternatives to Avoid Like the Plague
Because the culinary market is flooded with gimmicks, I must issue a strict warning about the cheap, toxic alternatives masquerading as legitimate pie weights. My philosophy is simple: if a tool degrades, leaches chemicals, or actively ruins your food, it has no place in your kitchen.
The Mystery Metal Pie Chain:
You have likely seen these—a long string of metal beads connected like a giant necklace, marketed as a “convenient, easy-to-remove” alternative to individual weights. Do not buy them. First, a single chain rarely provides enough weight or coverage to adequately support the side walls of a standard 9-inch pie dish. Second, cheap metal chains are often made from unverified alloys that can rust, discolor, or leach metallic flavors into your food when exposed to high heat and butterfat. They also tend to heat unevenly, creating hot spots that scorch your dough.
Glass Marbles:
I have seen lifestyle bloggers recommend using standard glass marbles as pie weights. This is incredibly dangerous. Standard decorative glass is not tempered for extreme oven temperatures. The thermal shock of moving from a room-temperature counter to a 425°F oven can cause the marbles to violently shatter. Nobody wants to read a tragic story about how your glass baking dish shattered along with a pound of glass marbles, ruining your oven and your dessert in one explosive moment.
Coated or Painted Weights:
Avoid any weights that feature a non-stick coating or colored paint. At high baking temperatures, cheap Teflon-style coatings can degrade, off-gas, and flake directly into your pastry. You want pure, unglazed, high-fired ceramic or food-grade anodized aluminum/stainless steel. Nothing else.
A Masterclass in Blind Baking: The Step-by-Step Guide
Now that we understand the science and have banished the beans, it is time to execute. Blind baking is a technique, and like all techniques, it requires precision. Follow these steps exactly, and you will never suffer a slumped, soggy crust again. Mastering this is one of those simple secrets for kitchen artistry that separates the amateurs from the true home experts.
Step 1: Chill Out (Literally)
Your dough must be aggressively cold before it enters the oven. After you have rolled out your dough, fitted it into your pie dish, and crimped the edges, you must put the entire dish into the refrigerator for at least 30 to 45 minutes (or the freezer for 15 minutes). The butter must be rock solid, and the gluten strands need time to relax. If you put warm, soft dough into the oven, the fat will melt instantly, and no amount of ceramic weights will save you from a slump.
Step 2: The Parchment Paper Shield
You cannot pour ceramic weights directly onto raw dough; they will bake right into the pastry and you will have to chip them out with a chisel. You need a barrier. Do not use aluminum foil—foil conducts heat too aggressively and can cause the bottom to burn, and it often sticks to the dough.
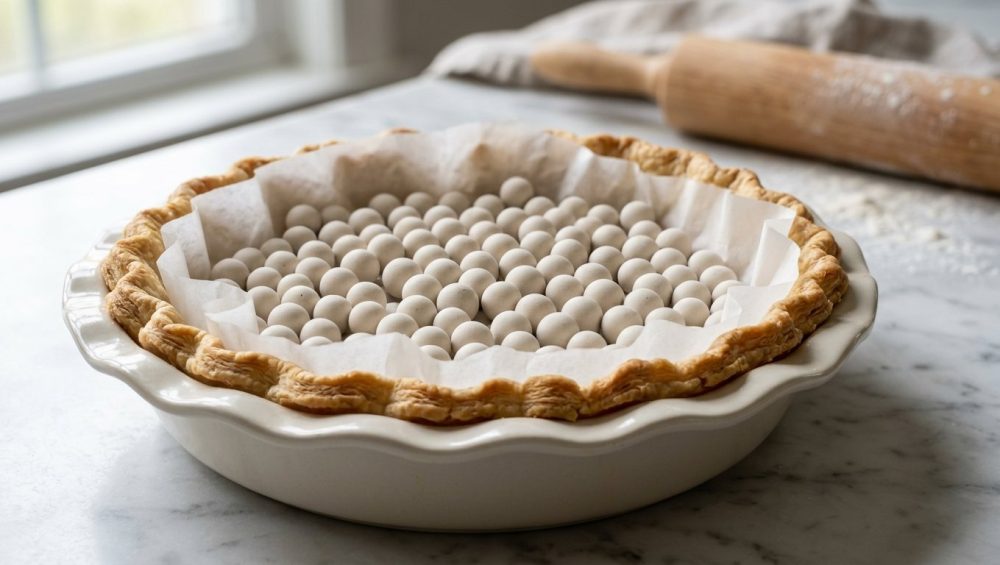
Instead, use standard parchment paper. Here is the pro-trick: tear off a large square of parchment paper and crumple it up tightly into a ball in your hands. Unfold it and smooth it out. Crumpling the paper breaks down its stiff fibers, making it incredibly pliable so it perfectly hugs the sharp corners and contours of your pie dish without digging into your delicate crimped edges.
Step 3: Fill ‘Em Up (Don’t Skimp on the Weights)
Place the crumpled parchment over the chilled dough, and pour in your ceramic pie weights.
Here is where 90% of home bakers fail: they do not use enough weights. If you only pour a single, shallow layer of weights across the bottom of the pie dish, you are completely ignoring the side walls. As the oven heats up, the unsupported side walls will melt and slump right down over your single layer of weights.
You need enough ceramic beads to fill the pie dish all the way to the top rim, pressing firmly against the side walls. For a standard deep-dish 9-inch pie plate, you will generally need at least 2 pounds (about 1 kilogram) of ceramic weights. Spread them evenly so they are flush against the sides.
Step 4: The Two-Stage Bake
Blind baking is a two-part process.
- Stage 1: Setting the Structure. Preheat your oven to 400°F or 425°F (depending on your specific recipe). Place the weighted pie crust on the middle rack. Bake for 15 to 20 minutes. During this stage, the intense heat sets the edges, gelatinizes the starches, and locks the side walls into place.
- Stage 2: Drying the Bottom. After 20 minutes, carefully remove the pie dish from the oven. Grab the corners of the parchment paper and lift the entire payload of hot ceramic weights out of the crust (place them in a heat-safe bowl to cool). The bottom of your crust will look pale and slightly wet. Return the unweighted, empty crust to the oven for another 5 to 10 minutes until the bottom is dry, crisp, and beautifully golden brown.
Step 5: The Docking Dilemma
To dock or not to dock? “Docking” means taking a fork and pricking dozens of small holes into the bottom of the raw pie dough before baking. The holes allow steam to escape, preventing bubbles.
If you are using a proper, heavy payload of ceramic weights, docking is largely unnecessary during Stage 1. However, if you find that your crust still puffs up slightly during Stage 2 (after the weights are removed), you can quickly reach into the oven and prick the bottom a few times with a fork to deflate it. Warning: Do not dock the crust if you are pouring in a highly liquid filling like a thin custard—the liquid will seep through the fork holes and glue the crust to the pan.
Advanced Pro-Tips for Flawless, Professional-Level Crusts
If you want to take your pastry game to the absolute pinnacle of perfection, incorporate these advanced thermodynamic strategies into your routine.
1. The Vodka Hydration Hack
Water is the enemy of tender pastry because water activates gluten. The more water you add to your dough, the tougher and more prone to shrinking it becomes. To combat this, utilize the absolute magic of chilled vodka to hydrate your dough. Replace half of the ice water in your recipe with ice-cold vodka. Alcohol does not activate gluten proteins the way water does, meaning you can add enough liquid to make the dough easy to roll without creating a tough, rubbery, shrink-prone crust. Furthermore, alcohol vaporizes at a lower temperature than water, meaning it cooks off rapidly in the oven, leaving behind an incredibly flaky, tender structure.
2. Stop Trusting Your Oven’s Thermostat
Baking is chemistry, and chemistry requires precise temperatures. If your recipe calls for a 425°F oven to rapidly set the starches in your crust, but your oven is secretly only hitting 375°F, your butter will melt long before the dough sets, resulting in a catastrophic slump. Home oven thermostats are notoriously inaccurate, often fluctuating by up to 50 degrees. Do not leave your weekend baking projects up to chance. Invest in a simple oven thermometer right now. Hang it on the center rack and verify the internal ambient temperature before you ever put a pie in the oven.
3. The Baking Stone Buffer
If you struggle with soggy bottoms even after blind baking, utilize the thermal mass of a baking stone or baking steel. Place the stone on the bottom rack of your oven and let it preheat for a full 45 minutes. When you are ready to blind bake, place your pie dish directly onto the hot stone. The stone will deliver an immediate, intense blast of conductive heat straight to the bottom of your glass or metal pie dish, accelerating the starch gelatinization process and guaranteeing a crispy, perfectly browned undercarriage.
Conclusion: You Can Do This
Listen to me, you ambitious, beautiful weekend bakers: professional-level results do not require a culinary degree. They do not require a commercial kitchen, and they certainly do not require a stressful, tear-filled breakdown over a slumped pie crust.
All you need is a fundamental respect for how ingredients react to heat, a refusal to settle for cheap, toxic kitchen gimmicks, and the willingness to invest in a few high-quality, scientifically sound tools like ceramic pie weights.
Baking is an exact science, but it is a science that belongs to all of us. Once you understand the mechanics of steam expansion, gluten contraction, and thermal conductivity, you are entirely capable of transforming your daily cooking into a triumphant display of culinary prowess.
So throw away those rancid, burnt pinto beans. Buy a proper set of high-fired ceramic weights. Chill your dough, crinkle your parchment paper, and bake with the confidence of someone who knows exactly what is happening on a molecular level inside that oven. Your future pies—and everyone lucky enough to eat them—will thank you.






