
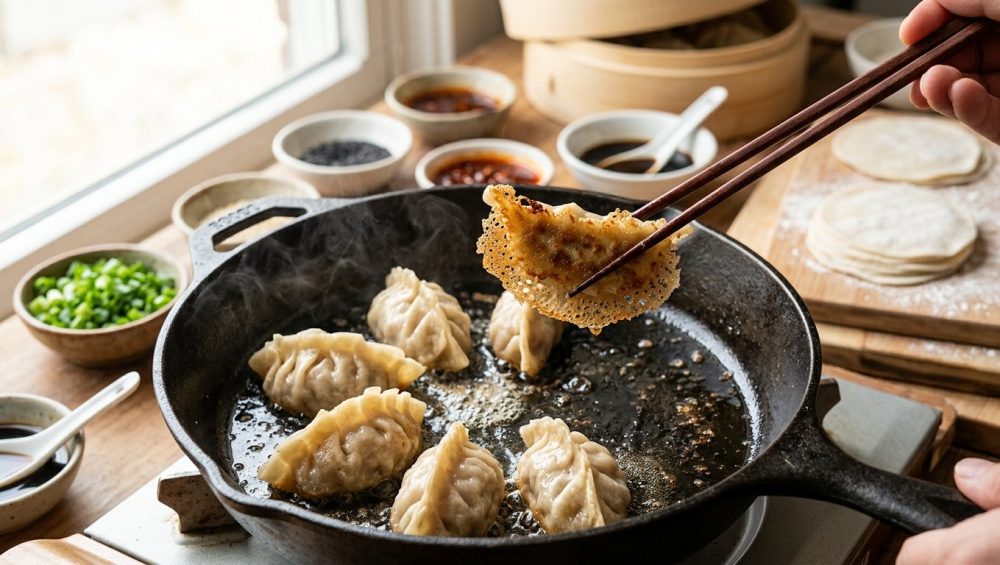
We have all been there. You spend an entire hour lovingly folding delicate, intricate little parcels of joy. You meticulously pinch the pleats, ensuring the savory pork and cabbage filling is perfectly sealed inside. You heat up your skillet, gently place your masterpieces into the oil, and wait for that beautiful, golden-brown crust to form. But when it is finally time to flip them, tragedy strikes. The dumplings have fused to the bottom of the pan like they were welded there by a disgruntled metalworker. You desperately scrape at them with a spatula, only to watch the bottoms violently rip off, leaving you with a sad, naked meatball surrounded by a massacre of torn, sticky dough. It is a universal culinary heartbreak.
But it ends today. You do not need a culinary degree to cook like a seasoned line cook, and you certainly do not need to sacrifice half of your dinner to the pan gods. What you need is a fundamental understanding of thermodynamics, a little bit of food chemistry, and a rock-solid strategy. We are going to dive deep into the exact science of why your food becomes a skillet hostage, how to manipulate heat to create an invisible non-stick shield, and how to leverage this knowledge to host an interactive, communal dinner party without losing your mind. If you want to ensure a stress-free folding night, you have to stop relying on blind luck and start relying on technique. Grab a glass of wine, sharpen your bench scraper, and let us get to work.
The Science of the Stick: Why Your Food Becomes a Hostage
To defeat your enemy, you must first understand it. When you drop a raw, doughy wrapper into a hot pan, you are initiating a complex series of chemical reactions. The primary culprit behind your torn dinner is a process known as starch gelatinization.
Starch is the main carbohydrate component in flour, composed of two molecules: amylose (a linear chain of glucose) and amylopectin (a branched structure). In their native state, these starch granules are insoluble in water. However, when you introduce heat and moisture—which happens the second your dumpling hits the hot oil and subsequently the steam—the starch granules begin to rapidly absorb water and swell. As the internal pressure of the granule increases, the structure degrades, the granule bursts, and the amylose and amylopectin dissolve into the surrounding moisture.
For standard corn starch, which is often used to dust wrappers, this gelatinization process occurs rapidly between 143°F and 161°F (62°C to 72°C). When this happens, the starch transforms into a highly viscous, polymeric gel. In layman’s terms? You have essentially just created a batch of high-strength papier-mâché paste directly inside your skillet.
If the surface of your pan is not properly prepared, this gelatinized starch will seep into the microscopic pores and crevices of the metal. As the water evaporates during the cooking process, the starch dehydrates and hardens, forming a cement-like mechanical bond with the pan. Add in the proteins from the meat juices that inevitably leak out of a poorly sealed wrapper—which undergo their own process of thermal coagulation and adhesion—and you have a recipe for absolute disaster. The metal and the food become one single entity.
The No-Go Rule: Why We Are Trashing Your Toxic Cookware
Before we talk about how to manipulate heat, we need to have a very serious conversation about the equipment you are using. I have absolutely zero patience for cheap, lightweight, peeling Teflon-coated pans. If you are relying on a scratched, five-year-old non-stick skillet that flakes mysterious black specks into your food, you are violating the most sacred rule of my kitchen.
These cheap pans are teflon-coated death traps. Not only do they degrade quickly, losing their non-stick properties after a few months of heavy use, but when heated past certain thresholds, traditional PTFE coatings can release toxic fumes. Furthermore, they teach you terrible cooking habits. They allow you to be lazy with your temperature control because the chemical coating does the heavy lifting—until it inevitably wears off. If you are still holding onto toxic kitchen gear out of a misplaced sense of nostalgia or frugality, march it out to the recycling bin right now.
We are upgrading. To achieve professional-level, deeply browned, perfectly crispy results, you must use materials that can handle high heat and offer superior thermal retention. You need a high-quality carbon steel skillet, a heavy-bottomed cast iron pan, or a multi-clad stainless steel sauté pan. Yes, these materials require you to actually pay attention to what you are doing. Yes, they require a baseline understanding of heat management. But they will last a lifetime, they will never poison your food, and once you master the techniques outlined below, they will perform infinitely better than any cheap non-stick pan ever could.
The Leidenfrost Effect: Your Invisible Non-Stick Shield
If we are tossing out the chemical non-stick coatings, how do we prevent the gelatinized starch from permanently bonding to our bare metal pans? The answer lies in a brilliant phenomenon of fluid dynamics known as the Leidenfrost effect.
When a liquid comes into contact with a solid mass that is significantly hotter than the liquid’s boiling point, it produces an insulating vapor layer that keeps the liquid from boiling rapidly. Instead of immediately vaporizing, the moisture forms a perfect, cohesive bead that floats on its own microscopic cushion of steam. This vapor barrier physically separates the food from the metal. If the food never actually touches the microscopic pores of the pan, the proteins and starches cannot bond to it.
To achieve this magical state, you need precise temperature control. The Leidenfrost point for water on a smooth steel surface typically occurs between 320°F and 350°F (160°C to 180°C). To test if your pan has reached this critical threshold, you will utilize the Water Drop Test, sometimes referred to as the mercury ball test.
Executing the Water Drop Test
Place your dry, clean stainless steel or carbon steel pan on the burner over medium heat. Do not add oil yet. Let the pan preheat for a few minutes. To test the temperature, flick a few drops of tap water from your fingertips into the center of the pan.
- Too Cold: If the water simply sits there and slowly bubbles, the pan is too cold. The moisture will eventually evaporate, but it will not form a vapor barrier. If you add food now, it will stick instantly.
- Getting Closer: If the water aggressively fizzles, spits, and evaporates within a second, you are getting closer, but the metal is still not hot enough to sustain the vapor layer.
- The Sweet Spot: If the water droplets immediately gather into a single, cohesive, marble-like bead that dances, glides, and skitters effortlessly around the surface of the pan without evaporating, you have achieved the Leidenfrost effect.
- Too Hot: If the water shatters into dozens of tiny, frantic beads that dart around violently, your pan is dangerously hot. Remove it from the heat for a moment to let it cool down, or your oil will instantly combust when you add it.
Once you have that perfect, dancing bead of water, wipe it out with a paper towel, pour in your high-smoke-point cooking oil, and swirl it to coat the bottom. The oil will instantly shimmer. You have now created a frictionless surface. This is the absolute best method for making your stainless steel pans perform with the same slickness as a brand-new, chemical-coated skillet.
Carbon Steel Polymerization: Seasoning Like a Pro
If you are using carbon steel or cast iron, the Leidenfrost effect is only half of the equation. The other half is polymerization. Many home cooks mistakenly believe that “seasoning” a pan just means wiping some grease on it and throwing it in the oven until it looks dark. This is completely wrong. Seasoning is a highly specific, controlled chemical reaction.
When you apply oil to a carbon steel pan and heat it, you are attempting to trigger a radical polymerization reaction. This process is triggered by heat, oxygen, and unsaturated fatty acids, and it bonds a thin, hydrophobic, carbon-rich layer directly to the iron lattice of the pan. This covalently bonded, cross-linked network of polymerized triglycerides fills the microscopic pores of the metal, physically blocking water and food from accessing the iron substrate.
To achieve this, you cannot use just any fat. Saturated fats like coconut oil, butter, or bacon grease will form soft, tacky, sticky films that oxidize poorly and wash off the second you scrub the pan. You must use an oil with at least 75% unsaturated fats—such as grapeseed oil, sunflower oil, or canola oil.
Temperature is equally critical. If you bake your oiled pan at a measly 300°F (150°C), you will not provide enough thermal energy to initiate the cross-linking process, leaving you with a pan that feels like it is coated in sticky glue. You must push the oil just past its smoke point. For oils like grapeseed, this means hitting temperatures between 420°F and 475°F (215°C to 245°C). However, if you push the heat too high (above 500°F), you will cause thermal decomposition, turning your hard-earned polymer layer into useless carbon ash.
Wipe the pan with a microscopic layer of unsaturated oil—so thin that the pan looks almost dry—and heat it on the stovetop or in the oven until it just begins to smoke. Let it smoke for a few minutes, then let it cool completely. Repeat this process three to four times. Properly seasoning cast iron and carbon steel is a non-negotiable skill if you want a lifetime of effortless, non-stick cooking.
The Perfect “Potsticker” Technique: Fry, Steam, Fry
Now that your equipment is optimized, your pan is seasoned, and you understand the thermodynamics of heat management, it is time to actually cook. The ultimate goal is a dumpling with a translucent, chewy, perfectly steamed top, and a shatteringly crisp, deeply browned bottom. To achieve this textural masterpiece, we use the classic “Fry, Steam, Fry” method.
Step 1: The Initial Sear
Preheat your carbon steel or stainless steel skillet over medium heat. Perform the water drop test. Once the pan is ready, add a generous glug of neutral, high-smoke-point oil (like canola or peanut oil). Swirl to coat. Carefully place your dumplings into the pan, flat side down, arranging them in a tight circular pattern.
Here is the most important instruction in this entire article: Do not touch them. Do not nudge them. Do not attempt to lift them with your spatula to “check” the color. Let the heat do its job. The Maillard reaction—the chemical reaction between amino acids and reducing sugars that gives browned food its distinctive flavor—needs uninterrupted physical contact with the hot metal to develop. Let them fry for about two to three minutes until the bottoms are a pale, golden blonde.
Step 2: The Steam Phase
Once the bottoms are set, it is time to cook the raw filling and the thick, doughy pleats at the top. You need to introduce moisture to create a violent burst of steam. Pour about a third of a cup of water directly into the hot pan. It will instantly hiss, spit, and erupt into a cloud of vapor. Immediately clamp a tight-fitting lid onto the skillet to trap the steam.
Reduce the heat slightly to medium-low. The trapped steam will rapidly raise the ambient temperature inside the pan, gelatinizing the starches in the upper wrappers and gently poaching the pork or shrimp filling inside. Let them steam undisturbed for about five to six minutes.
Step 3: The Second Crisp
Remove the lid. The pan will look like a soggy, bubbling mess, but do not panic. Turn the heat back up to medium-high. You need to rapidly evaporate all the remaining water. As the water boils off, the oil that was floating on top of the moisture will settle back down onto the floor of the pan. You will hear the sound change from a wet, rolling boil to a sharp, aggressive sizzle. This second fry is what dehydrates the bottom of the wrapper, reinforcing the crust and ensuring it releases cleanly from the metal. Once the water is completely gone and the bottoms are a deep, mahogany brown, remove the pan from the heat.
The Secret to the Ultimate Bing Hua (Snowflake Skirt)
If you want to elevate your cooking from “competent home cook” to “absolute culinary wizard,” you need to master the dumpling skirt. Known in Japanese izakayas as hanetsuki gyoza (gyoza with wings) and in Chinese cuisine as binghua jianjiao (ice-flower fried dumplings), this technique connects an entire pan of dumplings with a delicate, brittle, lace-like tuile of crispy starch.
To achieve this, you simply replace the plain water in the steaming phase with a highly specific starch slurry. When the water evaporates during the second crisping phase, the starches are left behind, frying in the residual oil to form a stunning geometric web.
The Golden Slurry Ratio
Do not just dump a fistful of flour into a cup of water. You need the right balance of structure and crispness. All-purpose flour provides a sturdy, hard crunch, while cornstarch or potato starch provides a light, airy, shatteringly crisp texture.
The scientifically optimal ratio for a standard 10-inch skillet is:
- 1/2 teaspoon of all-purpose flour
- 1/2 teaspoon of cornstarch
- 1/2 cup of cold water
- A tiny pinch of salt (to enhance the flavor of the skirt)
Whisk this mixture aggressively. Because starches do not dissolve in cold water, they will form a suspension and naturally sink to the bottom of the bowl. You must give the slurry a vigorous stir immediately before pouring it into the pan.
Follow the Fry, Steam, Fry method exactly as outlined above, but pour this slurry in instead of plain water. When you remove the lid, let the liquid evaporate completely until the bubbling subsides and the white, pasty liquid transforms into a golden, translucent web. Place a large plate upside down over the skillet, take a deep breath, and confidently invert the pan. The entire batch will drop onto the plate, connected by a glorious, crispy crown. This simple trick makes your cookware feel actually non-stick as the interconnected skirt pulls away from the metal in one beautiful, cohesive piece.
Hosting a Mindful Dumpling Bar: Strategy & Setup
Now that you have mastered the thermodynamics of the skillet, it is time to talk about the social logistics. Hosting a dinner party can be a chaotic, sweat-inducing nightmare if you try to play the role of a solitary martyr, trapped in the kitchen while your guests have all the fun in the living room.
The absolute genius of a dumpling party is that you completely outsource the manual labor to your friends. It is an interactive, hands-on, communal experience that breaks the ice, gives people something to do with their hands, and completely removes the pressure from you as the host. If you want to master the art of effortless hosting, stop trying to do everything yourself in a vacuum.
Pre-Party Preparation
The secret to a successful interactive dinner is doing the messy, unglamorous prep work the day before.
- The Fillings: Make your fillings 24 hours in advance. Whether you are doing a classic ground pork and napa cabbage mix, a minced shrimp and ginger blend, or a crumbled tofu and shiitake mushroom vegetarian option, mix them early. Store them in airtight containers in the fridge. This allows the salt to penetrate the proteins and the flavors to meld and mature.
- The Dipping Sauces: Whisk together your dipping sauces ahead of time. A classic ratio is three parts black vinegar, one part light soy sauce, a heavy drizzle of toasted sesame oil, and a spoonful of crispy chili oil. Put these in cute little serving bowls, cover them with plastic wrap, and forget about them until the doorbell rings.
- The Wrappers: If you are making dough from scratch, knead it and let it rest before guests arrive. If you are using store-bought wrappers (which is highly recommended for your first time hosting), keep them in the fridge until the last possible second so they do not dry out and crack.
The Folding Station
When your guests arrive, direct them to the folding station. Clear off your dining table or kitchen island. Set out the bowls of chilled filling, stacks of wrappers covered by barely-damp kitchen towels to prevent dehydration, and several small ramekins of room-temperature water for sealing the edges.
Give a quick, 30-second demonstration on how to wet the edge of the wrapper, add a modest spoonful of filling (warn them against overfilling, which causes catastrophic blowouts), fold it in half, and pinch the pleats. Then, pour everyone a drink, step back, and let the chaos unfold. Some guests will create beautiful, symmetrical masterpieces. Others will create lopsided, hideous little blobs. It does not matter. The goal is communal joy, not a Michelin-starred presentation. Equipping a beautifully organized dream kitchen means having these prep stations ready and waiting before the first guest even takes off their coat.
Cooking for a Crowd: Eliminating the Bottleneck
Here is the logistical hurdle that ruins most dumpling parties: A standard 10-inch or 12-inch skillet can only hold about 12 to 15 potstickers at a time. If you have six hungry guests who each want a dozen dumplings, you are looking at five or six separate batches.
If you just pile the cooked batches onto a ceramic plate on the counter, the residual steam escaping from the hot wrappers will condense on the plate, turning those shatteringly crisp bottoms into a soggy, gummy nightmare within five minutes. You need a systemic approach to batch cooking and thermal holding.
The “Zone 2” Thermal Holding Strategy
Professional kitchens manage massive multi-course services by utilizing thermal zones. You need to set up what is known as a “Zone 2” passive heat area.
Before you start frying the first batch, turn your oven to its absolute lowest setting—usually around 200°F (90°C) or a dedicated “Warm” setting. Take a bare aluminum half-sheet pan and place a stainless steel wire cooling rack directly inside it.
As each batch of dumplings finishes in the skillet, immediately transfer them out of the pan and arrange them in a single layer on the wire rack in the oven. Do not stack them, and absolutely do not cover them with aluminum foil. Covering them traps the escaping moisture and destroys the crust. The wire rack allows the dry, warm air of the oven to circulate completely around the food, keeping the bottoms crispy and the internal filling safely hot while you process the next batch in the skillet. Implementing proper batch preservation techniques is the difference between a synchronized, elegant feast and a lukewarm, stressful disaster.
A Warning on Pan Maintenance During Batching
When you are cooking four or five batches back-to-back in the same carbon steel or stainless skillet, the pan will accumulate fond (browned bits of starch and protein). Between each batch, take a damp paper towel held by a pair of tongs and quickly wipe out the hot skillet to remove any burnt flour residue.
And whatever you do, never, ever use an aerosol cooking spray to grease the pan between batches. Aerosol sprays contain soy lecithin, an emulsifier that burns at relatively low temperatures. When subjected to the repeated high-heat cycles of batch frying, that lecithin will polymerize into a sticky, impossible-to-remove brown lacquer that ruins the slip of your pan. This is a surefire way of ruining your nonstick pans and destroying the hard-earned seasoning on your carbon steel. Stick to a squeeze bottle of high-quality liquid cooking oil.
The Final Bite
Cooking incredible food at home does not require magic, and it does not require a pretentious culinary degree. It simply requires you to respect the science of the kitchen. By understanding how starches gelatinize, how to utilize the Leidenfrost effect, and how to harness the thermodynamics of a properly seasoned carbon steel pan, you strip away the anxiety of cooking.
When you combine that technical knowledge with a smart, outsourced hosting strategy and a scientific approach to thermal holding, you transform a stressful dinner party into a joyful, effortless gathering. So ditch the toxic pans, mix up that snowflake slurry, and invite your friends over. Your kitchen is just as capable as a restaurant line—you just have to treat it like one. Now get out of here and go make some dough.






