
Listen, we need to have a serious talk about your weekend brunch habits. I know exactly how the story goes. You wake up on a Sunday morning, feeling ambitious. You decide you are going to treat yourself to a beautiful, café-quality plate of Eggs Benedict. You get your water boiling, you crack your egg, you gently slide it into the pot, and instantly—disaster strikes.
Instead of a perfectly tight, beautiful oval of silken egg white cradling a molten golden yolk, your pot looks like it has been invaded by a shredded jellyfish. Ghostly white tentacles of egg protein go flying in every direction, foaming up the water and leaving you with a messy, stringy, unappetizing blob that looks more like wet tissue paper than breakfast. You fish it out, sigh heavily, and serve it anyway, wondering why it is so impossibly difficult to recreate diner-quality food at home.
I am here to tell you that it is absolutely not your fault. You do not lack culinary talent, and you certainly do not need an expensive degree from a pretentious culinary institute to master this. You simply lack the right technique. As a home cook who has set off the smoke detector more times than I care to admit, I firmly believe that anyone can cook like an expert. You just need to understand the science of what you are working with.
If you are trying to host a meaningful dinner party or an impressive weekend brunch, you cannot leave your egg poaching to chance. The secret to flawless, perfectly round, tear-free poached eggs does not involve creating a massive whirlpool in your pot. It does not involve drowning your water in foul-tasting vinegar. And it absolutely does not involve buying a cheap, toxic, single-use egg poaching gadget.
The secret is a simple, inexpensive fine mesh strainer.
Today, we are going to dive deep into the anatomy of an egg, the physics of simmering water, and the foolproof, science-backed preparation technique that will permanently eliminate your poaching frustrations. Grab a cup of coffee, and let’s fix your breakfast.
The 2026 Egg Renaissance: Why We Need to Master This Now
Before we get into the kitchen, let’s look at why mastering the poached egg is more relevant today than ever before. We are currently living in the golden age of the egg. If you feel like you are seeing eggs on every single menu and social media feed, you aren’t imagining things.
According to the comprehensive “Breakfast Smarter” report released in April 2026 by the British Egg Industry Council, egg consumption has absolutely skyrocketed. By the end of 2025, annual consumption reached a staggering 209 eggs per person, representing a massive 27% increase over the past two decades. In the UK alone, nearly 40 million eggs are consumed every single day.
This surge is being heavily driven by Millennials and Gen Z, who are actively shifting away from ultra-processed breakfast cereals and embracing nutrient-dense, high-protein, natural foods. The retail sales for eggs grew by an estimated 10% in 2025, hitting £2.1 billion. We are moving away from the rushed, sad granola bar eaten in the car, and moving toward intentional, globally inspired dishes like shakshuka, savory Asian-style porridges, and elaborate weekend brunches.
Because eggs have transitioned from a basic staple to the star of the modern culinary show, expectations are higher. You can no longer get away with serving a sloppy, waterlogged egg. If you want to participate in the brunch renaissance, you need to elevate your technique.
The Anatomy of an Egg: Understanding the Enemy
To understand why your poached eggs fall apart, you have to understand what an egg actually is. Most people think an egg is just two things: the yellow yolk and the clear white. This is a massive oversimplification, and it is exactly why so many beginner cooks fail.
Just like when you are struggling with peeling hard-boiled eggs, understanding the structural anatomy of the ingredient is the key to conquering it.
According to culinary scientist Harold McGee in his definitive book On Food and Cooking, the egg white (albumen) is actually composed of about 40 different distinct proteins, with Ovalbumin making up the majority at 54%, and Ovotransferrin making up 12%. But more importantly for our purposes, the egg white is physically divided into two distinct layers:
- The Thick Albumen (The Inner White): This is the dense, viscous, gelatinous layer of egg white that tightly hugs the yolk. It is held together by strong protein bonds. When you fry a perfectly fresh egg, this is the part that stands up tall and proud in the pan.
- The Thin Albumen (The Outer White): This is the watery, loose, runny layer of egg white that surrounds the thick albumen. It has a much higher water content and very little structural integrity.
When you drop a raw egg into a pot of simmering water, these two layers react completely differently. The thick albumen holds its shape, wrapping around the yolk and gently coagulating into that beautiful, tender oval we all want.
The thin albumen, however, is a nightmare. Because it is essentially just protein-infused water, it immediately disperses the second it hits the hot liquid. It feathers out into those ugly, stringy white wisps that cloud your water and ruin the aesthetic of your dish. To make matters worse, the thin outer white actually requires a much higher temperature to set than the thick white does. So while it is floating around your pot making a mess, it isn’t even cooking properly.
The Inevitable Betrayal of Aging Eggs
“But wait,” you might say, “I’ve seen professional chefs drop an egg straight into a pot without a strainer, and it comes out perfectly!”
Yes, you have. And that is because professional kitchens have access to farm-fresh eggs that were likely laid just a few days ago.
When an egg is freshly laid, the thick albumen is incredibly robust, and there is very little thin albumen present. However, from the moment that egg leaves the chicken, a relentless biological clock starts ticking. As an egg ages, its internal pH changes, becoming more alkaline. This chemical shift causes the tight protein bonds in the thick albumen to gradually break down and degrade into—you guessed it—runny, watery thin albumen.
By the time a standard carton of supermarket eggs reaches your local grocery store, sits on the shelf, gets purchased, and sits in your refrigerator until Sunday morning, those eggs are likely several weeks old. The thick white has degraded significantly, and the volume of the watery thin white has multiplied.
This excess liquid is the exact same watery mess that leads to watery scrambled eggs if you aren’t careful with your cooking temperatures. If you try to poach a three-week-old supermarket egg using traditional methods, you are mathematically guaranteed to end up with a pot full of stringy tentacles. The structural integrity simply does not exist anymore.
The Mesh Strainer Miracle: How It Works
This brings us to the ultimate hack. Instead of fighting the thin albumen, we are simply going to evict it.
This brilliant technique was popularized in modern culinary circles by the legendary chef Heston Blumenthal, and later heavily advocated for by J. Kenji López-Alt in his encyclopedic book The Food Lab. It is the ultimate equalizer for the home cook.
Instead of wasting money on toxic kitchen gear that promises a quick fix, all you need to do is crack your raw egg into a fine mesh stainless steel strainer over a small bowl.
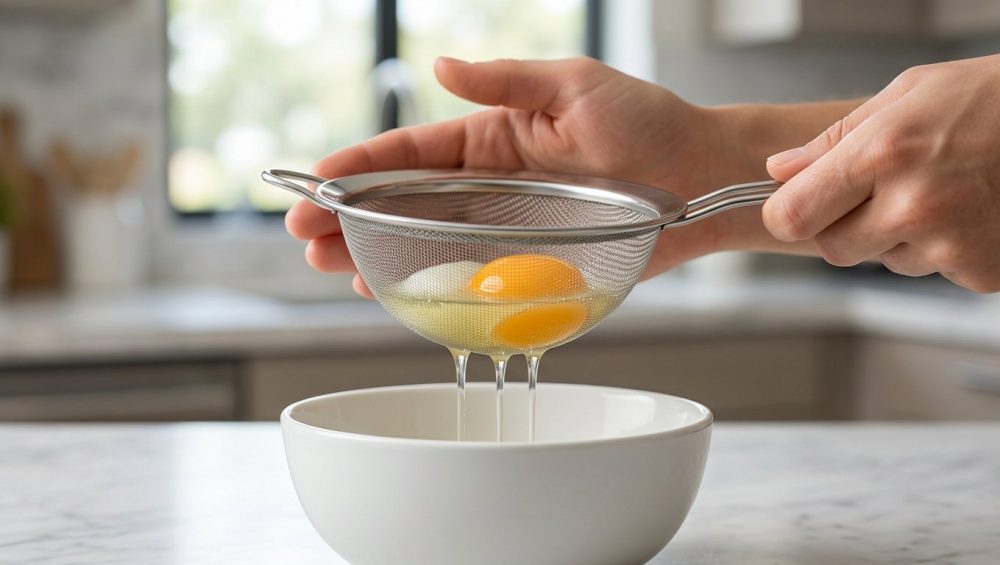
When you do this, gravity does the hard work for you. The tight, thick albumen is structurally sound enough to sit inside the mesh basket, cradling the yolk safely. Meanwhile, the watery, degraded thin albumen slips right through the tiny holes of the mesh and drips into the bowl below.
Within ten seconds, you have completely separated the good part of the egg white from the bad part. You are left with a pristine, tight, cohesive egg that is ready to be poached. When you gently lower this strained egg into simmering water, there is absolutely no loose water to feather out. The egg stays completely intact, forming a flawless, diner-perfect teardrop shape every single time. It feels like magic, but it is just basic physics.
The Physics of Perfect Poaching Water
Now that we have fixed the egg, we have to fix your water. The second biggest mistake home cooks make is wildly misunderstanding temperature control.
Most people crank their stove to high, bring the water to a violent, rolling boil (212°F / 100°C), and toss the egg in. This is a culinary crime. A rolling boil creates massive thermal convection currents and violent bubbles that physically agitate the egg, tearing the delicate proteins apart before they even have a chance to set. Furthermore, boiling an egg at 212°F pushes water out from between the protein molecules, resulting in a rubbery, squeaky texture.
Similar to mastering the water drop test for your skillets, mastering the visual cues of simmering water is crucial for your success.
You do not want a rolling boil. You want a gentle, lazy simmer. According to culinary science, egg whites begin to thicken and coagulate at around 145°F (63°C) and become a tender solid at 150°F (65°C). The yolk, which contains lipoproteins, sets higher, around 158°F (70°C).
Therefore, the absolute ideal temperature for your poaching water is between 180°F and 190°F (82°C to 88°C). At this temperature, the water will have tiny, champagne-like bubbles gently rising from the bottom of the pot, but the surface will remain relatively calm. This temperature is hot enough to quickly set the exterior of the thick albumen, locking the shape into place, but gentle enough that it won’t overcook the yolk. After all, nobody wants to bite into chalky yolks because the water was too hot and the timing was ignored.
Debunking the Vortex and Vinegar Myths
If you have ever Googled “how to poach an egg,” you have undoubtedly been told to do two things: add a splash of vinegar to the water, and stir the water vigorously to create a whirlpool vortex. Since I am your biggest cheerleader but also your harshest critic, I am giving you permission to permanently abandon both of these stressful, outdated methods.
The Vinegar Myth
The theory behind adding white vinegar to poaching water is rooted in real chemistry. Harold McGee explains that egg whites are naturally alkaline. When they hit acidic water, the drop in pH causes the proteins to coagulate and set much faster. Historically, cooks used vinegar to force the wispy thin albumen to set quickly before it could make a mess of the pot.
But here is the brilliant part: because we are using a mesh strainer to completely remove the thin albumen, we no longer have a mess to control! The thick albumen holds its own shape perfectly fine without chemical intervention. Adding vinegar is not only entirely unnecessary when using the strainer method, but it also actively ruins your food. Vinegar leaves a distinctly sour, astringent taste on the outside of the egg. You are making breakfast, not a salad vinaigrette. Skip the acid.
The Vortex Myth
The whirlpool method is another crutch designed to corral unruly thin egg whites. The idea is that the centripetal force of the spinning water wraps the wispy whites around the yolk.
Just like using aerosol sprays is ruining your nonstick pans, swirling boiling water is ruining your strained eggs. When you have already strained the egg, creating a violent vortex is actually counterproductive. The spinning water can catch the dense yolk and pull it right out of the center of the delicate white, leaving you with a lopsided egg where the yolk is exposed on one side and buried on the other. With a strained egg, you want calm, still, gently simmering water. Let the egg rest peacefully.
The Sassy Sous-Chef’s “No-Go” Rule on Toxic Gear
We need to take a brief intermission so I can yell about kitchen equipment, because my “No-Go” rule on toxic gear is absolute and unwavering.
There is an entire industry dedicated to selling you useless, single-task gadgets to solve the poached egg problem. I am begging you to ignore them. First on my hit list are those brightly colored silicone egg poaching pods. Silicone is notorious for absorbing and holding onto the volatile oils from your dish detergent. If you use those cheap silicone pods that end up making your food taste like soap, your luxurious Sunday brunch is going to taste like a mouthful of suds. They also steam the egg rather than poaching it, resulting in a weird, rubbery puck.
Even worse are the cheap, lightweight aluminum pans with “non-stick” poaching cup inserts. These are usually coated in mystery-metal Teflon that cannot handle the direct heat of boiling water over time. The coating inevitably bubbles, flakes, and peels directly into your breakfast. I have zero patience for ingesting toxic forever-chemicals just to save three minutes of cooking time.
You do not need a dedicated egg poaching pan. You do not need plastic wrap. You do not need microwave gadgets. You just need a high-quality, heavy-bottomed stainless steel pot or deep skillet, and a simple stainless steel fine mesh strainer. A good strainer will last you a lifetime, won’t peel toxic chemicals into your food, and won’t leave you with a cheap tool leaking dishwater all over your counter from a hollow handle. Invest in solid, safe, durable basics. Your health and your sanity are worth it.
The Step-by-Step Masterclass: Poaching with a Mesh Strainer
Alright, class is in session. We have covered the science, we have debunked the myths, and we have thrown away the toxic gear. Here is the exact, foolproof, step-by-step method for executing the perfect poached egg using a mesh strainer.
Step 1: The Setup
Fill a high-quality stainless steel saucepan or deep skillet with about 3 to 4 inches of water. You need enough depth that the egg won’t immediately flatten out on the bottom of the pan. Place it over medium heat and bring it to a gentle simmer (180°F to 190°F). Look for those tiny champagne bubbles. Add a generous pinch of kosher salt to the water.
Step 2: The Strain
Place a fine mesh stainless steel strainer over a small bowl. Crack your egg directly into the center of the strainer. Gently swirl the strainer in a circular motion for about 5 to 10 seconds. You will see the watery, loose thin albumen drip down into the bowl.
Crucial Tip: Do not let the egg sit in the strainer for five minutes while you go make toast. If the egg sits in the dry mesh for too long, the thick albumen will begin to sink into the wire grid and get stuck, tearing the egg when you try to release it. Crack, swirl, and move immediately to the stove.
Step 3: The Drop
Bring the strainer directly over your pot of gently simmering water. Lower the bottom of the strainer so it is just touching the surface of the water. Gently and decisively tip the strainer, allowing the egg to slide smoothly out and into the water. Do not drop it from a height of six inches, or the impact will break the yolk.
Step 4: The Wait
Do not touch the egg. Do not poke it. Do not swirl the water. Just let it be. Set a timer. For a perfectly runny yolk with fully set whites, you want exactly 3 minutes to 3.5 minutes. If you prefer a jammy, slightly firmer yolk, aim for 4 minutes.
Step 5: The Extraction
When the timer goes off, carefully approach the egg. Instead of using a standard spoon that will carry a puddle of hot water onto your toast, gently lift it out using a spider skimmer to let the water drain completely.
Step 6: The Blot
This is the final touch that separates the amateurs from the pros. Rest the bottom of your skimmer (with the egg still inside it) on a folded paper towel for three seconds. This blots away the residual surface water. Nobody wants soggy, wet English muffins. Slide the dry, perfect egg onto your dish.
Troubleshooting Common Disasters
Even with the best techniques, the kitchen can throw you a curveball. Here is how to handle the minor hiccups of the mesh strainer method.
“My egg stuck to the bottom of the pot!”
This happens if your water isn’t quite hot enough to set the exterior proteins upon contact, or if you dropped the egg too aggressively. To prevent this, you can give the water one very gentle stir before dropping the egg in, just to create a slight current (not a vortex) that keeps the egg moving for the first two seconds. Alternatively, use a slotted spoon to gently nudge the egg off the bottom of the pot after it has been cooking for 10 seconds.
“My egg stuck to the mesh strainer!”
As mentioned above, you let it sit too long. The proteins settled into the wire mesh. If you are prepping multiple eggs, crack them into small individual ramekins first. When you are ready to cook, pour the egg from the ramekin into the strainer, let it drain for five seconds, and immediately tip it into the water.
“My yolk broke when I tipped it in!”
You are either using a strainer with an incredibly sharp, cheap rim, or you are panicking and shaking the strainer. Lower the strainer all the way to the water’s surface, and confidently roll the egg out.
The Weekend Brunch Prep Hack: Time is Money
I am a massive advocate for efficiency. Weekday meals require speed, but weekend cooking projects allow for perfection. However, if you are hosting six people for brunch, you do not want to be standing at the stove individually poaching six eggs while your guests drink all the mimosas without you.
The mesh strainer method scales beautifully, and you can actually do it entirely in advance.
J. Kenji López-Alt famously demonstrated that you can crack multiple eggs into a large mesh strainer at once (he has done up to 30 at a time for restaurant prep!). The thin whites all drain away together. You can then gently lower the entire batch into a wide, simmering skillet.
But the real magic is the make-ahead hack. You can poach a dozen eggs on a Saturday afternoon, cooking them for just 3 minutes so they are slightly underdone. Remove them from the hot water and immediately plunge them into a bowl of ice water. This halts the cooking process instantly.
Once they are ice cold, you can store these perfectly shaped, strained poached eggs in a sealed container of cold water in your refrigerator for up to three days. On Sunday morning, when your guests arrive, simply drop the cold poached eggs into a pot of hot (not boiling) tap water for exactly 60 seconds to warm them through. They will taste as if you just poached them to order, and you get to actually enjoy your own party.
Bringing It All Together
Cooking should never be a source of stress. It should be a creative, empowering process that yields delicious results. The frustration of ruined poached eggs is a perfect example of how a lack of scientific understanding can make us feel like failures in our own kitchens.
But now you know the truth. You know about the treacherous thin albumen. You know about the pH degradation of aging supermarket eggs. You know that rolling boils and harsh vinegars are the enemies of tender proteins. And most importantly, you know that a simple, inexpensive fine mesh strainer is the only tool you need to bridge the gap between amateur frustration and professional perfection.
You don’t need a culinary degree. You don’t need toxic, peeling gadgets. You just need a little bit of science, a little bit of patience, and the confidence to execute. Go pull that mesh strainer out of your cabinet, grab a carton of eggs, and reclaim your weekend brunch. You’ve got this.






