
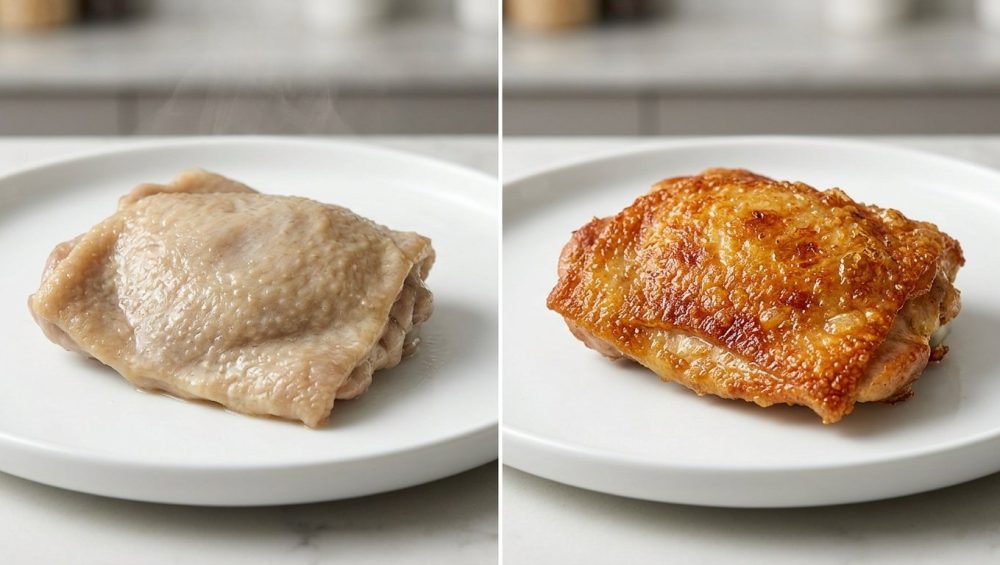
The Anatomy of a Culinary Tragedy
Let’s be brutally honest for a second: there are few things in the culinary world more profoundly disappointing than pulling a beautifully fragrant, perfectly seasoned chicken out of the oven, only to discover that the skin has the exact texture of a wet raincoat. You know the texture I’m talking about. It’s pale, it’s flabby, and when you try to take a bite, the entire sheet of rubbery skin slides off the meat and slaps you on the chin. It is a textural nightmare.
If this happens to you on a regular basis, pour yourself a glass of wine and take a deep breath. You are not a bad cook. You do not lack some magical culinary gene, and you certainly do not need a degree from Le Cordon Bleu to fix this. The reason your poultry skin is perpetually soggy is simply that most recipes written for the weekend hobbyist completely ignore the fundamental laws of thermodynamics and food chemistry. They tell you to take a bird out of a plastic bag, rub some oil and salt on it, and throw it into a 350°F oven. That is a recipe for steamed, sad poultry.
Crispy skin is not an accident; it is an engineered outcome. It is the result of ruthlessly controlling surface moisture, manipulating pH levels, and applying the correct type of heat to render subcutaneous fat. Today, we are going to tear down the bad habits you’ve learned, banish the myths you’ve seen on TikTok, and build a foolproof, science-backed foundation for achieving shatteringly crisp, golden-brown chicken skin every single time. No fluff, no pretentious chef-speak—just the hard culinary science of getting that perfect crunch.
The Science of the Sog: Why Your Skin is Failing
To defeat the enemy, you must first understand the enemy. Let’s look at the biological composition of chicken skin. It is essentially a thick layer of fat and water securely encased in a highly structured protein matrix made mostly of collagen. When you expose this structure to heat, several things need to happen in a very specific sequence for it to become crispy.
First, the water must evaporate. Moisture is the absolute, undisputed nemesis of crispiness. If there is water on the surface of the chicken, the heat of your pan or oven will spend all its energy boiling that water and converting it into steam. As long as water is evaporating, the surface temperature of the chicken cannot exceed 212°F (100°C), which is the boiling point of water.
Why does that matter? Because of the Maillard reaction. This is the complex chemical process where amino acids and reducing sugars react under heat to create hundreds of new flavor compounds and that gorgeous golden-brown color. The Maillard reaction does not occur in earnest until the surface temperature reaches approximately 285°F (140°C). If your chicken is wet, it is steaming. If it is steaming, it is not browning. It is physically impossible for wet skin to crisp.
Second, the fat must render. Directly beneath the outer layer of the skin is a thick deposit of adipose tissue (fat). For the skin to become thin and shatteringly crisp like a potato chip, that fat must melt away—a process known as rendering. If your heat is too high too fast, the outside of the skin will burn before the fat has a chance to melt. If the heat is too low, the skin acts like a sponge, soaking in the fat and remaining entirely flabby.
And before we move on, let’s address the viral internet “hack” of poking the chicken skin with a needle. You’ve probably seen influencers stabbing their poultry 50 times, claiming it “vents the steam” and renders the fat perfectly. It is mostly nonsense. Stabbing the skin haphazardly actually breaches the natural lipid barrier, allowing the moisture from the meat underneath to migrate upward, rehydrating the skin and ruining your crust. Unless you are executing a highly controlled, millimeter-precise micro-perforation technique used in commercial food labs, put the needle down. We are going to crisp your chicken the right way.
Culprit #1: The Packaging Swamp
The absolute worst thing you can do to a chicken is cook it straight out of the plastic packaging. Modern commercial poultry is often water-chilled during processing, meaning it has absorbed a massive amount of excess liquid. When you take it out of the bag, it is quite literally soaking in a swamp of its own juices.
If you take that wet bird, rub it with olive oil, and put it in a pan, you are not searing it; you are boiling it in oil.
The Non-Negotiable Pat Down
Your first line of defense is the humble paper towel. Before you even think about reaching for the salt or the spice rub, you must aggressively pat the chicken dry. I don’t mean a gentle dab. I mean you need to act like you are trying to erase a mistake on a math test. Get into the crevices of the wings, dry the underside of the thighs, and if you are roasting a whole bird, dry the inside of the cavity, too.
The Refrigerator Air-Dry
If you have the time—and if you are cooking a weekend dinner, you absolutely should make the time—the refrigerator is your best friend. A modern frost-free refrigerator is essentially a giant dehumidifier. By leaving your chicken uncovered in the fridge, the constantly circulating cold air will violently wick away surface moisture.
To do this properly, you cannot just leave the chicken sitting on a flat plate where the bottom will wallow in its own leaked juices. You need to elevate it. Utilizing the magic of a wire rack set inside a rimmed baking sheet ensures that cold air can circulate 360 degrees around the meat, drying the top, bottom, and sides evenly. Leave it in the fridge for at least four hours, but preferably overnight. When you take it out the next day, the skin will look tight, translucent, and leathery. That is exactly what you want. That leathery texture is the promise of future crunch.
Culprit #2: The Salt Situation (Mastering the Dry Brine)
If you are still submerging your poultry in buckets of saltwater (wet brining), we need to have an intervention. Wet brining had its moment in the early 2000s, but for the home cook chasing crispy skin, it is a logistical nightmare and a culinary mistake.
Wet brining forces the muscle fibers to absorb heavily diluted, flavorless water. Sure, it makes the meat “juicy,” but it also waterlogs the skin, guaranteeing that you will be fighting an uphill battle against steam in the oven. Furthermore, wet brined meat tends to leak that excess water into the pan while cooking, turning your pan-sear into a sad, sputtering boil.
The Superiority of the Dry Brine
Enter the dry brine. This technique is brilliantly simple: you aggressively salt the raw meat and let it rest in the fridge. That’s it. No buckets of water, no boiling aromatics, no sloshing raw chicken juice all over your kitchen counters.
When you apply kosher salt to the dry skin of a chicken, a fascinating process of osmosis begins. Initially, the salt draws moisture out of the skin and the superficial layers of the meat. For the first thirty minutes, the chicken will actually look wetter as the salt dissolves into this extracted liquid, forming a highly concentrated, natural brine.
But if you are patient, the magic happens. Over the next few hours, the meat reabsorbs this concentrated salty liquid deep into the muscle fibers. This does two things. First, it seasons the chicken all the way to the bone, rather than just leaving a salty crust on the outside. Second, the salt actually denatures (unwinds) the tightly coiled protein strands in the meat, allowing them to trap and hold onto their own natural juices during the cooking process.
Simultaneously, because you are doing this uncovered in the fridge, the surface of the skin is drying out completely. Experiencing the magic of dry brining will fundamentally change how you cook poultry. It is the ultimate two-for-one technique: deeply seasoned, incredibly juicy meat underneath, and bone-dry, tightly drawn skin on top.
For a weeknight meal where time is money, even a 45-minute dry brine at room temperature will vastly improve your dinner. But for a weekend project, a 24-hour uncovered dry brine in the fridge is the gold standard for restaurant-quality results.
Culprit #3: The pH Problem (The Alkaline Secret)
Now we are going to dive into a trick that feels like literal witchcraft, but is actually just brilliant chemistry. If you want skin that shatters like a kettle-cooked potato chip, you need to manipulate the pH level of the poultry.
Chicken skin is naturally slightly acidic. But the Maillard reaction—that beautiful browning process we talked about earlier—happens much faster and much more efficiently in an alkaline (basic) environment. By raising the pH of the skin, you weaken the peptide bonds in the proteins, causing them to break down rapidly when they hit the heat.
The Pantry Staple Miracle
How do we raise the pH? We use something you probably only use for baking cookies: aluminum-free baking powder.
By mixing a small amount of baking powder into your kosher salt before you dry brine the chicken, you completely alter the chemical trajectory of the skin. The baking powder does three critical things:
- It raises the alkalinity of the skin, accelerating the browning process so the skin crisps before the meat underneath overcooks.
- It acts as a desiccant, aggressively pulling moisture out of the epidermis.
- When it reacts with the chicken’s natural juices and the heat of the oven, it creates tiny bubbles of carbon dioxide gas. These micro-bubbles expand the surface area of the skin, creating a blistered, crackling texture similar to the batter on a piece of deep-fried chicken.
Embracing the magic of baking powder is the single most impactful adjustment you can make to roasted wings, thighs, or whole birds.
A Critical Warning: Powder vs. Soda
Do not, under any circumstances, confuse baking powder with baking soda. Baking soda is pure sodium bicarbonate. It is far too alkaline. If you rub your chicken with baking soda, it will taste like you marinated it in a mouthful of pennies and dish soap. Baking powder, on the other hand, contains an acid (like cream of tartar) that buffers the alkalinity, giving you all the structural benefits without the horrifying metallic aftertaste.
Always check your label and ensure your baking powder is aluminum-free. Use a ratio of about one part baking powder to three parts kosher salt, dust it lightly over the skin, and let the fridge do the rest.
Culprit #4: Toxic Kitchenware and the Searing Delusion
Listen to me very carefully. You can buy the most expensive, organic, air-chilled, pasture-raised chicken on the planet, dry brine it for two days, and dust it with the finest baking powder known to man. But if you throw it into a cheap, warped, scratched-up non-stick pan, you are going to ruin it.
I have zero patience for toxic kitchen gear, and neither should you. If you are serious about banishing toxic kitchen gear from your home, the very first thing you need to throw in the trash is that fifteen-dollar mystery-metal skillet with the peeling Teflon coating.
The Heat Limit of Non-Stick
Traditional non-stick coatings (PTFE) are fundamentally incapable of achieving the aggressive, sustained heat required for a proper, restaurant-quality sear. If you heat a cheap non-stick pan past 500°F (which happens incredibly fast on a gas burner), the coating begins to break down and off-gas toxic fumes. Because you are terrified of ruining the pan, you subconsciously cook at lower temperatures, which means your chicken skin gently stews in its own rendered fat instead of frying in it.
Furthermore, if you are using aerosol cooking sprays to grease the pan, you are actively ruining your nonstick pans anyway. The propellants and emulsifiers in those sprays polymerize under heat, leaving a sticky, impossible-to-remove residue that permanently destroys whatever non-stick properties the pan originally had.
The Heavy Metal Upgrade
If you want skin that crunches, you need cookware that holds thermal mass and isn’t afraid of high heat. You need heavy-clad stainless steel, carbon steel, or cast iron.
People are terrified of stainless steel because they think everything will stick to it. Protein only sticks to stainless steel when the pan is either too cold, or the meat is too wet. If you have properly dried your chicken, all you need to do is preheat your stainless pan correctly. Take two seconds to perform the water drop test—flick a drop of water into the heated pan. If it instantly vaporizes, it’s too cold. If it beads up into a perfect little sphere of mercury and glides effortlessly around the pan (the Leidenfrost effect), your pan is perfectly preheated and ready to sear without sticking.
If you prefer cast iron, excellent. It holds heat like a bank vault and renders chicken fat beautifully. And please, stop babying it. When you are done cooking, use a little hot water and a chainmail scrubber to effortlessly knock off any burnt bits. It won’t strip your seasoning, and it will keep your pan perfectly smooth for your next sear.
Culprit #5: The Thermodynamics of Fat Rendering
Let’s talk about the actual application of heat, because rendering fat is a delicate thermodynamic dance. You need to melt the subcutaneous fat layer slowly enough that it turns into liquid oil, but you need the heat high enough to crisp the remaining protein matrix.
The Stovetop Cold-Pan Method
If you are pan-searing skin-on chicken thighs, the absolute best technique is completely counter-intuitive: start with a cold pan.
If you drop a chicken thigh skin-side down into a ripping hot skillet, the protein fibers in the skin instantly seize, contract, and curl up. The outside of the skin will burn to a crisp in three minutes, while the thick layer of fat underneath remains completely raw and unrendered.
Instead, place your dry-brined chicken thighs skin-side down in a cold cast iron or carbon steel skillet. Turn the heat to medium-low. As the pan slowly heats up, the fat beneath the skin gently begins to melt and render out into the pan. By the time the pan is hot, the chicken is essentially shallow-frying in its own glorious, rendered fat. The skin stays perfectly flat, the fat melts away, and you are left with a golden, shatteringly crisp crust. Once the skin is perfect, flip it over for a few minutes just to finish cooking the meat.
The Oven Roasting Conundrum
If you are roasting a whole bird or baking wings, the oven dynamics are different. When you roast, you are relying on ambient hot air. If your oven is set to 350°F, it is simply not hot enough to rapidly evaporate the moisture and crisp the skin before the breast meat dries out.
You need high heat—typically 425°F to 450°F. This aggressive thermal blast forces the Maillard reaction into overdrive. Just be warned: when you start cooking at these temperatures with cheap, thin aluminum gear, you will immediately notice that your baking sheets keep warping with a terrifying BANG in the middle of the cooking process. Invest in heavy-gauge, aluminized steel half-sheet pans with rolled rims. They will stay dead-flat, ensuring your chicken cooks evenly and the rendered fat doesn’t pool in one warped corner, causing soggy bottoms.
The Masterclass Protocols: Execution in the Home Kitchen
We’ve covered the science, the chemistry, and the gear. Now it’s time to put it all together. Here are your two operational protocols, depending on how much time you have.
Protocol A: The Weeknight Rush (Time is Money)
It’s 6:00 PM on a Tuesday. You are exhausted, you want dinner in 40 minutes, and you refuse to eat soggy chicken. Efficiency is the name of the game here.
- The Aggressive Dry: Take your skin-on, bone-in chicken thighs out of the package. Obliterate every drop of moisture on them with paper towels. Press hard.
- The Quick Season: Generously season the meat side with salt and pepper. Season the skin side with kosher salt only (pepper can burn in the pan).
- The Cold Start: Place the thighs skin-side down in a cold carbon steel or cast-iron skillet. Do not add oil; the chicken has enough fat.
- The Slow Render: Turn the burner to medium-low. Walk away and prep your side dish. Let the chicken slowly heat up for about 12 to 15 minutes. You will hear it go from a gentle sizzle to an aggressive fry as the fat renders.
- The Flip: Check the skin. When it is a deep mahogany brown and sounds like sandpaper when you scrape a spatula across it, flip the thighs.
- The Finish: Cook on the meat side for another 5 to 8 minutes until done. Remove from the pan and let them rest skin-side up on a cutting board. (Never rest crispy chicken on a plate where it will sit in its own steam).
Protocol B: The Weekend Perfectionist (The 24-Hour Shatter)
It’s Saturday. You have time, you have wine, and you want to roast a whole chicken that will make your dinner guests weep with joy.
- The Prep: Remove the whole bird from its packaging. Remove the giblets. Pat the entire bird aggressively dry, inside and out.
- The Alkaline Brine: Mix 1 tablespoon of kosher salt, 1 teaspoon of aluminum-free baking powder, and 1/2 teaspoon of freshly cracked black pepper.
- The Application: Dust this mixture evenly over every inch of the chicken. Use your fingers to gently separate the skin from the breast meat, and get some salt under there, too.
- The Fridge Rest: Place the chicken on a wire rack set inside a heavy-duty baking sheet. Put it in the refrigerator, completely uncovered, for 18 to 24 hours.
- The Roast: The next day, preheat your oven to 425°F (or 400°F if using convection). Do not rub the bird with oil or butter—it contains enough water to ruin the crispness.
- The Temperature Check: Roast the bird until the thickest part of the thigh registers 165°F. Do not guess the temperature. If your meat thermometer is lying to you because it is a cheap, uncalibrated dial thermometer from 1998, throw it away and buy a high-quality digital instant-read probe.
- The Rest: Pull the bird from the oven. If your chicken always turns out dry, it is almost certainly because you didn’t let the meat rest, causing all the internal juices to violently bleed out onto the cutting board the second you sliced into it. Let the bird rest, uncovered, for 15 minutes before carving.
The Final Bite
You don’t need a Michelin star to achieve perfection in your own kitchen; you just need to respect the basic laws of food science. Control your moisture, leverage the power of alkalinity, respect the rendering process, and stop cooking on toxic, warped pans that fight against you.
Crispy chicken skin is a right, not a privilege. By following these protocols, you will never have to suffer the indignity of a flabby, rubbery roast chicken ever again. Now get into the kitchen, dry off that poultry, and start cooking. You’ve got this.






