
The Tragedy of the Soggy Crostini
Picture this: You have spent the entire Saturday afternoon meticulously preparing for a casual weekend get-together. You’ve swept the floors, curated the perfect playlist, and dropped half your paycheck on imported cheeses and heirloom tomatoes. You assemble a stunning platter of bruschetta, carefully spooning your perfectly seasoned tomato-basil mixture over beautifully toasted slices of baguette. You set the platter on the dining table, feeling like an absolute culinary deity.
Then, your guests arrive twenty minutes late.
By the time everyone finally gathers around the appetizer spread, your once-glorious crostini have undergone a horrifying metamorphosis. The crisp, golden crusts have collapsed. The structural integrity of the bread has vanished, replaced by a sad, limp, disintegrating sponge that bends under its own weight. As your best friend picks one up, the damp bread tears in half, sending a cascade of oily tomatoes plummeting onto your pristine rug.
Welcome to the tragedy of the soggy crostini. It is a culinary heartbreak that has claimed the sanity of countless home cooks, and frankly, it is completely avoidable.
According to recent data from the American Time Use Survey, the amount of time Americans spend hosting or attending social events has plummeted by a staggering fifty percent over the last two decades. We are dealing with a generation of weekend culinary hobbyists who are paralyzed by hosting anxiety. We are terrified of serving ruined food, terrified of the chaotic prep work, and terrified of the cleanup. But here is the unvarnished truth from your favorite sassy sous-chef: you do not need a degree from Le Cordon Bleu to host a flawless evening, nor do you need to spend your entire party sweating over a hot stove. You just need to understand a little bit of basic kitchen science.
Today, we are going to completely deconstruct the bruschetta appetizer. We are going to dive deep into the thermodynamics of toasting, the cellular biology of tomatoes, and the absolute magic of the interactive DIY bruschetta bar. By the time we are finished, you will possess the structural secrets of the perfect, indestructible crostini, allowing you to reclaim your weekend and actually enjoy your own party.
The Culinary Science of Moisture Migration
To defeat our enemy—the soggy appetizer—we must first understand how bad things happen to good bread. The degradation of a crostini is not magic; it is a rapid, merciless demonstration of physics and chemistry known as moisture migration.
The Anatomy of a Baguette
A standard French baguette is a marvel of simple engineering, consisting of only four ingredients: flour, water, yeast, and salt. When baked, it develops two distinct distinct zones. The exterior is the crust, which has been dehydrated by the intense heat of the oven and browned through complex chemical reactions. The interior is the crumb, a delicate, airy matrix of gelatinized starches and gluten proteins.
When bread exits the oven and begins to cool, a process called starch retrogradation immediately kicks in. The gelatinized starch molecules begin to realign and crystallize, forcing moisture out of the crumb. In a whole loaf of bread, this moisture naturally migrates outward toward the dry crust, which is why day-old bread gets tough and chewy.
However, when we slice that baguette into thin rounds for crostini, we are exposing the highly porous, sponge-like interior crumb to the open air. We have essentially created dozens of tiny, highly absorbent discs that are desperately waiting to soak up any liquid they come into contact with.
Tomato Syneresis: The Enemy Within
Now, let us look at the traditional bruschetta topping: the tomato. From a botanical and culinary perspective, a raw tomato is essentially a fragile water balloon. Fresh tomatoes possess a staggering moisture content of roughly ninety-three percent.
When you take a sharp serrated utility knife and dice a tomato, you are rupturing thousands of plant cells, instantly releasing that trapped water. But the real disaster happens when you season your tomatoes. The moment you sprinkle salt over your diced tomatoes, you trigger a process called osmosis. The salt draws the moisture out of the cellular walls at an alarming rate, a phenomenon scientifically referred to as syneresis. Within minutes of salting, your bowl of diced tomatoes is swimming in a shallow pool of acidic, flavorful, but structurally devastating tomato water.
The Physics of the Mush
The soggy crostini is the result of a catastrophic collision between these two elements. When you spoon salted, diced tomatoes onto a piece of toasted bread, capillary action takes over. The porous starch matrix of the bread’s crumb acts like a vacuum, aggressively sucking up the free-flowing tomato water.
Because water is a universal solvent, it immediately begins to dissolve the toasted starches. The crispy exterior turns flaccid, the airy interior turns to mush, and the entire appetizer structurally fails. If you assemble your bruschetta in the kitchen and let it sit on a platter for thirty minutes before your guests eat it, you are not serving an appetizer. You are serving a science experiment in structural degradation.
The Masterclass: Crafting the Indestructible Crostini Base
If we want to build a bruschetta that can withstand the test of time, we have to engineer a better base. We have to create a crostini that is crispy enough to shatter delightfully when bitten, yet structurally sound enough to hold a mountain of toppings without collapsing.
Selecting the Right Bread
The foundation of a great crostini starts at the bakery. I cannot stress this enough: put down the squishy, plastic-wrapped “French bread” from the supermarket aisle. Those loaves are packed with dough conditioners and sugars designed to keep them unnaturally soft for weeks. They possess zero structural integrity and will instantly turn to paste the moment they encounter a damp tomato.
You need a traditional, artisan-style baguette. You want a loaf that feels heavy for its size, with a thick, deeply browned crust that crackles when you squeeze it. The interior crumb should feature a mix of large and small holes (a sign of proper fermentation). If you are feeling adventurous, a rustic sourdough or ciabatta can also work beautifully, provided the bread has a sturdy crust and a chewy crumb. Day-old bread is actually preferable here, as it has already begun the process of retrogradation, making it slightly drier and easier to slice cleanly.
The Slicing Strategy
How you slice your bread dictates the entire eating experience. If you slice it straight across (a 90-degree angle), you end up with tiny, bite-sized rounds that cannot hold more than a single piece of tomato without spilling.
Instead, you must utilize the bias cut. Hold your knife at a sharp 45-degree angle to the loaf and slice downward. This elongated, oval shape dramatically increases the surface area of the crostini, providing a much larger canvas for your toppings while remaining narrow enough to comfortably fit into your mouth.
Thickness is equally critical. If you slice the bread too thin (under a quarter of an inch), it will burn in the oven and shatter into dust when you bite it. If you slice it too thick (over an inch), the exterior will toast but the interior will remain dense and doughy, requiring your guests to unhinge their jaws like a python just to take a bite. The sweet spot is exactly half an inch thick. This allows the heat to penetrate the bread perfectly, creating a crispy exterior with just a hint of chewy give in the very center.
The Lipid Shield: Oiling for Structural Integrity
This is the most crucial step in preventing a soggy crostini, and it is the step that most rushed home cooks skip. We must waterproof the bread.
Water and oil do not mix; lipids are inherently hydrophobic. By applying a layer of fat to the surface of the bread before we toast it, we are creating a microscopic moisture barrier. When the wet tomatoes eventually hit the bread, the oil will physically block the tomato water from penetrating the starch matrix.
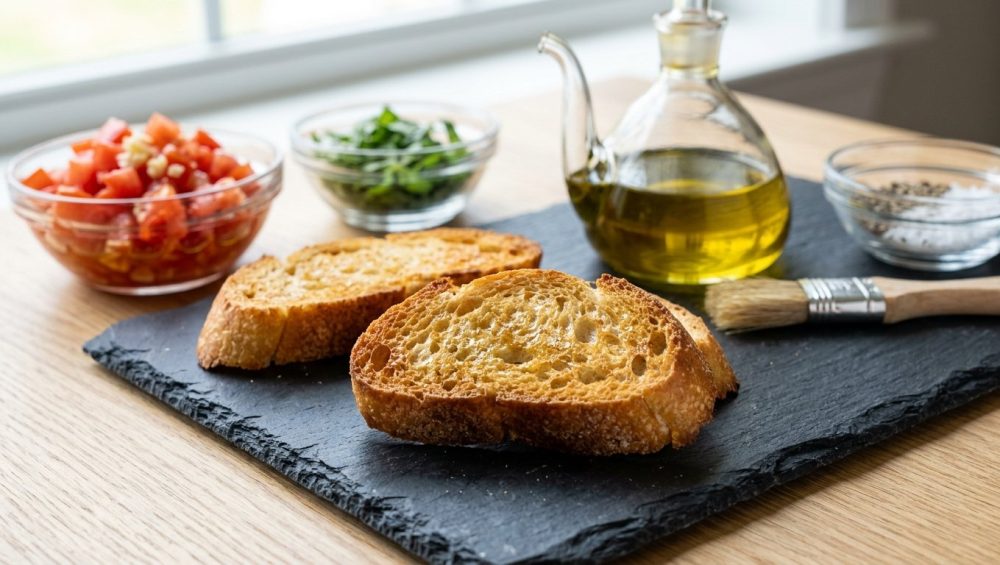
Place your bias-cut bread slices on a work surface. Pour a generous amount of good extra-virgin olive oil into a small bowl. Do not pour directly from the bottle, and definitely do not use a cheap aerosol cooking spray. Grab a silicone pastry brush and lightly, but thoroughly, paint the top surface of every single slice of bread. You want an even, glistening coat that reaches all the way to the crust.
If you are using a high-quality opaque oil dispenser, you are already ahead of the game, as keeping your olive oil protected from light and heat preserves the delicate, grassy flavor compounds that will infuse into the bread during toasting.
The Toasting Protocol: Maillard Reaction Magic
Now we must apply heat. We are not just drying the bread out; we are fundamentally altering its chemical structure through the Maillard reaction. This is the complex cascade of non-enzymatic browning that occurs when amino acids and reducing sugars are exposed to high heat, producing hundreds of new flavor compounds and that signature golden-brown color.
The Maillard reaction requires a very specific temperature window to thrive, generally occurring rapidly between 140°C and 165°C (284°F to 330°F). If the temperature is too low, the bread will simply dehydrate and turn into a rock-hard crouton. If the temperature is too high, the reaction tips over into pyrolysis—otherwise known as burning—leaving you with a bitter, charred mess.
Preheat your oven to 375°F (190°C). This ambient temperature is perfect because by the time the heat transfers to the surface of the oil-coated bread, it hits that optimal Maillard sweet spot. Arrange your oiled bread slices in a single layer on a baking sheet. Bake for 8 to 12 minutes, rotating the pan halfway through. You are looking for the edges to turn a deep, toasted gold, while the center remains slightly lighter.
When you pull them from the oven, immediately transfer the crostini to a wire cooling rack. If you leave them on the hot baking sheet, the residual steam escaping from the bottom of the bread will condense against the metal pan, rendering the undersides soggy before you even add the toppings.
A Quick Rant on Toxic Baking Sheets
Since we are talking about baking sheets, I need to pause for a moment to address a massive pet peeve of mine. I have zero patience for cheap, toxic kitchenware. If you are toasting your beautiful, artisanal bread on a flimsy, dark-coated non-stick baking pan you bought at a discount store ten years ago, you are actively ruining your food.
Those cheap pans are notorious for hot spots, which means half your crostini will burn while the other half stays pale. Worse, when exposed to high heat, cheap non-stick coatings begin to degrade, blister, and flake off. I refuse to let anyone serve appetizers garnished with mystery chemical flakes. Furthermore, thin aluminum pans warp violently in the oven—sounding like a gunshot—which launches your carefully arranged bread slices into the air.
Do yourself a massive favor and invest in heavy-duty, uncoated, commercial-grade aluminum or stainless steel half-sheet pans. They conduct heat evenly, they will never warp, and they will never poison your food. If you are tired of dealing with warped and peeling baking sheets, throw them in the recycling bin immediately. Your health, and your crostini, deserve better.
The Bruschetta Topping Science: Managing Moisture at the Source
We have engineered an indestructible, oil-shielded, Maillard-enhanced crostini base. Now, we must address the topping. The secret to a perfect bruschetta is not just playing defense with the bread; it is playing offense with the tomatoes. We have to manage the moisture before it ever leaves the bowl.
The Salt-and-Drain Tomato Hack
As we established earlier, salting tomatoes draws out their water. Most recipes tell you to dice the tomatoes, toss them with salt, oil, and basil, and serve immediately. This is a recipe for a puddle.
Instead, we are going to force the syneresis to happen on our terms. Dice your fresh tomatoes (Roma or cherry tomatoes work best, as they have a higher ratio of flesh to watery seed pulp). Place the diced tomatoes into a fine-mesh strainer or colander, and set that strainer over a mixing bowl.
Now, generously salt the tomatoes and gently toss them. Walk away for fifteen to twenty minutes.
During this resting period, the salt will aggressively pull the excess water out of the tomatoes. That water will drip through the strainer and collect in the bowl below. By the time you are ready to mix your topping, the tomatoes will have shed up to twenty percent of their water weight. What remains is deeply concentrated tomato flavor with a firm, meaty texture that will not turn your bread into a swamp.
Just make sure you are using a non-reactive bowl—like glass or stainless steel—to catch the juices. Acidic ingredients reacting with cheap aluminum or cast iron is exactly what leads to metallic tasting tomato mixtures, which will completely ruin the fresh vibe of your appetizer.
Flavor Amplification Without the Puddle
Once your tomatoes are drained, transfer them to a dry bowl. Now you can add your extra-virgin olive oil, torn fresh basil, a splash of balsamic vinegar, and your garlic.
Let’s talk about the garlic. Do not, under any circumstances, use a garlic press. A press crushes the cell walls of the garlic so violently that it releases an overwhelming amount of allicin, creating a harsh, bitter, burning flavor that will overpower the delicate tomatoes. Please, throw away your garlic press. Instead, finely mince your garlic with a sharp knife, or grate it on a ceramic ginger grater for a smooth puree.
If raw garlic is too pungent for your guests, you can mellow it out by blooming it in a tiny bit of warm olive oil for sixty seconds before adding it to the tomatoes. This gentle heat deactivates the harsh enzymes and sweetens the garlic. Just be careful not to let it brown, as burnt garlic is irreparably bitter. Mastering temperature control is the only way to prevent garlic from burning and ruining the dish.
And what about that bowl of salty, highly acidic tomato water you collected during the draining phase? Do not throw it down the sink! That liquid is liquid gold. It is packed with umami and natural pectin. Whisk a little olive oil and Dijon mustard into that tomato water, and you have an incredible base for emulsifying your vinaigrette dressings to serve over a side salad. Resourcefulness is the hallmark of a great home cook.
The Mindful Bruschetta Bar: A Stress-Free Hosting Blueprint
We have solved the science of the bread and the science of the tomatoes. But if you assemble all the crostini in the kitchen and carry them out on a tray, you are still racing against the clock. Even the most perfectly oiled and toasted bread will eventually succumb to moisture if it sits under a pile of wet ingredients for an hour.
This brings us to the ultimate secret weapon for the weekend culinary hobbyist: The DIY Bruschetta Bar.
Why DIY is the Ultimate Host Hack
The concept is brilliantly simple: you provide the toasted crostini bases, you provide an array of toppings in beautiful bowls, and you force your guests to assemble their own appetizers.
Why is this so effective?
- Zero Moisture Migration: Because the tomatoes do not touch the bread until the exact second before consumption, the crostini remains shatteringly crisp. There is zero time for the bread to get soggy.
- Interactive Entertainment: People love playing with their food. A DIY bar acts as a natural icebreaker, giving guests something to do with their hands and something to talk about while they mingle.
- Allergen and Diet Friendly: If you have a guest who is gluten-free, they can eat the toppings with a fork or over cucumber slices. If someone hates tomatoes, they can skip them. You do not have to become a short-order cook accommodating a dozen different dietary restrictions.
- Your Sanity: You do not have to spend the first thirty minutes of your own party frantically assembling delicate appetizers in the kitchen while everyone else is laughing in the living room. You are effectively outsourcing the labor to your guests, which is the ultimate trick for hosting a stress-free gathering.
Staging the Station
Setting up a mindful bruschetta bar requires a little bit of aesthetic staging, but it is incredibly easy. You want to create a flow that guides your guests through the assembly process.
Start with the foundation. Place your perfectly toasted, room-temperature crostini in a wide, shallow basket lined with a linen napkin. Do not pile them too high, or the ones on the bottom might get crushed.
Next, lay out your toppings. You want a variety of textures and flavor profiles. While the classic tomato-basil is mandatory, you should offer at least two other options to make it a true “bar.”
- The Sweet & Salty: A bowl of fresh ricotta cheese drizzled with honey, alongside a platter of thinly sliced prosciutto and fresh figs.
- The Earthy: A puree of cannellini beans blended with rosemary, lemon juice, and roasted garlic.
- The Funky: A bowl of olive tapenade or caramelized onions with crumbled gorgonzola.
Arrange these toppings in small, matching ceramic bowls. Provide a dedicated spoon or spreader for each bowl to prevent cross-contamination.
Place all of these bowls on a large, beautiful wooden serving board to contain any spills and drips. Just make sure your board is in good condition. If you are serving food on a warped, deeply cracked wooden cutting board, you are harboring bacteria in those crevices. Oil your wooden boards regularly, and replace them if they split.
Finally, provide garnishes. A small dish of flaky sea salt, a pepper grinder, and a bottle of high-quality balsamic glaze for guests to drizzle over their creations.
When the party is over, breaking down the station is a breeze. Put lids on the bowls of leftover toppings and stick them in the fridge. To clean up the crumbs left behind on the counter, simply grab your trusty stainless steel bench scraper, sweep the debris right into the trash can, and wipe down the surface. Minimal dishes, minimal stress.
Temperature and Time Management
The true beauty of the bruschetta bar is that every single component can be prepared well before your doorbell rings.
The crostini can be sliced, oiled, and toasted up to six hours in advance. Once they are completely cool, store them in an airtight container or a large zip-top bag at room temperature. Do not put them in the refrigerator; the cold, humid environment of the fridge will accelerate starch retrogradation and make them stale and chewy.
The toppings can also be prepped ahead. The tomato mixture can be drained and mixed an hour before guests arrive. (Do not mix it too early, or the fresh basil will oxidize and turn black). The ricotta can be whipped, and the bean puree can be blended the day before and stored in the fridge. Just remember to pull the chilled toppings out of the refrigerator about thirty minutes before serving, as the flavors of tomatoes and cheeses are severely muted when they are ice cold.
Troubleshooting Your Bruschetta Station
Even with the best preparation, questions arise. Here are a few quick fixes for common bruschetta bar hiccups:
“My crostini are too hard, they are hurting people’s gums.”
You sliced the bread too thin, or you baked it too long at too low of a temperature, completely dehydrating the crumb. Next time, slice thicker (half an inch) and ensure your oven is at 375°F to quickly toast the exterior while leaving the center slightly chewy. If you already made them and they are too hard, you can lightly mist them with water and flash-warm them in the oven for two minutes to soften the starches, but you must serve them immediately.
“My tomatoes taste bland, even after salting and draining.”
You probably bought out-of-season, hothouse tomatoes that were refrigerated at the supermarket. Refrigeration destroys the volatile flavor compounds in tomatoes. If you are stuck with sub-par winter tomatoes, you can cheat by adding a tiny pinch of sugar and a splash of high-quality red wine vinegar to the mixture. The acid and sweetness will mimic the profile of a ripe summer tomato. Also, make sure you are using enough salt. Fat and acid need salt to amplify their flavors on the palate.
“My guests are making a mess trying to eat them.”
This is the nature of bruschetta. It is a rustic, tactile food. However, you can mitigate the disaster by providing plenty of cocktail napkins and ensuring your crostini are sliced on that 45-degree bias. A longer, narrower piece of bread is much easier to bite into than a wide, round disc.
Final Thoughts: Reclaiming Your Dinner Party
Cooking for other people should not be an exercise in masochism. You do not have to suffer in a hot kitchen, frantically trying to assemble fifty delicate appetizers while your friends are in the next room opening the wine without you.
The soggy crostini is a symptom of a larger problem in home entertaining: the belief that we have to do everything perfectly, simultaneously, and by ourselves. By understanding the science of moisture migration, utilizing the lipid shield technique, and embracing the interactive nature of a DIY bruschetta bar, you are working smarter, not harder. You are preventing the bread from turning to mush, but more importantly, you are freeing yourself from the tyranny of last-minute plating.
You are a home cook, not a Michelin-starred line cook working a Saturday night service. Give yourself permission to set up the station, pour yourself a large glass of wine, and actually enjoy the mindful gathering you worked so hard to create. The bread will stay crispy, the tomatoes will stay bright, and your sanity will remain entirely intact. Now go forth, conquer the kitchen, and stop apologizing for your food. You’ve got this.






