The Starchy Elephant in the Room
Listen, we need to have a serious talk about the starchy, gummy, elastic elephant in the room. You have spent all day meticulously roasting a gorgeous turkey, tending to a perfectly seared prime rib, or reducing a complex pan sauce. You are feeling like an absolute culinary rockstar. And then, you proudly serve your masterpiece alongside a steaming mound of… wallpaper paste. You smile tightly as your dinner guests try to politely pry the gluey, cohesive mass off the roofs of their mouths, desperately reaching for their water glasses to wash down the spackle you just served them.
We have all been there. I have been there. In my early days of cooking, I served mashed potatoes that possessed the tensile strength of industrial sealant. But here is the brutal truth: ruining your side dish has nothing to do with a lack of culinary school training, and everything to do with a fundamental misunderstanding of basic kitchen physics.
As a busy home cook, I am all about cutting corners on a chaotic Tuesday night. Time is money, and if there is a weeknight shortcut to get dinner on the table before I completely collapse, I will take it without a second thought. But when the weekend rolls around, or when a holiday dinner puts your reputation on the line, there are absolutely zero shortcuts allowed with mashed potatoes. Mastering the art of the home kitchen requires you to respect your ingredients. The difference between ethereal, cloud-like potato perfection and an inedible, sticky disaster comes down to a microscopic war happening inside your pot. It is time to put down the electric mixer, step away from the food processor, and learn the actual science of the spud.
The Microscopic War: Starch Gelatinization Explained
To understand why your potatoes are turning into glue, we have to dive deep into the cellular chemistry of the potato itself. Do not panic; I am not going to bore you with pretentious recipe jargon. We are going to look at the cold, hard facts of what happens when heat meets a carbohydrate.
Potatoes are essentially giant, subterranean storage units for water and carbohydrates. Those carbohydrates are stored in microscopic, balloon-like cellular sacks called amyloplasts. Inside these fragile amyloplasts, you have two distinct types of starch molecules that dictate the entire texture of your final dish:
- Amylose: This is a long, straight-chain molecule. When dissolved in water, these straight chains love to tangle up with each other, forming a rigid, sticky, highly viscous gel. Amylose is the enemy of fluffy potatoes when it is allowed to run rampant.
- Amylopectin: This is a highly branched, bushy molecule. Because of its tree-like structure, it does not tangle as easily as amylose. It provides a more stable, creamy viscosity without the aggressive stickiness.
When you drop a raw potato into water and apply heat, you are initiating a chemical process known as starch gelatinization. As the internal temperature of the potato reaches approximately 140°F to 150°F (60°C to 66°C), those tiny amyloplasts begin to absorb the surrounding water and swell up to several times their original size. The heat actively breaks down the intermolecular bonds of the starch molecules in the presence of water, causing the granules to become tender and swollen.
If you treat these swollen, delicate, water-logged balloons with the utmost respect, they will separate cleanly from one another when mashed, giving you a phenomenally light, fluffy texture. But if you violently rupture them through aggressive mechanical force, they will burst open like overfilled water balloons. When an amyloplast bursts, it violently spills its sticky payload of amylose directly into your mash. Once that straight-chain amylose is freed from its cellular prison, it immediately cross-links with the water and other starch molecules, creating an incredibly tight, elastic polymer network.
Congratulations. You have just manufactured edible glue.
The Varietal Breakdown: Stop Buying the Wrong Spuds
Before you even turn on your stove, you are likely setting yourself up for failure in the produce aisle. One of the most common beginner cooking mistakes is assuming that a potato is just a potato, and grabbing whatever generic bag happens to be on sale. All potatoes are not created equal, and their internal chemistry dictates how they will behave in the pot.
The Holy Grail: Russet Potatoes
Also known as Idaho potatoes or baking potatoes, Russets are classified as high-starch, low-moisture potatoes. They have a remarkably high dry matter content—hovering around 22%—which means there is significantly less internal water to bog down your final dish. While they do contain a high amount of amylose, their cellular structure is so large, dry, and mealy that the cells swell and separate incredibly easily when cooked. They practically fall apart on their own. If your goal is the absolute lightest, fluffiest, cloud-like mash possible, the Russet is your undisputed champion.
The Flavor Compromise: Yukon Gold Potatoes
Yukon Golds are medium-starch, medium-moisture potatoes. Their dry matter content sits lower than a Russet, typically around 16% to 18%. What they lack in sheer fluffiness, they make up for in flavor. They possess a naturally buttery, rich taste and a beautiful, appetizing golden hue. They will not give you the ultra-airy texture of a Russet, but they yield a creamier, denser, and highly flavorful mash. For the ultimate weekend side dish, many professional chefs swear by a 50/50 split: half Russets for the airy structure, and half Yukon Golds for the buttery flavor profile.
The Enemy of the Mash: Waxy Potatoes
Red potatoes, new potatoes, and fingerlings are low-starch, high-moisture potatoes. Their cellular structure is incredibly tight, and their cells do not separate easily when cooked; instead, they fiercely cling together. If you attempt to mash waxy potatoes, you will inevitably end up with a chunky, watery, and hopelessly gluey mess. They require immense mechanical force to break apart, which guarantees ruptured amyloplasts. Save your waxy potatoes for roasting or for potato salads where you actually want the chunks to hold their shape. Keep them far away from your masher.
The Thermodynamics of Boiling: Where the Ruin Begins
Let us talk about the actual cooking process, because this is where the thermodynamics of the kitchen either work for you or against you.
First, you must peel your potatoes completely. I know that “rustic,” skin-on mashed potatoes are a popular trend for weeknight dinners, but if we are aiming for definitive, masterclass-level perfection, the skins have to go. They introduce an unpleasant, chewy texture that interrupts the smooth creaminess we are working so hard to achieve. Once peeled, cut your potatoes into uniform chunks—about one to one-and-a-half inches thick. If your knife work is sloppy and your chunks are wildly different sizes, the smaller pieces will overcook and disintegrate into a watery mush while the larger pieces remain hard and raw in the center.
Now, pay close attention, because this rule is written in stone: why starting in cold water is absolutely non-negotiable for boiling potatoes.
Do not, under any circumstances, drop raw potato chunks into a pot of rapidly boiling water. If you drop a dense, starchy potato into 212°F (100°C) water, the extreme heat instantly cooks the exterior of the potato, gelatinizing the starches on the outside and turning them into mush. Meanwhile, the dense interior remains a hard, raw rock. By the time the heat finally penetrates to the center of the potato, the outside has completely dissolved into the water. By starting your potatoes in cold water and bringing the temperature up gradually, the heat penetrates the potato evenly from edge to center, ensuring that the entire chunk cooks at the exact same rate.
Furthermore, you must salt your water aggressively. The water should taste like the ocean. Potatoes are incredibly dense, starchy sponges, and the boiling phase is your one and only opportunity to season them from the inside out via osmosis. If you boil them in plain water and wait until they are fully mashed to add all your salt, the salt will only sit on the surface of the starch molecules. You will end up with a fundamentally bland base that tastes vaguely of surface-level sodium, rather than a deeply, inherently well-seasoned dish.
Bring the pot to a boil, and then immediately drop the heat to maintain a gentle, steady simmer. A violent, rolling boil will physically bash the potato chunks against each other and against the walls of the pot, breaking off the fragile exteriors and leaving you with a cloudy pot of potato soup. You want a gentle simmer until a paring knife or a cake tester slides into the center of the largest chunk with absolutely zero resistance.
The Drying Phase: Evaporating the Enemy
Once your potatoes are perfectly tender, you will drain them thoroughly in a colander. But do not you dare start mashing them yet. This next step is the crucial secret that separates the weekend culinary warriors from the true masters.
Return the drained, hot potatoes to the empty, dry pot and set it back on the stove over low heat for about two to three minutes. Gently shake the pot back and forth. You will see plumes of steam rising from the potatoes, and the edges of the chunks will begin to look chalky and dry. You are actively evaporating the residual surface moisture.
Why does this matter so much? Because excess water is the mortal enemy of flavor and texture. If your potatoes are waterlogged from the boiling pot, they will be physically incapable of absorbing the rich butter and heavy cream you are about to add. Drying them out ensures that the starch matrix is thirsty, empty, and ready to soak up all that luxurious dairy fat, giving you a rich, velvety texture instead of a watery, sad puddle.
The Mechanical Nightmare: Why Your Food Processor is a Weapon of Mass Destruction
Here is where the most tragic, heart-breaking kitchen disasters occur. You have chosen the right potato. You have boiled them perfectly from a cold start. You have meticulously dried them out. And then, in a highly misguided attempt to save your arms some manual labor, you dump them into a food processor. Or perhaps you grab an immersion blender, or a high-speed electric hand mixer.
Stop. Do not do this. You must immediately ditch the hand mixer and step away from any appliance that plugs into a wall.
Let us return to our cellular science lesson. Remember those swollen, delicate, water-logged amyloplasts? They are incredibly fragile right now. To achieve fluffy mashed potatoes, our mechanical goal is to gently separate these intact cells from one another without breaking their outer walls.
When you use a food processor, a blender, or an electric mixer, you are introducing extreme mechanical shear force. A food processor blade spins at thousands of revolutions per minute, exerting upwards of 45 psi of localized pressure onto the delicate food. Instead of gently coaxing the cells apart, the high-speed metal blades violently slice right through the cellular walls.
Within mere seconds of turning on that machine, millions of amyloplasts are brutally torn open. The straight-chain amylose molecules flood out into the surrounding liquid environment. Because amylose is highly reactive, it immediately begins bonding with the water and with other free amylose chains, forming a thick, elastic, gummy gel. The longer you run the processor, the more cells you rupture, and the tighter the polymer network becomes.
This is not just culinary folklore; it is documented food science. In rigorous laboratory testing, food-processed mashed potatoes have been shown to develop a polymer entanglement density nearly 6.8 times higher than that of gently hand-mashed potatoes. You have literally, chemically created a non-Newtonian fluid. It will stretch like mozzarella cheese, it will stick to your serving spoon like cement, and it will absolutely ruin your dinner party. If you want to achieve greatness in your kitchen, you have to treat your ingredients with the mechanical respect they demand.
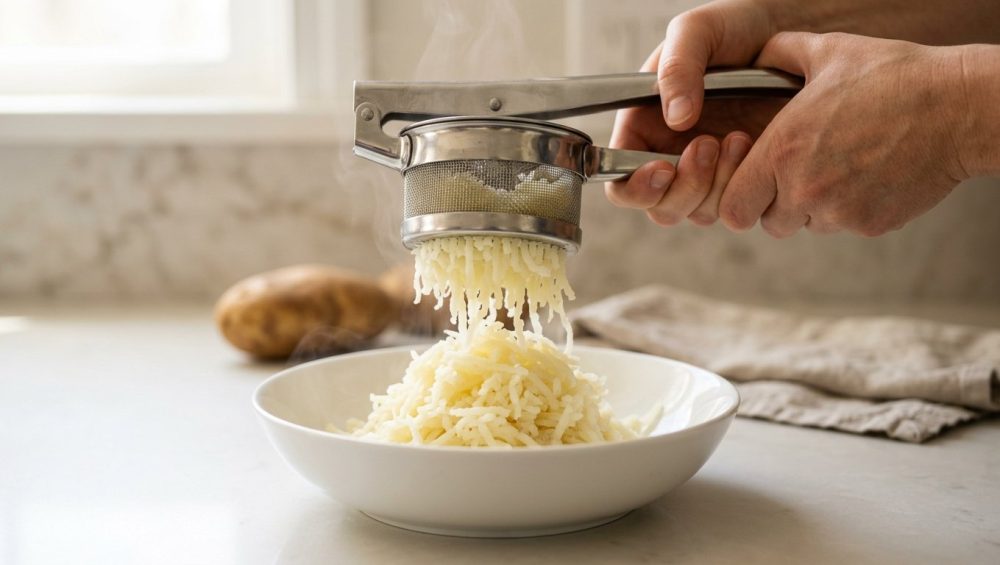
The Holy Grail of Fluff: The Stainless Steel Potato Ricer
If we cannot use a food processor, and if a standard wire potato masher requires too much elbow grease and leaves behind unwanted rustic lumps, what is the professional solution?
This is exactly why you need a potato ricer in your culinary arsenal. Experiencing the sheer efficiency of this tool will change your holiday cooking routine forever.
A potato ricer looks and operates like a giant, oversized garlic press. It consists of a large hopper where you place the hot, cooked potato chunks, and a heavy plunger mechanism (usually operated by two long handles) that forces the potato downward through a flat plate perforated with dozens of small holes, known as a die plate.
Why is this the ultimate, unrivaled tool for mashed potatoes? Because it relies entirely on a single, unidirectional extrusion force. It presses the potato through the holes exactly one time. There is no repetitive shearing, no high-speed spinning blades, and no violent, continuous agitation. As the potato is forced through the die plate, the cells are gently and cleanly separated from one another, falling into your mixing bowl in light, airy, delicate strands that resemble grains of rice (hence the name). The amyloplasts remain entirely intact, the sticky amylose stays safely trapped inside the cell walls, and your potatoes remain impossibly fluffy.
However, a massive word of warning regarding your equipment: do not buy a cheap, flimsy plastic ricer. I have absolutely zero tolerance for low-grade, toxic kitchenware that bends under pressure, snaps in half mid-squeeze, or leaches microplastics and mystery chemicals into your hot food. On this blog, we are strictly banishing toxic kitchen gear from our homes. You must invest in a heavy-duty, commercial-grade, 100% 304 or 316 stainless steel potato ricer. Look for a model that features a 2.3 mm die plate, which food scientists have determined is the absolute optimal extrusion size for producing perfectly smooth, lump-free potatoes without creating enough friction to overwork the starch.
Once you experience the magic of a potato ricer, you will never look at a wire hand masher or an electric mixer the same way again. (As a bonus, a high-quality stainless steel food mill will achieve very similar, excellent results, though it does require a bit more manual cranking).
The Dairy Dilemma: Lipid Barriers and Thermal Shock
So, you now have a mountain of beautifully riced, steaming, fluffy potatoes sitting in a warm mixing bowl. The next critical phase is incorporating your fats and liquids.
If you take a jug of ice-cold milk straight from the refrigerator and pour it directly into your steaming hot potatoes, you are committing a severe culinary crime. Adding cold dairy instantly plummets the temperature of the potatoes. This rapid temperature drop causes the starches to experience thermal shock; they seize up, contract, and turn your beautiful, airy mash into a dense, heavy, unappetizing brick. Furthermore, cold liquids simply do not emulsify or absorb easily into a hot starch matrix.
You must heat your dairy. In a small saucepan on the stove, gently warm your heavy cream, whole milk, or half-and-half until it is steaming (but not boiling).
Now, let us talk about the butter, because the specific order in which you add your ingredients matters immensely for the final texture. You should always, always fold in your melted (or very soft, room temperature) butter before you add a single drop of your liquid dairy.
Why? Because of the lipid barrier. The pure fat from the butter coats the exterior of the individual, separated starch granules. This lipid layer acts as a lubricating, protective barrier around the cells. It prevents them from swelling any further and bursting when the water-based milk or cream is eventually added. The fat literally waterproofs the starch.
Once the butter is gently folded in and the starch is coated, you can gradually pour in your warm cream or milk. And I do mean gently fold. Do not vigorously stir or whip the mixture. Use a flexible silicone spatula and employ a gentle folding motion—scraping the bottom of the bowl and lifting the potatoes over themselves—just until the liquid is incorporated. The very second the mixture looks cohesive and creamy, stop touching it.
Step-by-Step Masterclass: The Foolproof Weekend Recipe
Let us put all of this intense food science and thermodynamic theory into a highly practical, foolproof workflow. Follow these exact steps, and you will achieve legendary, restaurant-quality results every single time.
- The Prep: Select 3 pounds of high-starch Russet potatoes (or, for the ultimate flavor/texture balance, use 1.5 lbs of Russets and 1.5 lbs of Yukon Golds). Peel them completely, removing all eyes and green spots. Cut them into uniform 1.5-inch chunks.
- The Cold Start: Place the uniform potato chunks into a large, heavy-bottomed pot or Dutch oven. Cover them with cold tap water by at least one full inch. Add a very generous handful of kosher salt. Stir to dissolve.
- The Simmer: Place the pot over medium-high heat and bring it to a gentle boil. The moment it reaches a boil, immediately reduce the heat to maintain a steady, gentle simmer. Cook for 15 to 20 minutes. Test the largest chunk with a paring knife—it should slide all the way to the center and pull out with absolutely zero resistance.
- The Drain and Dry: Drain the potatoes completely in a colander. Immediately return the hot potatoes to the hot, empty pot. Place the pot back on the stove over low heat for 2 to 3 minutes. Gently shake the pot back and forth until the surface moisture has completely steamed off and the edges of the potatoes look chalky, dry, and slightly crumbly.
- The Ricer: Working quickly in batches, press the hot potatoes through your heavy-duty stainless steel potato ricer directly into a large, warm mixing bowl. Do not let the potatoes cool down before ricing; if they drop in temperature, starch retrogradation will set in, making them incredibly difficult to press.
- The Fat Coating: Cut 1 stick (8 tablespoons) of high-quality, high-butterfat, unsalted butter into small cubes. The butter must be at room temperature, or completely melted. Gently fold the butter into the riced potatoes using a silicone spatula until the fat is fully absorbed and the potatoes are glistening.
- The Warm Liquid: In a small saucepan, heat 1 cup of whole milk, heavy cream, or a mixture of both until it is steaming hot. Gradually fold the warm liquid into the butter-coated potatoes, adding a few tablespoons at a time until you reach your desired level of creaminess. You may not need the entire cup.
- The Final Seasoning: Taste the potatoes. Add more kosher salt if necessary. Add a crack of fresh white pepper (to avoid black specks in your pristine mash) and, if you like, a microscopic pinch of freshly grated nutmeg to elevate the dairy flavors. Serve immediately.
Troubleshooting and Salvaging: Can You Resurrect a Gluey Disaster?
Let us assume you are reading this masterclass a little too late. You already boiled waxy potatoes. You already dumped them into the food processor. You are currently staring into a mixing bowl filled with a shiny, elastic, gluey paste, and your dinner guests are arriving in exactly twenty minutes.
If you are wondering how to fix gluey mashed potatoes and magically turn them back into fluffy, airy clouds, I have some brutally honest, terrible news for you: You cannot.
You cannot un-rupture a microscopic starch cell. You cannot un-tangle a complex polymer network of cross-linked amylose molecules. Once the mechanical damage is done to the amyloplasts, the chemical transformation is permanent.
However, you absolutely do not have to throw the entire batch in the trash. You can pivot, and you can pivot hard.
The absolute best way to save a gluey mash is to lean heavily into the elasticity and transform the mistake into Pommes Aligot. This is a decadent, highly revered French dish from the Aubrac region where mashed potatoes are deliberately, aggressively overworked with massive amounts of melted cheese and minced garlic. Traditionally, it uses Tomme de Laguiole or Tomme de l’Aubrac, but if you are in a pinch, a heavy mixture of Gruyère and low-moisture mozzarella works brilliantly. Place your gluey potatoes in a pot over low heat, add a splash of cream, a clove of minced garlic, and fold in handfuls of grated cheese while stirring vigorously. The result is a stretchy, fondue-like, impossibly rich potato dish that is meant to be eaten with crusty bread or roasted meats. Your guests will think you are a culinary genius, and they will never know it started as a mistake.
Alternatively, you can spread the gluey potatoes into a buttered baking dish, top them generously with toasted panko breadcrumbs, melted butter, and parmesan cheese, and bake them at 400°F until the top is deeply golden and crispy. The textural contrast of the crunchy top hides the gummy interior. Or, if you have time, chill the gluey mash completely in the fridge, form them into small patties, coat them in flour, egg wash, and breadcrumbs, and deep-fry them into crispy potato croquettes. The sticky, cohesive texture actually works in your favor here, helping the croquettes hold their shape perfectly in the hot frying oil.
Whatever you do, do not panic, and please, do not let these rookie kitchen mistakes ruin your holiday gathering. A good home cook knows how to execute a recipe; a great home cook knows how to salvage a disaster.
Conclusion
Cooking is not an innate magical talent bestowed upon a lucky few; it is simply applied physics, chemistry, and thermodynamics. When you take the time to understand how your ingredients actually behave on a molecular level, you completely strip away the anxiety of the kitchen. You no longer need to cross your fingers and rely on blind luck.
Mashed potatoes are the ultimate litmus test of a home cook’s understanding of starch mechanics. By choosing the correct high-starch potato variety, controlling your boiling temperatures, meticulously drying out the residual moisture, and utilizing the gentle, unidirectional extrusion of a stainless steel ricer, you mathematically guarantee perfection every single time.
Put away the electric mixers. Banish the food processor to the deepest, darkest corner of your pantry. Respect the amyloplast. Your weekend dinners and holiday feasts deserve nothing less than absolute perfection, and your guests will be begging you for your secret. Now go pour yourself a large glass of wine, get back into the kitchen, and show those spuds exactly who is boss.


