You are standing in your kitchen on a Sunday afternoon, staring down into a heavy-bottomed pot. You have done everything right. You bought the expensive European butter. You warmed the heavy cream. You boiled the potatoes to the exact right tenderness. You grabbed your trusty hand masher and went to work. But as you stir in the dairy, a creeping sense of dread washes over you. The mixture isn’t fluffy. It isn’t light. It is dense, sticky, and stretching like melted mozzarella cheese. You have accidentally manufactured a pot of culinary spackle.
If this sounds familiar, take a deep breath. It is not your fault. You are not a bad cook, and your ingredients were not defective. You are simply the victim of the wrong kitchen tool.
According to recent U.S. agricultural reports, Americans consume roughly 117 pounds of potatoes per person every single year. Of that massive volume, mashed potatoes account for roughly 30% of all consumption. That means the average person is putting away about 35 pounds of mashed potatoes annually. Yet, despite this staggering volume of side-dish consumption, millions of home cooks are unknowingly serving up bowls of gummy, heavy, wallpaper paste.
As a home cook who learned by trial, error, and setting off the smoke detector more times than I care to admit, I am here to tell you that professional-level results do not require a culinary degree. They require a basic understanding of food science and the willingness to upgrade your gear. Today, we are taking an exhaustive, definitive dive into the science of starch, the catastrophic failure of traditional mashing, and why the humble potato ricer is the ultimate magic bullet for fluffy, cloud-like perfection.
The Anatomy of a Spud: A Scientific Breakdown
To understand why your side dish turned into adhesive, we need to get a little nerdy. It’s time to finally decode pretentious culinary jargon and understand what is actually happening inside that humble tuber on a microscopic level.
Potatoes are essentially giant, underground storage lockers for water and carbohydrates. These carbohydrates are stored in the form of raw starch granules, which are safely locked away inside tiny, rigid plant cells called amyloplasts. The starch itself is made up of two distinct types of molecules: amylose and amylopectin. In their raw, cold state, these granules are hard, semi-crystalline, and completely unappetizing.
When you drop your chopped potatoes into a pot of boiling water, a magical transformation occurs. The heat and the surrounding moisture cause those hard starch granules to absorb water and swell up like microscopic water balloons. This process is known in the culinary science world as gelatinization. The rigid cell walls soften, the starch inside expands, and the potato becomes tender and edible.
Here is the crucial catch: as long as those swollen, water-filled cells remain intact, your potatoes will be light, fluffy, and dry. They act like millions of tiny, separate sponges, eagerly waiting to absorb the rich, delicious butter and cream you are going to add later.
But those gelatinized cells are incredibly fragile. If you apply too much mechanical force, those delicate cell walls rupture. When an amyloplast bursts, it violently spills its sticky amylose and amylopectin guts all over your pot. When these free-floating starches mix with the residual water in the potato, they bind together to form a literal adhesive paste. The more cells you break, the gluey-er your potatoes become. There is absolutely no way to salvage a ruined dinner once the potatoes have turned to glue; you cannot un-burst a starch cell. You can only mask the texture, poorly.
The Crime Scene: How You Are Murdering Your Mash
Now that we understand the fragility of the potato cell, let’s talk about the weapons of mass destruction sitting in your kitchen drawers. The reason your potatoes are gummy is directly related to the mechanical violence you are inflicting upon them.
The Food Processor and Blender
If you want to fix common beginner mistakes, you must immediately stop using motorized blades on your potatoes. It is tempting to throw your boiled spuds into a food processor to save time, but a blender spins at thousands of revolutions per minute. It does not gently mash the potato; it violently shears millions of cell walls in a matter of seconds. The sheer force of the blades guarantees total cellular destruction. You will end up with a sticky, gummy paste that mimics the texture of hot chewing gum and tastes like sadness.
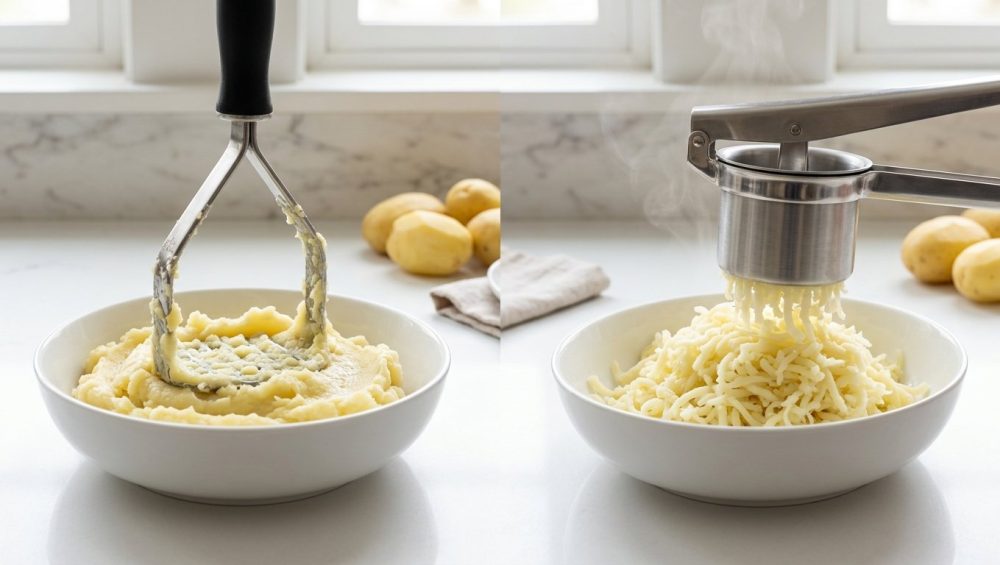
The Traditional Hand Masher
Ah, the classic squiggly wire masher. It seems innocent enough, and it is a staple in almost every beginner kitchen. But here is the fundamental flaw: a hand masher is incredibly inefficient. To get rid of all the lumps, you have to smash, pound, twist, and grind the potatoes over and over again. Every single time you press down and grind that wire grid against the bottom of the pot, you are crushing and bursting more cells. By the time you finally eliminate the stubborn lumps, you have brutally overworked the starch. You have sacrificed texture for smoothness, and the result is a heavy, dense mound of spackle.
The Fork
Using a fork is fine if you are living in a college dorm and making a single baked potato, but it is a disaster for a family-sized pot of mash. The tines of a fork compress and drag the flesh, tearing the tubers and releasing excess starch. It is slow, it causes severe forearm fatigue, and it yields a stringy, pasty, lumpy mess.
The Magic of the Potato Ricer: The Ultimate Extruder
Enter the hero of our story: the potato ricer. Patented way back in 1909, this brilliant, low-tech device looks like an oversized garlic press. It features a large hopper (a basket) where you place your cooked potato chunks, and a heavy plunger attached to a long lever handle. The bottom of the hopper is a perforated die—a metal plate covered in dozens of tiny, uniform holes.
Here is the beautiful physics of why it works: When you squeeze the handles together, the plunger applies even, downward pressure. The potato is forced through the tiny holes in one single, smooth pass.
This single-pass extrusion is the magic bullet. The ricer gently separates the softened potato flesh into tiny, uniform strands (which look like grains of rice, hence the name) without grinding, tearing, or shearing the cell walls. Because the mechanical shear force is kept to an absolute minimum, the vast majority of the delicate amyloplasts remain perfectly intact.
Because the cells aren’t ruptured, no excess amylose is released into the wild. The result? A towering, airy, cloud-like mountain of perfectly smooth, lump-free potatoes. It gives you the silky smoothness of a puree without the dense, gummy consequences of over-mashing.
Furthermore, I firmly believe that time is money. When you are focused on mastering simple weeknight dinners, efficiency is your best friend. A high-quality ricer can process two pounds of potatoes in under 90 seconds. It is significantly faster than battling lumps with a hand masher, requires no electricity, and cleans up in under a minute with a quick rinse under the tap. It pays for itself in time saved and culinary heartache avoided.
The “No-Go” Rule: Banishing Toxic and Flimsy Ricers
If you have spent any time reading my reviews, you know my absolute biggest rule is that you must ditch toxic kitchen equipment that leaches chemicals or degrades into your food. I have zero patience for cheap, dangerous garbage manufactured by corner-cutting brands. A tool is only as good as the materials it is made from.
When shopping for a potato ricer, you will inevitably encounter a sea of cheap plastic models marketed as “lightweight” or “budget-friendly.” Do not buy them. Boiled potatoes can easily exceed 200°F (93°C) right out of the pot. Squeezing boiling hot, dense food through a cheap plastic hopper is a recipe for disaster. The plastic flexes under pressure, the hinges warp, and over time, the intense heat degrades the material, potentially leaching microplastics and chemical plasticizers directly into your beautiful side dish. Furthermore, plastic ricers simply do not have the structural integrity to handle the force required for extrusion; they will eventually snap in your hands.
You will also see cheap, thin metal ricers. These are often made of low-grade tin, coated aluminum, or mystery metal alloys. The sheer physical force required to rice a hopper full of potatoes will bend thin metal out of shape. Worse, the cheap protective coatings will eventually flake off into your food, and the exposed, low-grade metal will rapidly rust. Rusted metal leaves ugly gray streaks and a foul, metallic taste in your potatoes.
What you need is heavy-gauge, 18/10 stainless steel. A commercial-grade stainless steel ricer is one of those essential beginner kitchen tools that you will buy once and use for decades. Look for models with a large hopper capacity (so you don’t have to chop your potatoes into tiny, tedious bits), double-welded handles that won’t snap under pressure, and ergonomic, non-slip silicone grips to protect your hands and wrists. A premium stainless steel ricer is chemically inert, rust-proof, food-safe, and will not buckle when you squeeze it with all your might.
The Definitive Masterclass: Flawless Mashed Potatoes Step-by-Step
Having the right equipment will instantly cure your cooking anxiety when preparing intimidating holiday meals, but a great tool still requires proper technique. Here is my foolproof, step-by-step masterclass for achieving ultimate weekend potato perfection. Leave no stone unturned.
Step 1: The Potato Selection
Not all potatoes are created equal, and choosing the wrong variety will sabotage you before you even turn on the stove. You need high-starch or medium-starch potatoes.
- Russet Potatoes: The undisputed king of the mash. They have a very high starch content (around 20-22%) and low moisture. When cooked, their cells swell and separate effortlessly, resulting in an incredibly fluffy, light, and dry texture. Because they are dry, they act like sponges, absorbing massive amounts of butter and cream.
- Yukon Golds: The medium-starch alternative. They have slightly less starch than Russets but make up for it with a naturally rich, buttery flavor and a gorgeous, appetizing golden hue. A 50/50 blend of Russets and Yukon Golds is the ultimate chef secret for balancing fluffy texture with deep flavor.
- The Trap (Waxy Potatoes): Avoid waxy potatoes like Red Bliss, Fingerlings, or New Potatoes at all costs. They have low starch and high moisture. Because their cells are tightly packed and resistant to breaking down, they require significantly more mechanical force to mash, which practically guarantees a gummy, sticky texture. Save them for roasting or potato salad.
Step 2: The Prep and The Boil
Peel your potatoes. Yes, some heavy-duty ricers claim you can leave the skins on because the perforated die will catch them, but peeling ensures that absolutely zero bitter skin oils or earthy grit make it into your pristine puree.
Cut the peeled potatoes into uniform chunks—about 1.5 to 2 inches thick. Do not eyeball this. If they are drastically different sizes, the small chunks will overcook, disintegrate, and waterlog before the large chunks are even tender in the middle.
Place the uniform potato chunks in a large, heavy-bottomed pot and cover them with cold water. Never drop raw potatoes into boiling water. If you start with boiling water, the outside of the potato will rapidly overcook and turn to mush while the center remains hard and raw. Starting with cold water ensures even, gentle cooking. Add a generous handful of kosher salt to the water. The water should taste like the sea. Boiling is your one and only chance to season the actual interior flesh of the potato cell.
Step 3: The Crucial Drying Phase
Boil the potatoes gently until they are perfectly fork-tender (usually 15 to 20 minutes, depending on the size of your chunks). Drain them thoroughly in a colander. But do not reach for your ricer just yet!
Return the drained potatoes to the empty, hot pot and place it back on the stove over low heat for about 1 to 2 minutes. Gently shake the pot. You want to steam off all the residual surface moisture. Water is the absolute enemy of great mashed potatoes. If the potatoes are waterlogged, they will be physically unable to absorb the butter and cream later. Just as you use heat to prevent food from sticking in a stainless steel skillet, you must use ambient pot heat to manipulate the potato starch and dry it out. When the potatoes look chalky and dry on the edges, pull them off the heat.
Step 4: The Extrusion
Once you organize your kitchen zones properly, grabbing your ricer and setting up a smooth workflow becomes second nature. Set your stainless steel ricer over a large, warm mixing bowl. (Pro tip: Rinse your mixing bowl with hot water and dry it first so it doesn’t immediately sap the heat from your potatoes).
Working quickly while the potatoes are still piping hot, load the hopper about three-quarters full. Squeeze the handles firmly and evenly. Watch in awe as perfect, uniform strands of potato rain down into the bowl. Repeat until all the potatoes are riced. If a sticky film of starch builds up on the bottom of the perforated die, leave it there. Do not scrape that concentrated starch into your bowl.
Step 5: The Dairy Integration (The Fat Matrix)
Here is where well-meaning home cooks ruin their perfectly riced potatoes: they open the fridge, grab a carton of cold milk, and pour it straight into the hot spuds. Cold dairy aggressively shocks the hot starch cells, causing them to seize up, tighten, and turn waxy.
Always, always heat your dairy. In a small saucepan, melt your high-quality butter into your heavy cream (or whole milk) until it is gently simmering. If you want to elevate the dish, infuse the dairy with smashed garlic cloves, black peppercorns, and sprigs of fresh thyme while it heats, then strain the solids out before using.
Pour the hot, infused dairy mixture over the riced potatoes in batches. Now, put down the whisk. Put down the wooden spoon. Grab a flexible silicone spatula and gently fold the liquid into the potatoes. You are not mixing; you are carefully folding. You are simply trying to coat the intact starch cells with the fat matrix. The exact moment the liquid is absorbed and the potatoes look creamy, stop touching them. Over-mixing at this final stage will rupture the cells and undo all the hard work your ricer just did.
Troubleshooting Your Spuds
Even with a magical ricer, things can go slightly awry if you ignore the environmental factors in your kitchen. Here is how to troubleshoot the most common mashed potato sins:
- If your potatoes taste aggressively bland: You failed to salt the boiling water. You can add salt at the end, but surface salt will never penetrate the potato cells the same way that salty boiling water does. Next time, salt the water heavily.
- If your potatoes are soupy or thin: You either skipped the crucial drying phase in the hot pot, or you dumped all your dairy in at once. Always add the hot dairy in small batches. Potatoes harvested at different times of the year have different moisture contents; sometimes they need less cream than the recipe states.
- If you are stressed about timing: Mashed potatoes hate sitting around. They stiffen and congeal as they cool down. If you are hosting a large holiday dinner and need oven space, you can rice the potatoes an hour early and keep them warm in a slow cooker set to the “keep warm” setting. Fold in the hot dairy right before you carry the bowl to the table. This make-ahead trick is the absolute secret to effortless dinner party hosting without the last-minute kitchen panic.
Beyond the Spud: Other Brilliant Uses for Your Ricer
I despise unitaskers. Kitchen real estate is too precious to dedicate drawer space to a tool that only does one job. Fortunately, the potato ricer is actually a master multitasker that will elevate several other areas of your cooking.
Flawless, Pillowy Gnocchi
If you want to make light, delicate Italian gnocchi at home, a potato ricer is non-negotiable. Hand-mashed potatoes create a dense, heavy, wet dough that requires too much flour to bind. Riced potatoes keep the dough incredibly light, dry, and airy, resulting in dumplings that melt in your mouth instead of sitting in your stomach like lead weights.
Squeezing Water from Greens
Making a spinach and artichoke dip, or a ricotta filling for stuffed shells? You know how annoying it is to wring out thawed frozen spinach with paper towels. Put your wet spinach in the hopper of the ricer and squeeze. It is the most efficient, mess-free way to extract every last drop of excess water.
Velvety Tomato Puree
If you are roasting fresh garden tomatoes for a homemade marinara sauce, run them through the ricer instead of a blender. The perforated die will naturally catch the tough skins and bitter seeds, leaving you with a perfectly smooth, velvety tomato puree.
Safe, Homemade Baby Food
If you are making homemade baby food, a ricer makes incredibly quick work of steamed carrots, soft apples, pears, and sweet potatoes. It ensures a perfectly safe, lump-free texture without having to drag out and wash the heavy food processor.
The Final Word on Flawless Food
Cooking is not about innate talent or possessing some mystical chef intuition. It is about understanding the medium you are working with. When you finally understand that a potato is not just a solid block of starch, but rather a delicate matrix of microscopic cells waiting to be gently coaxed into a creamy puree, the mystery vanishes.
You do not need to be a Michelin-starred chef to make mind-blowing, restaurant-quality side dishes in your own home. You just need to stop beating your food to a pulp. Throw away that flimsy, squiggly wire masher. Unplug the food processor. Invest in a high-quality, heavy-gauge stainless steel potato ricer. Treat your ingredients with a little bit of mechanical respect, and I promise you, your weekend dinners will never be the same.
Now, go pour yourself a large glass of wine, get into the kitchen, and show those spuds who is boss.


