We have all been there. You invite a few friends over on a Friday night, plug in an electric pot in the center of your dining table, and excitedly dump a mountain of raw ingredients into a violently bubbling vat of liquid. Twenty minutes later, you are fishing out a gray, curled-up piece of beef that has the exact texture and visual appeal of a rubber shoe insert. Meanwhile, a disintegrated piece of Napa cabbage floats sadly in a murky, grease-slicked broth. You chew, your jaw aches, and you wonder why your DIY dinner feels less like a luxurious Asian culinary tradition and more like a frantic, messy race to consume overcooked sadness.
Listen to me carefully: hot pot is not a race. It is not a garbage disposal for your leftover fridge scraps, and it is certainly not a boil-it-to-death free-for-all. As a home cook who has survived enough kitchen disasters to know better, I am here to tell you that the difference between a chaotic, chewy disaster and a transcendent, mindful dining experience comes down to one single, undeniable factor: temperature control.
If you want to host a relaxed dinner party that actually feels relaxing, you have to stop treating your simmering broth like a witch’s cauldron. Today, we are going completely scorched-earth on the bad habits that are ruining your expensive ingredients. We are going to dive deep into the actual food science of protein denaturation, explain why your broth needs to chill out, and teach you how to transform a frantic meal into a slow, perfectly cooked, intentional communal experience. Pour yourself a glass of wine, grab a notepad, and let’s fix your weekend dinner plans.
The Thermodynamics of Ruined Meat: Understanding Protein Denaturation
I promised you no pretentious chef-speak, but we do need to have a brief, highly digestible science lesson. When you drop a beautifully marbled, paper-thin slice of premium beef into a pot of liquid that is furiously boiling at 212°F (100°C), you are committing a culinary crime. Understanding what happens on a molecular level is the first step to fixing your chewy meat problem forever.
The Myosin and Actin Breakdown
Meat is essentially a complex matrix of water, fat, and proteins—specifically, myosin and actin. These proteins are responsible for muscle contraction in the living animal, but in your kitchen, they are the absolute dictators of texture. When meat is heated, these proteins begin to denature. This means their tightly wound molecular coils unfold and then coagulate, squeezing out moisture like a sponge being wrung out by a giant, invisible hand.
Myosin begins to denature at around 104°F to 122°F (40°C to 50°C). This is the sweet spot where meat becomes opaque, its structure sets slightly, but it remains incredibly tender and bursting with juicy moisture. Actin, however, is the villain in our story. Actin does not start denaturing until the internal temperature hits about 150°F to 165°F (66°C to 74°C). When actin denatures, the muscle fibers shrink drastically in length, expelling almost all of their retained water and turning your expensive cut of beef into something resembling a dog’s chew toy.
The 145°F Threshold and Beyond
The USDA generally recommends an internal temperature of 145°F for the safe consumption of whole cuts of beef, but remember that your broth, if left at a rolling boil, is sitting at a blistering 212°F. When you submerge a delicate, 2-millimeter slice of meat into a 212°F environment for more than a few seconds, it rockets past the myosin phase, blasts through the actin phase, and enters the “congratulations, you’ve ruined it” phase almost instantaneously.
This is the real secret to tender meat in a communal dining setting: you must respect the thermal threshold. You want to cook the meat just enough to render the fat and denature the myosin, without violently contracting the actin. This requires a gentle, controlled heat, not a jacuzzi of doom.
The Role of Collagen in Longer Cooks
You might be wondering about tougher cuts of meat, like beef tendon or tripe, which are also popular in traditional settings. These cuts are loaded with collagen, a tough connective tissue. Unlike actin and myosin, collagen requires prolonged exposure to heat to break down into silky, luxurious gelatin. If you are cooking tendon, you actually do want it in the pot for an hour or more. But for the paper-thin slices of ribeye or lamb shoulder that make up the bulk of the meal, collagen breakdown is irrelevant. Those cuts rely entirely on a flash-cook method to preserve their delicate structure.
The Simmer vs. The Boil: Mastering Table-Side Temperature Control
The biggest rookie mistake you can make is cranking the heat dial to “High” and leaving it there for two hours. I see people doing this constantly, and it makes my eye twitch. You are not boiling pasta; you are gently poaching delicate proteins.
The Myth of the Rolling Boil
There is a pervasive and stubborn myth that broth must be kept at a furious, rolling boil to safely cook the food. This is categorically false. A rolling boil aggressively agitates the ingredients, smashes fragile items like tofu into oblivion, and, as we just discussed, instantly overcooks thinly sliced proteins.
Furthermore, a violent boil emulsifies the rendered animal fats into the water. If you have ever wondered why your chicken broth turns cloudy during a long cooking session, it is because the violent agitation of boiling forces liquid fat and water to mix into a murky, greasy suspension. The exact same principle applies at the dining table. A rolling boil will turn a beautifully clear, aromatic broth into a heavy, muddy sludge by the end of the night.
Visual Cues for the Perfect Simmer (Shui Gun)
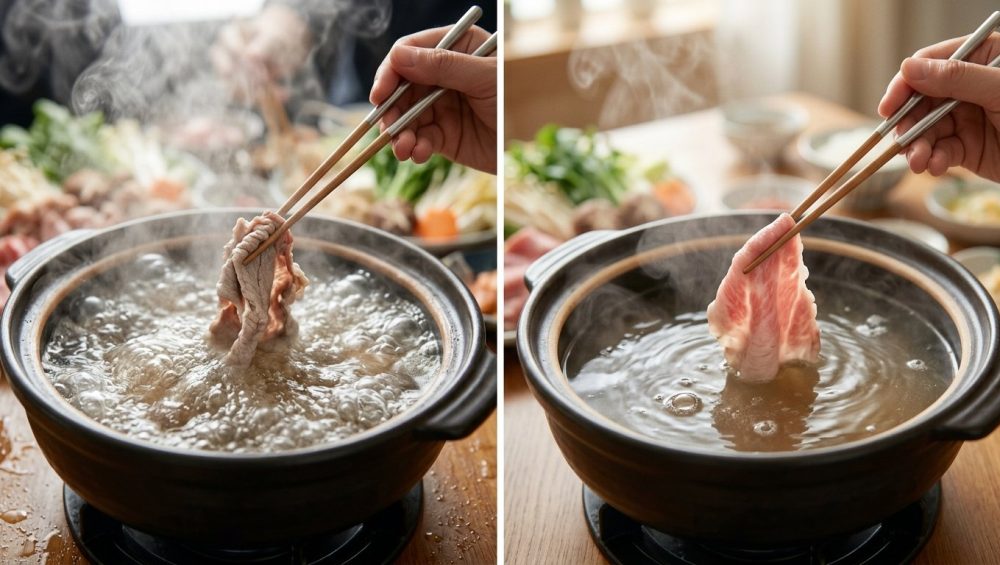
What you actually want is a gentle, steady simmer. In Chinese culinary terms, there is a concept often referred to as “shui gun” (water boiling), but the nuance is in how it boils. You are looking for small, champagne-like bubbles gently breaking the surface, occasionally releasing a wisp of steam, not a chaotic, churning whirlpool that threatens to splash scalding liquid onto your guests.
When you first bring the pot to the table, you can absolutely bring it to a rapid boil just to get things started and ensure the liquid is food-safe. But the very moment you begin cooking, you must play the role of the DJ, constantly adjusting the heat dial. Did you just drop in a massive batch of cold vegetables? The temperature will drop, so turn the heat up slightly. Is the broth starting to bubble aggressively again? Dial it back down immediately. This constant, mindful adjustment is the core of the experience. It forces you to pay attention to the food, to slow down, and to engage actively with your meal.
A Brutally Honest Rant on Toxic Hot Pot Gear
We need to have a serious talk about your equipment right now, because I have absolutely zero patience for cheap, toxic kitchenware. If you are using one of those twenty-dollar plastic electric pots with a peeling, mystery-metal non-stick coating that you bought on impulse from a discount website, I want you to unplug it and throw it in the trash. I am completely serious.
The Danger of Cheap Non-Stick Coatings
Time is money on weekdays, which is why I love a good time-saving kitchen hack, but I will never compromise on safety. Many cheap, mass-produced electric pots are lined with low-grade polytetrafluoroethylene (PTFE) coatings. When these thin, poorly applied coatings are subjected to the prolonged, intense heat of a two-hour dining session, they degrade rapidly.
If you notice that you are ruining your nonstick pans and the coating is visibly flaking off into your broth, you are quite literally ingesting synthetic forever chemicals (PFAS). There is nothing mindful, relaxing, or appetizing about serving your friends a side of toxic synthetic polymers. Beyond the health risks, these cheap pots have terrible heating elements that cycle awkwardly between a violent boil and a dead stop, making it impossible to maintain the gentle simmer we just talked about.
Safe, High-Quality Alternatives
You do not need a specialized, single-use appliance to enjoy this meal. You need safe, durable equipment that offers real value, excellent thermal retention, and precise temperature control.
My absolute favorite setup for the home cook is a high-quality portable induction cooktop paired with a safe, heavy-bottomed pot. Induction burners offer instantaneous, precise temperature control—meaning when you turn it down to a simmer, it simmers immediately, unlike the frustratingly delayed reaction of cheap electric coil pots.
For the vessel itself, a multi-clad stainless steel pot is fantastic and indestructible. If you want to elevate the aesthetic and the thermal retention of your table, look into induction-safe donabe pots. These traditional Japanese clay pots are stunningly beautiful and hold heat incredibly well, providing a gentle, radiant warmth that is perfect for maintaining a steady simmer without scorching the bottom. Invest in good gear once, and banishing toxic kitchen gear from your life will be the best culinary decision you ever make.
The Meat Matrix: Choosing, Prepping, and Slicing
Now that we have the science and the gear sorted out, let’s talk about the star of the show: the meat. You can have the most beautifully simmered, perfectly balanced broth in the world, but if you are tossing in thick, unevenly hacked chunks of cheap beef, you are going to be chewing for days.
The 2-Millimeter Rule
The ideal thickness for sliced meat in this context is astonishingly thin—usually around 1 to 2 millimeters thick. At this thickness, the meat is almost translucent when held up to the light. When dipped into a gently simmering broth, a 2-millimeter slice of wagyu or lamb shoulder will cook to a perfect, tender medium-rare in approximately 10 to 15 seconds. If your meat is thicker than this, the outside will overcook and become tough before the inside has a chance to safely warm through.
The Partial-Freeze Slicing Hack
Unless you own a commercial deli slicer, achieving a uniform 2-millimeter slice with fresh, room-temperature meat is nearly impossible. The meat will squish, slide, and yield under the pressure of the blade, resulting in jagged, uneven chunks.
Here is the ultimate home cook hack: the partial freeze. Place your cut of meat in the freezer for about 45 minutes to an hour before you plan to prep. You want it to be firm to the touch and slightly icy, but not frozen solid like a brick. This firmness provides the structural integrity needed to slice it paper-thin with ease.
Of course, this technique requires a razor-sharp knife. If your knives get dull so fast that you are hacking and sawing rather than smoothly slicing, you are going to tear the muscle fibers and ruin the texture before the meat even hits the pot. A sharp carbon steel or high-quality stainless steel chef’s knife, or a specialized Japanese sujihiki (slicing knife), is absolutely mandatory here.
Selecting the Right Cuts
Not all meat is created equal when it comes to a flash-cooking environment. You need cuts that naturally balance fat and flavor, as lean cuts (like chicken breast or pork loin) will dry out and turn chalky almost instantly.
- Beef: Ribeye is the undisputed king of the table. Its high fat content and extensive intramuscular marbling mean it essentially bastes itself as it cooks, remaining tender even if you accidentally leave it in the broth a few seconds too long. Brisket and short rib are also excellent, provided they are sliced strictly against the grain to shorten the muscle fibers.
- Pork: Pork belly is essential. The distinct, alternating layers of fat and lean meat create a beautiful textural contrast that absorbs spicy broths perfectly. Pork shoulder is a great, slightly leaner alternative that still retains enough fat to stay juicy.
- Lamb: Thinly sliced lamb shoulder is a historic staple in Northern Chinese dining. Its robust, slightly gamey flavor stands up perfectly to intensely spiced, heavy broths, like a numbing Sichuan mala broth packed with peppercorns and chilies.
Broth and Vegetables: The Supporting Cast
Meat may be the main event, but a mindful dining experience relies heavily on the supporting cast. The way you handle your vegetables, starches, and your broth dictates the overall pacing, flavor progression, and enjoyment of the meal.
Why Violent Boiling Ruins Your Veggies
Just as a rolling boil ruins your meat by violently contracting proteins, it completely decimates the cellular structure of delicate vegetables. Leafy greens like spinach, watercress, chrysanthemum greens, and Napa cabbage require mere seconds in hot liquid to wilt perfectly. If you leave them boiling for ten minutes, the pectin breaks down entirely, and they turn into a slimy, unappetizing mush that disintegrates into the broth. If you want to stop eating mushy veggies, you have to treat them with the exact same respect and timing you give your premium ribeye.
Root vegetables like daikon radish, lotus root, taro, and potatoes take significantly longer to cook. These should be added early in the meal to gently simmer. As they cook, they release starches that slightly thicken and flavor the broth. But leafy greens? They should be treated as a quick, ten-second dip, executed right before eating.
Navigating the Broth Styles
The broth you choose sets the entire mood for the evening. If you want a deeply savory, sweat-inducing experience, a Sichuan-style Mala broth—made with beef tallow, copious amounts of dried chilies, and mouth-numbing Sichuan peppercorns—is the way to go. Because this broth is so intensely flavored and heavy on the oil, it is best suited for robust meats and root vegetables.
On the opposite end of the spectrum is a Japanese Shabu-Shabu style broth, which is often nothing more than a piece of dried kombu (kelp) simmered in water. This minimalist broth is designed not to overpower, but to gently enhance the natural, high-quality flavors of premium wagyu beef and fresh vegetables. As the night goes on, the ingredients you cook will slowly transform this simple water into an incredibly rich, complex soup that you can drink at the end of the meal.
Crafting the Ultimate Dipping Sauce
A perfectly cooked, 2-millimeter slice of medium-rare ribeye is a beautiful thing on its own, but it requires a finishing touch. The dipping sauce station is where you and your guests get to express your personal culinary identities. A great dipping sauce must balance rich fats, bright acids, salty umami, and pungent aromatics.
Balancing Fats, Acids, and Aromatics
If you just pour straight soy sauce into a bowl and call it a day, you are missing out on half the experience. You need to build a flavor profile.
Start with a rich base. Sesame paste (which is similar to tahini but made from roasted, toasted sesame seeds) or a high-quality toasted sesame oil provides a rich, nutty foundation that coats the meat. Next, add your salty umami component—usually a good quality light soy sauce or oyster sauce.
Now, you desperately need acid to cut through the richness of the meat and the heavy fat of the broth. Chinese black vinegar is traditional; it offers a complex, slightly sweet, malty acidity that brightens up every bite.
Finally, load up on fresh aromatics. Minced raw garlic, finely chopped scallions, and fresh cilantro are non-negotiable staples. If you like heat, a spoonful of crispy chili oil, chili crisp, or freshly diced bird’s eye chilies will elevate the sauce to the absolute next level.
The Role of the Raw Egg Yolk
In Japanese shabu-shabu and sukiyaki, it is highly traditional to use a beaten raw egg as a dipping sauce for the hot meat. When you pull a slice of beef straight from the simmering broth and dip it into the egg, the residual heat of the meat slightly tempers and cooks the egg yolk. This creates a rich, velvety coating that cools the meat down just enough to eat comfortably while adding an incredible, luxurious richness. If you choose to do this, ensure you are using high-quality, pasteurized eggs to mitigate any food safety risks.
Putting It All Together: Your Weekend Action Plan
We have covered the food science, the gear, the ingredients, and the philosophy. Now it is time to execute. Weekday meals are about survival and efficiency, but the weekend is your chance to be an absolute perfectionist.
Prep Work and Staging
The absolute beauty of hosting this kind of meal is that 90% of the work is done before your guests even arrive. There is no frantic sautéing, no stress over timing multiple side dishes to finish simultaneously, and no hiding in the kitchen while your friends mingle in the living room.
Spend your afternoon meticulously prepping. Wash and dry your greens thoroughly. Use the partial-freeze hack to slice your meats paper-thin. Arrange everything beautifully on large, aesthetic platters. We eat with our eyes first, and a stunning array of fresh, colorful ingredients sets the tone for a mindful, intentional meal.
If you are making homemade meatballs or shrimp paste, ensure they are bound properly. If your dumplings fall apart into a soggy mess at the bottom of the pot, it’s usually because they were either poorly sealed during prep or boiled far too violently.
Keep a large pitcher of extra unsalted broth or hot water nearby. As the night progresses, the liquid in your pot will naturally evaporate and reduce, concentrating the sodium and becoming overly salty. You will need to top it off periodically to maintain the perfect volume and flavor balance.
The Art of Pacing Your Meal
This brings us to the core philosophy of the night: pacing. This meal is not a race to see who can consume the most calories in the shortest amount of time. It is a slow, deliberate, multi-course grazing experience that should last for hours.
Do not allow your guests to dump all their ingredients into the pot at once. Doing so drops the temperature of the broth drastically, forcing you to crank the heat, which inevitably leads to the dreaded rolling boil once the liquid finally recovers.
Instead, encourage everyone to cook one or two bites at a time. Dip a slice of meat, swish it gently in the simmer for ten seconds, pull it out, dip it in your sauce, and eat it. Then, add a piece of tofu, let it simmer, retrieve it. This slow, methodical pacing forces you to engage in conversation, sip your drink, and actually enjoy the company of your guests.
The Final Word on Table Etiquette
When your guests sit down, take thirty seconds to establish the ground rules. Explain that the broth is going to stay at a gentle simmer, and that you will be managing the temperature. Show them the 10-second dip technique for the beef. Encourage them to take their time, to cook only what they are about to immediately eat, and to savor the experience.
You might also want to establish some basic tool etiquette. Use separate chopsticks or designated communal scoops for handling raw meat versus eating. If you need a bench scraper to clean up the mess of raw meat juices on your cutting board during prep, make sure that cross-contamination doesn’t make its way to the dining table. Keep raw and cooked stations distinctly separate.
You are the host, but you are also the culinary guide. By setting the pace, controlling the thermal environment, and educating your guests on the science of what makes the food taste good, you transform a potentially chaotic free-for-all into a sophisticated, relaxing, and deeply satisfying communal feast.
Cooking at home does not require a culinary degree; it requires observation, a willingness to understand the basic science of your ingredients, and the right tools for the job. You now know exactly why your meat used to turn into shoe leather, and you have the knowledge to prevent it from ever happening again.
Ditch the toxic non-stick pots, respect the thermal limits of actin and myosin, slice your meat thinner than you ever thought possible, and for the love of all things culinary, turn the heat down to a gentle simmer. Your weekend dinners are about to become legendary. Now, go sharpen your knives, clear off your dining table, and invite some friends over for a meal they will never forget.


