You are standing over the stove, whisking frantically. You have followed the recipe to the letter. You made the roux. You slowly added the milk. You dumped in the convenient little bag of pre-shredded cheddar. But instead of a glossy, cascading waterfall of liquid gold, you are staring into a saucepan of broken, oily, grainy sadness. It looks like wet sand swimming in a puddle of grease.
You start questioning your life choices. Did you heat it too fast? Is the dairy cursed? Should you just give up, throw the whole pot in the trash, and order an expensive pizza? Let me stop you right there. Put down the whisk, pour yourself a generous glass of wine, and take a deep breath. It is not your fault. You didn’t ruin dinner; the grocery store did.
As a weekend culinary hobbyist, you deserve better than the culinary tragedy hiding inside a plastic bag. We are going to dive deep—scientifically deep—into the hidden trap of pre-shredded cheese. I am going to explain exactly why those convenient little bags are the mortal enemy of a smooth cheese sauce, and how you can achieve restaurant-level perfection in your own kitchen with zero professional culinary training.
The Anatomy of a Broken Cheese Sauce: What Went Wrong?
Let’s be real for a second. Making a cheese sauce shouldn’t feel like defusing a bomb, yet so many home cooks approach it with a sense of impending doom. To understand why your sauce broke, we first need to understand what a cheese sauce actually is on a molecular level.
At its core, cheese is a delicate, beautiful miracle of nature. In its solid state, it is a highly stable emulsion of dairy fat, water, and protein—specifically, casein proteins. These casein proteins form a microscopic net, happily trapping the fat and water together in perfect harmony.
When you apply heat to cheese, that protein matrix begins to relax. The fat begins to liquefy and desperately wants to escape. The water starts to turn to steam and wants to evaporate. If you don’t carefully control the thermal environment, the emulsion shatters. The proteins panic, coagulate, and tighten up into tiny, rubbery clumps (that’s the grit), and the dairy fat separates and pools on the surface (that’s the dreaded oil slick).
When you are trying to stop sauces from separating, you need an emulsifier to act as a peacemaker, holding the fat and water together. In a traditional béchamel-based cheese sauce (a classic Mornay), the starch from the cooked flour in your roux acts as a physical barrier, preventing the fat droplets from coalescing. But when you introduce pre-shredded cheese into this delicate balancing act, you are throwing a massive chemical wrench into the gears.
The Hidden Trap: What Exactly Is in That Bag of Pre-Shredded Cheese?
We all love a good shortcut. I am the very first person to advocate for ruthless efficiency when you are trying to get a frantic Tuesday night dinner on the table. But the shredded cheese industry—a market that hit a staggering $4.85 billion in the United States in 2025 and is projected to reach $6.45 billion by 2032—has sold us a massive lie. They have convinced us that convenience doesn’t come with a culinary cost.
If you look closely at the ingredient list on a bag of store-bought shredded cheese, you will see the cheese itself, and then you will see a list of anti-caking agents. The most common offenders are powdered cellulose, potato starch, corn starch, and calcium sulfate, often accompanied by natamycin, an anti-fungal preservative used to extend shelf life.
Let’s talk about cellulose. Cellulose gum, or carboxymethyl cellulose (CMC), is a plant pulp derivative. While cellulose naturally exists in the cell walls of all plants, industrial food-grade cellulose is frequently derived from plant waste, such as wood bark or cotton lint, because it is incredibly cheap and highly abundant. Now, before you panic and throw out your groceries, no, you are not eating literal wooden splinters. Powdered cellulose is completely food-safe, FDA-approved, and passes through your digestive system harmlessly as insoluble dietary fiber.
But just because it is safe to eat doesn’t mean it belongs anywhere near your saucepan. These anti-caking agents are added for one highly specific reason: to absorb excess moisture and prevent the cheese shreds from clumping together into a solid, unappealing brick while sitting on the supermarket shelf for months. They do their job incredibly well. But that exact moisture-absorbing, clump-preventing superpower is precisely what ruins your dinner.
The Chemistry of Clumps: Why Anti-Caking Agents Ruin Your Emulsion
Here is where the kitchen science gets fascinating—and incredibly frustrating. When you dump a bag of pre-shredded cheese into a hot liquid, you aren’t just adding cheese. You are adding a significant payload of dry, ungelatinized starches and refined wood pulp.
Cellulose does not melt. Period. You can heat it to the temperature of the sun, and it will remain a microscopic, gritty solid. When you melt pre-shredded cheese, those tiny particles of cellulose detach from the cheese shreds and float freely in your sauce. This is the primary culprit behind that sandy, grainy texture that coats the roof of your mouth and ruins the luxurious mouthfeel of your macaroni and cheese.
But the starches—like potato or corn starch—are even more insidious. Remember how cheese is an emulsion of fat and water? When potato starch hits a hot liquid, it rapidly absorbs water and swells up. It acts like a microscopic sponge. However, starch aggressively repels fat. According to a 2020 study by North Carolina State University, manufacturers heavily favor potato starch because it makes the shreds look better in the package, completely disregarding how it behaves in a hot pan.
As the potato starch steals the water from the melting cheese, it forcefully evicts the dairy fat. Without enough water to maintain the emulsion, the casein proteins crash into each other and bond tightly, forming those rubbery, chewy little clumps. Meanwhile, the rejected fat has nowhere to go but up, resulting in a greasy, unappetizing oil slick floating on top of your meal.
This chemical reaction is practically irreversible once it starts. No amount of aggressive whisking will force the fat back into the water once the starches have hijacked the moisture. If you want to smooth out grainy sauces, your absolute best defense is to never introduce these rogue starches into your pot in the first place.
The Financial Illusion: Are You Really Saving Time and Money?
I know exactly what you are thinking right now. “But Sassy Sous-Chef, I am tired! I worked all day! Grating cheese takes time!”
Does it, though? Let’s break down the actual cost of this so-called convenience, both in terms of your hard-earned cash and your precious time.
First, the financial cost. You are paying a premium for the labor of a factory shredding the cheese, tossing it in anti-caking dust, and sealing it in a plastic bag flushed with nitrogen gas. Ounce for ounce, a solid block of cheese is almost always cheaper than its pre-shredded counterpart. You are literally paying extra money for an inferior product that actively sabotages your cooking.
Now, let’s talk about time. Yes, grating an eight-ounce block of sharp cheddar on a box grater takes approximately two minutes. It requires a minor amount of elbow grease. But let’s compare that to the time you spend frantically Googling how to rescue a broken sauce, aggressively whisking a greasy mess for ten minutes, and ultimately throwing the ruined batch in the trash and starting over from scratch.
When you are desperately trying to overcome weeknight cooking anxiety, the last thing you need in your kitchen is unpredictable, unreliable ingredients. Block cheese is incredibly reliable. It behaves exactly how you expect it to behave. Grating your own cheese isn’t a tedious chore; it is an insurance policy for your dinner. Two minutes of prep work guarantees a flawless, velvety sauce every single time.
The Art of the Melt: How to Choose the Right Block Cheese
Alright, you have officially sworn off the bags. You are standing in the dairy aisle, staring at a massive wall of block cheese. Which one do you choose? Not all cheeses are created equal when it comes to melting.
The secret to a beautiful, cascading melt lies in the moisture content and the age of the cheese. Young, high-moisture cheeses have a loose protein structure that breaks down easily and gracefully under heat. As cheese ages, it loses moisture, and its protein matrix tightens, hardens, and becomes brittle.
The Melting Superstars
- Gruyère: The undisputed king of the melting world. It has the absolute perfect balance of water, fat, and protein, resulting in a silky, elastic melt with a complex, nutty flavor. It is the backbone of any respectable fondue.
- Fontina: Incredibly buttery, rich, and smooth. It melts like an absolute dream and is perfect for elevating a standard macaroni and cheese.
- Young Cheddar: Mild or sharp cheddar that hasn’t been aged for years will melt beautifully, bringing that classic, comforting flavor. Avoid “extra sharp” aged cheddars for sauces, as their lower moisture content makes them prone to breaking.
- Gouda: Young Gouda (not the hard, aged variety with crunchy calcium lactate crystals) provides a creamy texture and a mild, slightly sweet profile.
- Low-Moisture Mozzarella: The undisputed champion of the cheese pull. It represents a massive 47.2% of the shredded cheese market for a reason—it stretches perfectly without breaking, making it essential for pizza and baked pasta.
The Melting Nightmares
- Aged Parmesan or Pecorino: These hard, dry cheeses have almost no moisture left in them. If you dump them into a hot pan, they will instantly separate into a pool of grease and hard, gritty clumps. If you want to incorporate them into a sauce, they must be grated into a micro-fine dust and melted off the heat very, very gradually.
- Feta and Cotija: These crumbly cheeses are highly acidic, which permanently alters their protein structure. They will soften under heat, but they will never truly melt into a cohesive liquid sauce.
A Quick Note on the Grate Size
The size of your shred matters immensely. For a delicate sauce, you want to use the medium or fine holes on your grater. The smaller the shreds, the faster and more evenly they will melt, minimizing the amount of time the cheese is exposed to direct heat. Massive, thick shreds take too long to melt, increasing the risk of your emulsion breaking before the cheese is fully incorporated.
The Sassy Sous-Chef’s Blueprint for a Flawless, Silky Cheese Sauce
Now that we have the right ingredients and understand the science, let’s talk technique. Making a flawless cheese sauce requires a little bit of finesse, but it is incredibly straightforward once you know the golden rules.
Step 1: Build the Foundation
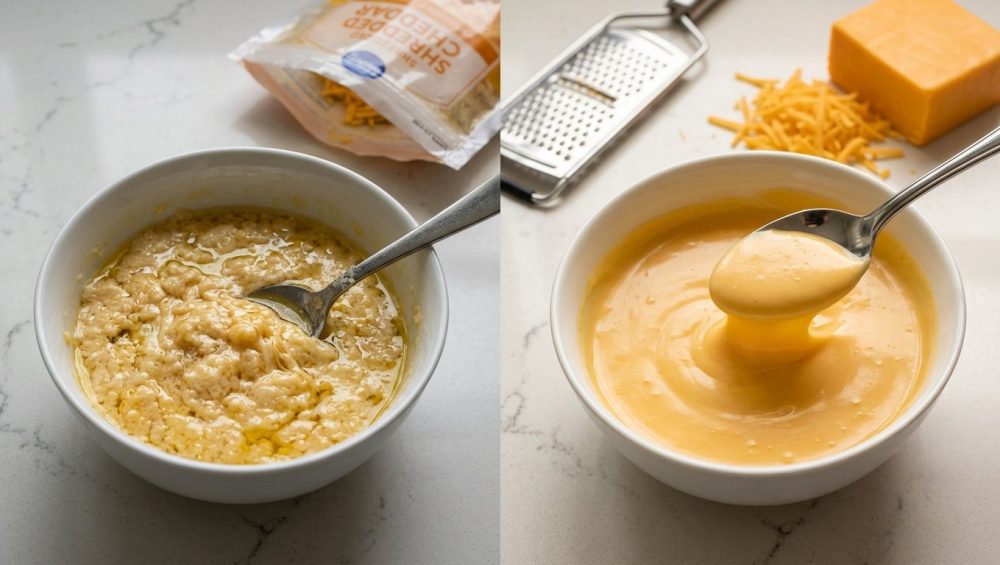
The classic method involves a roux—equal parts fat (usually butter) and flour, cooked together over medium heat for about a minute to remove the raw flour taste. This coats the flour particles in fat, preventing them from clumping when you add your liquid. Slowly whisk in cold or room-temperature whole milk. You must whisk constantly to build a smooth, thickened béchamel base. The starch in the flour will act as your physical emulsifier, giving the cheese proteins a safe environment to melt into.
Step 2: Master the Temperature Control
This is where 90% of home cooks ruin their sauce. Cheese absolutely hates high heat. If you boil a cheese sauce, the proteins will instantly seize up and violently squeeze out the fat.
Once your béchamel has thickened to a beautiful, silky consistency, turn off the heat completely. Better yet, move the saucepan to a cool burner. The residual heat in the thickened milk is more than enough to melt the finely grated cheese.
Step 3: The Gradual Incorporation
Do not, under any circumstances, dump a massive mountain of cheese into the pot all at once. This drops the temperature of the sauce too quickly and overwhelms the emulsifiers. Add your freshly grated cheese a small handful at a time. Whisk gently until it is completely melted and incorporated before adding the next handful. Patience is your best friend here.
Sodium Citrate: The Modern Kitchen Secret for Bulletproof Melting
If you want to completely skip the flour, the butter, and the anxiety of maintaining a fragile emulsion, I am about to introduce you to a modern culinary miracle: Sodium Citrate.
If you have ever wondered why processed American cheese or Velveeta melts into a perfectly smooth, glossy pool of liquid gold that never separates, the answer is sodium citrate. And no, despite how it sounds, it is not a terrifying, toxic artificial chemical. It is simply the sodium salt of citric acid, which is naturally found in citrus fruits.
When you add a tiny amount of sodium citrate to a heated liquid (like milk, water, or even a flavorful beer) and whisk in your cheese, a fascinating chemical exchange occurs. Cheese proteins (caseins) are bundled together in submicroscopic spheres called micelles, which are held together by calcium phosphate bridges. The sodium citrate acts as a chelating agent. It actively interacts with the casein proteins, specifically targeting and binding to the calcium ions that normally cause the proteins to curl up and clump together.
By replacing those calcium ions with sodium ions, the protein structure relaxes completely. The casein breaks apart into individual molecules, which then become highly soluble and act as their own powerful emulsifiers, binding the fat and water together permanently.
The result? You can take any sharp, aged, stubborn block of cheddar and turn it into a silky, flowy, stadium-style nacho cheese sauce without a single gram of flour. It will never break. It will never get grainy. It is practically bulletproof. You just dissolve about a half teaspoon (around 2 to 4 grams) of sodium citrate into a half cup of simmering liquid, and slowly whisk in eight ounces of freshly grated cheese. It feels like you are cheating, but it’s just brilliant, accessible food science.
Troubleshooting Common Cheese Sauce Disasters
Even with the best intentions and block cheese, things can sometimes go sideways if you lose focus. If you find yourself staring at a less-than-perfect sauce, don’t panic. There are ways to salvage the situation before your dinner guests notice.
Disaster 1: It’s Too Thick and Gloopy
As cheese sauce cools, the fats and proteins begin to solidify, causing the sauce to thicken dramatically. If your sauce resembles wet cement, do not add more cheese. Instead, place the pot over very low heat and whisk in a splash of warm milk. Keep adding milk a tablespoon at a time until the sauce loosens up and regains its flowy, luxurious texture.
Disaster 2: It’s Too Thin and Watery
If you accidentally added too much milk to your béchamel, you need to reduce the moisture. However, boiling the sauce will break the cheese. If you need to thicken up watery pan sauces without boiling them, you can create a quick, cold cornstarch slurry (one teaspoon of cornstarch mixed with one teaspoon of cold water) and whisk it in. Heat it very gently until it thickens, being incredibly careful not to let it reach a rolling boil.
Disaster 3: It Started to Separate
If you accidentally overheated the sauce and see a layer of grease starting to form around the edges, immediately remove it from the heat. Whisk vigorously. If it refuses to come back together, grab your immersion blender. A few short bursts with an immersion blender can force the fat droplets back into the emulsion by sheer mechanical force. If it’s still stubborn, adding a splash of cold heavy cream can rapidly lower the temperature and provide extra emulsifying milk proteins to help stabilize the mixture.
The Gear Check: Essential Tools for Flawless Cheese Prep
I have a very strict, uncompromising rule in my kitchen: I do not tolerate cheap, toxic, or dysfunctional gear. You can have the best, most expensive artisanal block cheese in the world, but if you are cooking it in a pan that is shedding mystery chemicals into your food, you are fighting a losing battle. If you want to ditch the toxic cookware, you need to start with the tools you use for delicate tasks like making dairy sauces.
The Grater
Throw away that flimsy, rusted, bent box grater you bought for three dollars in college. A dull grater will mash, tear, and smear the cheese rather than cutting it cleanly, resulting in uneven shreds that melt at different rates. You need a sturdy, high-quality stainless steel box grater with razor-sharp etched holes. If you are grating massive amounts of cheese for a holiday mac and cheese, a food processor with a shredding disk is a fantastic investment. Just remember to chill your cheese block in the freezer for ten minutes before running it through the processor so it shreds cleanly instead of gumming up the fast-moving blades.
The Saucier Pan
Please, I am begging you, stop making delicate dairy sauces in cheap, scratched non-stick pots where the Teflon coating is actively peeling off into your food. Not only is it a massive health hazard, but thin, cheap aluminum pots have terrible heat distribution, creating aggressive hot spots that will instantly scorch your milk and break your cheese.
If you want to master cooking with stainless steel, you need a heavy-bottomed, fully clad saucier. You can easily prevent scorching your sauces by utilizing the curved bottom of a saucier, which prevents thick ingredients from getting trapped and burning in the sharp corners of a standard saucepan, allowing your whisk to reach every single square inch of the pan’s surface.
The Whisk
A flimsy, bending whisk is completely useless against a thick flour roux or a heavy, dense cheese sauce. You need a sturdy, professional-grade stainless steel balloon whisk with fully sealed handles. If your current whisk traps dirty dishwater in the handle and leaks it into your pristine food while you stir, it is immediately time to invest in a better whisk.
The Prep Surface
When you are shredding cheese manually, you need a highly stable surface. A solid, heavy cutting board is absolutely essential. And when it comes to transferring that massive mountain of freshly grated cheese from the wooden board to your hot pot, do not drag the sharp edge of your expensive chef’s knife across the board to scoop it up. You will instantly destroy the delicate blade alignment. You need to stop dulling your knives and use a stainless steel bench scraper instead. It easily scoops up massive amounts of cheese in one swift, satisfying motion.
The Weeknight Shortcut: When You Actually DON’T Need to Grate
Because I firmly believe that time is money during the week, I will concede one minor point to the pre-shredded cheese industry. There is exactly one scenario where buying the bag is acceptable: when the cheese is never going to be melted into a liquid emulsion.
If you are tossing a handful of cheddar onto a cold house salad, sprinkling some Monterey Jack over a quick Tuesday night taco, or stuffing a cold wrap for tomorrow’s lunch, the cellulose powder isn’t going to ruin the dish. The anti-caking agents only become culinary villains when introduced to heat and liquid. So, if you need a fast garnish, use the bag. But the second you turn on the stove to make a sauce, a soup, or a fondue, the bag stays in the fridge.
Elevating Your Culinary Confidence
Cooking isn’t about memorizing complex, pretentious culinary jargon; it is about understanding the fundamental behavior of your ingredients. When you understand exactly why a pre-shredded bag of cheese acts the way it does under heat, you take all the stressful guesswork out of the equation. You stop hoping for a good result and start actively engineering one.
The next time you are planning a cozy, comforting meal, whether it is a massive, bubbling tray of baked macaroni and cheese, a velvety Swiss fondue, or a simple, elevated weeknight quesadilla, skip the convenience aisle. Buy the block. Take the two minutes to grate it yourself.
By respecting the ingredients and understanding the molecular science of the melt, you will completely transform your comfort food. You will build your dream kitchen repertoire one flawless, silky, perfectly emulsified sauce at a time. Now, grab that block of Gruyère, fire up the stove, and show that sauce who is boss. You’ve got this.