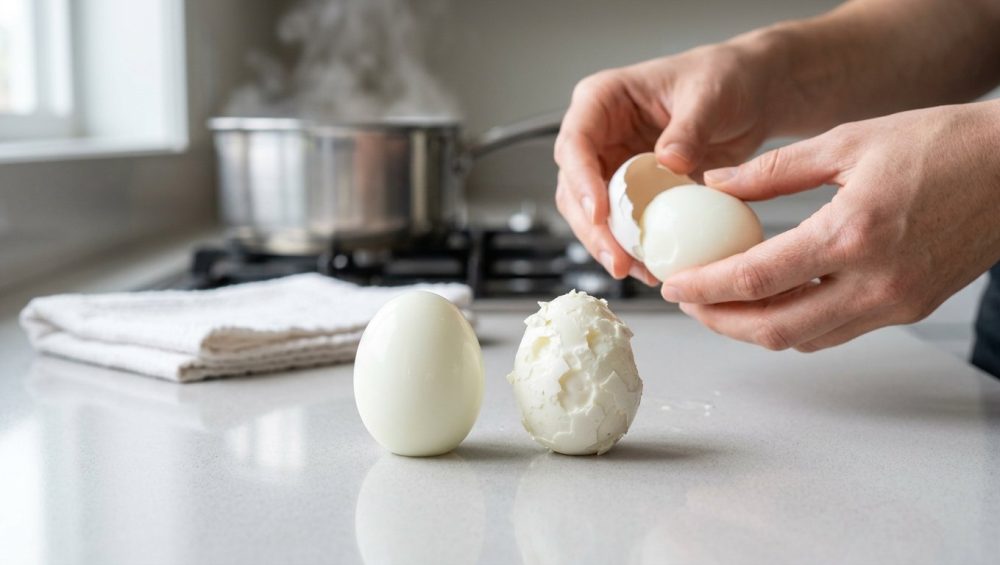
Let’s be brutally honest for a second. There is exactly one kitchen task that can reduce a grown, tax-paying adult to near tears on a Sunday afternoon, and it is the agonizing, soul-crushing process of peeling a hard-boiled egg. You know the exact scenario I am talking about. You have grand plans for a beautiful platter of deviled eggs, or perhaps a pristine Niçoise salad to impress your dinner guests. You do everything “right”—or so you thought. You boil the water, you set the timer, you cool the eggs.
But then the peeling begins. First, a tiny shard of shell comes off. Then, another piece, but this time it takes a massive, jagged chunk of the pristine egg white with it. You try to salvage it by running it under the faucet, but the inner membrane is clinging to the albumen with the desperate grip of a toddler refusing to leave the toy aisle. By the time you are done, your once-perfect oval looks like it survived a meteor shower. It’s pockmarked, mangled, and utterly ruined.
If your refuse to peel cleanly, you are not alone. For decades, home cooks have been plagued by this culinary Russian roulette. We have been sold a litany of old wives’ tales and bogus kitchen hacks to solve this problem. Add a splash of vinegar! Throw a matchstick in the water! Pierce the shell with a thumbtack! Add baking soda! Pray to the culinary gods! None of these gimmicks address the actual root cause of the problem.
The real culprit? The starting temperature of your water.
If you are placing your raw eggs into a pot of cold tap water and then turning on the stove, you are actively sabotaging your own success. It is time to unlearn the outdated, fundamentally flawed methods passed down by our grandmothers. Today, we are going to dive deep into the thermal dynamics, the protein chemistry, and the absolute, irrefutable science of why starting your eggs in cold water is a massive mistake. As your resident Sassy Sous-Chef, I promise you that professional-level results are completely achievable in your standard home kitchen. You do not need a culinary degree to make flawless food, but you do need to understand the basic physics of what is happening inside that shell.
The Cold Water Myth: Why We Were Taught Wrong
Before we fix the problem, we have to understand why the cold-water myth became so deeply entrenched in our culinary consciousness. The logic, on its surface, seems sound. The theory goes that by starting eggs in cold water and bringing everything up to a boil gradually, you treat the delicate egg gently. A gradual temperature increase supposedly prevents the shell from cracking due to thermal shock.
It sounds lovely and nurturing, doesn’t it? We want to be kind to our ingredients. But here is the brutal truth: while the cold-water start might slightly reduce the risk of a hairline fracture in the shell, it virtually guarantees that the egg white will fuse to the inner membrane. You are trading a microscopic, cosmetic crack for an egg that is fundamentally impossible to peel.
Think about it. When you drop an egg into cold water and slowly apply heat, you are giving the proteins inside the egg an agonizingly long time to warm up. During this prolonged heating phase, the proteins in the egg white (the albumen) slowly unfold and tangle together. Because they are heating up so lethargically alongside the shell, they have ample time to chemically bond with the keratin in the shell’s inner membrane. They essentially become one single, unified entity. By the time the water reaches a rolling boil, the damage is already permanently done.
Time is money, my friends. As a busy professional who survives weekdays using clever, time-saving cooking hacks, I have zero patience for a cooking method that takes longer and yields inferior results. The cold-water start is a lose-lose scenario. We need efficiency, and we need perfection.
The Anatomy of an Egg: A Microscopic Look at the Enemy
To defeat the enemy, you must know the enemy. Let’s strip away the pretentious chef-speak and look at the actual biological anatomy of an egg, because what is happening inside that shell is a fascinating feat of natural engineering.
The Calcium Carbonate Fortress
The outermost layer, the shell, is primarily composed of calcium carbonate crystals. It is not a solid, impenetrable wall; it is actually a highly porous surface containing thousands of microscopic holes. These pores allow gases—specifically carbon dioxide and oxygen—to pass back and forth. This will become incredibly important later when we discuss the age of the egg and its pH levels.
The Keratin Membranes
Just inside the shell, there are two incredibly thin, transparent layers called the outer and inner shell membranes. They are made of keratin—the exact same strong protein that makes up your hair and nails. The outer membrane sticks to the eggshell, and the inner membrane sticks to the albumen (the egg white). When we struggle to peel an egg, it is almost always because the egg white has stubbornly fused to this inner keratin membrane.
The Albumen (Egg White)
The egg white is roughly 90% water, but the remaining 10% is a complex matrix of proteins. The two most important proteins for our purposes are ovalbumin, which makes up about 54% of the protein content, and ovotransferrin, which makes up about 12%. These proteins start out tightly coiled up in little microscopic balls.
The Yolk
Floating in the center of the albumen is the yolk, tethered in place by two twisted, rope-like strands of tissue called the chalazae. The yolk is rich in fats, vitamins, and minerals, including iron. If you have ever overcooked a boiled egg and seen that horrifying, sulfurous green ring around the yolk, you have witnessed a chemical reaction between the sulfur in the egg white and the iron in the yolk.
The Thermal Physics of Protein Denaturation
Now we get to the fun part: applying heat. Cooking is just applied chemistry and thermodynamics. When you expose an egg to heat, the kinetic energy causes those tightly coiled protein molecules in the albumen to vibrate violently. Eventually, the weak bonds holding them in their coiled shape break, and the proteins unspool and stretch out. This process is called denaturation.
Once unspooled, these long protein strands bump into each other and form new, much stronger bonds, creating a complex three-dimensional web that traps the water inside. This is coagulation. It is the exact process that turns a translucent, slimy raw egg white into a firm, opaque, solid mass.
Different proteins denature at different temperatures. Ovotransferrin is highly sensitive to heat and begins to set around 140°F (60°C). Ovalbumin, the more robust protein, requires a higher temperature and fully sets closer to 176°F (80°C).
When you use the cold-water method, the temperature of the egg slowly creeps up through these thermal milestones. The proteins denature lazily, reaching out and grabbing onto whatever is closest to them. Unfortunately, what is closest to the outermost layer of the albumen is the inner keratin membrane. They form a chemical bond that is stronger than the physical integrity of the egg white itself. When you pull the shell, the membrane comes with it, and the membrane takes the egg white with it. Disaster ensues.
The Hot Water Drop: The Ultimate Scientific Solution
So, how do we prevent this tragic fusion? We shock the system. We drop the eggs directly into a pot of violently boiling water (212°F / 100°C) or hot steam.
This is the Hot Start method, and it is the single most important secret to a flawless peel. When a cold egg hits boiling water, the outermost layer of the albumen is subjected to an immediate, extreme blast of thermal energy. The proteins in that outer millimeter of the egg white denature and coagulate almost instantaneously.
Because this happens so incredibly fast, the proteins do not have time to lazily bond with the keratin membrane. Instead, they rapidly bond to each other, instantly forming a smooth, tight, solid barrier right inside the shell. This rapid coagulation creates a distinct physical separation between the cooked egg white and the membrane.
When it comes time to peel, the shell and the membrane will slip right off that perfectly smooth, instantly-cooked outer barrier. It is the exact same thermodynamic principle that prevents a steak from sticking to a searing hot pan, or why you might use a stainless steel spider skimmer to swiftly retrieve perfectly blanched vegetables before they turn to mush. We want rapid, controlled application of heat.
The Kenji López-Alt Double-Blind Study
If you think this is just my sassy opinion, let’s look at the hard data. The legendary food scientist J. Kenji López-Alt conducted what is arguably the most exhaustive, obsessive study on boiling eggs ever recorded for Serious Eats and The New York Times. He boiled thousands of eggs, testing every conceivable variable: old eggs, fresh eggs, baking soda, vinegar, hot starts, cold starts, steaming, pressure cooking, and ice baths.
He then subjected the peeling process to a rigorous double-blind test. The statistics were staggering, and they completely decimated the cold-water myth.
Eggs that were started in cold water had a dismal success rate of approximately 50%. Half of them tore, ripped, or were otherwise mangled during the peeling process. On the other hand, eggs that were hot-started—plunged directly into boiling water or hot steam—boasted a massive 90% success rate for clean, flawless peeling. The data is unequivocal. The hot start is the undisputed champion of the kitchen.
The Age Factor: Why Fresh Eggs Are Your Enemy
While temperature is the primary physical driver of peeling success, we cannot ignore the chemical reality of the egg’s age. If you buy farm-fresh eggs from a local farmers market and try to boil them the very next day, you are going to have a bad time, regardless of your technique.
As I mentioned earlier, an eggshell is porous. The moment an egg is laid, it begins to slowly off-gas carbon dioxide through those microscopic pores. In a freshly laid egg, the albumen is heavily saturated with CO2, which makes the environment slightly acidic, with a pH of around 7.6.
At this lower, acidic pH, the proteins in the egg white adhere incredibly strongly to the inner keratin membrane when cooked. But as the egg sits in your refrigerator over the course of a week or two, it continues to lose carbon dioxide. As the CO2 escapes, the pH of the egg white gradually rises, becoming more alkaline, eventually reaching a pH of around 9.2.
This alkaline shift chemically weakens the bond between the albumen and the keratin membrane. Furthermore, as moisture evaporates through the shell over time, the air pocket at the wide base of the egg expands, creating more physical separation.
This is why older eggs peel much cleaner than fresh ones. If you are planning to make deviled eggs for a Sunday gathering, do yourself a massive favor: buy your eggs the weekend prior and let them age in the fridge for at least 7 to 10 days. If you want to survive the kitchen without ordering emergency takeout because you ruined the appetizers, plan ahead.
The Baking Soda Hack: Fact or Fiction?
You may have heard the rumor that adding a teaspoon of baking soda to your boiling water makes eggs easier to peel. The theory relies on the pH science we just discussed: baking soda is highly alkaline, so adding it to the water supposedly raises the pH of the egg and weakens the membrane bond.
Does it work? Marginally. The problem is that the baking soda has to actually penetrate the eggshell to affect the pH of the albumen. While a tiny amount might seep through the pores, it is largely inefficient. Worse, heavily alkaline water can make the egg whites taste unpleasantly soapy or metallic, and it can give the yolk an unappetizing greenish-gray hue. If you utilize the hot-start method with eggs that are at least a week old, you absolutely do not need to bother with baking soda.
The “No-Go” Rule on Toxic Kitchen Gear
We need to pause for a crucial public service announcement. As a vocal advocate for the home cook, I have a strict “No-Go” rule when it comes to toxic, low-quality kitchenware. I am looking directly at those of you who are boiling water in a scratched, peeling, ten-year-old Teflon non-stick pot.
When you heat up a compromised non-stick pan, especially at high temperatures, you risk off-gassing toxic forever chemicals (PFAS) into your home and your food. If you notice your losing their slip and flaking into your meals, it means you are literally eating the coating. Stop it. Throw them in the garbage immediately.
Similarly, do not use cheap, reactive aluminum pots that pit and warp after three uses. Aluminum is highly reactive to acidic and alkaline environments, and it has no business being the workhorse of your kitchen.
If you are serious about banishing toxic kitchen gear, you need to invest in high-quality, fully-clad stainless steel cookware. A heavy-bottomed stainless steel saucepan offers superior thermal mass, meaning when you drop six cold eggs into the boiling water, the temperature of the pot won’t drastically plummet. Stainless steel is non-reactive, indestructible, and completely safe. It is an absolute non-negotiable for anyone who wants to cook safely and efficiently.
The Ice Bath Imperative: Stopping the Clock
We have conquered the hot start, but the journey is only half over. What you do the exact second your timer goes off is just as critical as how you started the boil. You must immediately plunge the eggs into a violently cold ice bath.
Do not just run them under the cold tap for ten seconds. Do not just put them in a bowl of cool water. I am talking about a bowl filled to the brim with literal ice cubes and water.
The ice bath serves two absolutely vital thermodynamic functions:
- Halting the Carryover Cooking: Eggs retain a massive amount of residual heat. If you pull them from the boiling water and set them on the counter, they will continue to cook internally for several minutes. Your perfectly jammy 6-minute egg will turn into a chalky 9-minute egg. The ice bath instantly drops the temperature, freezing the cooking process in its tracks. This is also how you prevent that dreaded green sulfur ring from forming around the yolk.
- Thermal Contraction: Physics dictates that materials expand when heated and contract when cooled. When you plunge a hot egg into freezing water, the egg white rapidly contracts and shrinks away from the shell. This microscopic shrinkage creates even more separation between the cooked albumen and the keratin membrane, practically guaranteeing a shell that slips off with zero resistance.
Leave your eggs in the ice bath for a minimum of 15 minutes. Do not rush this step. Patience is a virtue, especially when it prevents you from throwing a ruined egg across the kitchen.
The Steaming Alternative: The Secret Weapon
While dropping eggs into boiling water is vastly superior to the cold-water start, there is an alternative method that many culinary professionals—including Kenji López-Alt and Alton Brown—argue is actually the absolute best way to cook an egg in the shell: Steaming.
Instead of submerging the eggs in water, you place an inch of water in the bottom of your pot, insert a steamer basket, bring the water to a rolling boil, and place the eggs in the basket, covering the pot tightly with a lid.
Why is steaming so effective?
- Gentler on the Shells: When eggs are furiously bouncing around in a pot of boiling water, they often crash into each other or the bottom of the pot, causing them to crack and leak white trails into the water. In a steamer basket, they sit perfectly still.
- Intense, Even Heat: Steam is incredibly efficient at transferring thermal energy. The blast of 212°F (100°C) steam provides the exact same instant-denaturation shock to the outer proteins as boiling water, ensuring the membrane doesn’t stick.
- Less Temperature Drop: When you drop cold eggs into a small volume of boiling water, the water temperature temporarily plummets. Steam, continuously generated by the boiling water below, maintains a much more consistent, aggressive temperature environment.
If you have a steamer basket, I highly recommend adopting this method. It is foolproof, clean, and yields incredibly consistent results.
The Sassy Sous-Chef’s Masterclass: Step-by-Step Instructions
Alright, let’s put all of this glorious science into practice. This is the definitive, no-nonsense method for cooking the perfect boiled egg. Print this out, tape it to your fridge, and never let me catch you starting eggs in cold water again.
Step 1: The Setup
Select eggs that have been in your refrigerator for at least a week. Fill a high-quality stainless steel saucepan with enough water to submerge the eggs by about an inch. If you are steaming, add one inch of water and insert your steamer basket. Place the pot on the stove over high heat and bring it to a vigorous, rolling boil.
Step 2: The Ice Bath Prep
While the water is coming to a boil, prepare your ice bath. Fill a large bowl with a 50/50 mix of cold water and ice cubes. Set it right next to the stove. You want this ready to go the exact second the timer beeps.
Step 3: The Drop
Once the water is at a full boil, do not just toss the eggs in with your hands. You are not a barbarian. Use a slotted fish turner or a spider skimmer to gently lower the cold eggs directly from the fridge into the water. The moment the last egg hits the water, start your timer.
Note: If the boil becomes too violent, lower the heat slightly to maintain a gentle simmer. You want the water bubbling, but you don’t want the eggs rattling around like lottery balls.
Step 4: The Timing Guide
Timing is everything. Because we are dropping cold eggs into boiling water, the timing is incredibly precise and predictable. Here is your definitive cheat sheet for large eggs straight from the fridge:
- 6 Minutes: The ultimate soft-boiled egg. The whites are just barely set, and the yolk is completely liquid and warm. Perfect for ramen or dipping toast soldiers.
- 7 Minutes: The jammy egg. The whites are fully firm, and the yolk is gooey and custard-like in the center. This is the sweet spot for salads and grain bowls.
- 8 to 9 Minutes: Medium-boiled. The yolk is mostly set but still slightly soft and vibrantly orange in the very center.
- 10 to 11 Minutes: The classic hard-boiled egg. The yolk is fully set, pale yellow, and opaque, but still creamy.
- 12+ Minutes: Danger zone. Anything past 12 minutes risks turning the yolk chalky, dry, and developing that sulfurous green ring.
Step 5: The Shock
The millisecond your timer goes off, use your skimmer to immediately transfer the eggs from the boiling water directly into the ice bath. Do not hesitate. Let them sit in the freezing water for a minimum of 15 minutes. They must be completely cold to the core before you even attempt to peel them.
Troubleshooting the Peel: Technique Matters
You have followed the science. You hot-started the eggs. You ice-bathed them. Now comes the moment of truth: the peeling. Even with the perfect thermal dynamics, poor physical peeling technique can still cause a tear. Here is how you execute the final step with the grace of a seasoned pro.
The Tap and Roll
Remove a cold egg from the ice bath. Gently tap the wide end of the egg on your countertop. The wide end houses the air pocket, making it the easiest place to break the tension. Once the bottom is cracked, gently tap the entire circumference of the egg until it is covered in a web of tiny fractures.
Next, place the egg on the counter under the flat palm of your hand. Apply very gentle downward pressure and roll the egg back and forth. You will hear the shell crinkle and crunch. This rolling motion helps separate the shattered shell from the inner membrane.
Peel Under Water
Never peel a dry egg. The absolute best way to peel is submerged in water. You can either peel the egg while holding it under a gentle stream of cold running tap water, or you can peel it directly inside the ice bath bowl. The water seeps under the cracked shell, acting as a hydrostatic lubricant that effortlessly separates the membrane from the egg white.
Start peeling from the wide end where the air pocket is. Pinch the shell and the membrane together. If you have done everything correctly, the shell should slip off in two or three massive, satisfying pieces, leaving behind a pristine, glossy, unblemished egg white.
The High Altitude Exception
I would be remiss as a culinary instructor if I did not mention the one major caveat to the boiling water rule: altitude. If you live in Denver, or anywhere significantly above sea level, the laws of physics shift slightly.
Because atmospheric pressure is lower at high altitudes, water boils at a lower temperature. At sea level, water boils at 212°F (100°C). But in Denver (5,280 feet), water boils at roughly 203°F (95°C).
This means your “hot start” isn’t quite as hot as mine. The thermal shock to the outer proteins is slightly less aggressive, and the overall cooking time will need to be extended. If you are boiling eggs at high altitude, you may need to add an extra 1 to 2 minutes to the timing guide to achieve the same level of doneness. The hot start method is still infinitely better than the cold start at high altitude, but be aware that your water simply doesn’t contain as much thermal energy.
Expanding Your Culinary Arsenal
Once you master the basic science of protein denaturation and temperature control, the entire kitchen opens up to you. You begin to realize that cooking isn’t about blindly following a list of ingredients; it is about understanding how heat interacts with matter.
When you learn that acid can brighten a dull dish, you realize your dinner actually needs acid, not just more salt. When you learn about the Maillard reaction, you stop crowding your pans. When you understand the boil them first technique for mushrooms, you stop serving spongy, oil-logged fungi. When you figure out why your scrambled eggs leak water (hint: you are overcooking them and squeezing the moisture out of the protein matrix), breakfast becomes a joy rather than a chore.
These aren’t just random tips; they are foolproof cooking secrets based entirely on the unbreakable laws of physics and chemistry. Once a beginner has stopped burning dinner, it wasn’t because they magically became a better person; it was because they finally learned to control their heat source.
Final Thoughts: Reclaiming Your Weekend
We cook to nourish ourselves, to show love to our families, and to find a moment of creative peace in an otherwise chaotic world. We do not cook to be bullied by an unpeelable egg.
By ditching the cold-water myth and embracing the thermodynamic power of the hot start, you are taking back control of your kitchen. You are aligning yourself with science, efficiency, and common sense. No more mangled egg whites. No more frustrating Sunday afternoons picking microscopic shards of shell off a cutting board.
You now possess the definitive, scientifically backed masterclass on boiling eggs. Go forth, boil some water, shock those proteins, and make the most aesthetically flawless deviled eggs your dinner guests have ever seen. You’ve got this. Now, if you’ll excuse me, I have a batch of jammy ramen eggs calling my name.


