
The secret to incredible, restaurant-quality food isn’t found in a culinary degree, a massive grocery budget, or a set of pretentious tweezers. It is found in understanding the basic, undeniable rules of kitchen science.
Look, I get it. It’s a random Tuesday night. You are exhausted, the dog is barking at a leaf blowing across the yard, and you just want to get a pot of chili on the stove before you collapse into a well-deserved Netflix coma. So, you dutifully chop your onions, brown your ground beef, and then you do what millions of tired home cooks do every single night: you pop open a tiny six-ounce can of tomato paste, aggressively thwack the bottom of it until a gelatinous red cylinder plops directly into your simmering broth, give it a half-hearted stir, and call it a day.
Fast forward twenty minutes. You grab a spoon, blow on the hot liquid, and take a taste. Your face instantly scrunches up. Why does your lovingly crafted dinner taste like you have been sucking on a handful of loose change?
Welcome to the harsh, tinny, overly acidic nightmare of raw tomato paste.
If you have ever wondered why your homemade stews, chilis, and ragus lack that deep, rich, warming depth, or if you are constantly trying to figure out why you keep ending up with a metallic tasting tomato sauce, you are not alone. You have simply fallen victim to one of the most common culinary misunderstandings in the modern kitchen. Tomato paste is not a liquid ingredient. It is not a broth. It is a highly concentrated flavor bomb that requires a very specific chemical reaction to unlock its true potential.
And the secret to unlocking that potential is ridiculously simple: you have to fry it first.
Today, we are going to dive deep into the culinary science of tomato paste. We are going to talk about the chemistry of browning, the pretentious-sounding French techniques that you can easily master in your sweatpants, and exactly how a two-minute step will completely transform your daily cooking. Grab a glass of wine, pull up a stool, and let’s get to work.
The Great Tinny Tragedy: Why Your Tuesday Night Chili Tastes Like Pennies
To understand the solution, we first have to understand the enemy. What exactly is tomato paste, and why does it possess the unique ability to make a beautiful pot of soup taste like a rusty tin can when used incorrectly?
The Cult of the Can (And Why It Betrays You)
Tomato paste is, at its core, a magnificent ingredient. It is made by taking fresh tomatoes, cooking them down for hours to reduce their water content, straining out the seeds and skins, and then reducing the remaining liquid even further until it becomes a thick, dense, highly concentrated paste.
Because tomatoes naturally contain extremely high levels of glutamic acid (the amino acid responsible for the savory, mouth-watering sensation known as umami) and natural sugars like fructose and glucose, the resulting paste is an absolute powerhouse of potential flavor. However, tomatoes also contain high levels of citric and malic acids. During the intense reduction process, this acidity is concentrated right alongside the sugars and the umami.
When you open a can of tomato paste, you are exposing a raw, highly acidic, and overwhelmingly astringent product. This sharp astringency, combined with the harshness of the canning process, creates a sensory perception on your palate that registers distinctly as “metallic” or “tinny.” Even if you are buying premium paste in BPA-free lined cans or those fancy imported Italian squeeze tubes, the raw, concentrated acidity will still punch your tastebuds in the teeth if you don’t tame it first.
The Chemistry of the Tinny Tang
Here is where the science comes in, and I promise to keep it highly relevant so your eyes don’t glaze over.
When you dump raw tomato paste straight into a pot of watery stew, bubbling stock, or simmering crushed tomatoes, you are making a critical thermodynamic error. The temperature of any wet, boiling liquid maxes out at 212°F (100°C)—the boiling point of water. At this relatively low temperature, the dense, acidic paste merely dissolves. It dilutes. It releases its harsh, raw, metallic flavors directly into your dish without undergoing any structural or chemical transformation.
Because the acidity remains sharp and untamed, many home cooks panic. They taste the sauce, wince at the sour, metallic bite, and immediately start dumping in fistfuls of white sugar to balance it out. Please, for the love of all things holy, you can stop adding sugar to tomato sauce. Sugar doesn’t fix the metallic flavor; it just masks it under a cloying blanket of artificial sweetness. You don’t need sugar. You need heat. You need chemistry.
What Is “Pincage”? (Pardon My French)
If you went to a fancy culinary school, paid tens of thousands of dollars in tuition, and spent your days getting yelled at by an angry chef in a tall white hat, you would learn a very specific vocabulary. In professional kitchens, the act of browning tomato paste is known as pincage (pronounced pin-SAHJ).
The Pretentious Culinary Term for a Simple, Brilliant Hack
Pincage is a classic French technique that traditionally involves adding tomato paste to a slowly cooking mirepoix (the holy trinity of diced onions, carrots, and celery) and allowing it to fry and roast in the residual fat. The goal is to cook the paste until it transforms from a bright, raw crimson into a deep, dark, rusty brick red.
I have zero patience for pretentious chef-speak when I am just trying to get dinner on the table, but the underlying principle of pincage is absolutely bulletproof. By exposing the tomato paste directly to hot fat on the dry surface of a skillet, you are bypassing the 212°F (100°C) temperature limit of boiling water. Oil can easily reach 300°F to 400°F (150°C to 200°C), which is the exact thermal sweet spot required to trigger culinary magic.
The Maillard Reaction vs. Caramelization: A Sassy Science Lesson
When you fry tomato paste in hot oil, two distinct chemical miracles occur simultaneously:
- The Maillard Reaction: Named after the French chemist Louis Camille Maillard who first described it in 1912, this is the complex chemical reaction between amino acids (which tomatoes have in spades) and reducing sugars (which tomatoes also have) in the presence of high heat. This is the exact same reaction that gives a seared steak its beautiful brown crust, turns pale dough into a golden loaf of bread, and makes roasted coffee beans taste so complex. The Maillard reaction creates hundreds of brand-new flavor compounds, dramatically amplifying the savory umami notes of the paste.
- Caramelization: While the Maillard reaction handles the proteins and amino acids, caramelization is the pyrolysis (browning) of the natural sugars in the tomatoes. As the intense heat breaks down the fructose and glucose, the sugars oxidize, turning deeply brown, nutty, and naturally sweet.
This dual-action chemical process completely cooks off the sharp, astringent citric acidity. It neutralizes the tinny flavor profile and replaces it with a rich, sweet, deeply savory backbone. This is the key to accelerating the Maillard reaction in your skillet and building a restaurant-quality foundation for your meal.
The Two-Minute Masterclass: How to Actually Brown Tomato Paste
Alright, enough theory. Let’s get our hands dirty. How do you actually execute this technique without burning your house down or ruining your dinner? It is incredibly simple, but it requires your undivided attention for exactly two minutes.
Step 1: Clearing the Runway
Most recipes start by having you sauté some aromatics—diced onions, minced garlic, maybe some bell peppers or celery—in a bit of olive oil or butter. Once those vegetables are soft, translucent, and smelling fabulous, it is time for the paste.
Do not just dump the paste on top of the vegetables. Instead, use your spatula to push all of your sautéed veggies to the outer edges of the pan, creating an empty, hot clearing right in the center of your skillet. You need the tomato paste to make direct, uninterrupted contact with the hot surface of the pan.
Step 2: The Sizzle and the Fat
Tomato paste is entirely fat-soluble, which means its flavor compounds bloom and distribute best in oil. If your pan looks a little dry after pushing the vegetables aside, drop an extra tablespoon of olive oil or a small pat of butter directly into the center clearing.
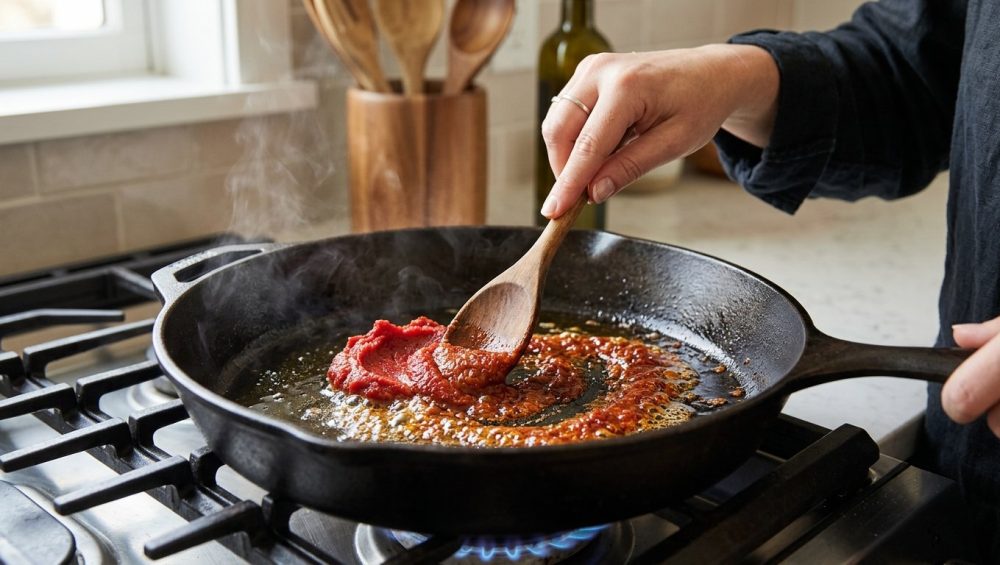
Squeeze or spoon your tomato paste right into that hot oil. You should immediately hear a satisfying, aggressive sizzle. If it doesn’t sizzle, your pan isn’t hot enough. Use your spatula to smash the paste down into the oil, spreading it out into a thin, even layer across the bottom of the pan to maximize surface area contact.
Step 3: The Visual Cues (Rust to Brick)
Now, we watch and we stir. You cannot walk away during this step. Tomato paste contains a lot of natural sugar, which means it can go from beautifully caramelized to bitterly burnt in a matter of seconds.
Keep the paste moving, scraping it off the bottom of the pan and smashing it back down. You are looking for three distinct sensory cues:
- The Color Shift: The paste will start out as a bright, vibrant, fire-engine red. As it fries, it will rapidly darken. You want to cook it until it reaches a deep, oxidized, rusty brick-red or burgundy color.
- The Oil Separation: As you fry the paste, it will initially absorb the oil. After a minute or two, it will “break,” meaning the oil will begin to separate from the solids. You will notice the oil itself taking on a gorgeous, glowing orange-red hue.
- The Aroma: The smell will shift dramatically. It will go from smelling like sharp, raw ketchup to emitting a rich, roasted, deeply savory fragrance that smells remarkably like expensive sun-dried tomatoes.
Once you hit this trifecta—brick red color, separated orange oil, and a roasted aroma—your pincage is complete. Mix the caramelized paste back together with the onions and vegetables you pushed to the side.
Step 4: Deglazing Like a Boss
As the paste caramelizes, it is going to leave a dark, sticky, beautiful residue on the bottom of your pan. In the culinary world, this is called the fond, and it is pure, unadulterated flavor.
If you are using high-quality stainless steel pans, you can easily build a fond without worrying about damaging your cookware. To capture all of that flavor, you need to deglaze. Pour in a splash of liquid—a heavy glug of red wine, a splash of chicken broth, or even just half a cup of water. As the liquid hits the hot pan, it will instantly boil and steam. Use your spatula to aggressively scrape the bottom of the pan, lifting all of those caramelized, browned tomato bits up and dissolving them into the liquid.
Congratulations. You have just built a master-level flavor base. You can now proceed with the rest of your recipe, adding your crushed tomatoes, your beans, your ground meat, or your simmering broths, safe in the knowledge that your final dish will taste absolutely incredible.
The “No-Go” Rule: Why Your Cookware Is Ruining Everything
As your delightfully snarky but fiercely protective culinary guide, I have to pause here for a very serious intervention. I firmly believe that anyone can cook like an expert, but you absolutely cannot do it if you are actively poisoning your food with garbage equipment. I am a massive advocate for banishing toxic kitchen gear from your home, and the pincage technique is exactly why.
The Toxic Truth About Peeling Non-Stick Pans
Frying tomato paste requires high, direct heat and aggressive scraping with a spatula to lift the caramelized fond off the bottom of the pan. If you attempt to do this in a cheap, scratched, peeling non-stick skillet, you are making a catastrophic mistake.
Despite decades of warnings and endless “greenwashed” marketing campaigns promising safer alternatives, a recent 2026 Ecology Center study revealed that a staggering 79% of tested non-stick cooking pans still utilize PTFE (Polytetrafluoroethylene) coatings, which belong to the notorious PFAS family of “forever chemicals”.
When you push your vegetables aside to create a dry clearing in the center of your pan, that localized area of the skillet heats up incredibly fast. PTFE coatings begin to break down and release toxic, invisible fumes when heated above 500°F (260°C)—a temperature that is shockingly easy to reach in a dry spot on a gas burner. Furthermore, when you drag a spatula across a damaged or peeling non-stick surface to scrape up your tomato paste, you are literally flaking off microscopic shards of plastic directly into your family’s dinner.
There is absolutely no excuse for this. Throw the peeling, toxic pans in the trash. Today.
The Safe Alternatives: Pans That Actually Do the Job
If you want to cook like a pro, you need materials that can handle the heat, build a proper fond, and withstand a little elbow grease without leaching chemicals into your ragu.
- Multi-Clad Stainless Steel: This is the gold standard for browning. It distributes heat evenly, allows for a beautiful, sticky fond to develop, and is virtually indestructible. It is completely non-toxic and will last you a lifetime.
- Enameled Cast Iron: A heavy Dutch oven from brands like Le Creuset or Staub is perfect for stews and chilis. The enamel coating is essentially glass, meaning it is completely non-reactive and safe. Just be sure to clean it properly and stop ruining your cast iron by letting acidic tomato paste sit in it for hours after dinner is over.
- Carbon Steel: If you insist on having a naturally non-stick surface, a well-seasoned carbon steel skillet is a fantastic, non-toxic alternative that can handle blistering high heat without releasing a single fume.
Weeknight Efficiency vs. Weekend Perfection
I am a busy professional, just like you. I know that the way we cook on a chaotic Tuesday evening is vastly different from the way we cook on a lazy, rainy Sunday afternoon. The beauty of browning tomato paste is that the technique scales perfectly to fit your schedule.
The 60-Second Tuesday Shortcut
When it comes to simple weeknight dinners, efficiency is everything. You don’t have time to slowly coax flavors out of a mirepoix for half an hour.
For the rapid-fire weeknight approach, crank your heat to medium-high. Sauté your onions aggressively until they just start to take on some color. Push them aside, drop in your paste, and fry it hard and fast. Because the heat is high, you only need about 60 to 90 seconds of constant, vigorous stirring to achieve that dark brick-red color. Deglaze immediately with whatever liquid is within arm’s reach—a splash of water from the tap works perfectly fine in a pinch—and dump in the rest of your ingredients. You have just added hours of slow-simmered flavor to a 30-minute meal.
The Saturday Afternoon Slow-Burn
When the weekend rolls around and you have the luxury of time, you can elevate the pincage technique into an absolute art form.
Lower your heat to medium-low. Take your time sweating down your finely diced onions, carrots, and celery in a generous pool of high-quality olive oil until they are completely translucent and meltingly soft. Add your tomato paste, but don’t rush it. Let it slowly, gently caramelize over the course of 10 to 15 minutes. The paste will slowly stain the vegetables, turning the entire mixture into a deep, dark, jammy, intensely fragrant flavor base. The sugars will caramelize much more deeply without any risk of burning, resulting in a profoundly sweet and complex foundation for a Sunday Bolognese or a classic French braise.
Five Rookie Mistakes That Turn Pincage Into a Disaster
As foolproof as this technique is, I have seen enough kitchen disasters to know exactly where things go wrong. If you are new to browning tomato paste, avoid these five common pitfalls.
Mistake 1: The Oil Drought
Tomato paste is incredibly thick and sticky. If your pan is bone dry when you add the paste, it will instantly latch onto the metal, scorch, and burn before it ever has a chance to caramelize. Fat is your friend here. Do not be afraid to add an extra glug of olive oil right before the paste goes in. The fat acts as a buffer, conducting the heat evenly and allowing the paste to fry rather than incinerate.
Mistake 2: The Impatient Stir
Browning requires heat and contact time. If you drop the paste into the pan and immediately start frantically stirring it around without ever letting it rest against the hot metal, it will take forever to brown. Spread it out, let it sit for 15 seconds to sizzle and sear, then scrape and stir. Repeat this process. Give it a moment to actually cook.
Mistake 3: The Scorched Earth Policy
There is a very fine line between deeply caramelized and bitterly burnt. Because tomato paste is packed with concentrated natural sugars, it can cross that line in the blink of an eye. If your heat is too high and you turn your back to check your phone, your beautiful brick-red paste will turn black, acrid, and completely unsalvageable. If it burns, you cannot fix it. You have to throw it out, wash the pan, and start over. Stay at the stove.
Mistake 4: Adding the Liquids Too Early
This is the most common offense. You add the paste, give it two stirs, panic that it’s sticking to the bottom, and immediately dump in your chicken stock. You just ruined the reaction. The liquid immediately drops the temperature of the pan below the Maillard threshold, and your paste will remain raw and tinny. Hold your nerve. Let it get dark before you reach for the broth.
Mistake 5: Neglecting the Aromatics
If your wooden spoons keep cracking, it’s time to upgrade your stirring tools, because you are going to need a sturdy, flat-edged wooden spatula for this next part. When you brown the paste, you are creating a sticky fond. If you don’t aggressively scrape that fond off the bottom of the pan when you deglaze, you are leaving all of your hard-earned flavor stuck to the cookware. Scrape like you mean it.
Beyond the Paste: Elevating Your Base Flavor Profile
Once you have mastered the art of browning your tomato paste, you have unlocked the gateway to building incredibly complex, layered flavor profiles without relying on extra, expensive ingredients. You can take this technique even further by pairing it with other culinary secrets.
The Magic of Blooming Spices
Many home cooks make the mistake of sprinkling their dried spices—like chili powder, cumin, or dried oregano—into the wet, simmering liquid at the very end of the cooking process. Dried spices contain fat-soluble essential oils that remain dormant until they are exposed to heat and fat.
Take your aromatics to the next level by blooming them in oil alongside the paste. During the last 30 seconds of your pincage, when the tomato paste is beautifully dark and the oil is bubbling, sprinkle your dried spices directly into the hot fat. The heat will instantly toast the spices, releasing their volatile oils and creating an intoxicating, deeply fragrant aroma. The toasted spices will bind with the caramelized tomato paste, creating a unified, incredibly robust flavor base for your chili or stew.
The Umami Amplifiers (Because Tomatoes Need Friends)
While browned tomato paste is an umami powerhouse on its own, it loves to play with other savory ingredients. If you really want to blow the minds of your dinner guests, try sneaking in a few umami amplifiers during the pincage stage.
A tiny splash of soy sauce, a dash of Worcestershire, or even a very finely minced anchovy fillet melted into the hot oil alongside the tomato paste will exponentially increase the savory depth of your dish. Don’t worry, your sauce won’t taste like fish or Asian takeout; these ingredients simply provide a massive dose of glutamates that harmonize perfectly with the caramelized tomatoes, creating a rich, meaty backbone that will make people beg you for the recipe.
The Final Verdict: Your Kitchen, Your Rules
Cooking does not have to be an intimidating, stressful chore reserved for culinary school graduates with fancy tweezers and a superiority complex. The difference between a bland, tinny, disappointing weeknight dinner and a spectacular, mind-blowing meal usually comes down to understanding a few basic principles of kitchen science.
You do not need a Michelin star to make great food. You just need to know how to manipulate heat, fat, and time. By taking an extra two minutes to push your onions aside, drop your tomato paste into hot oil, and let the Maillard reaction work its undeniable magic, you are taking complete control of your ingredients. You are neutralizing the harsh, metallic acidity of the canning process and unlocking the sweet, deeply savory potential hidden inside that humble little tin.
So the next time you find yourself standing over the stove on a Tuesday night, exhausted and tempted to just dump everything into the pot and walk away, stop. Take a breath. Turn up the heat. Fry that paste until it turns the color of a rusted brick, deglaze the pan with authority, and taste the difference.
Your palate—and anyone lucky enough to eat at your table—will thank you. Now get out of here, go check your cupboards for toxic non-stick pans, throw them in the trash where they belong, and go make something delicious.






