
Listen, we need to have a serious intervention about what is happening in your skillet. We have all been there: you drop a small fortune on a beautifully marbled, thick-cut ribeye or a pristine filet mignon. You get your pan screaming hot, you lay the meat down, and instead of that glorious, aggressive sizzle that promises a steakhouse-quality crust, you hear a pathetic, sputtering hiss. A few minutes later, you flip the meat, only to reveal a pale, rubbery, unappetizing slab of gray protein sitting in a murky puddle of its own juices.
It is a culinary tragedy. It is also entirely preventable.
As a home cook, you do not need a culinary degree, a commercial kitchen, or a thousand-dollar salamander broiler to achieve a mind-blowing, mahogany-brown crust on your proteins. You just need to understand a little bit of basic kitchen physics and embrace a zero-cost prep technique that takes exactly ten seconds. If you want to stop ruining your weeknight dinners and discover the magic of paper towels, you have to realize that surface moisture is the absolute enemy of a good sear.
Grab a glass of wine, pull up a stool, and let’s dive deeply into the science of why your steaks are turning out gray, and exactly how to fix it forever.
The Anatomy of a Gray Steak: Why Wet Meat is the Enemy
To understand how to fix the problem, we first have to understand the crime scene. When you buy a piece of meat—whether it is a premium steak, a pack of chicken thighs, or a tray of pork chops—it is usually sealed in plastic. Inside that packaging, the meat naturally releases a liquid known as “purge.” (And no, it is not blood. It is a mixture of water and myoglobin, a protein found in muscle tissue).
When you pull that steak out of the plastic, the surface is completely saturated with this myoglobin-rich water. If you take that wet steak and immediately throw it into a hot pan, you are not searing it. You are boiling it. You might as well be throwing it into a pot of soup. This is the exact same frustrating phenomenon that happens when your ground beef steams in the pan instead of getting those crispy, caramelized edges for your taco night.
Water is the ultimate thermal thief. It completely hijacks the heat of your pan, violently dropping the temperature of the metal and actively preventing the chemical reactions required for browning. To fully grasp why wet meat is the death of flavor, we have to put on our safety goggles and look at the thermodynamics of stovetop cooking.
The Thermodynamics of the Sear: A Masterclass in Kitchen Physics
I promise I will not bore you with pretentious chef-speak, but we do need to talk about science. Specifically, we need to talk about temperature thresholds, phase changes, and the most important chemical reaction in all of cooking.
The 212°F Boiling Point Barrier
Under normal atmospheric pressure, water boils at 212°F (100°C). This is a hard, physical limit. Liquid water cannot get hotter than 212°F. When you place a wet steak into a hot pan, the surface of that meat cannot exceed 212°F until every single microscopic drop of water has evaporated.
Your burner might be cranking out intense heat, and your pan might have started at a blistering 450°F, but the moment that wet meat hits the metal, the pan’s thermal energy is immediately redirected away from cooking the meat and toward boiling the water. The surface temperature of the steak is artificially capped at the boiling point.
The Latent Heat of Vaporization (The Ultimate Energy Thief)
Here is where the physics get truly wild. Boiling water away takes an astronomical amount of energy. In thermodynamics, this is known as the “latent heat of vaporization.” It takes roughly 2,260 Joules of energy to turn just one single gram of liquid water into steam. To put that into perspective, it takes over five times more energy to turn boiling water into steam than it does to heat that same water from freezing cold to the boiling point.
When your steak is wet, your pan is forced to expend a massive amount of its stored heat energy just to perform this phase change. As the water evaporates, it literally sucks the heat right out of the metal. By the time the water is finally gone, your pan has lost so much temperature that it simply does not have the thermal horsepower left to sear the meat.
The Maillard Reaction Threshold
Why does the 212°F boiling barrier matter? Because of the Maillard reaction.
Named after the French chemist Louis-Camille Maillard, who first described it in 1912, the Maillard reaction is a complex chemical process that occurs between amino acids (proteins) and reducing sugars when they are subjected to high heat. It is the holy grail of cooking. It is the reaction responsible for the deep, savory, complex flavors of a seared steak, the golden crust of a baked loaf of bread, and the rich aroma of roasted coffee beans.
Here is the catch: The Maillard reaction does not even begin to kick in until the surface temperature of the food reaches approximately 280°F to 330°F (140°C to 165°C).
Do you see the problem now? If the surface of your steak is covered in moisture, its temperature is physically locked at 212°F (100°C). The Maillard reaction requires at least 280°F (140°C). It is mathematically and physically impossible to sear wet meat. As long as there is water on the surface, you are steaming your food. By the time the water finally cooks off and the surface temperature can climb into the Maillard zone, the interior of your expensive steak is already overcooked, gray, and ruined.
The “No-Go” Rule: Why You Must Banish Toxic Cookware
Before we talk about the solution, we have to address the elephant in the kitchen. I have zero patience for cheap, toxic kitchenware, and if you are trying to sear a steak in a flimsy, scratched-up non-stick pan, we need to have words.
The Hidden Danger of PTFE and PFAS
Traditional non-stick pans are coated with PTFE (polytetrafluoroethylene), which belongs to a larger class of “forever chemicals” known as PFAS. These pans are designed for gently cooking delicate items like eggs or pancakes on medium-low heat. They are absolutely not designed for the blistering high heat required to sear a steak.
When you heat a traditional non-stick pan to searing temperatures, the chemical coating begins to break down. At temperatures above 500°F (260°C), PTFE coatings can degrade and release highly toxic fumes. If you push them even further, toward 680°F (360°C), the off-gassing becomes a serious health hazard, known to cause a condition called “polymer fume fever”.
Furthermore, high heat aggressively destroys the non-stick properties of the pan. If you have ever wondered why your pans are losing their slip after just a few months of use, it is because you are blasting them with too much heat. It is time to start toxic kitchen gear eviction procedures. Throw those peeling, scratched non-stick pans in the trash where they belong.
The Solution: High Thermal Mass Cookware
To get a steakhouse-quality sear, you need a pan that can hold an immense amount of heat and recover quickly when a cold piece of meat is dropped into it. You need thermal mass.
Your best options are heavy cast iron, thick multi-clad stainless steel, or carbon steel. A heavy cast iron skillet is the classic choice because it absorbs heat like a sponge and refuses to let it go, making it perfect for maintaining the 400°F to 450°F (204°C to 232°C) surface temperatures required for an aggressive sear. Alternatively, if you want something a bit lighter and more responsive, mastering the thermodynamics of carbon steel pans will give you professional-level heat retention with a naturally slick, seasoned surface.
The Paper Towel Protocol: Your Zero-Cost Searing Weapon
Now that we understand the physics of the Maillard reaction and we have safely disposed of our toxic non-stick pans, it is time for the easiest, most effective cooking hack in the world.
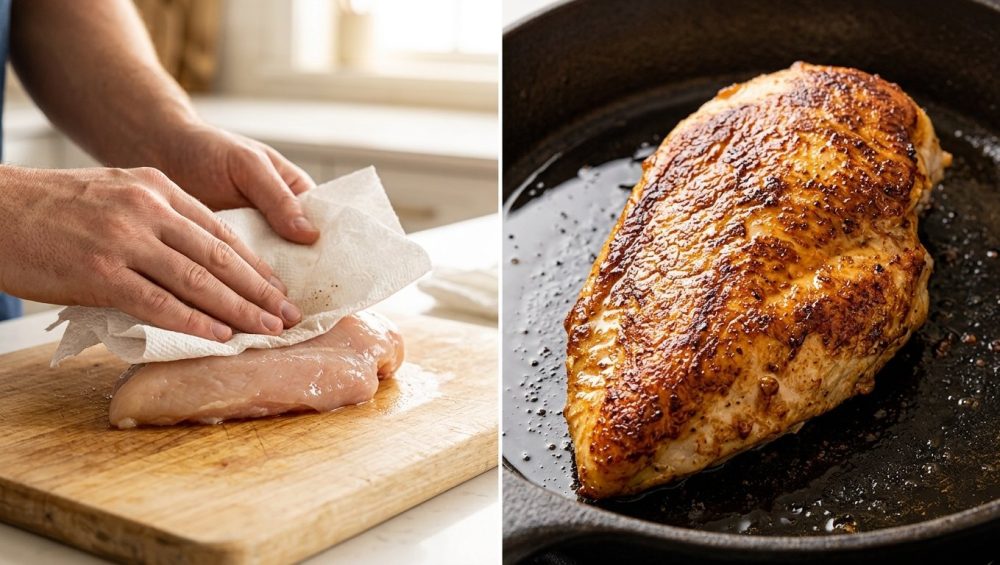
If you want a perfect crust, you must remove the surface moisture. And the best tool for the job is a simple, humble paper towel. Thoroughly patting your protein dry is the absolute non-negotiable first step to achieving a rich, caramelized crust.
How to Properly Pat Your Protein Dry
Do not just lightly dab the top of the steak and call it a day. You need to be aggressive.
- Unpack and Drain: Remove your steak from the packaging and let any excess liquid drain off into the sink.
- The First Pass: Take two heavy-duty paper towels and press them firmly into the top and bottom of the meat.
- The Edges: Do not forget the sides! The edges of a thick steak contain a beautiful ribbon of fat that needs to render and crisp up. Wrap the paper towel around the edges and squeeze gently.
- The Second Pass: If your paper towels are soaked through, throw them away and grab fresh ones. Keep blotting until the paper towels come away completely dry. The surface of the meat should feel tacky and matte, not slick and glossy.
The “Wrap and Press” Method for Wet Proteins
This rule does not just apply to beef. It applies to chicken, pork, and especially seafood. Scallops and fish fillets are notorious for holding onto excess water. If you want perfectly seared fish with a crispy, golden skin, you need to use the “wrap and press” method. Lay your fish fillets on a bed of paper towels, place more paper towels on top, and gently press down with your hands to coax the moisture out of the flesh. Let them sit wrapped in the paper towels for five minutes before cooking.
Beyond the Paper Towel: Elevating to the Dry Brine
If you are cooking a quick weeknight dinner and time is money, the paper towel protocol is your best friend. It takes ten seconds and instantly upgrades your stovetop browning. But what if it is the weekend? What if you have a little extra time and you want to elevate your steak to an absolute Michelin-star level?
Enter the dry brine.
If the paper towel is the basic defense against surface moisture, the dry brine is the nuclear option. Dry brining is a zero-effort technique that simultaneously seasons the meat to its core while creating a desert-dry surface for the ultimate sear.
The Science of Salt, Time, and Osmosis
Here is how the magic of dry brining works. You take your heavily paper-toweled steak, place it on a wire rack set inside a baking sheet, and aggressively salt all sides of the meat. Then, you place it in the refrigerator, completely uncovered, for anywhere from 4 to 24 hours.
When you first apply the salt, it draws moisture out of the meat through a process called osmosis. For the first 30 minutes, the steak will actually look wetter as the liquid pools on the surface. But if you wait, the magic happens. The salt dissolves into that liquid, creating a concentrated brine. Over the next few hours, the meat reabsorbs that salty liquid deep into the muscle fibers, seasoning the steak all the way through.
Meanwhile, the constant circulation of cold, dry air in your refrigerator acts like a gentle dehydrator. It evaporates any remaining moisture on the surface of the meat. When you pull a dry-brined steak out of the fridge the next day, the exterior will be incredibly dry, slightly darkened, and stiff. It looks a little weird, but trust me—when that bone-dry surface hits a 450°F cast iron pan, the Maillard reaction happens almost instantaneously. You will get a crust so thick and crunchy it belongs in a museum.
The Masterclass: Step-by-Step to the Perfect Stovetop Sear
We have the dry meat. We have the heavy pan. Now it is time to execute. Searing a steak is a high-octane, fast-paced event. You need to have your exhaust fan on high, your windows open, and your full attention on the stove.
Step 1: Preheating the Pan and the Leidenfrost Effect
Place your cast iron or stainless steel pan on the burner and turn the heat to medium-high. You need to let the pan preheat completely. Do not rush this. A heavy cast iron skillet can take 5 to 10 minutes to become fully saturated with heat.
If you are using stainless steel, you can test if the pan is ready by utilizing the water drop test. Flick a tiny drop of water into the pan. If it sizzles and evaporates immediately, the pan is not hot enough. If the drop of water forms a perfect little bead and glides around the pan like a mercury marble, you have achieved the Leidenfrost effect. The pan is perfectly heated and ready for oil.
Step 2: Choosing the Right Fat
Do not put butter in a screaming hot pan. Butter contains milk solids that will burn and turn acrid at around 302°F (150°C). You need a cooking fat with a high smoke point to act as the thermal conductor between the pan and the uneven surface of the meat.
Avocado oil, grapeseed oil, or clarified butter (ghee) are excellent choices. If you want to be a true culinary rockstar, use beef tallow. Tallow has a smoke point above 400°F (204°C) and actively contributes to the rich, beefy flavor profile of the crust. Add just enough fat to coat the bottom of the pan. As soon as the oil begins to shimmer and you see the very first wisp of white smoke, it is go-time.
Step 3: The Drop and the Hold
Carefully lay the dry steak into the pan, laying it away from you so you do not splash hot oil on yourself.
Now, listen to me very carefully: Do not touch it.
Do not poke it. Do not press down on it with a spatula. Do not continuously slide it around. Just let it sit there. The heat is doing the work. The Maillard reaction is building complex flavor compounds, and the proteins on the surface are polymerizing to form a crust. Let it sear undisturbed for 2 to 3 minutes until a deep mahogany crust forms, then flip it.
Troubleshooting Common Weeknight Searing Disasters
Even with dry meat and a hot pan, things can occasionally go sideways. Here is how to troubleshoot the most common rookie mistakes.
Overcrowding the Pan
If you are cooking for a family, it is tempting to cram four steaks into one skillet. Do not do it. Remember the thermodynamics we talked about? Every piece of cold meat you add to the pan drops the temperature of the metal. If you add too much meat at once, the pan’s temperature will plummet below the 280°F (140°C) Maillard threshold. The meat will release its internal juices, the pan won’t be hot enough to evaporate them quickly, and suddenly you are boiling your dinner again. Cook in batches, or use two pans.
Dealing with Curled Edges
Sometimes, the moment a piece of meat hits the hot pan, it aggressively bows up in the center like a dome, meaning only the outer edges are touching the metal. If you are wondering why your pork chops always curl, it is because of the band of fat and connective tissue surrounding the exterior of the meat. When that connective tissue hits high heat, it shrinks rapidly like a rubber band, pulling the meat into a cupped shape.
To prevent this, simply take your chef’s knife and make a few shallow vertical slits through the fat cap around the perimeter of the chop or steak before cooking. This severs the “rubber band” and allows the meat to lay perfectly flat against the pan for an even sear.
Fidgeting and Flipping Too Early
If you try to flip your steak and it feels like it is superglued to the pan, stop pulling on it. You are going to tear the crust right off. When meat first hits hot metal, the proteins bind to the surface. But as the Maillard reaction progresses and the crust fully forms and dehydrates, the meat will naturally release itself from the pan. If it is sticking, it simply needs more time. Be patient.
Deglazing: The Ultimate Reward
Once your steak is beautifully seared and resting on a cutting board, look at your pan. It is probably covered in dark, caramelized, stuck-on bits of meat and fat. Those bits are called “fond,” and they are pure, concentrated flavor.
Do not you dare take that pan to the sink and wash it. You are going to make a pan sauce. Place the skillet back on medium heat, toss in some minced shallots, and pour in a splash of wine, broth, or even just water. As the liquid bubbles, use a wooden spoon or a bench scraper to scrape up all that fond. Let the liquid reduce, swirl in a knob of cold butter, and you have just created a restaurant-quality sauce in three minutes. Mastering the art of turning burnt bits into sauce is the hallmark of a truly resourceful home cook.
The Final Sizzle
Cooking an incredible, mind-blowing meal at home does not require expensive gadgets, toxic non-stick pans, or a culinary degree from Le Cordon Bleu. It requires a basic understanding of how heat interacts with food, and the willingness to take a few extra seconds to set yourself up for success.
The next time you bring home a beautiful piece of protein, treat it with the respect it deserves. Banish the surface moisture. Grab the paper towels. Pat that meat down until it is bone dry. Heat up your heavy cast iron, wait for the oil to shimmer, and let the thermodynamics of the Maillard reaction do the heavy lifting.
You have the knowledge. You have the tools. Now go get your pan hot and stop eating gray steak. You deserve better.






