
Let’s get one thing straight right out of the gate: you do not need a culinary degree, a starched white chef’s coat, or a kitchen staffed with overworked line cooks to make a café-quality breakfast at home. I firmly believe that anyone can execute mind-blowing food in a standard home kitchen, provided you have the right tools, a basic understanding of culinary science, and the willingness to ignore pretentious restaurant dogma.
Weekdays in my house are about sheer survival—clever hacks, efficient prep, and getting dinner on the table before I lose my mind. But the weekend? The weekend is when we buy ourselves the time to be absolute perfectionists. It is when we tackle those intimidating culinary projects that make us feel like kitchen gods. And nothing strikes fear into the heart of the weekend culinary hobbyist quite like the elusive, perfectly poached egg.
We have all been there. You have a beautiful piece of sourdough toast waiting. You have your smashed avocado seasoned to perfection. You crack your egg into a pot of hot water, holding your breath, only to watch in horror as the egg white violently explodes into a chaotic, wispy mess of ghostly tentacles. You are left with a sad, naked yolk sitting in a pot of cloudy egg-drop soup. It is frustrating, it is messy, and it makes you want to throw your spatula across the room and order a twenty-dollar delivery breakfast.
But what if I told you that the secret to a perfectly spherical, tightly bound, silky poached egg has absolutely nothing to do with how fast you can stir a pot of water? What if I told you that the solution is sitting in your kitchen right now, masquerading as a simple prep tool?
Grab a cup of coffee (or a mimosa—I don’t judge), pull up a chair, and let’s dismantle the myths, the bad advice, and the frustrating failures of poaching eggs. We are going to dive deep into the biology of the egg, the physics of simmering water, and the foolproof fine mesh strainer trick that will change your weekend brunch game forever.
The Great Poached Egg Lie: Why the Vinegar Vortex is Garbage
If you have ever Googled how to poach an egg, you have undoubtedly been assaulted by the same tired, recycled advice passed down from old-school French culinary institutions. They tell you to bring a massive pot of water to a boil. They tell you to dump in a heavy glug of white vinegar. And then, they tell you to take a whisk and stir the water into a frantic, swirling whirlpool before dropping your egg into the center of the abyss.
I call this the “vinegar vortex,” and I absolutely despise it.
Let’s break down why traditional restaurant chefs insist on this method, and why it is completely impractical—and frankly, inferior—for the home cook.
The Problem with the Whirlpool
The theory behind the whirlpool is that the centrifugal force of the spinning water will wrap the loose, wispy egg whites around the yolk, forcing the egg into a neat little spherical package. In a high-volume restaurant where a line cook is firing off fifty orders of Eggs Benedict during a Sunday rush, this aggressive mechanical manipulation makes sense. They don’t have time to baby each individual egg.
But in your home kitchen? The whirlpool is a recipe for anxiety. If you stir too slowly, the egg still feathers out into a million strands. If you stir too aggressively, the sheer force of the vortex rips the delicate egg white apart, separating it entirely from the yolk. Furthermore, the whirlpool method only allows you to cook one single egg at a time. If you are trying to serve brunch to your family or friends, you will be standing over the stove for twenty minutes, frantically spinning water while everyone else’s toast gets cold.
The Acid Problem
Then there is the vinegar. The culinary science behind adding acid to poaching water is sound: acid lowers the coagulation temperature of the egg white proteins. By adding vinegar, the proteins in the egg white denature and set much faster when they hit the hot water, which theoretically prevents them from spreading out.
However, there is a massive, glaring flaw with this approach: vinegar tastes like vinegar.
When you heavily acidify your poaching water, your beautiful, delicate egg absorbs that sour, astringent flavor. Instead of tasting the rich, buttery notes of the yolk, your egg tastes like a vinaigrette. While there are certain dishes where you might realize your dinner actually needs acid to balance out rich fats, your poaching water is not one of them.
Furthermore, the rapid coagulation caused by the vinegar fundamentally alters the texture of the egg white. Instead of being tender, silky, and cloud-like, the exterior of the egg white seizes up instantly. The result is a tough, rubbery outer skin that squeaks against your teeth. It is the exact same chemical reaction that occurs when you overcook your breakfast in a hot skillet and realize your scrambled eggs are rubbery and unappetizing. We want our poached eggs to be ethereal and delicate, not bouncy.
The Culinary Science of the Incredible, Degrading Egg
To understand how to fix our poached eggs, we have to stop looking at the water and start looking at the egg itself. Cooking is just edible chemistry, and the egg is one of the most complex, fascinating biological structures in your kitchen.
When your poached egg turns into a wispy, feathery mess, it is not because you are a bad cook. It is because you are fighting against the natural, inevitable degradation of the egg’s internal protein structure.
The Anatomy of Albumen
We casually refer to the clear liquid inside an egg as the “egg white,” but its scientific name is albumen. The albumen is not just one uniform puddle of liquid; it is actually composed of two distinct layers: the thick inner albumen and the thin outer albumen.
The thick inner albumen is a dense, gel-like substance that tightly surrounds and protects the yolk. It gets its structural integrity from a fibrous protein called ovomucin, which acts like a microscopic net, trapping water and other proteins in a tight, cohesive matrix.
The thin outer albumen, on the other hand, is exactly what it sounds like: a watery, runny liquid that lacks that strong ovomucin network.
When you crack a farm-fresh egg onto a flat plate, you can clearly see these two distinct layers. The thick albumen will stand up tall and proud, forming a tight, distinct ring around a plump yolk. The thin albumen will spread out slightly around the edges, but it will be minimal. In a perfectly fresh egg, the ratio of thick albumen to thin albumen is about 60 to 40.
The Aging Process and Protein Breakdown
Here is where the trouble begins. The shell of an egg is not a solid, impermeable wall; it is porous, covered in thousands of microscopic holes. From the exact moment an egg is laid, it begins to age, and a slow, invisible chemical reaction takes place.
Moisture and carbon dioxide slowly evaporate and escape through the pores of the shell, while ambient air moves in. As the carbon dioxide leaves the egg, the internal pH of the albumen begins to rise. A freshly laid egg has a slightly alkaline pH of around 7.6. After a few weeks of sitting in a refrigerator, that pH can climb past 9.0.
This drastic shift in alkalinity causes the ovomucin protein matrix to break down and disintegrate. The tight, gel-like net that holds the thick albumen together literally dissolves. As the egg ages, the ratio of thick albumen to thin albumen plummets. The once-proud, tight egg white becomes a loose, watery, runny puddle.
This degradation is the sole reason your poached eggs look like sea monsters. When you drop an older egg into hot water, that degraded, watery thin albumen has no structural integrity. It immediately flows away from the yolk, spreading out into the water and cooking into those hideous, wispy white strands.
This aging process affects every method of egg cookery. It is the reason why older eggs spread out into massive, flat puddles in your frying pan, and it is the reason why your scrambled eggs leak water onto your plate if they aren’t bound properly. Ironically, while fresh eggs are mandatory for poaching, this exact same biological aging process is what makes older eggs ideal for hard-boiling. As the pH rises and the egg shrinks slightly away from the shell, it becomes infinitely easier to peel; if you use farm-fresh eggs for boiling, you will quickly find that your eggs refuse to peel without taking chunks of the white with them.
Decoding the Carton: The Julian Date
If fresh eggs are the secret to poaching, how do you know if the eggs at your grocery store are actually fresh? Do not look at the “Sell By” or “Expiration” date. Those dates are arbitrary and can be set weeks after the eggs were actually packed.
Instead, look for the Julian Date. On every USDA-graded carton of eggs, there is a three-digit number printed near the expiration date, ranging from 001 to 365. This number represents the exact day of the year the eggs were washed, graded, and packed. A carton labeled 001 was packed on January 1st; a carton labeled 365 was packed on December 31st.
If you are planning a weekend brunch, check the Julian date on the cartons at the store and buy the number that is closest to the current day of the year. The closer the number, the fresher the egg, the tighter the ovomucin network, and the better your poached egg will be.
The Mesh Strainer Trick: Your Weekend Brunch Savior
Even if you buy the freshest eggs available, there will always be a small amount of thin, watery albumen present. To achieve that flawless, café-style spherical poached egg, we have to get rid of that watery liquid before the egg ever touches the hot water.
Enter the fine mesh strainer.
This brilliant culinary technique, championed by modern food science pioneers like J. Kenji López-Alt and Chef Heston Blumenthal, completely eliminates the need for the chaotic vinegar vortex. It is elegant, it is simple, and it relies on basic physics rather than frantic stirring.
How the Strainer Hack Works
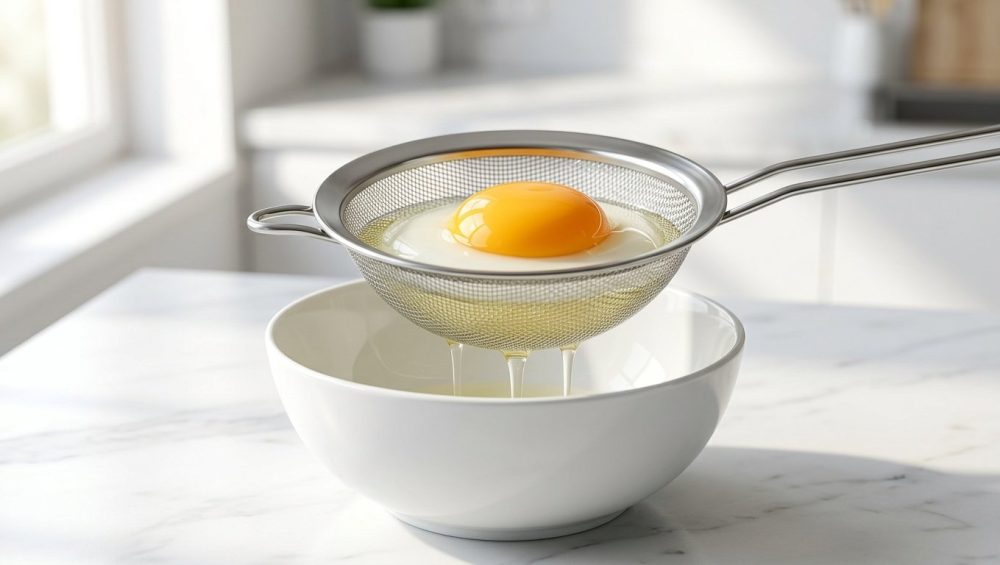
The concept is beautifully straightforward. You take a fine stainless steel mesh strainer and set it over a small bowl. You crack your raw egg directly into the strainer.
Because the thick inner albumen is held together by its gel-like protein matrix, it will stay perfectly intact, cradling the yolk in the center of the strainer. But the degraded, watery thin albumen? It lacks the viscosity to hold itself together. Gravity takes over, and the thin, runny egg white drips right through the tiny holes of the mesh, leaving it behind in the bowl below.
What you are left with inside the strainer is the absolute purest, tightest portion of the egg. You have effectively isolated the thick albumen.
When you gently lower this strained egg into a pot of simmering water, there is no loose, watery liquid to feather out and create those ugly white tentacles. The thick albumen immediately wraps around the yolk, naturally forming a beautiful, tight teardrop shape. No whirlpool required. No sour vinegar required. Just pure, unadulterated, perfectly cooked egg.
This trick also scales brilliantly. Because you aren’t relying on a spinning vortex in the center of the pot, you can strain multiple eggs in individual ramekins and gently slip them into a wide pot of water, allowing you to poach four, six, or even eight eggs simultaneously. You can finally host a brunch where everyone eats at the exact same time.
Temperature Control: Respect the Simmer
Now that we have hacked the egg white, we have to talk about the cooking medium: the water. If you take a perfectly strained egg and drop it into a pot of violently boiling water, you are going to ruin it.
The Violence of the Rolling Boil
Water boils at 212°F (100°C) at sea level. At this temperature, water is rapidly turning into steam, creating massive, violent bubbles that churn and crash against each other.
Dropping a delicate, raw egg into a rolling boil is an act of culinary violence. The sheer mechanical turbulence of the boiling water will rip the egg apart before the proteins even have a chance to set. Furthermore, the extreme heat will instantly overcook the exterior of the egg white, turning it rubbery and tough while leaving the yolk ice-cold in the center.
Careful temperature management is a hallmark of good cooking. Just as blasting a delicate piece of fish with uncontrolled, blazing heat is a surefire way to ruin your dinner—you must respect the heat if you want to stop ruining your salmon—you must treat your eggs with the same gentle respect.
The Thermodynamics of Protein Coagulation
To understand the perfect poaching temperature, we have to look at the specific proteins inside the egg. The egg white is made up of approximately forty different proteins, but the two most important for our purposes are ovotransferrin and ovalbumin.
Ovotransferrin makes up about 12% of the egg white and begins to set and coagulate at a very low temperature—around 140°F (60°C).
The yolk, which is packed with complex lipoproteins and fats, begins to thicken and set at around 158°F (70°C).
Ovalbumin, which makes up a massive 54% of the egg white, requires more heat. It does not begin to fully set and solidify until the temperature reaches 180°F (80°C).
If we want a poached egg with a fully set, opaque white and a liquid, runny yolk, our water temperature needs to be hot enough to coagulate the ovalbumin, but gentle enough not to mechanically destroy the egg or instantly overcook the exterior.
The magic number is between 180°F and 190°F (82°C to 88°C).
In culinary terms, this is a gentle simmer. You are not looking for a rolling, churning boil. You are looking for water that is steaming heavily, with tiny, champagne-like bubbles gently releasing from the bottom of the pot and quietly rising to the surface.
If you struggle with temperature control on your stovetop, use an instant-read digital thermometer. Bring the water to a boil, then lower the heat until the thermometer registers a steady 185°F. Maintaining this gentle, consistent heat ensures that the egg white cooks evenly and tenderly. If you allow the water to get too hot, the proteins will seize and squeeze out their moisture; this is the same thermodynamic failure that occurs when meat sticks to your stainless steel skillet because the heat wasn’t properly managed.
Gear Talk: The “No-Go” Rule on Toxic Kitchenware
As the Sassy Sous-Chef, I have a very strict, non-negotiable rule in my kitchen: we do not use cheap, toxic, poorly manufactured gear. Time is money, and your health is priceless. There is absolutely no excuse for using kitchenware that actively degrades into your food.
To execute the mesh strainer trick, you need exactly one piece of specialized equipment: a fine mesh strainer.
The Danger of Plastic Strainers
Do not, under any circumstances, use a cheap plastic mesh strainer for this technique. I see these flimsy, neon-colored plastic strainers in discount bins all the time, and they infuriate me.
When you rest a plastic strainer over a pot of steaming, 185°F water, or worse, if you use the strainer to gently lower the egg directly into the hot water, that plastic is subjected to thermal stress. Cheap plastics are notorious for leaching endocrine-disrupting chemicals, phthalates, and microplastics when exposed to high heat.
Cooking should nourish you, not poison you. Using melting plastic tools in hot water is just as egregious as using cheap, filler-packed silicone utensils that degrade over time until your silicone spatulas taste like soap and ruin your sauces. It is just as toxic as buying a discount, mystery-metal pan coated in cheap Teflon, blasting it with aerosol propellant sprays, and completely ruining your nonstick pans as the chemical coating flakes off into your scrambled eggs.
Invest in Stainless Steel
You must use a high-quality, 100% stainless steel fine mesh strainer. Stainless steel is non-reactive, incredibly durable, and completely safe at high temperatures. It will not warp, it will not rust if properly cared for, and it will certainly not leach chemicals into your perfectly poached eggs.
A good stainless steel strainer is an essential, multi-purpose tool. You will use it for sifting flour, dusting powdered sugar, straining silky pan sauces, and, of course, achieving brunch perfection. Curating high-quality, safe, and durable tools is the absolute foundation of building a beautifully organized dream kitchen that you actually want to cook in.
Do yourself a favor: audit your kitchen drawers this weekend. Throw away the peeling non-stick, toss the melting plastic spoons, and invest in solid stainless steel, carbon steel, and wood. Your food will taste better, and your body will thank you.
The Step-by-Step Foolproof Masterclass
We have covered the biology, the thermodynamics, and the gear. Now, it is time to put it all together. Here is my definitive, idiot-proof, step-by-step masterclass for executing the perfect poached egg using the mesh strainer trick.
Step 1: The Setup
Fill a wide, shallow saucepan or skillet with about three inches of water. You want a wide pan, not a tall stockpot, so that you have plenty of surface area to work with if you are poaching multiple eggs. Place the pan over medium-high heat and bring it to a rolling boil.
Once it reaches a boil, heavily salt the water. We are not adding vinegar, so salt is our only seasoning. Treat it like pasta water—it should taste pleasantly salty. The salt also slightly increases the density of the water, which helps the egg float rather than sinking and sticking to the bottom.
After salting, turn the heat down to low. Watch the water carefully until the violent, rolling bubbles subside into a gentle, peaceful simmer (180°F – 190°F). You should see small champagne bubbles rising from the bottom, and a wisp of steam across the surface.
Step 2: The Strain
While the water is coming to a simmer, prep your eggs. Place your stainless steel fine mesh strainer over a small bowl. Crack your fresh egg directly into the strainer.
Let it sit for about 30 to 60 seconds. You will see the thin, watery, degraded albumen drip through the mesh and pool in the bowl below. If the egg is slightly older, you can gently swirl the strainer in a circular motion to help coax the watery whites through the mesh.
Once the dripping stops, you are left with a pristine, tight egg white encompassing the yolk.
Step 3: The Transfer
If you are cooking multiple eggs, gently tip the strained egg from the strainer into a small ramekin or teacup. Repeat the straining process for your remaining eggs, placing each strained egg into its own individual ramekin. This allows you to deploy all the eggs into the water in rapid succession.
If you are only cooking one egg, you can leave it right in the strainer.
Step 4: The Slide
Bring the lip of the ramekin (or the strainer) as close to the surface of the simmering water as possible. Do not drop the egg from a height; the impact will cause unnecessary turbulence.
Gently tip the ramekin and let the egg slide smoothly into the water. Because you removed the watery albumen, the egg will immediately pull together into a tight, neat little sphere. No whirlpool required.
If you are cooking multiple eggs, slide them into the water one by one, working your way around the perimeter of the pan so you remember the order in which they were added.
Step 5: The Simmer and Time
Set a timer. For a perfectly poached egg with a firm, opaque white and a warm, liquid, runny yolk, you want exactly 3 to 4 minutes.
Do not touch the eggs for the first 60 seconds. Let the ovalbumin protein set. After a minute, you can gently nudge the eggs with a slotted spoon just to ensure they aren’t sticking to the bottom of the pan, but otherwise, leave them alone. Let the gentle heat do the work.
While the eggs are poaching, this is the perfect time to drop your sourdough in the toaster, fan out your avocado, and wipe down your cutting board. (Pro tip: when clearing away stubborn toast crumbs or dried bits from your prep station, you absolutely need a bench scraper to make cleanup effortless).
Step 6: The Extraction
When your timer goes off, carefully lift the first egg out of the water using a slotted spoon or a spider skimmer.
Give the egg a gentle poke with your finger. The white should feel firm and springy, but the center should still feel soft and yielding, like a water balloon. If the white feels incredibly squishy and translucent, it needs another 30 seconds. If the whole thing feels like a golf ball, you’ve overcooked it—congratulations, you made a hard-boiled egg without the shell.
Step 7: The Drain
Never put a wet poached egg directly onto toast. It will instantly turn your beautiful, crispy sourdough into a soggy, unappetizing sponge.
When you lift the egg out of the water with your slotted spoon, briefly rest the bottom of the spoon on a folded paper towel or a clean kitchen towel for three seconds. This wicks away the excess poaching water.
Gently slide the perfectly dry, perfectly spherical poached egg onto your prepared toast. Hit it with a crack of fresh black pepper, a sprinkle of flaky sea salt, and a dash of hot sauce or paprika.
Grab your knife, slice through the center, and watch that liquid gold spill out over the plate.
The Weekend is Yours
There is a profound sense of satisfaction that comes from mastering a technique that once intimidated you. Cooking is not magic, and it is not an exclusive club reserved for people who went to culinary school in France. It is just science, heat, and a little bit of patience.
By understanding how an egg ages, respecting the temperature of your water, and utilizing a simple stainless steel mesh strainer, you have completely eliminated the guesswork, the mess, and the stress of the dreaded vinegar vortex. You have taken control of your kitchen.
So this weekend, skip the crowded brunch lines. Skip the overpriced cafe menus. Put on your favorite playlist, pull out your safe, high-quality kitchen gear, and poach some eggs like an absolute professional. You’ve got this. Now go make something delicious, and for the love of all things culinary, throw away that plastic strainer.






