
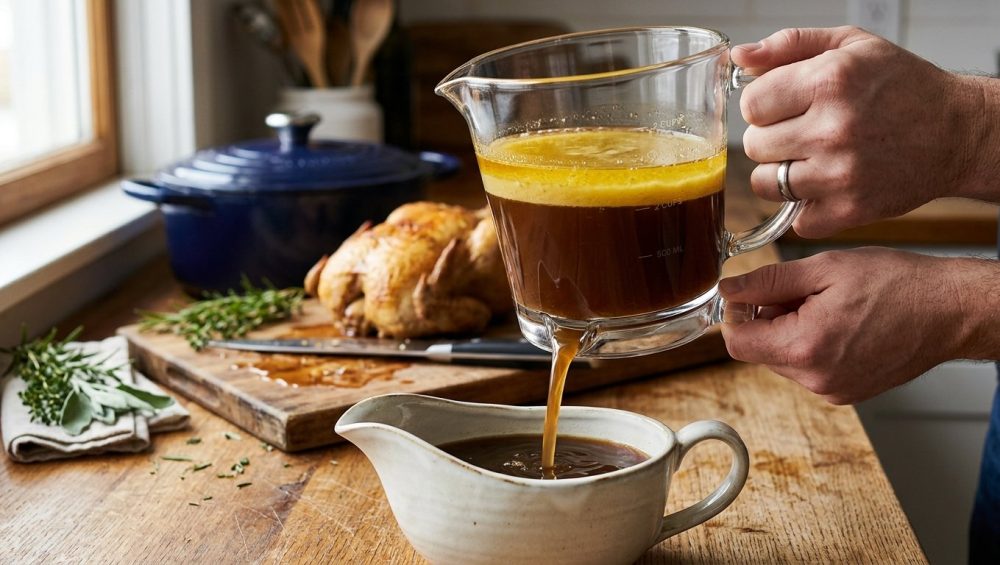
Listen up, weekend culinary warriors. You have spent the better part of your Saturday carefully coaxing flavor out of roasted soup bones, meticulously chopping a mountain of mirepoix, and babysitting a simmering Dutch oven for hours on end. You have done everything right. But when you finally lift the heavy cast-iron lid to behold your culinary masterpiece, you are greeted not by a shimmering, deeply flavored broth, but by a thick, opaque, unappetizing oil slick floating aggressively on the surface. Your beautiful braise looks like an environmental disaster, and your heart sinks.
You grab a spoon and begin the agonizing, futile process of trying to skim the hot oil off the top without losing your precious liquid gold. Thirty minutes later, your wrist aches, your counter is covered in greasy drips, and you have somehow managed to throw away half a cup of your actual soup while leaving a solid layer of fat behind. It is maddening. It is entirely unnecessary. And it is exactly why you need to stop torturing yourself and let physics do the heavy lifting.
If you want to transform your chaotic, frustrating cooking routine into a peaceful daily habit, you need the right tools. Spoon-skimming is for people with too much time and not enough sanity. Enter the bottom-release fat separator. It is a deceptively simple gadget that utilizes the fundamental laws of gravity and liquid density to effortlessly remove excess oil from pan drippings, broths, and stews. It feels like absolute magic, but it is just pure, unadulterated science. Today, we are going to dive deep into exactly why your soups end up greasy, why your current skimming methods are failing you, and how this brilliant, physics-based tool guarantees cleaner, professional-tasting dishes without that heavy, greasy mouthfeel.
The Anatomy of a Kitchen Disaster: Why Your Soups and Sauces Turn into Oil Slicks
Before we can fix the problem, we need to understand why it happens in the first place. When you set out to make a rich, comforting weekend meal, you are usually dealing with cuts of meat that are highly prized for their flavor and connective tissue—think chuck roasts, pork shoulders, short ribs, and bone-in chicken thighs. These are not lean, boring chicken breasts. These are robust proteins that require low, slow heat to become tender.
The Science of Rendered Fat
As you subject these glorious cuts of meat to prolonged heat, two distinct structural transformations occur. First, the tough connective tissue, primarily collagen, begins to break down and dissolve into gelatin at around 160°F (71°C). This gelatin is exactly what you want; it gives your broth that luxurious, lip-smacking body and silky texture.
However, simultaneously, the adipose tissue (the visible white fat and the intramuscular marbling) begins to melt and render out into pure liquid lipid. A standard four-pound chuck roast or a large batch of chicken thighs can easily release upwards of a half-cup to a full cup of pure, liquid fat during the cooking process. Because fat is hydrophobic (it repels water), it refuses to mix with the water-based stock you are creating. Instead, it pools together. When slow cooker meals or heavy braises are left to simmer unattended for hours, this massive volume of rendered fat has nowhere to go but up, forming a thick, impenetrable layer on top of your cooking liquid.
The Dreaded Greasy Mouthfeel
Why is this oil slick such a culinary crime? It comes down to how the human palate perceives flavor. When you take a bite of a poorly degreased stew or a spoonful of oily soup, that liquid fat immediately coats the inside of your mouth, your tongue, and your palate.
This hydrophobic coating acts as a physical barrier between your taste buds and the food. Your taste receptors rely on water-soluble flavor compounds—like salts, acids, and sugars—to register taste. When your tongue is wrapped in a layer of grease, those water-soluble flavors cannot penetrate the barrier. The result is a dish that tastes simultaneously heavy, cloying, and surprisingly bland. No matter how much salt or expensive wine you added to the pot, the grease mutes everything. Removing this fat is not just about cutting calories; it is an absolute requirement for unlocking the bright, complex flavors you worked so hard to build.
The Spoon-Skimming Delusion (And Why You Need to Stop)
For generations, home cooks have been taught that the only way to deal with this rendered fat is to skim it off manually. This has led to a variety of tedious, inaccurate, and frankly infuriating techniques that belong in the culinary dark ages.
The Spoon-Skimming Trap
We have all been there. You tilt the heavy pot to one side, hoping the fat pools at the edge. You take a shallow spoon or a ladle and try to delicately skim just the very top millimeter of liquid. But fluid dynamics are working against you. The moment you press the spoon into the surface, you disrupt the stratification. The fat swirls, the broth rushes in, and you inevitably scoop up a depressing mixture of 70% fat and 30% of your precious, hard-earned broth. You repeat this process forty times, standing over a steaming stove, burning your knuckles, and slowly losing your mind. In the end, you still leave a greasy sheen on the soup, and you have wasted a significant portion of your actual meal.
The Refrigerator Chill Method: A Time-Sucking Trap
Then there is the chilling method. This is the technique where you take your entire pot of soup, let it cool on the counter, and then wrestle it into the refrigerator overnight. The next morning, the fat has solidified into a hard, white disc that you can simply lift off and throw away.
Is this method effective? Yes, absolutely. It works flawlessly for homemade chicken broth that you are preparing in advance for future use. But what if you are making Sunday dinner on a Sunday? You cannot look your hungry dinner guests in the eye and tell them the short ribs will be ready on Monday afternoon because the braising liquid needs a 12-hour nap in the fridge. The chill method is a time-sucking trap that completely ruins same-day cooking projects.
The Ice Cube Trick: A Diluted Disappointment
Desperate cooks often turn to the “ice cube trick.” This internet-famous hack involves tossing a handful of ice cubes into your hot soup or wrapping ice in a cheesecloth and dragging it across the surface. The theory is that the extreme cold will instantly congeal the fat, allowing you to pluck it out.
Here is the brutal truth: it is a parlor trick. While a small amount of fat might cling to the ice, you are simultaneously melting frozen water directly into your meticulously reduced, deeply concentrated sauce. You are watering down your flavor profile to save five minutes. If you want to elevate your cooking and stop making greasy gravy, you need to abandon these desperate hacks and invest in a tool that actually works.
Enter the Bottom-Release Fat Separator: A Masterclass in Kitchen Physics
The solution to your greasy woes is not a new technique; it is a better piece of equipment. The bottom-release fat separator is a triumph of practical kitchen engineering. It requires no electricity, no overnight chilling, and no frustrating spoon maneuvers. It relies entirely on the immutable laws of physics.
How Gravity and Liquid Density Do the Work for You
To understand why this tool is so brilliant, we have to talk about specific gravity. Specific gravity is the ratio of the density of a substance to the density of water. Pure water has a specific gravity of 1.000. Your rich, gelatinous bone broth or pan sauce is mostly water, so it sits very close to that 1.000 mark.
Rendered animal fat, on the other hand, is significantly less dense than water. Liquid beef tallow, pork lard, and chicken schmaltz typically have a specific gravity hovering around 0.900. Because the fat is lighter and less dense, gravity dictates that it absolutely must rise to the top, while the heavier, denser water-based liquid sinks to the bottom. They will not stay mixed unless an emulsifier is introduced and mechanical force is applied. If you simply pour the mixture into a vessel and let it sit for a few minutes, physics guarantees a perfect, distinct separation of the two liquids.
The Flaw with Traditional Spout Separators
Now, you might be thinking, “I already have a fat separator! It looks like a little plastic watering can.”
I hate to break it to you, but those traditional spout-style separators are deeply flawed. Yes, they pour from the bottom of the pitcher via a long spout that connects at the base. However, as you tip the pitcher forward to pour out the good broth, the liquid level inside the main chamber tilts. The fat layer creeps dangerously close to the spout entrance. By the time you get to the last quarter of your broth, the fat inevitably gets sucked down the side and right into your gravy boat. Furthermore, those long, narrow spouts are an absolute nightmare to clean. Fat congeals inside the spout, goes rancid, and ruins your next meal.
The Genius of the Bottom Valve
The bottom-release fat separator completely eliminates the tilting problem. It looks like a large measuring cup, but instead of a spout, it features a small, perfectly sized drainage hole in the absolute dead center of the bottom. This hole is securely sealed by a spring-loaded silicone plug, which is attached to a trigger mechanism built seamlessly into the handle.
When you pour your greasy drippings into the vessel and wait three minutes, the liquids stratify perfectly. The fat floats to the top; the dark, rich broth sinks to the bottom. When you are ready, you hold the separator over a saucepan and simply squeeze the trigger in the handle. The silicone plug lifts straight up, and gravity pulls the heavy, fat-free broth straight down through the hole. There is no tilting. There is no disruption of the fat layer. As the liquid drains, the fat layer simply lowers uniformly until it reaches the very bottom of the cup. The millisecond before the fat enters the drainage hole, you release the trigger. The plug snaps shut, trapping 100% of the unwanted grease inside the cup, leaving you with pure, unadulterated liquid gold in your saucepan.
It is a flawless system. In fact, the rigorous testers at America’s Test Kitchen crowned a bottom-release model (specifically the Cuisipro) as their absolute top pick, decisively beating out the old-school spout versions because the bottom-drain mechanism offers unparalleled control and accuracy.
The “No-Go” Rule: How to Choose a Fat Separator That Won’t Poison Your Food
Here is where I have to get brutally honest with you. As a staunch advocate for the home cook, I have a strict “no-go” rule when it comes to cheap, toxic kitchenware. I am fully committed to banishing toxic kitchen gear from your home, and fat separators are one of the biggest offenders on the market.
The Dangers of Cheap, Toxic Plastics
Think about what you are doing with this tool. You are taking boiling hot, 212°F (100°C) liquid directly from a roasting pan or a simmering stockpot and pouring it into a plastic container. If you buy a cheap, poorly manufactured plastic fat separator from a discount bin, you are making a massive mistake.
Many low-end plastics, particularly older polycarbonates, contain Bisphenol A (BPA) and its chemical cousins (BPS, BPF). BPA is a well-documented endocrine disruptor that mimics estrogen in the human body, potentially leading to hormonal imbalances, reproductive issues, and developmental problems.
The danger of BPA is exponentially amplified by heat. A landmark study conducted by researchers at the University of Cincinnati tested polycarbonate plastic bottles and found that when exposed to boiling hot water, the plastic released BPA up to 55 times more rapidly than when exposed to room-temperature water. Let that sink in. Fifty-five times more rapidly.
Furthermore, a recent study published in the International Journal of Environmental Research and Public Health analyzed chemical migration in plastics and found that BPA leaching increases noticeably even at moderately warm temperatures (around 28°C or 82°F). You are not pouring 82°F water into your fat separator; you are pouring boiling, acidic, salty meat drippings into it. If your separator is made of cheap plastic, the heat and the acidity will aggressively strip the chemical plasticizers out of the vessel walls and leach them directly into the gravy you are about to feed your family. It is unacceptable.
Glass vs. High-Quality Tritan: The Only Acceptable Options
You have two, and only two, acceptable options when purchasing a bottom-release fat separator.
The first is heat-resistant borosilicate glass. Borosilicate glass (the material originally used for laboratory beakers and vintage Pyrex) is completely inert. It contains no plasticizers, no BPA, and no toxic chemicals. It can withstand massive thermal shock, meaning you can pour boiling liquid into it without fear of it shattering or leaching. The only downside to glass is that it is heavier and, if dropped on a tile floor, it will break.
The second option is Tritan plastic. If you prefer the lightweight, shatterproof nature of plastic, you must ensure the product is explicitly made from Tritan. Tritan is a high-performance, medical-grade copolyester that is rigorously tested and certified to be completely free of BPA, BPS, and all other bisphenol compounds. It is engineered specifically to withstand high heat without warping, degrading, or leaching endocrine disruptors into your food. The Cuisipro model, which won the America’s Test Kitchen testing, is constructed from this high-quality Tritan material. Do not compromise on this. Your health is worth the extra ten dollars.
A Step-by-Step Guide to Effortless Degreasing
Now that you have acquired a safe, high-quality bottom-release fat separator, it is time to put it to work. Using this tool is incredibly straightforward, but following a precise workflow will guarantee flawless results every single time. You can easily save a ruined, greasy meal without ordering takeout if you follow these steps.
Step 1: The Transfer (Strain the Chunks)
Most high-quality bottom-release separators come with a hard plastic or stainless steel strainer lid that sits securely over the top opening. Do not skip using this lid. Carefully lift your roasting pan or Dutch oven and pour the entire volume of liquid—fat, broth, aromatics, and all—directly through the strainer top.
The strainer will catch the mushy carrots, the exhausted celery, the whole peppercorns, the stray bay leaves, and any rogue bone fragments. You are left with a perfectly smooth, albeit highly greasy, liquid in the main chamber. Discard the spent aromatics caught in the strainer; they have already given their life and flavor to the broth.
Step 2: The Settling Period (Patience is a Virtue)
This is the most critical step, and the one impatient cooks always mess up. You must put the separator down on the counter and walk away. Give it a minimum of three to five minutes.
If you just aggressively poured the liquid into the vessel, you have temporarily agitated the fat and water molecules. You must give gravity the time it needs to pull the heavier water molecules down and push the lighter lipid molecules up. You will literally watch the liquid clarify before your eyes as a distinct, sharp line forms between the dark, rich broth on the bottom and the pale, cloudy fat on the top. Do not rush this. Let the physics work.
Step 3: The Bottom Release (Pure Liquid Gold)
Once the stratification is complete and the line between fat and broth is razor-sharp, hold the separator over a clean saucepan or a storage container. Gently squeeze the trigger mechanism in the handle.
The silicone plug at the bottom will lift, and a glorious stream of pure, fat-free liquid will pour out. Keep your eyes glued to the liquid line inside the separator. As the heavy broth drains, the fat layer will drop lower and lower. The very moment the bottom of the fat layer touches the drainage hole, release the trigger. The valve snaps shut instantly. You have just perfectly separated your liquids. Dump the trapped fat into a disposable container (never down your sink drain, unless you enjoy paying plumbers), and proceed with your recipe.
Beyond Soup: Unleashing the Full Potential of Your Fat Separator
While it is an absolute lifesaver for Sunday stews, the bottom-release fat separator is not a one-trick pony. Once you understand the mechanics of liquid density, you will find yourself reaching for this tool constantly.
Elevating Holiday Pan Drippings and Gravy
Thanksgiving and Christmas dinners are stressful enough without having to frantically spoon-skim a roasting pan while a massive turkey gets cold on the cutting board. When you pull your holiday bird from the oven, the bottom of the roasting pan is filled with incredibly flavorful, caramelized brown bits (the fond) and savory juices, completely drowned in an ocean of rendered poultry fat.
Simply deglaze the roasting pan with a splash of wine or stock, scrape up the fond, and pour the entire messy mixture into your fat separator. Within minutes, you can drain off the pure, intensely flavored turkey juices to use as the base for a show-stopping gravy, while reserving exactly two tablespoons of the trapped fat to make your roux. It is the secret to a flawless, professional-grade holiday meal.
Perfecting Braising Liquids for Short Ribs and Pulled Pork
Braising is the ultimate weekend cooking project, but heavily marbled cuts like beef short ribs and pork shoulder release a staggering amount of grease. Often, recipes will instruct you to remove the meat, strain the braising liquid, and reduce it on the stove until it becomes a thick, sticky glaze.
If you attempt to reduce a braising liquid that still contains a half-inch of liquid fat, you will fail. The fat will prevent the sauce from emulsifying, leaving you with a broken, oily mess. If you constantly find that your pan sauces are watery or excessively greasy, running the braising liquid through a bottom-release separator before the reduction stage is the ultimate fix. Once the fat is removed, the remaining liquid will reduce beautifully, naturally thickening into a glossy, restaurant-quality sauce.
Clarifying Butter the Easy Way
Here is a genius, off-label use for your bottom-release fat separator: clarifying butter. Clarified butter (or ghee) is simply pure butterfat with the water and milk solids removed. It has a much higher smoke point than regular butter, making it perfect for high-heat searing.
Normally, clarifying butter involves melting it on the stove and meticulously skimming the white milk solids off the top, while trying not to disturb the water that sinks to the bottom. It is tedious. Instead, gently melt a pound of butter in a saucepan and pour it into your fat separator.
Here is where the physics flip, but the tool remains just as effective. In butter, the water and the milk solids are actually heavier and denser than the pure butterfat. Therefore, the water and white milk solids will sink to the very bottom of the separator, while the pure, golden butterfat floats on top! Hold the separator over a waste container, pull the trigger, and drain away the cloudy water and milk solids. The moment the pure golden butterfat reaches the bottom valve, release the trigger. You now have a pitcher full of perfectly clarified butter, ready to be poured into a storage jar. It is brilliantly easy.
Maintenance and Care: Keeping Your Gear Pristine
Because you are dealing with liquid animal fats, proper cleaning and maintenance of your separator is non-negotiable. Fat goes rancid quickly, and if you leave a microscopic film of old grease inside the valve mechanism, it will impart a stale, funky flavor to the next dish you make.
Cleaning the Silicone Valve
The bottom-release mechanism is fantastic, but it does introduce a moving part into the equation. Most high-quality models are designed to be easily disassembled. You must take the time to unscrew or detach the silicone plug from the bottom of the pitcher.
Wash the pitcher, the strainer lid, and the silicone plug mechanism thoroughly in hot, heavily soapy water. While many Tritan models claim to be dishwasher safe, I highly recommend hand-washing the silicone plug and the spring mechanism to ensure no greasy residue is left hiding in the crevices.
Preventing Odor Retention in Plastics
Even high-quality Tritan plastic can occasionally hold onto strong odors if you process a particularly pungent batch of lamb stock or a heavily spiced curry broth. To prevent your separator from perpetually smelling like roasted garlic, give it a quick soak in a solution of warm water, white vinegar, and a tablespoon of baking soda after washing.
Also, a quick safety tip: once you have separated your broth and returned it to the stove to reduce, it will boil much more aggressively now that the heavy blanket of fat is gone. Do yourself a favor and use a fine mesh splatter screen over your saucepan to keep your stovetop pristine while the liquid bubbles away.
Conclusion: Reclaiming Your Time and Your Tastebuds
Cooking should be a joy, not a battle against fluid dynamics. Mastering the art of the home kitchen does not mean you have to suffer through tedious, outdated techniques just to prove you are a “real” cook. It means understanding the science behind your food and utilizing smart, efficient tools that allow you to work smarter, not harder.
The bottom-release fat separator is the ultimate embodiment of that philosophy. By harnessing the simple power of gravity and liquid density, it eliminates one of the most frustrating chores in the culinary world. It protects your palate from greasy, muted flavors, it saves your precious broths from the sink drain, and it gives you back your time.
So, banish the skimming spoon to the back of the utensil drawer. Stop watering down your hard work with ice cubes. Invest in a safe, high-quality, bottom-releasing physics marvel. The next time you pull a glorious Sunday roast out of the oven, you can confidently separate the fat, whip up a flawless pan gravy, serve it over a mountain of fluffy mashed potatoes, and finally enjoy the pure, unadulterated flavor you worked so hard to achieve. Your tastebuds, and your sanity, will thank you.






