
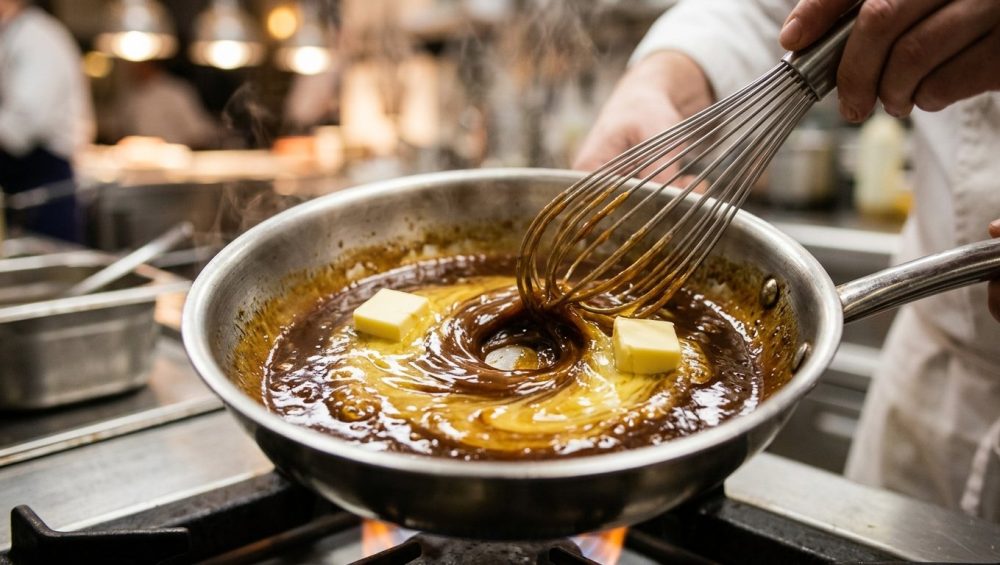
You just nailed the perfect sear on a beautiful, expensive cut of steak. The crust is a mahogany masterpiece, the internal temperature is a flawless medium-rare, and it is resting peacefully on your cutting board. You look down at your skillet. It’s a treasure trove of caramelized brown bits—the fond—just begging to be transformed into a luxurious, restaurant-quality pan sauce. You deglaze with a splash of wine, let it reduce, and then, following the vague instructions of some internet recipe, you toss in a soft, room-temperature knob of butter.
Instantly, tragedy strikes.
Instead of a glossy, velvety sauce that coats the back of a spoon, you are left staring at a broken, greasy oil slick. The milk solids have separated into grainy little specks, and a pool of yellow fat is aggressively floating on top of a watery liquid. You sigh, pour this disappointing grease puddle over your gorgeous steak, and wonder why your home cooking never quite matches the glossy perfection of a high-end bistro.
Listen to me carefully: It is not your lack of a culinary degree. It is not because you didn’t stir fast enough. It is entirely because of your butter’s temperature.
Welcome to the magic of monter au beurre. This classic French technique translates to “mounting with butter,” and it is the absolute definitive secret to achieving a flawless pan sauce. I am completely obsessed with this technique because it embodies my core cooking philosophy: you can achieve mind-blowing, professional-level food on a random Tuesday night without spending hours in the kitchen. It takes exactly zero extra minutes to use cold butter instead of warm butter, yet it completely alters the chemical structure of your dinner.
Today, we are going to dive deep into the food physics, interfacial chemistry, and thermal kinetics of why pan sauces break, and exactly how you can master the simple, foolproof science of the cold butter emulsion. Grab a whisk, and let’s fix your greasy gravies for good.
The Anatomy of a Pan Sauce: Why Yours Looks Like an Oil Slick
To understand why your sauce is breaking, we have to talk about the fundamental laws of nature. Specifically, we need to address the fact that oil and water absolutely hate each other.
Water molecules are polar, meaning they have a positive and negative end, which makes them want to stick together. Fat molecules (like the butterfat you are trying to incorporate) are nonpolar. When you dump them into the same pan, they will naturally repel one another and separate based on their differing densities. Your pan sauce is essentially a battlefield between the water-based liquids (your wine, stock, or vinegar) and the fats (the rendered fat from your meat and the butter you add).
When you successfully force these two enemies to hold hands and play nice, you create what is known in kitchen science as an emulsion. An emulsion is a colloidal dispersion of two immiscible liquids. In a proper pan sauce, you are creating an oil-in-water emulsion, where microscopic droplets of fat are evenly suspended throughout the water-based liquid. This suspension is what gives a great sauce its thick, viscous body and its mirror-like, glossy shine.
But emulsions are incredibly fragile. They are thermodynamically metastable, meaning they are constantly looking for an excuse to fall apart. If the temperature gets too high, or if the fat droplets become too large, the emulsion breaks. The fat molecules instantly seek each other out, merging back together into a greasy pool, while the water separates to the bottom.
This is exactly what happens when you drop room-temperature, softened butter into a bubbling hot pan. Solid butter itself is actually a delicate water-in-oil emulsion, consisting of about 80% butterfat, 15% to 18% water, and 1% to 2% milk solids. When butter hits a temperature of around 158°F, its natural emulsion breaks. If you toss soft butter into a 212°F boiling liquid, it melts instantaneously. The fat separates from the water and milk solids in a split second, creating massive fat droplets that refuse to suspend in your sauce.
Furthermore, if your liquid hasn’t been reduced properly to concentrate its natural thickeners, you are fighting an uphill battle. This is precisely why your pan sauces are watery to begin with. Without a proper reduction or a gelatin-rich base, the water phase is too thin to physically support the heavy fat droplets, practically guaranteeing a greasy separation.
The Hero of the Skillet: The Science of Monter au Beurre
So, how do we defy the laws of physics and force this fat to suspend beautifully in our liquid? We use the monter au beurre technique. We use freezing-cold butter, straight from the refrigerator, cut into small cubes.
Why does the temperature of the butter matter so much? It all comes down to interfacial chemistry and thermal kinetics.
When you whisk a cube of freezing-cold butter into a hot (but not boiling) liquid, the butter melts gradually. It has a precise melting range of about 90°F to 95°F (32°C to 35°C). Because it is melting slowly, you have the time to mechanically shred the melting fat into millions of micron-scale droplets with your whisk.
This creates an absolutely massive surface area—an enormous oil-water interface. Tiny droplets reflect light more evenly, which is what gives a properly mounted sauce that incredible restaurant-quality gloss. Furthermore, because these microscopic fat droplets are packed so tightly together in the water phase, they physically bump into each other and resist flow, which dramatically increases the viscosity and thickness of the sauce without you needing to add a single pinch of flour or cornstarch.
But mechanical whisking isn’t enough on its own. To keep those tiny fat droplets from merging back together, you need an emulsifier. Emulsifiers are miraculous little molecules that have a hydrophilic (water-loving) head and a lipophilic (fat-loving) tail. They act as chemical bridges, grabbing onto a water molecule with one hand and a fat molecule with the other, locking them together.
Here is the brilliant part: butter comes with its own built-in emulsifiers. The milk solids in butter contain natural phospholipids, most notably lecithin. Peer-reviewed studies in food science have proven that the lecithin in butter reduces the interfacial tension between oil and water by a staggering 63%. By whisking in cold butter slowly, you are allowing these natural milk proteins and lecithin molecules to coat the tiny fat droplets as they melt, stabilizing the emulsion before it ever has a chance to break.
The “No-Go” Rule: Why Your Toxic Pan is Sabotaging Your Sauce
Before we get into the exact step-by-step masterclass of building your sauce, we need to have a very serious conversation about your equipment. As your sassy sous-chef, I have zero patience for toxic, disposable kitchenware.
If you are trying to build a pan sauce in a scratched, peeling, cheap non-stick skillet, you have already failed before you even turned on the stove. I will shout this from the rooftops until I am blue in the face: stop ruining your nonstick pans with high-heat searing, and stop using them for pan sauces!
Teflon and mystery-coating pans are explicitly designed to prevent food from sticking. But when you are making a pan sauce, you want the food to stick. You need the Maillard reaction to occur. You need those caramelized proteins and sugars to adhere to the bottom of the pan to create the fond. That sticky brown layer is the entire flavor foundation of your sauce. Cheap non-stick pans prevent fond from forming, meaning your sauce will taste like salty dishwater. Worse, when you heat these cheap coatings to searing temperatures, they can degrade and release toxic forever chemicals (PFAS) into your food. No thank you.
To make a proper pan sauce, you need a high-quality, fully-clad stainless steel skillet, or a well-seasoned carbon steel pan. Now, I know what you are thinking. You are terrified of stainless steel because your food always glues itself to the metal. But once you learn proper temperature control and the Leidenfrost effect, you will understand everything sticks to your stainless simply because you are putting cold protein into a lukewarm pan. Heat the pan properly, let the meat release naturally, and you will be left with a gorgeous layer of fond.
Additionally, the shape of your cookware plays a massive role in emulsion stability. If you are reducing a delicate liquid, stop scorching your sauces in thin, flimsy pots with hard 90-degree corners where a whisk can’t reach. A curved saucier or a heavy-bottomed skillet ensures even heat distribution and allows your whisk to constantly agitate the entire volume of the liquid, preventing localized hot spots that can instantly shatter your butter emulsion.
Speaking of agitation, ditch the cheap plastic spatulas and the splintering wooden spoons that harbor last week’s raw chicken bacteria. I don’t know who needs to hear this, but why your wooden spoons keep cracking is because you are leaving them soaking in the sink like a swamp monster. Invest in a proper flat-edged silicone spatula for scraping fond, and a high-quality metal whisk for the butter mounting phase. If you are struggling to get your emulsions smooth, it is likely because your whisking technique is inefficient. Understanding why your gravy is lumpy often comes down to using a giant balloon whisk in a shallow skillet, rather than a flat roux whisk that maximizes contact with the bottom of the pan.
The Masterclass: How to Execute Monter au Beurre Step-by-Step
Alright, grab your apron. We are going to build a flawless, glossy, restaurant-quality pan sauce. This technique applies whether you are searing a ribeye, pan-frying chicken thighs, or roasting pork chops.
Step 1: The Sear, The Rest, and The Fat Management
You’ve seared your meat in your stainless steel skillet. Remove the meat and set it on a cutting board to rest. Look at the pan. You should see a beautiful, sticky brown layer of fond. You will also see a pool of rendered fat.
Here is where rookie mistakes happen. You cannot build a stable emulsion if the fat-to-water ratio is wildly out of balance. If you leave six tablespoons of rendered beef tallow in the pan and only add a quarter cup of wine, your sauce will break immediately. Pour off the excess fat, leaving just about one tablespoon in the pan to cook your aromatics. If you struggle with separating fat from roasting pan drippings for larger meals, stop making greasy gravy and invest in a bottom-release fat separator. But for a simple skillet meal, just tilt the pan and spoon off the excess.
Step 2: Sautéing the Aromatics
Drop your heat to medium-low. Add your finely minced shallots or onions to the residual fat. Sweat them until they are translucent. Now, add your minced garlic. Do not add the garlic at the same time as the onions. The reason why your garlic always burns is because it has a significantly lower moisture content and higher sugar content than onions, meaning it scorches in seconds.
If you want to add a punch of umami, stir in a dollop of tomato paste now. You must let the tomato paste fry in the fat for a minute until it turns a deep rust color. The reason why your tomato paste tastes metallic and raw is because you are skipping this crucial caramelization step.
Step 3: Deglazing the Pan
Turn the heat up slightly and pour in your cold liquid. This could be a dry white wine, a robust red, chicken stock, or even just water with a splash of vinegar. The thermal shock of the cold liquid hitting the hot metal will instantly release the fond. Grab your flat spatula and aggressively scrape every single brown bit off the bottom of the pan. That is pure, concentrated flavor.
Step 4: The Reduction
Let the liquid bubble and reduce. You want to cook off the harsh alcohol (if using wine) and evaporate the excess water to concentrate the flavors and the natural gelatin from your stock. Reduce the liquid by at least half, until it lightly coats the bottom of the pan and has a slightly syrupy consistency.
Step 5: The Whisper Principle (Crucial Temperature Control)
This is the make-or-break moment. Your liquid is boiling at 212°F. If you add butter now, it will instantly melt into a greasy oil slick. You must drop the temperature.
Turn the burner off completely, or slide the skillet to a cool burner. You want the liquid to stop aggressively bubbling. The magical sweet spot for a stable butter emulsion is between 180°F and 200°F. It should be warm enough to melt the butter, but cool enough that the milk proteins don’t instantly coagulate and separate.
Many home cooks ruin their sauces because they blindly trust the dial on their stove instead of looking at the food. You must learn to read the physical cues of the pan. Just like you must stop trusting your oven dial and use a thermometer, you must stop trusting your stove’s “Low” setting and look for the visual cue of a bare, gentle tremble in the liquid.
Step 6: The Cold Butter Whisk (Monter au Beurre)
Take your freezing-cold, unsalted butter out of the fridge. Cut it into small, pea-sized or hazelnut-sized cubes. Do not throw a giant two-ounce block in at once.
Toss in two or three small cubes. Immediately begin whisking vigorously in a figure-eight motion. The figure-eight pattern creates turbulent flow, which shears the butterfat into microscopic droplets much more efficiently than stirring in a circle.
As the first cubes are almost completely melted, toss in a few more. Keep whisking. You will literally watch the chemistry happen before your eyes. The dark, thin, watery liquid will suddenly transform. It will turn opaque, lighten in color, and take on a glossy, velvety, thick texture.
Once all the butter is incorporated, stop. Do not put the pan back on the heat. Do not let it boil. Taste it, adjust the salt and pepper, add a squeeze of fresh lemon juice or chopped herbs to brighten it up, and immediately pour it over your resting meat.
Advanced Emulsion Engineering: Troubleshooting the Broken Sauce
Look, we all make mistakes. Maybe the phone rang, maybe you left the burner on, and suddenly your beautiful sauce breaks. The butterfat separates, and you are left with a greasy, broken mess. Do you throw it away? Absolutely not. You are a resourceful home cook, and science is on your side.
The Rescue Mission
If your emulsion breaks, it usually means the fat-to-water ratio has tipped too far in favor of the fat, or the temperature spiked too high. To fix it, you need to re-introduce a stable water phase and rapidly agitate it.
Pull the pan completely off the heat. In a separate clean bowl, add one tablespoon of cold heavy cream or a splash of warm water. Slowly drizzle your broken, greasy sauce into the cream while whisking like your life depends on it. The proteins and water in the cream will act as a fresh foundation, grabbing onto the rogue fat droplets and forcing them back into suspension.
The Emulsifier Cheat Codes
If you want to guarantee your sauce never breaks in the first place, you can utilize the power of extra emulsifiers. While butter has natural lecithin, sometimes it needs a little help, especially if you are holding the sauce for a dinner party.
- Dijon Mustard: Mustard seeds contain a high level of natural mucilage, a complex carbohydrate that acts as a phenomenal emulsifier. Whisking a half-teaspoon of Dijon into your reduction before adding the butter will act as an insurance policy, locking the fat and water together permanently. Plus, the sharp tang of the mustard cuts through the richness of the butter beautifully.
- Xanthan Gum: If you want to get slightly molecular, a microscopic pinch of xanthan gum whisked into the hot liquid will dramatically stabilize the emulsion. Xanthan gum is a hydrocolloid that thickens the water phase, making it so viscous that the fat droplets are physically trapped and cannot merge together. This is how high-end restaurants hold butter sauces warm for hours during service without them breaking.
The Gelatin Factor
A true restaurant pan sauce is usually built on a foundation of homemade veal or chicken stock that has been simmering for 24 hours. That slow simmer extracts massive amounts of collagen from the bones, which converts into gelatin. Gelatin is a protein that adds incredible lip-smacking body to a sauce, and it physically stabilizes emulsions by coating the fat droplets.
If you are cooking on a random Wednesday, you probably don’t have homemade bone broth on hand. You are using thin, watery, store-bought boxed broth. To hack the system, sprinkle a half-teaspoon of unflavored powdered gelatin over your boxed broth and let it bloom for five minutes before pouring it into the pan for deglazing. This perfectly mimics the mouthfeel and emulsion-stabilizing properties of a 24-hour restaurant stock, ensuring your cold butter has a strong, viscous base to bind with.
Weeknight Efficiency vs. Weekend Perfection
I am a firm believer that your cooking approach should adapt to your schedule.
The Weeknight Hustle: Time is money. You just worked an eight-hour day and you want a phenomenal dinner without a pile of dishes. Sear some chicken breasts, remove them, and toss in a minced shallot. Deglaze with a splash of whatever white wine is open in the fridge, and scrape up the fond. Reduce it for exactly two minutes. Pull it off the heat, whisk in three cubes of cold butter, and you are done. The monter au beurre technique takes literally 60 seconds of whisking. You have elevated a boring chicken breast into a bistro-quality meal in less time than it takes to microwave a frozen dinner.
The Weekend Project: It’s Saturday night. You have a beautiful thick-cut pork chop, a bottle of good wine, and time to kill. This is when you lean into the perfectionism. You take the time to deeply caramelize the shallots. You deglaze with a dry vermouth, reduce it until it is almost a syrup (au sec). You add a rich, gelatin-heavy homemade stock, reducing it slowly until it coats the back of a spoon (nappé). You pull it off the heat, let the temperature drop to exactly 190°F, and meticulously whisk in your cold, high-quality European cultured butter one tiny cube at a time. You finish it with fresh thyme and a crack of black pepper. The result is a sauce so profoundly rich and glossy you could see your reflection in it.
The Final Word: Embrace the Butter
Cooking is not magic. It is just applied physics and chemistry that you get to eat.
For too long, home cooks have been intimidated by French culinary terms and the fear of broken sauces. But once you understand the simple mechanics of an emulsion—that oil and water need an emulsifier, that fat droplets need to be microscopic, and that heat is the enemy of stability—you hold the keys to the kingdom.
The monter au beurre technique is the ultimate testament to the power of technique over ingredients. You don’t need a pantry full of expensive truffles or a culinary degree to make mind-blowing food. You just need to understand that the temperature of your butter dictates the chemical structure of your sauce.
So the next time you sear a beautiful piece of meat, don’t you dare wash that pan. Don’t you dare throw away that precious fond. And for the love of all things culinary, leave your butter in the fridge until the absolute last second. Treat the heat with respect, whisk with intention, and watch as basic kitchen science transforms your weeknight dinner into a masterpiece. Now get out of here, go buy some high-quality unsalted butter, and start cooking like the expert you are.






