Listen, I love a lazy weekend morning as much as the next person, but if you invite people over for brunch and serve them a pot of grey, congealed spackle, we need to have a serious conversation. We have all been there. You envision a beautiful, Pinterest-worthy morning gathering. You imagine your friends and family casually wandering into your kitchen, mugs of artisanal coffee in hand, ready to customize a steaming, fragrant bowl of perfectly textured hot grains. But then you lift the lid off your stovetop pot, and reality hits. Instead of a luxurious, creamy porridge, you are staring down a gelatinous, rubbery mass that looks and acts more like industrial wallpaper paste than human food. It coats the spoon. It seizes up as it cools. It is an absolute culinary tragedy.
But here is the good news: you do not need a culinary degree to fix this. If you want to master the art of effortless hosting, you need to understand that weekend mornings should be about genuine connection, not chaotic line-cook energy. You should not be sweating over a hot stove, aggressively whisking a pot while your guests mingle without you. The secret to a stress-free, build-your-own breakfast bowl bar lies entirely in understanding the basic science of starch, choosing the correct variety of grain, and utilizing hands-off thermal holding techniques. Today, we are going to leave absolutely no stone unturned. We are going to break down the molecular biology of your breakfast, banish the toxic cookware ruining your food, and build a foolproof, scalable system for batch-cooking oatmeal that stays perfectly creamy for hours.
The Molecular Sabotage: Why Your Oatmeal Turns to Glue
To understand why your oatmeal gets gummy, we have to take a brief detour into the microscopic world of starch chemistry. I promise to keep the pretentious chef-speak to a minimum, but if you want to cook like an expert, you need to respect the science of your ingredients.
Oats, like all grains, are packed with starch granules. These granules are microscopic energy storage units made up of two distinct types of carbohydrate molecules: amylose and amylopectin. Amylose is a straight, linear chain of glucose molecules. When it dissolves in water, it forms a relatively stable, pleasant gel network. Amylopectin, on the other hand, is a highly branched, bushy molecule. When amylopectin is released into liquid, it acts like a microscopic traffic jam. It tangles, it clumps, and it creates a sticky, viscous, glue-like texture.
When you combine raw oats with cold water, nothing much happens. But as you apply heat, a process called gelatinization begins. Right around 140°F to 160°F, the starch granules inside the oats begin to absorb water like tiny sponges. They swell up, becoming fragile and bloated. This is exactly what you want to happen; this is how the grain softens and becomes edible.
However, here is where everything goes wrong. When those starch granules are fully swollen and fragile, they are highly susceptible to physical shear—which is a fancy scientific term for you stirring the pot like a maniac. Aggressively stirring your boiling grains is one of those seven rookie kitchen mistakes that will instantly turn your breakfast into a pot of glue. When you forcefully agitate the swollen oats, you physically smash the starch granules open. They rupture prematurely, violently dumping massive payloads of that sticky, highly branched amylopectin directly into your cooking liquid.
This is the exact same mechanical process we use to our advantage when making risotto. In a risotto, we want to slowly coax the starch out of Arborio rice through constant stirring to create a naturally creamy sauce. But oatmeal is not risotto. If you apply the risotto method to oats, you do not get a creamy sauce; you get a rubbery, cohesive mass that will stick to the roof of your mouth.
Furthermore, as the oatmeal cools down on the buffet table, a secondary chemical reaction occurs called retrogradation. The starch molecules that were happily swimming in the hot liquid begin to cool, slow down, and realign themselves into a rigid, crystalline structure. This is why leftover oatmeal turns into a solid hockey puck in your refrigerator. To prevent both the initial gumminess and the secondary seizing, we must control the agitation, control the temperature, and, most importantly, choose the right oat.
The Great Grain Showdown: Choosing the Right Oat
All oatmeal starts its life as the exact same thing: a whole oat groat. The groat is the intact, hulled kernel of the oat plant, containing the fibrous bran, the starchy endosperm, and the nutrient-dense germ. The only difference between the bags of oats sitting on your grocery store shelf is how aggressively that groat was processed before it was put into the packaging. You don’t need to decode pretentious recipe jargon to understand why certain oats work for a crowd and others end in disaster.
Instant Oats: The Absolute Enemy
Let me be perfectly clear: instant oats have absolutely no place on a breakfast bowl bar. Instant oats are heavily processed. The whole groats are steamed for a long time, rolled paper-thin, and often dehydrated. Because they are so thin and pre-cooked, their surface area is massive. The moment hot water hits them, their fragile cellular structure collapses, and they instantly release all their starch.
While they might cook in sixty seconds, they turn into a homogenous, mushy paste almost immediately. Furthermore, because they break down so rapidly in the digestive tract, instant oats have a high glycemic index (often hitting 79 to 83 on the GI scale). They will spike your guests’ blood sugar, leading to a mid-morning crash. If you attempt to hold instant oats in a slow cooker for a two-hour brunch, you will be serving your guests a pot of disintegrated liquid mush. Avoid them entirely.
Rolled Oats: The Weekday Warrior
Rolled oats, often labeled as “Old Fashioned” oats, are the middle ground. The whole groats are steamed to soften them, and then run through heavy steel rollers to flatten them into distinct flakes. They cook in about five to ten minutes on the stovetop.
For a quick, efficient Tuesday morning breakfast before work, rolled oats are fantastic. They retain enough structural integrity to offer a pleasant chew, and they are packed with beneficial beta-glucan fiber. However, when it comes to hosting a weekend gathering, rolled oats are a massive risk. Because they have been flattened, their starchy interior is still highly exposed. If you try to hold a large batch of rolled oats over a heat source for an extended period, they will eventually succumb to the moisture and heat, losing their texture and crossing the line into gummy territory. They simply cannot survive the holding process required for a relaxed buffet.
Steel-Cut Oats: The Undisputed King
If you are batch-cooking for a crowd, steel-cut oats (sometimes called Irish oats) are your only acceptable option. Steel-cut oats are exactly what they sound like: the raw, whole oat groat has simply been chopped into two or three smaller pieces by a steel blade. They are not steamed, and they are not rolled flat.
Because they retain their dense, three-dimensional structure, their surface area is minimal. This means the starch is locked safely inside the grain. They take significantly longer to cook—usually 25 to 30 minutes of gentle simmering—but the payoff is extraordinary. They boast a low glycemic index (around 53), providing slow, sustained energy. More importantly for our purposes, they possess an incredible structural resilience. Even after an hour of sitting in a warm chafing dish, steel-cut oats retain a distinct, chewy, caviar-like “pop.” They are the ultimate foundation for a premium breakfast bowl bar.
The “No-Go” Rule: A Brutally Honest Warning About Your Cookware
Before we even discuss ratios and recipes, we need to address the vessel you are cooking in. I am completely uncompromising when it comes to banishing toxic kitchen gear from your home, and this is where we need to have a serious talk.
If you are planning to simmer a massive, sticky batch of oatmeal in a cheap, lightweight, non-stick aluminum pot that you bought at a big-box store five years ago, stop right now. Look at the bottom of that pot. Is the dark grey coating scratched? Is it flaking off at the edges? If the answer is yes, you are actively serving your guests a side of “forever chemicals” with their breakfast.
Traditional non-stick cookware is coated with polytetrafluoroethylene (PTFE), commonly known by the brand name Teflon. Historically, these coatings were manufactured using perfluorooctanoic acid (PFOA), a highly toxic chemical belonging to a broader class of compounds known as PFAS (per- and polyfluoroalkyl substances). While PFOA has largely been phased out due to massive health and environmental scandals, the replacement PFAS chemicals used in modern non-stick pans are structurally similar and carry many of the exact same risks.
These chemicals are called “forever chemicals” because they feature incredibly strong carbon-fluorine bonds that simply do not break down in the environment or in the human body. When ingested, they bioaccumulate in your tissues. Extensive scientific and epidemiological studies have linked PFAS exposure to a terrifying laundry list of health issues, including kidney and testicular cancer, severe endocrine disruption, thyroid disease, elevated cholesterol, and a suppressed immune system.
When a PTFE-coated pan is heated above 500°F (260°C), the chemical structure begins to rapidly decompose, releasing invisible, odorless, toxic fluoropolymer fumes into your kitchen. Inhaling these fumes causes a documented medical condition known as “polymer fume fever,” which presents with severe flu-like symptoms. But even if you are just gently simmering oatmeal at 212°F, a scratched or damaged non-stick coating is a massive liability. Recent independent laboratory analyses have demonstrated that a single scratch on a Teflon pan can release millions of microscopic plastic particles (microplastics and nanoplastics) directly into your food in a matter of minutes.
You are cooking for people you love. Do not feed them microplastics. Do yourself a favor and invest in a few safe, curated kitchen essentials like a heavy-bottomed stainless steel Dutch oven, a high-quality enameled cast-iron pot, or a lead-free ceramic slow cooker insert. Not only are these materials completely non-toxic and unreactive, but their heavy thermal mass provides superior, even heat distribution. This prevents the dreaded “hot spots” that cause oatmeal to scorch and burn to the bottom of the pot.
Mastering the Batch Cook: The Golden Ratios and Methods
Now that we have selected the proper grain and a safe, heavy-bottomed pot, it is time to execute the master batch. Cooking steel-cut oats for a crowd requires precision. You cannot just eyeball the water and hope for the best.
The Liquid-to-Oat Ratio
The ratio of liquid to steel-cut oats dictates the final texture of your porridge.
- For a chewier, more distinct grain: Use exactly 1 cup of steel-cut oats to 3 cups of liquid.
- For a silkier, creamier porridge: Use 1 cup of steel-cut oats to 3.5 or 4 cups of liquid.
If you are hosting a standard gathering of six to eight people, a foolproof batch size is 3 cups of dry steel-cut oats. Based on the creamy ratio, this requires roughly 10.5 to 11 cups of liquid.
The Water vs. Milk Dilemma
Do not cook your oats entirely in milk. While it sounds luxurious, milk proteins and milk sugars (lactose) are highly prone to scorching. A pot of boiling milk will aggressively foam up, boil over your stove, and burn onto the bottom of your pot within minutes. Conversely, cooking oats entirely in water extracts the purest, nuttiest oat flavor, but lacks richness.
The professional compromise is the hybrid approach. Cook the oats in pure water for the majority of the simmering time. Then, during the final five minutes of cooking, stir in a generous splash of heavy cream, whole milk, or a high-quality, barista-blend oat milk to provide that luxurious mouthfeel without the risk of scorching.
The Step-by-Step Stovetop Method
Step 1: The Dry Toast (Non-Negotiable)
Place your heavy-bottomed stainless steel or enameled cast-iron pot over medium heat. Do not add any liquid yet. Add your 3 cups of dry steel-cut oats and a small knob of grass-fed butter or virgin coconut oil. Stir the raw oats constantly for about 3 to 5 minutes. Taking two minutes for toasting your oats first in a dry pan completely transforms their flavor profile. The Maillard reaction occurs, releasing volatile essential oils and giving the oats a rich, deeply nutty aroma that mimics popcorn or toasted almonds. Furthermore, this dry heat slightly alters the exterior starch structure of the chopped groat, creating a microscopic barrier that helps prevent the grain from turning to mush later on.
Step 2: The Boil and Season
Carefully pour in your measured water (e.g., 9 to 10 cups, reserving the dairy for later). Stand back, as the water will aggressively sputter and steam when it hits the hot pot. Immediately add a generous pinch of kosher salt. Do not skip the salt. Unsalted oatmeal is flat, dull, and profoundly depressing. Salt acts as a universal flavor enhancer; it suppresses the perception of bitterness and elevates the perception of sweetness. By properly salting the cooking water, your guests will actually need to add significantly less sugar to their bowls later. Respecting the ratio is a fundamental part of the art of the kitchen, especially when scaling up for a crowd.
Step 3: The Hands-Off Simmer
Bring the pot to a rolling boil, then immediately drop the heat down to the absolute lowest setting your stove allows. Cover the pot with a tight-fitting lid. Now, walk away. Let the oats simmer gently for 25 minutes. Do not lift the lid every two minutes to check on them. Do not drag a wooden spoon through them repeatedly. Remember the starch science: aggressive agitation equals glue. Let the gentle, ambient heat of the water do the work.
Step 4: The Final Fold
After 25 minutes, remove the lid. The oats should have absorbed most of the water and plumped up beautifully. Now, pour in your reserved 1 to 1.5 cups of milk or cream. Using a silicone spatula, gently fold—do not aggressively whip—the dairy into the oats. Turn off the heat and let the pot sit, covered, for another 5 minutes to allow the starches to relax.
The Art of Holding: Keeping It Warm Without Making Glue
Cooking the oats is only half the battle. The true challenge of hosting a morning gathering is the holding phase. Your guests are not going to eat all at once. They will trickle into the kitchen over the course of an hour or two. If you simply leave your Dutch oven on a warm stove burner, the direct bottom heat will eventually scorch the oats, and the surface exposure will cause the top layer to form a thick, unpleasant, leathery skin.
To survive the holding phase, we must look to professional catering strategies. The safe holding temperature for hot food, according to food safety guidelines, is between 140°F and 160°F (60°C to 71°C). Dropping below 140°F enters the “danger zone” where bacterial growth accelerates, and the starch retrogradation we discussed earlier begins to solidify the porridge into a brick.
The Slow Cooker Hack
The absolute best tool for the home cook during a brunch bar is a ceramic slow cooker. Once your oats are perfectly cooked on the stove, immediately transfer them to a pre-warmed slow cooker set to the “Keep Warm” function. The thick ceramic insert provides gentle, omnidirectional heat that envelops the oats rather than scorching them from the bottom up. Keep the lid on to trap the steam and prevent a skin from forming.
The Hydration Station
Even in a covered slow cooker, the oats will continue to slowly absorb ambient moisture as they sit, gradually thickening over time. By utilizing proper batch preservation techniques, you can maintain that perfect, creamy consistency for hours. The secret is the “Hydration Station.”
Keep a small, insulated thermal carafe filled with piping hot milk or hot water right next to the slow cooker. Do not use cold milk from the fridge; adding cold liquid to hot starch shocks the matrix and causes clumping. Every 30 to 45 minutes, check the slow cooker. If the oats are looking a little stiff, pour a splash of the hot liquid from the carafe over the top and gently fold it in with a ladle. This instantly revives the emulsion, loosening the starches and restoring that luxurious, freshly-cooked texture without requiring any violent stirring.
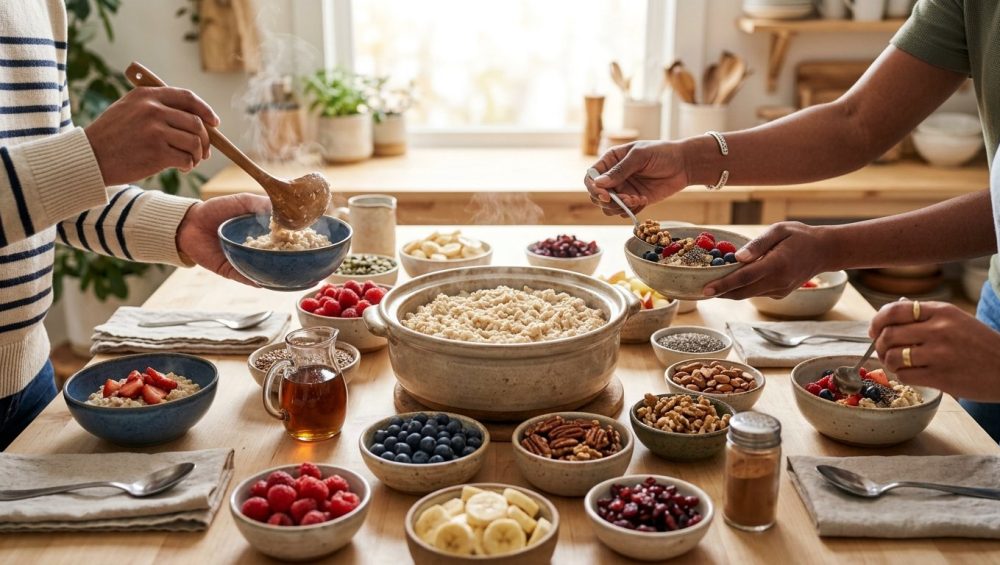
Building the Ultimate Cozy Breakfast Bowl Bar
The oatmeal is your canvas; the toppings are the art. A truly spectacular breakfast bowl bar empowers your guests to customize their flavor profiles, balancing different culinary elements to suit their exact palate. A well-curated topping matrix must hit four distinct categories: The Crunch, The Fruit, The Liquid Gold, and The Richness.
1. The Crunch (Texture)
Oatmeal is inherently soft. To prevent palate fatigue, you must introduce contrasting textures.
- Toasted Nuts: Raw nuts taste like dusty cardboard. You must toast your pecans, walnuts, or sliced almonds in a 350°F oven for 8-10 minutes until they are fragrant and golden. Toasting releases their natural oils and provides a shattering crunch.
- Seeds & Nibs: Offer small bowls of raw pumpkin seeds (pepitas), hemp hearts, chia seeds, and bitter cacao nibs. Cacao nibs, in particular, provide a brilliant, unsweetened chocolate crunch that cuts through heavy syrups.
- Toasted Coconut: Unsweetened, large-flake coconut toasted until golden brown adds a beautiful tropical aroma and a delicate, crispy texture.
2. The Fruit (Acid and Sweetness)
Fruit provides necessary acidity to brighten the heavy grains.
- Fresh Berries: Raspberries, blueberries, and blackberries are classic. For an elevated touch, toss the berries in a tiny splash of lemon juice and a pinch of sugar ten minutes before guests arrive. This macerates the fruit, drawing out a beautiful, glossy natural syrup.
- Stewed Apples or Pears: Dice Granny Smith apples and sauté them in a pan with a little butter, cinnamon, and a splash of bourbon or apple cider until tender. This acts as a warm, comforting compote.
- Avoid Watery Fruits: Melons, grapes, and citrus segments do not belong in hot oatmeal. They clash texturally and water down the porridge.
3. The Liquid Gold (Sweeteners)
Ditch the refined white sugar and the fake, high-fructose pancake syrups. Offer complex, natural sweeteners.
- Real Maple Syrup: Grade A Dark Amber maple syrup offers deep, caramel-like complexity.
- Raw Honey: A high-quality local honey adds floral notes.
- Agave or Date Syrup: Excellent vegan alternatives that dissolve beautifully into the hot grains.
4. The Richness (Fats)
Fat carries flavor and coats the palate, making the bowl feel incredibly satiating.
- Nut Butters: High-quality, runny almond butter, cashew butter, or natural peanut butter.
- Tahini: This is the ultimate wildcard. A drizzle of sesame tahini adds a deeply savory, nutty, slightly bitter profile that pairs miraculously well with maple syrup.
- Dairy: A bowl of plain, whole-milk Greek yogurt, a dollop of mascarpone cheese, or a tiny artisan pitcher of heavy cream allows guests to cool down their hot oats and add a tangy, luxurious finish.
5. The Professional Wildcards
To truly blow your guests’ minds, include a small dish of flaky sea salt (like Maldon). A tiny pinch of flaky salt on top of a sweet, maple-drenched bowl of oats creates an addictive sweet-and-salty dynamic. Additionally, keep a whole nutmeg with a microplane grater on the bar. Freshly grated nutmeg is infinitely more aromatic than the pre-ground dust sitting in your spice cabinet.
Staging and Logistics for Stress-Free Hosting
The final piece of the puzzle is the physical layout of your kitchen. The way you arrange your breakfast bowl bar dictates the flow of the morning. If you set it up poorly, you will create a chaotic traffic jam of confused guests bumping into each other while holding hot bowls. Once you realize how simple it is to produce restaurant-quality food at home, breaking your takeout habit becomes incredibly easy.
The exact same staging strategies that help you throw a relaxed dinner party apply perfectly to a morning brunch bar. You must organize the stations in a logical, linear progression.
- Station One: The Foundation. Start with the bowls. If you want to be an absolute legend, warm the ceramic bowls in your oven at 150°F for 15 minutes before setting them out. Warm bowls keep the oatmeal hot longer. Place the napkins and the slow cooker full of hot steel-cut oats here, along with a large, long-handled ladle.
- Station Two: The Heavy Toppings. Next in line should be the dense, heavy additions. This is where you place the stewed apples, the Greek yogurt, and the nut butters. Guests need to add these while the oats are piping hot so they melt and integrate seamlessly.
- Station Three: The Delicate Crunches & Fresh Fruit. Following the heavy items, lay out the small bowls of toasted nuts, seeds, cacao nibs, and fresh berries. Provide small serving spoons or tongs for each individual bowl to prevent cross-contamination.
- Station Four: The Liquid Finishes. The very end of the line is reserved for the syrups, the honey, the heavy cream, and the flaky sea salt. These are the final garnishes that sit on top of the composed bowl.
- Station Five: The Hardware. Place the eating spoons at the very end of the line. Never put the spoons at the beginning; guests will have to awkwardly juggle a spoon, a bowl, and a napkin while trying to serve themselves from the slow cooker.
By separating the workflow into distinct zones, your guests will naturally move down the line, building their perfect bowl without bottlenecking the kitchen.
Hosting a weekend morning gathering should never fill you with dread, nor should it require you to wake up at 4:00 AM to start prepping. By respecting the science of starch gelatinization, choosing resilient steel-cut oats, utilizing safe and heavy cookware, and deploying professional holding techniques, you eliminate all the variables that lead to gummy, ruined breakfasts. You are no longer just making oatmeal; you are curating an experience. Pour yourself a cup of coffee, step back, and actually enjoy the company of the people you invited over. You’ve earned it.


