
Look, we have all been there. It is a beautiful Saturday afternoon. You have successfully survived the grueling Monday-through-Friday grind, you have managed to master simple weeknight dinners through clever shortcuts, and now you finally have a few precious hours to yourself. You decide to tackle an elaborate, perfectionist baking project. You gather your bowls, your digital scale, and your ingredients. You reach into the pantry for the brown sugar, pull out the bag, and your heart sinks.
Instead of soft, scoopable, molasses-rich sugar, you are holding a literal geological formation. It is a solid, impenetrable brick. You try to squeeze it, and it feels like a cobblestone. You grab a butter knife and start chipping away at it like a desperate archaeologist, sending jagged sugar shrapnel flying across your countertops. Your relaxing weekend baking project has suddenly turned into a high-intensity manual labor job, and your prep-time bottleneck is officially ruining your afternoon.
You do not need a culinary degree to bake like an expert, but you absolutely cannot bake like an expert if your ingredients require a chisel. As a home cook who has set off the smoke detector more times than I care to admit, I can tell you that kitchen frustrations like this are entirely preventable. If you want to actually survive the kitchen with your sanity intact, you need to work smarter, not harder.
The secret to never fighting a rock-hard sugar boulder again is not a fancy gadget, a toxic chemical additive, or a frustrating “kitchen hack” you saw on social media. It is a humble, inexpensive, historically proven tool: the unglazed terracotta disk. Today, we are going to dive deep into the fascinating food science of why your brown sugar turns to stone, why the internet’s favorite softening tricks are secretly ruining your food, and how the ancient magic of baked earth will completely eliminate this universal kitchen headache forever.
The Anatomy of a Brick: The Science of Brown Sugar
Before we can fix the problem, we have to understand the chemistry of the ingredient. I promise to keep the pretentious chef-speak to a minimum, but we need to talk about what brown sugar actually is.
Despite what some natural food marketing campaigns might imply, standard commercial brown sugar is not a fundamentally different species of sweetener than white sugar. It is, at its core, highly refined white sucrose crystals that have been carefully coated in a film of liquid molasses. According to strict FDA Standards of Identity, true brown sugar must contain molasses in a proportion that leaves it at no less than 88% and no more than 96% sucrose by weight on a dry basis. That remaining 4% to 12% non-sucrose fraction is where the magic happens.
That sticky molasses coating is not just there for color; it is a highly functional culinary engine. Molasses is packed with reducing sugars like glucose and fructose, along with minerals, water, and ash. These components drastically lower the activation energy required for the Maillard reaction—the complex chemical cascade responsible for browning and deep flavor development. In laboratory settings using thermogravimetric analyzers, scientists have observed that brown sugar solutions begin to brown at 292°F, whereas pure white sugar does not begin to caramelize until it hits 315°F. This 23-degree temperature gap is the exact reason why your gingerbread sets up so beautifully and why your pecan pie filling thickens properly.
However, that exact same molasses coating is also the culprit behind your pantry woes. Molasses is a viscous liquid containing approximately 15% water. Because of this moisture content, brown sugar has a very specific Equilibrium Relative Humidity (ERH) of 65% to 72%. In plain English, this means that brown sugar is only happy and soft when the air surrounding it holds a humidity level of around 70%.
The Physics of Hardening: Why the Sugar Turns to Stone
Here is where the disaster strikes. When the ambient humidity in your kitchen drops below that 65% threshold—which happens universally during the winter months when indoor heating strips the air of moisture, dropping indoor relative humidity to a desert-like 30% to 40%—a thermodynamic migration occurs. The dry air acts like a sponge, aggressively pulling the water molecules out of the molasses coating on the surface of your sugar.
As the moisture evaporates into the drier air, the viscosity of the molasses increases exponentially. The remaining sugars in the molasses begin to crystallize, acting like a microscopic cement that binds the individual sucrose crystals together into a rigid, inflexible three-dimensional network.
The most shocking part? It does not take much evaporation to ruin your day. Once the moisture loss in the brown sugar exceeds a mere 1.5%, the hardening process becomes completely irreversible without the introduction of heat-assisted rehydration. You are left with a solid block that cannot be scooped, measured, or mixed. And if you try to force it? Your measurements will be wildly inaccurate, and your cookies spread into giant puddles because the moisture ratio in your dough is completely ruined.
The Great Refrigerator Myth and Other Dangerous Hacks
If you complain about hard brown sugar to your friends, you will inevitably be bombarded with well-meaning but fundamentally flawed advice. Let’s brutally debunk the worst offenders right now, because I refuse to let you ruin your expensive baking ingredients.
The Refrigerator Catastrophe
There is a persistent myth that storing brown sugar in the refrigerator will keep it soft. This is scientifically disastrous. The average home refrigerator is a highly controlled environment designed to preserve perishable food by keeping temperatures low and the air incredibly dry. Refrigerators typically maintain a relative humidity of 35% to 40%. Because brown sugar requires an ERH of 65% to stay soft, placing it in the fridge will cause it to desiccate and turn into a brick five times faster than if you just left it on the counter. Furthermore, when you pull cold sugar out of the fridge into a warm kitchen, condensation forms on the surface, which invites bacterial growth and ruins the texture.
The Apple Slice and Bread Wedge Disaster
Your grandmother probably told you to throw a slice of white bread or a wedge of fresh apple into your sugar container to soften it up. While this “hack” does technically introduce moisture, it is a biological hazard.
Brown sugar sits in the “intermediate moisture” zone of food science. It is generally too dry to support nasty bacteria like Salmonella, but it absolutely can and will support xerophilic molds (like Aspergillus and Wallemia) if the humidity gets too high. When you drop a wet piece of fruit or a slice of bread into a sealed jar of sugar, you are uncontrollably spiking the humidity. In laboratory environmental chamber tests, brown sugar exposed to 80% relative humidity developed visible, fuzzy mold colonies in just 68 hours.
Just as fresh berries get moldy when trapped in excess condensation, brown sugar will grow fuzzy mold if you use the wrong softening trick. Furthermore, the sugar will absorb the odors of whatever you put in there. No one wants their premium chocolate chip cookies to taste like fermented apples or stale sourdough.
Enter the Terracotta Disk: Ancient Technology for Modern Kitchens
We need a solution that introduces exactly the right amount of moisture, maintains a stable humidity level, does not introduce mold spores, and does not transfer weird flavors. The answer has been staring humanity in the face since the Neolithic Revolution: Terracotta.
Terracotta, which translates from Italian as “baked earth,” is a porous, coarse clay that has been fired in a kiln at low temperatures. For over twenty thousand years, humans have utilized fired clay to store and protect food and water. From the ancient amphorae used by the Greeks and Romans to transport olive oil across the Mediterranean, to the traditional “zeer pots” used as evaporative coolers in desert climates, terracotta is the ultimate historical food preservation tool.
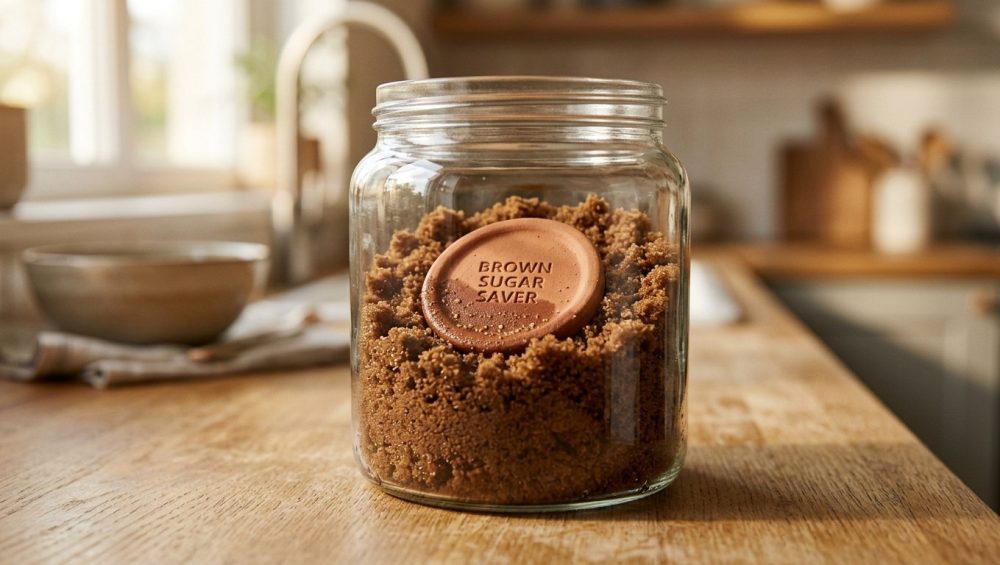
When it comes to your pantry, a small, unglazed terracotta disk is a miracle of fluid dynamics. It operates entirely on the principle of capillary action and soil moisture tension. Because the clay is unglazed, its surface is covered in microscopic pores. When you soak the disk in water, these pores absorb the liquid, holding it deep within the ceramic matrix.
When you place this hydrated disk into an airtight container with your dry brown sugar, the magic happens. The dry air inside the container creates a negative pressure. This suction gently and slowly pulls the water molecules out of the microscopic pores of the terracotta. As the moisture is released into the air, the molasses coating on the sugar absorbs it, rehydrating the crystals and returning the sugar to its soft, sandy texture.
The true brilliance of the terracotta disk is that it is a self-regulating humidity buffer. It does not aggressively dump water into the sugar like an apple slice does. When the ambient humidity inside the jar reaches the optimal 60% to 65% range, the negative pressure drops, and the disk naturally stops releasing moisture. It creates a perfectly balanced microclimate. Consider this one of the essential tools every beginner needs for their pantry. A solid brick of sugar is enough to trigger a meltdown, but this little piece of clay will cure cooking anxiety when it comes to baking prep.
The Anti-Toxic Storage Manifesto: Building the Ultimate Sugar Sanctuary
Before we talk about how to use the disk, we need to have a very serious conversation about your storage containers. I am fiercely dedicated to banishing toxic kitchen gear from your home, and my “no-go” rule absolutely extends to the cheap, flimsy plastic containers you might be using to store your pantry staples.
You cannot throw a premium terracotta disk into a leaky, toxic plastic tub and expect professional results. Cheap plastic containers do not form a true hermetic seal. Furthermore, glass jars without proper silicone gaskets transmit moisture vapor three times faster than high-quality polypropylene or tempered glass. If your container is leaking air, your terracotta disk will dry out in a matter of days as it desperately tries to humidify your entire kitchen.
Worse yet, cheap plastics degrade over time, leaching endocrine-disrupting chemicals into your food. Nobody wants to use a container where plastic containers stay greasy no matter how hard you scrub, or where the material absorbs the smell of last week’s garlic.
To build the ultimate brown sugar sanctuary, you need a high-quality, food-grade glass or heavy-duty ceramic canister with a heavy latch and a thick, medical-grade silicone seal. The container must be completely airtight. The goal is to trap the moisture released by the terracotta disk inside the jar, forcing it to interact solely with the sugar.
When buying a terracotta disk (often sold in cute shapes like a “Brown Sugar Bear”), you must ensure it is made from 100% natural, food-safe, unglazed clay. Do not buy anything that has a shiny glaze on it. Glaze is essentially a layer of melted glass; it completely seals the pores of the clay, rendering the capillary action impossible and making the disk completely useless.
How to Properly Activate and Use Your Terracotta Disk
Using a terracotta disk is incredibly simple, but if you skip a step, you will end up with a soggy mess. Here is the foolproof, step-by-step masterclass on how to activate and maintain your new favorite kitchen tool.
Step 1: The Initial Soak
Take your dry, unglazed terracotta disk and place it in a small bowl. Pour clean, room-temperature filtered water over the disk until it is completely submerged. Let it sit undisturbed for 15 to 20 minutes. During this time, the microscopic pores in the clay will drink up the water. You might even see tiny bubbles escaping from the clay as the water displaces the air inside the matrix.
Step 2: The Crucial Pat-Down
This is the step where rookies fail. After 20 minutes, remove the disk from the water. You must thoroughly pat the disk dry with a clean paper towel or a lint-free kitchen cloth. The surface of the disk should feel damp and cool to the touch, but there should be absolutely no standing water or dripping droplets on the surface. If you throw a dripping wet piece of clay into your sugar, the excess liquid water will instantly melt the sucrose crystals it touches, leaving you with a sticky, syrupy puddle of ruined sugar at the bottom of your jar.
Step 3: Placement and Patience
Place the dried-off, hydrated disk directly into your airtight container, resting it right on top of the brown sugar, or burying it slightly in the middle of the pile. Seal the lid tightly.
If your sugar was already a rock-hard brick, do not expect instant magic. The terracotta disk releases moisture slowly and steadily. It will take anywhere from 12 to 24 hours for the capillary action to rehydrate the molasses coating throughout the jar. Leave it alone, go enjoy your evening, and when you return the next day, you will find perfectly soft, scoopable sugar.
Step 4: Maintenance and Recharging
A properly soaked terracotta disk housed in a truly airtight container will keep your brown sugar soft for anywhere from 3 to 6 months. You require exactly zero daily maintenance. However, eventually, the disk will run out of moisture. When you notice your sugar starting to feel slightly stiff again, simply fish the disk out of the jar, rinse it off, and repeat the 20-minute soaking process.
A Warning on Cleaning
Never, under any circumstances, wash your terracotta disk with dish soap. Because the clay is highly porous, it will absorb the chemical surfactants and artificial fragrances from the soap. The next time you put it in your sugar jar, it will release those soapy flavors right into your baking ingredients, and your next batch of cookies will taste like a laundromat. If your disk gets covered in sticky molasses over time, simply rinse it under hot, running water and scrub it with a clean, stiff-bristled brush.
The “I Need It Now” Emergency Softening Protocols
I preach preparation, but I also live in the real world. Sometimes, you forget to recharge your terracotta disk, you are in the middle of a recipe, and you need soft brown sugar right this second. You do not have 24 hours to wait. When you are in a pinch, you can force the moisture back into the molasses coating using heat, but you must do it carefully.
Emergency Method 1: The Microwave Steam Chamber
Place your hardened brick of brown sugar into a microwave-safe glass bowl. Take a heavy paper towel, run it under the faucet, and wring it out completely so it is only slightly damp—not dripping. Drape the damp paper towel completely over the top of the bowl, ensuring it does not directly touch the sugar. Microwave the bowl on high power in short, 20-second bursts. The microwave energy will heat the water in the paper towel, creating a localized steam room. The heat lowers the viscosity of the hardened molasses, while the steam provides the necessary moisture. After a few bursts, poke the sugar with a fork. It should crumble apart.
Emergency Method 2: The Low-Temp Oven Bake
If you do not own a microwave, you can use your oven. Preheat your oven to 250°F (120°C). Place the sugar brick in a heavy-duty, oven-safe glass or ceramic baking dish. Do not use cheap glass here; it’s a disaster waiting to happen, much like when glass bakeware shatters in the oven because of thermal shock. Place the dish in the oven and check it every 3 to 5 minutes, poking it with a spoon until it softens.
The Catch: Why These Are Only Temporary Fixes
I must warn you: both the microwave and oven methods are strictly temporary emergency measures. By applying heat, you are temporarily lowering the viscosity of the molasses, allowing you to break the brick apart. However, as soon as that sugar cools back down to room temperature, the moisture will rapidly evaporate again, and the molasses will lock up tighter than before. If you use the heat method, you must measure out exactly what you need for your recipe immediately, and then immediately prep a terracotta disk to save the rest of the batch.
Beyond Brown Sugar: Other Brilliant Uses for Your Terracotta Disk
Once you realize the power of a self-regulating humidity buffer, you will want to buy a handful of these terracotta disks for your entire pantry. They are not just for brown sugar.
Saving Marshmallows: Have you ever reached for a marshmallow for a weekend hot chocolate, only to find they have turned into chewy, stale foam pellets? Marshmallows go stale due to moisture loss. Toss a hydrated terracotta disk into your marshmallow container, and they will stay perfectly soft and squishy for months.
Reviving Dried Fruit: Raisins, dried cranberries, and chopped apricots have a terrible habit of turning into tooth-breaking pebbles in the pantry. A terracotta disk will slowly rehydrate them, making them plump and perfect for folding into oatmeal or cookie dough.
Keeping Baked Goods Fresh: If you baked a massive batch of soft, chewy chocolate chip cookies and want to keep them from turning hard on day three, place a hydrated terracotta disk into your cookie tin. The disk will release just enough moisture to keep the crumb soft without making the cookies soggy. Just like cheap baking sheets keep warping under high heat, cheap storage fails under pressure; ensure your cookie tin has a tight seal so the disk can do its job.
Reclaiming Your Kitchen Sanity
Cooking and baking should be a joy, not a stressful battle against your own ingredients. You do not need to accept rock-hard brown sugar as an inevitable fact of life, and you certainly do not need to rely on mold-inducing apple slices or destructive refrigerator storage to fix it.
By understanding the simple science of moisture evaporation and molasses viscosity, you can outsmart your pantry. A high-quality, unglazed terracotta disk is a testament to the fact that sometimes, the oldest, simplest, most natural technologies are still the absolute best tools for the job. It costs less than a fancy coffee, it lasts for years, it contains zero toxic chemicals, and it completely eliminates a frustrating prep-time bottleneck.
So, ditch the chisel. Upgrade your storage containers. Soak a piece of baked earth in some water, and reclaim your weekend baking projects. You have better things to do with your time than fight a boulder of sugar. Now, preheat your oven, get your scale ready, and go make something spectacular.






