
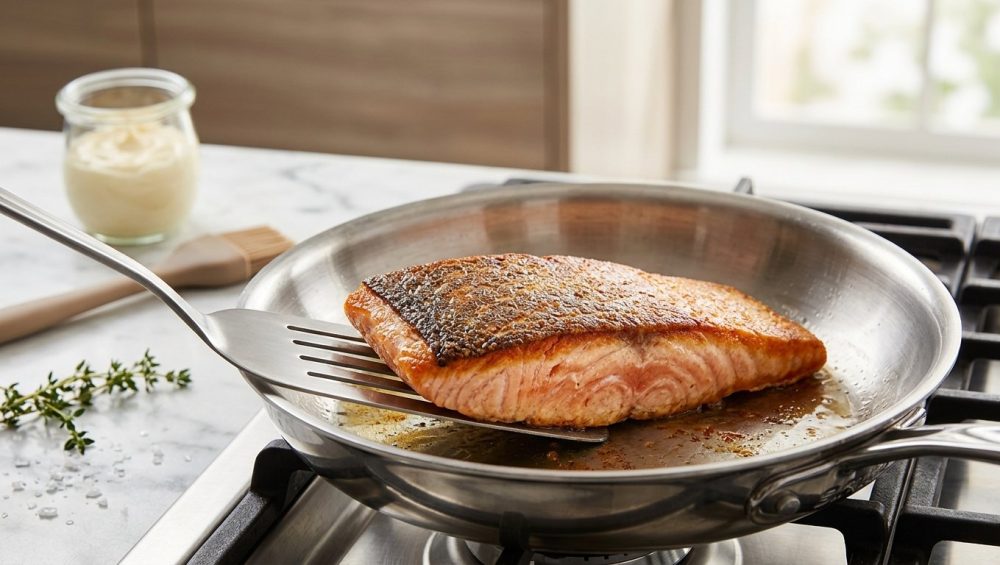
Picture this: It is 7:00 PM on a Thursday. You have just spent twenty-five of your hard-earned dollars on a beautiful, glistening fillet of wild-caught salmon or line-caught halibut. You have seasoned it meticulously. You have heated up your pan. You gently lay the fish down, listening to that satisfying, aggressive sizzle. For a fleeting, glorious moment, you feel like an absolute culinary god. But then, tragedy strikes. Five minutes later, you try to flip it. The fish resists. You push harder with your spatula. The delicate flesh tears, leaving the most delicious part—the crispy, golden skin—cemented to the bottom of your skillet like it was welded there by a vengeful kitchen demon.
We have all been there. It is infuriating, it is demoralizing, and it is one of those classic rookie kitchen mistakes that makes perfectly capable, intelligent adults want to throw their spatulas out the nearest window and order overpriced takeout.
But I am here to tell you that you do not need a culinary degree from Le Cordon Bleu to fix this. You do not need a professional salamander broiler, and you certainly do not need to surrender to the tyranny of cheap, toxic non-stick pans. You just need a little bit of food science, a dash of confidence, and an ingredient that is currently sitting in your refrigerator door, wedged somewhere between the artisanal ketchup and the leftover hot sauce.
We are talking about mayonnaise.
Yes, you heard me correctly. The humble, slightly jiggly sandwich spread is the ultimate culinary secret weapon for flawlessly seared, restaurant-quality fish. Today, we are going to dive deep—and I mean extraordinarily deep—into the molecular chemistry, the thermodynamics, and the practical application of the mayonnaise sear. Grab a glass of wine, pull up a stool, and let’s get to work on transforming your seafood game forever.
The Anatomy of a Culinary Disaster: Why Fish Hates Your Pan
To understand why mayonnaise is an absolute miracle, we first have to understand why fish is such a nightmare to cook in the first place. You see, cooking fish is fundamentally different from cooking a steak. Beef has long, dense muscle fibers heavily reinforced with thick connective tissue and generous marbling. Fish, on the other hand, evolved to float weightlessly in water. It does not need dense structural support.
Instead, fish muscle is composed of short, fragile blocks of muscle called myotomes, which are held together by incredibly thin layers of connective tissue called myocommata. Furthermore, fish has a staggeringly high water content—sometimes up to 82% water by weight. It is also packed with delicate proteins, specifically myosin and albumin, which begin to denature and coagulate at much lower temperatures than the proteins in land animals.
When a cold, wet piece of fish hits a hot metal pan, a violent microscopic battle ensues. The surface water turns to steam, which instantly saps the heat from the metal. At the same time, the delicate fish proteins denature, meaning their tight, coiled structures unfold. These unfolded proteins are chemically desperate to bond with something. If the pan has cooled down because of the surface moisture, those proteins will bypass forming a crust with each other and instead form strong covalent bonds directly with the reactive metal atoms (like iron) in the surface of your pan [1].
This molecular bonding is exactly why your fish fillets always fall apart. The chemical bond between the denatured fish proteins and the metal skillet literally becomes stronger than the physical bond between the fish’s own myotomes. When you attempt to lift the fillet, the fish tears itself apart before it lets go of the metal.
The Mayonnaise Miracle: The Science of the Emulsion
So, why does standard cooking oil fail to prevent this, and why does mayonnaise succeed? It all comes down to the science of emulsions and viscosity.
When you pour a tablespoon of olive oil or canola oil into a hot pan, its viscosity drops as it heats up. It becomes incredibly fluid. If your pan has even the slightest warp, or if the fish fillet is slightly curved, that liquid oil pools in the edges of the pan, leaving the center contact points completely dry. You are essentially putting bare, wet protein directly onto bare, hot metal.
Mayonnaise, conversely, is an emulsion. In its most basic form, mayonnaise is a mixture of oil, water, egg yolks, and an acid (like vinegar or lemon juice). Normally, oil and water refuse to mix. But egg yolks contain a magical phospholipid called lecithin. Lecithin molecules have a hydrophilic (water-loving) head and a lipophilic (fat-loving) tail. They act as microscopic mediators, grabbing onto the water and the oil simultaneously, forcing them into a stable, thick, viscous suspension [1].
Because mayonnaise is a thick emulsion, it behaves entirely differently than liquid oil when applied to food. When you brush a thin layer of mayonnaise directly onto your fish fillet, it does not run off. It does not pool. It clings tenaciously to every single microscopic crevice of the fish’s surface. It creates a seamless, impenetrable lipid barrier between the delicate protein and the reactive metal.
As the fish hits the hot pan, the emulsion slowly breaks down. The water evaporates, the oil provides a continuous, localized layer of lubrication right at the exact point of contact, and the egg proteins in the mayo cook instantly, forming a protective shield. It is a foolproof, scientifically sound non-stick barrier.
The Maillard Reaction on Steroids
Preventing sticking is only half the battle. The other hallmark of a restaurant-quality fish fillet is a deeply browned, shatteringly crisp crust. This is where mayonnaise transcends being a mere non-stick hack and becomes a legitimate flavor enhancer.
Browning in the kitchen is driven by the Maillard reaction, a chemical process discovered by French chemist Louis-Camille Maillard in 1912. The Maillard reaction occurs when amino acids (the building blocks of proteins) and reducing sugars are subjected to high heat (typically above 285°F or 140°C). They rearrange themselves into thousands of new, complex flavor compounds that taste rich, savory, and undeniably delicious.
Fish naturally struggles to achieve a good Maillard reaction because of its high water content. Remember, water boils at 212°F (100°C). As long as there is liquid water on the surface of the fish, the temperature cannot rise high enough for the Maillard reaction to occur. The fish simply steams in its own juices.
Mayonnaise completely bypasses this problem. By coating the fish in mayo, you are introducing a highly concentrated source of extra amino acids (from the egg yolks) and a touch of natural sugars. You are literally painting the chemical precursors of the Maillard reaction directly onto your food. Furthermore, the acid in the mayonnaise (the vinegar or lemon juice) helps slightly tenderize the surface of the fish, allowing the crust to form faster and more evenly.
Culinary science advocates, including J. Kenji López-Alt and Meathead Goldwyn, have long championed this technique for grilling and searing [1]. They have repeatedly proven through rigorous testing that the mayonnaise sear accelerates browning, locks in internal moisture, and creates a golden crust that is practically impossible to achieve with standard cooking oil alone.
The Sassy Sous-Chef’s Anti-Toxic Cookware Rant (Listen Up, People)
Now, before we get to the step-by-step masterclass, we need to have a serious conversation about the pan you are using. I have zero patience for pretentious chef-speak, but I have even less patience for toxic, cheap kitchenware. If you are still cooking your dinners on a scratched, peeling, ten-year-old Teflon pan because you are terrified of food sticking, we need to have an intervention right now.
The non-stick cookware industry has been selling home cooks a convenient but highly problematic crutch for decades. Most traditional non-stick pans are coated with PTFE (polytetrafluoroethylene), which belongs to a massive class of thousands of synthetic chemicals known as PFAS (per- and polyfluoroalkyl substances), commonly referred to as “forever chemicals.”
The science on this is no longer fringe; it is mainstream and deeply alarming. In December 2023, the International Agency for Research on Cancer (IARC) officially classified PFOA—a chemical historically essential to manufacturing PTFE—as a Group 1 carcinogen, placing it in the same risk category as asbestos and tobacco [1]. Recent studies published throughout 2024 and 2025 continue to demonstrate how these forever chemicals migrate from packaging and cookware directly into our food systems and bodies [1]. In fact, the issue is so pressing that in 2025, the California legislature attempted to pass a sweeping bill banning PFAS in cookware, though it was controversially vetoed after massive industry lobbying [1].
Furthermore, when PTFE-coated pans are heated above 500°F (260°C)—a temperature easily reached if you accidentally leave an empty pan on a high burner for just a few minutes—the coating begins to break down and off-gas toxic fumes.
I firmly believe that banishing toxic kitchen gear is a non-negotiable step for any serious home cook. You do not need a chemical coating to cook fish. You need technique. It is time to throw away the peeling pans, stop ruining your nonstick pans with cheap aerosol cooking sprays that bake into an impossible-to-clean polymer residue, and invest in real cookware. A high-quality tri-ply stainless steel skillet, a well-seasoned carbon steel pan, or a classic cast iron skillet will last you a lifetime, will never off-gas into your food, and, when used correctly with our mayonnaise trick, will be perfectly non-stick.
Mastering the Heat: Thermodynamics and the Water Drop Test
The biggest complaint I hear from weekend culinary hobbyists is that stainless steel is impossible to use. I am going to give you some tough love: the pan is not the problem. The problem is your heat management.
The reason why everything sticks to your stainless steel pan is almost always because you are putting cold food into a cold or lukewarm pan. Stainless steel is porous at a microscopic level. As the metal heats up, it expands, and those microscopic pores open and close. If you put food in too early, the proteins sink into those pores, the metal clamps down as it expands, and your food is trapped.
To make stainless steel behave like a non-stick surface, you must utilize the Leidenfrost effect. Described by Johann Gottlob Leidenfrost in 1756, this is a physical phenomenon where a liquid, when placed in near contact with a mass significantly hotter than the liquid’s boiling point, produces an insulating vapor layer that keeps that liquid from boiling rapidly.
In the kitchen, we harness this via the magic of the water drop test. Heat your dry stainless steel pan over medium heat for about two to three minutes. Flick a few drops of water into the pan. If the water sits there and gently bubbles, the pan is too cold. If the water violently splatters and instantly vanishes into steam, the pan is actually too hot. But, if the water instantly forms a perfect, cohesive bead that glides effortlessly across the surface of the pan like a mercury marble on glass, you have achieved the Leidenfrost effect. Your pan is perfectly preheated and ready to sear.
The Definitive, No-Nonsense Mayo Sear Masterclass
We have covered the biology, the chemistry, and the thermodynamics. Now it is time to put it all together. Here is your step-by-step, foolproof masterclass for searing fish perfectly every single time.
Phase 1: Procurement and The Great Drying
Start with a high-quality piece of fish. This technique works brilliantly on salmon, halibut, cod, sea bass, and even delicate trout. Thirty minutes before you plan to cook, take the fish out of the fridge.
This next step is critical: Pat the fish completely dry with paper towels. I do not mean a gentle dab. I mean you need to aggressively blot every single millimeter of that fillet until the paper towel comes away completely dry. Surface moisture is the enemy of the Maillard reaction. If you want to be a true perfectionist, lightly salt the fish and leave it uncovered in the fridge for a few hours prior (a dry brine), which will draw out surface moisture and firm up the flesh.
Phase 2: The Mayo Schmear
Take a standard, full-fat mayonnaise (do not use low-fat or fat-free versions, as they are pumped full of water and starches that will ruin the sear). Using a pastry brush, the back of a spoon, or your impeccably clean fingers, apply a very thin, even layer of mayonnaise to the side of the fish you intend to sear first (usually the presentation side, or the skin side if you are keeping the skin on).
You are not frosting a cupcake here. You want a translucent layer—just enough to coat the surface and fill in the microscopic gaps. If you can clearly see a thick white paste, you have applied too much.
Phase 3: Thermal Priming
Place your stainless steel or carbon steel skillet on the stove over medium-high heat. Perform the water drop test as described above. Once the water beads up and dances, wipe it out with a towel. Add just a tiny splash of neutral, high-smoke-point cooking oil (like avocado oil or grapeseed oil) to the pan. You only need a tiny amount to help conduct the heat; the mayonnaise on the fish will do the heavy lifting for the non-stick barrier.
Phase 4: The Drop and the Wait
Gently lay the fish into the pan, mayo-side down. Always lay the fish away from your body so that any stray drops of hot oil splatter toward the back of the stove, not onto your favorite shirt.
You should immediately hear a loud, aggressive sizzle. Now comes the hardest part of cooking for any beginner: Step away. Do not touch it. Do not nudge it. Do not shake the pan. Do not try to peek underneath. Let the thermodynamics do their job. As the egg proteins in the mayo cook and the fish’s moisture evaporates, the crust will form.
Phase 5: The Flip
After about 3 to 5 minutes (depending on the thickness of the fillet), the fish will naturally release itself from the pan. You will know it is ready because the edges will look deeply golden brown, and the fish will slide easily if you give the pan a gentle shake.
Take a flexible, thin-edged slotted fish turner, slide it confidently under the fillet, and flip it over. You should be staring at a breathtakingly perfect, mahogany-colored crust. Coat the top side with a tiny bit more mayo if you wish, and let the fish finish cooking on the second side for another minute or two.
Flavor Upgrades: Compound Mayonnaises for Weekend Perfection
The beauty of the mayonnaise sear is that it is not just a textural hack; it is a blank canvas for flavor. Because the mayonnaise adheres so perfectly to the fish, it acts as an incredible binder for herbs and spices. Furthermore, this trick is not strictly limited to seafood. It is also the ultimate secret weapon for pork chops, steaks, and is the definitive answer to why your chicken breast turns out dry.
If you are cooking for a weekend dinner party and want to show off, you can mix aromatics directly into the mayonnaise before smearing it on the protein. The mayo encases the spices, protecting them from burning instantly on the hot metal while infusing their essential oils directly into the crust.
Here are a few of my favorite compound mayo variations:
The Umami Bomb (Perfect for Salmon or Black Cod)
Whisk one tablespoon of white miso paste, a splash of toasted sesame oil, and a pinch of finely grated fresh ginger into your mayonnaise. The miso caramelizes in the pan, creating a deeply savory, complex crust that mimics a three-day professional marinade.
The Provencal (Perfect for Halibut or Chicken)
Finely mince fresh thyme, rosemary, and garlic. (Make sure you are using a razor-sharp chef’s knife to cleanly slice the aromatics so you can stop weeping over onions and garlic fumes). Mix the herbs into the mayo along with the freshly grated zest of one lemon. The citrus oils brighten the rich mayonnaise beautifully.
The Spicy Diablo (Perfect for Shrimp Skewers or Mahi-Mahi)
Stir a teaspoon of Calabrian chili paste or high-quality harissa into the mayonnaise, along with a dash of smoked paprika. The paprika blooms in the hot oil of the mayo, giving the fish a stunning brick-red color and a smoky, lingering heat.
Weeknight Efficiency vs. Weekend Artistry
As someone who advocates for the home cook, I firmly believe in the philosophy that time is money on a weekday. You do not always have the luxury of perfectly mincing fresh herbs or zesting lemons on a Tuesday night after a grueling day at the office.
When it comes to simple weeknight dinners, do not overcomplicate this. Pull the fish out of the fridge, pat it dry, hit it with kosher salt and cracked black pepper, smear it with plain, straight-out-of-the-jar mayonnaise, and throw it in the pan. Start to finish, you will have a perfectly cooked, beautifully seared protein on the table in under ten minutes, with exactly one pan to wash.
Save the miso-ginger compound mayos and the elaborate plating for Saturday nights when you have the time to pour a glass of wine and actually enjoy the meditative process of cooking. The technique scales perfectly to match your energy level.
Debunking the “Ew, Warm Mayo” Psychological Barrier
I know what some of you are thinking. I can hear the collective shudder through the internet. “The Sassy Sous-Chef wants me to eat hot mayonnaise? Absolutely not.”
I get it. The idea of warm, gloopy mayonnaise triggers a visceral reaction for people who associate it with sad, room-temperature potato salads left out too long at a summer barbecue. But you have to trust the chemistry here.
When you sear fish with mayonnaise, you are not eating hot mayonnaise. The intense heat of the skillet completely transforms the emulsion. The water content flashes off into steam. The oil renders out to fry the exterior of the fish. The egg yolks and their proteins polymerize and undergo the Maillard reaction, turning into a crisp, savory crust.
By the time the fish hits your plate, the mayonnaise has literally ceased to exist in its original form. It leaves behind absolutely zero “mayo flavor” and zero gelatinous texture. All that remains is a microscopic, golden-brown batter that keeps the fish incredibly moist and perfectly intact. If you didn’t tell your dinner guests how you achieved that perfect crust, they would never, ever guess your secret.
Conclusion: Reclaiming Your Kitchen Confidence
Cooking should not be a stressful, high-stakes hostage negotiation between you and a piece of metal. You do not need to fear delicate proteins, and you do not need to rely on toxic, disposable cookware to get dinner on the table.
By understanding the basic science of why proteins stick, leveraging the thermodynamic power of a properly heated pan, and utilizing the brilliant, emulsified magic of a thin layer of mayonnaise, you can completely eliminate the anxiety of cooking seafood.
You have the tools. You have the knowledge. Now go buy a beautiful piece of fish, grab that jar of mayo, and show your skillet who is actually in charge of this kitchen. Happy searing, weekend warriors.






