The End of the Toxic Era and the Carbon Steel Awakening
Grab a glass of wine, pull up a stool, and let’s have a brutally honest conversation about the state of your cookware. If you have been following my kitchen rants for any length of time, you already know my absolute, uncompromising stance on cheap, synthetic non-stick pans. I despise them. I have zero patience for mystery metals, and I am constantly advocating for banishing toxic kitchen gear from your home. The peeling Teflon, the scratched chemical coatings, the bizarre fumes that happen when you accidentally leave an empty pan on a high burner—it is all entirely unnecessary. You deserve better. Your food deserves better.
So, you did the right thing. You listened to reason, you threw the scratched chemical nightmare into the trash, and you invested in a gorgeous, heavy-gauge carbon steel skillet. You brought it home, washed off the factory wax, rubbed it down with oil, and proudly baked it in the oven. For the first week, it was glorious. Your eggs slid around like they were on ice. Your steaks had a crust that belonged in a Michelin-starred restaurant. You felt like an absolute culinary god.
And then, the tragedy struck.
On a random Tuesday evening, you were sautéing some simple vegetables, and you noticed something horrifying. Tiny, black, brittle flakes were peeling off the bottom of your beautiful pan and mixing into your dinner. Your flawless, hard-earned patina looked like a patchy, peeling sunburn. Panic set in. You scrubbed it, you oiled it again, you blasted it with heat, but the sticking and the flaking only got worse.
I see this happen constantly, and it absolutely breaks my heart because it drives well-meaning home cooks right back into the arms of toxic non-stick pans. But here is the truth: your carbon steel pan is not defective, and you are not a bad cook. You simply fell victim to generic internet cooking folklore. The culinary world is absolutely saturated with terrible, scientifically illiterate advice regarding how to season and maintain raw steel. People treat the seasoning process like it is some kind of mystical dark art, throwing around arbitrary oven temperatures and trendy miracle oils without understanding a single fraction of the chemistry involved.
We are ending that nonsense today. We are going to strip away the myths, the old wives’ tales, and the pretentious chef-speak. Instead, we are going to dive headfirst into the hard, objective molecular physics of lipid polymerization and metallurgical thermodynamics. By the time you finish reading this masterclass, you will understand exactly why your seasoning failed, and you will possess a data-backed, foolproof framework for building a bulletproof patina that will outlast you. Let’s get to work.
Lipid Chemistry 101: The True Nature of Polymerization
Before we can fix your flaking pan, we have to establish exactly what “seasoning” actually is. When the average person hears the word seasoning, they think of salt, pepper, and garlic powder. In the context of carbon steel and cast iron cookware, seasoning has absolutely nothing to do with flavor. It is a highly specific, complex chemical transformation. You are not simply “drying” oil onto a piece of metal, nor are you merely staining the steel. You are facilitating a radical chain reaction that transforms a liquid lipid into a solid, highly cross-linked, hydrophobic plastic-like polymer matrix.
To achieve perfect polymerization and nonstick cooking, you have to understand the molecular structure of the fats you are using. Cooking oils are primarily composed of triglycerides—molecules consisting of a glycerol backbone attached to three long fatty acid chains. These fatty acid chains are made of carbon atoms bonded to hydrogen atoms.
Saturated vs. Unsaturated Fats
If every carbon atom in the chain is fully bonded to hydrogen atoms, the fat is “saturated.” Saturated fats, like butter, lard, and coconut oil, are incredibly stable. Because their carbon chains are fully occupied, they have no desire to react or bond with anything else. This makes them wonderful for cooking, but absolutely terrible for seasoning a pan. You cannot build a durable polymer out of saturated fats because they simply will not cross-link efficiently.
Unsaturated fats, on the other hand, contain one or more double bonds between their carbon atoms. These double bonds are the secret to everything. They are points of chemical vulnerability. When you expose an unsaturated fat to high heat and oxygen, those double bonds break apart, releasing highly reactive molecules known as free radicals.
The Radical Cross-Linking Process
Free radicals despise being alone. The moment they are generated by the intense heat of your oven, they frantically seek out other molecules to bond with in order to regain stability. They latch onto the free radicals of neighboring fatty acid chains. This process is called cross-linking. As millions of these chains link together side-by-side and end-to-end, the liquid oil fundamentally changes its state of matter. It becomes a dense, microscopic 3D web—a solid polymer.
Furthermore, the iron in your carbon steel pan acts as a secondary chemical catalyst, actively accelerating this radical polymerization process and providing a substrate for the polymer matrix to anchor itself to. When executed correctly, this polymer matrix is incredibly hard, naturally hydrophobic (which is what makes it non-stick), and highly resistant to chemical breakdown. But as you have already discovered, building this matrix is only half the battle. Keeping it attached to the metal is where the real physics come into play.
The Metallurgical Divide: Why Carbon Steel is Not Cast Iron
The single biggest mistake people make when seasoning carbon steel is treating it exactly like cast iron. You cannot do this. While they are chemical cousins, their metallurgical properties and thermodynamic behaviors are vastly different. If you apply cast iron seasoning folklore to a carbon steel skillet, you are practically begging for polymerization failure.
Let’s look at the elemental composition. Cast iron is typically composed of about 96% to 97.5% iron and a massive 2% to 3.5% carbon. This high carbon content makes the metal incredibly hard, but also quite brittle, which is why cast iron must be poured into thick, heavy sand molds. Carbon steel, by contrast, is composed of roughly 99% iron and only about 1% carbon. Because it has less carbon, it is significantly more malleable. It isn’t poured into molds; it is forged, spun, or stamped from flat sheets of raw steel under immense pressure.
Surface Porosity and Mechanical Adhesion
The manufacturing process creates a drastic difference in surface texture. Cast iron, having been cast in sand, possesses a highly textured, porous surface. When you polymerize oil on cast iron, the liquid oil seeps deep into those microscopic craters and valleys before it hardens. It creates a profound mechanical interlock. The polymer is essentially bolted into the metal.
Carbon steel is entirely different. Because it is pressed from sheet metal, its surface is incredibly smooth and dense. There are no massive craters for the oil to hide in. The polymer matrix has to grip a nearly flat surface, which requires a much more delicate and precise chemical bond.
Thermal Conductivity and Expansion Coefficients
This is where the physics of heat transfer ruin your day. Because cast iron is thick and porous, it has an enormous thermal mass but relatively poor thermal conductivity. It takes a very long time to heat up, and a very long time to cool down. It absorbs thermal energy slowly and stubbornly.
Carbon steel is the exact opposite. It is thinner, denser, and highly thermally conductive. When you put a carbon steel pan on a hot burner, it heats up almost instantly. When you take it off the heat, it cools rapidly. This rapid fluctuation in temperature triggers aggressive thermal expansion and contraction. The metal physically swells when heated and shrinks when cooled.
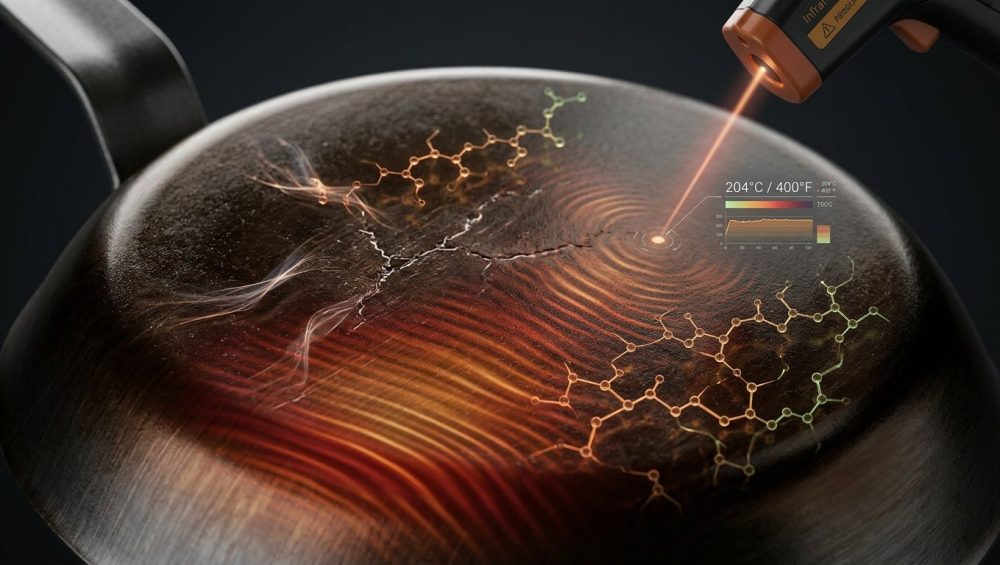
If the polymer layer resting on top of this expanding metal is too thick or too rigid, the sheer mechanical stress of the metal swelling underneath it will cause the bond to shear. You must focus on mitigating thermal shock to keep the matrix intact. If you blast a cold carbon steel pan with maximum heat, the metal expands faster than the polymer matrix can stretch, resulting in microscopic fractures that eventually lead to massive flaking.
The Great Flaxseed Oil Deception and the Iodine Value Trap
Now that we understand that the polymer matrix on a carbon steel pan must be able to stretch and compress with the rapidly expanding metal, we have to address the elephant in the room: the catastrophic internet trend of seasoning with flaxseed oil.
Around a decade ago, a very popular blog post went viral, claiming that organic, unrefined flaxseed oil was the ultimate, scientifically proven secret to a bulletproof seasoning. The logic seemed sound on paper. Flaxseed oil (which is the food-grade equivalent of linseed oil used by oil painters) is a “drying oil.” It possesses an incredibly high Iodine Value.
Understanding the Iodine Value
In lipid chemistry, the Iodine Value (IV) is a metric used to determine the exact degree of unsaturation in a fat. The higher the Iodine Value, the more double bonds the oil has. The more double bonds it has, the more free radicals it can generate, and the faster and harder it will polymerize.
Saturated fats like lard have an IV of around 40. They barely polymerize. Olive oil, a monounsaturated fat, has an IV of around 80. It polymerizes, but it tends to be soft and slightly gummy. Grapeseed and canola oil sit in the sweet spot with an IV between 110 and 135.
Flaxseed oil has an astronomical Iodine Value of 170 to 200. It is packed to the brim with polyunsaturated fatty acids, specifically alpha-linolenic acid. Because of this, flaxseed oil cross-links aggressively and forms an incredibly dense, hard, glass-like polymer matrix.
The Brittle Glass Phenomenon
On a thick, slow-heating, highly porous cast iron skillet, a hard, glass-like flaxseed polymer can sometimes survive because the metal’s texture holds it in place and the pan’s thermal mass prevents rapid expansion. But on carbon steel? It is an absolute disaster.
Remember the smooth surface and the rapid thermal expansion of carbon steel? When you heat the pan, the steel expands rapidly. The flaxseed polymer, being highly cross-linked and glass-like, has zero elasticity. It cannot stretch. So, it shatters. It fractures at the microscopic level, loses its weak grip on the smooth steel, and begins to flake off into your food in large, brittle shards.
This is why you must avoid oils with extreme Iodine Values when working with carbon steel. You do not want a rigid plastic coating; you want an elastomer. You need a polymer matrix that has just enough cross-linking density to be durable and non-stick, but enough flexibility to stretch and bend with the thermal expansion of the metal. Grapeseed oil, canola oil, and refined avocado oil are the undisputed champions here. They provide the perfect balance of durability and elastic give.
Thermodynamics of the Oven: Smoke Point vs. Polymerization
If the flaxseed oil myth is the primary cause of flaking, the misunderstanding of oven temperatures is a close second. Walk into any culinary forum, and you will inevitably hear someone shout, “You have to heat the oil past its smoke point to season the pan!”
This is fundamentally, scientifically, and thermodynamically false. In fact, heating your oil past its smoke point is exactly how you destroy a patina before you even cook with it. To understand why, we have to differentiate between vaporization, decomposition, and polymerization.
The Decomposition Disaster
The smoke point of an oil is not a magical threshold where polymerization begins. The smoke point is the exact thermal limit at which the lipid molecules literally begin to decompose. When an oil hits its smoke point, the intense thermal energy breaks the carbon chains apart entirely, releasing volatile gaseous compounds (which you see as smoke) and leaving behind pure, unbonded carbon ash.
Ash is not a polymer. Ash has no structural integrity. Ash cannot bond to a smooth steel surface. If you take an oil with a smoke point of 400°F and blast it in a 500°F oven for an hour, you are not creating a durable, cross-linked matrix. You are incinerating the oil. You are creating a fragile layer of burnt carbon dust that is temporarily clinging to the metal. The moment you try to cook with it, that ash layer will immediately wash away or flake off into your food.
The Endothermic Sweet Spot
Polymerization is a chemical reaction that requires a specific input of thermal energy, but it absolutely occurs below the smoke point of the oil. You want to provide enough heat to break the double bonds and initiate the radical cross-linking, but you must stay safely below the temperature where the entire molecule decomposes into ash.
When you are mastering the Maillard reaction on a weeknight, you rely on precise heat control to brown your proteins without burning them. You must apply that exact same logic to your seasoning process. Time is your greatest ally here. A lower temperature applied for a longer duration will always yield a tighter, more uniform, and more elastic polymer matrix than a massive blast of extreme heat.
Here are the exact, data-backed thermal guidelines you should follow based on the oil you choose:
- Grapeseed Oil: Smoke point is approximately 420°F. Your ideal oven polymerization temperature is 375°F to 390°F.
- Canola Oil: Smoke point is approximately 400°F. Your ideal oven polymerization temperature is 350°F to 375°F.
- Refined Avocado Oil: Smoke point is a massive 520°F. Your ideal oven polymerization temperature is 450°F to 475°F.
Do not rush the physics. Keep the oven temperature safely below the decomposition threshold, and let the cross-linking happen naturally over a longer period.
The Micro-Layering Phenomenon: The Physics of Thin Films
We have established the right oil and the right temperature, but none of that matters if your application technique is flawed. The most common physical error home cooks make is applying the oil too thickly. They pour a tablespoon of oil into the pan, smear it around, and throw it in the oven, expecting a thick, protective armor to form. Instead, they get a sticky, gummy, peeling mess.
This failure is dictated by the physics of oxygen permeability. For radical polymerization to occur correctly, the oil needs to interact with the oxygen in the air. If you leave a thick layer of oil on the pan, the intense heat of the oven will rapidly polymerize the very top molecular layer of the oil—the part touching the air.
Once that top layer cross-links and hardens, it acts as an impenetrable oxygen barrier. The oil trapped underneath it is completely cut off from the atmosphere. It cannot polymerize. It remains in a semi-liquid, gummy, highly viscous state. You have effectively created a hard plastic shell floating on top of a layer of liquid grease.
The moment you put a spatula to that pan, the hard top layer will experience sheer stress. Because it is not anchored to the steel (it is floating on gummy oil), it will immediately peel off in large, unsightly strips.
The Visual Cue of Thin-Film Interference
To prevent this, the absolute key to preventing protein adhesion lies in the microscopic film you create during the application phase. You must wipe the oil out of the pan until it looks completely, entirely dry. You want to feel like you made a mistake and wiped too much off.
At a microscopic level, the steel is still coated in a layer of lipids that is only a few molecules thick. This ultra-thin layer allows oxygen to permeate the entire depth of the oil simultaneously. The entire layer polymerizes uniformly, anchoring directly to the iron lattice of the steel.
When you execute this correctly, you will witness a phenomenon known as thin-film interference. As the microscopic polymer layer forms, it will refract light differently than the raw steel, causing the pan to take on a beautiful, iridescent bronze, blue, or copper hue. It will not look black and glossy on the first coat. That deep black color only comes after months of continuous use and hundreds of microscopic layers building upon one another.
The Sassy Sous-Chef’s Definitive Seasoning Protocol
We have covered the molecular chemistry, the metallurgy, the thermodynamics, and the physics of thin films. It is time to put it all together into a highly technical, objective framework. Do not skip steps. Do not improvise. Even if you only own a few beginner kitchen tools, you can execute this protocol flawlessly if you simply follow the data.
Step 1: The Chemical Strip
If you are starting with a brand new pan, it is coated in factory beeswax or mineral oil to prevent rust during shipping. You absolutely cannot polymerize cooking oil over wax. You must strip it completely. Scrub the pan aggressively with hot water, a harsh dish detergent, and a scouring pad until the water sheets off the metal rather than beading up. Dry it immediately with a towel to prevent flash rust.
Step 2: The Thermal Prep
Place the dry, raw steel pan into an oven preheated to 200°F for exactly 15 minutes. This is a crucial step. At a microscopic level, the grain structure of the steel holds invisible ambient moisture. If you apply oil over this moisture, it will turn to steam during the high-heat phase, creating microscopic bubbles that rupture your polymer matrix. The 200°F pre-heat evaporates the moisture and slightly expands the metal, preparing it to receive the oil.
Step 3: The Micro-Application
Carefully remove the warm pan from the oven. Apply a dime-sized drop of your chosen moderately-unsaturated oil (Grapeseed or Canola). Using a lint-free paper towel, rub the oil over every square inch of the pan—inside, outside, and the handle. Now, take a clean, dry paper towel and vigorously wipe the pan until it looks bone dry. I cannot stress this enough: wipe it until you think there is no oil left. The remaining microscopic film is all you need.
Step 4: The Thermal Ramp
Place the pan upside down on the middle rack of the oven. Do not blast it with a pre-heated 400°F environment. Remember the thermal expansion coefficient of carbon steel? We want to avoid thermal shock. Leave the oven at 200°F, place the pan inside, and then dial the temperature up to your oil’s specific polymerization sweet spot (e.g., 375°F for grapeseed). Allowing the pan to heat up gradually alongside the oven ensures the metal expands slowly, preventing shear stress on the developing polymer bonds.
Step 5: The Hold
Once the oven reaches the target temperature, set a timer for two full hours. Do not open the door. Do not check on it. Let the thermodynamics do their job. This extended hold time allows the radical cross-linking process to reach maximum density without crossing the threshold into decomposition and carbonization.
Step 6: The Annealing Phase
When the two hours are up, turn the oven off. Do not take the pan out. If you pull a 375°F pan into a 70°F kitchen, the rapid cooling will cause the steel to contract violently, instantly fracturing your newly formed polymer matrix. Leave the pan inside the closed oven and let it cool down naturally over the next three to four hours. This slow cooling acts as an annealing phase, relieving internal mechanical stress within the polymer and ensuring a permanent bond to the steel.
Real-World Application: Surviving the Weekday Kitchen
You have spent your weekend executing the perfect thermal protocol. Your pan is a beautiful, iridescent bronze, and the polymer matrix is flawless. But a pristine pan is useless if you are terrified to cook with it. The true test of your seasoning comes on a chaotic Tuesday night when you are desperately trying to get dinner on the table.
You do not have time to baby your cookware during the week. You need efficiency. Thankfully, maintaining this patina does not require hours of labor. It simply requires an understanding of how heat interacts with food. This is how one reader stopped burning dinner and finally found peace in the kitchen: they stopped fighting the thermodynamics of their pan.
The Necessity of Pre-Heating
A properly polymerized pan is naturally hydrophobic, but it is not magic. If you throw a cold, wet piece of chicken into a cold carbon steel pan and turn the burner on high, the proteins will bond directly to the metal as it heats up, tearing your beautiful polymer matrix right off the pan when you try to flip it.
You must pre-heat the pan slowly. Bring it up to a medium heat before you add your cooking fat, and ensure your cooking fat is shimmering before you add your food. This utilizes the Leidenfrost effect—the rapid vaporization of moisture on the surface of the food creates a microscopic cushion of steam, preventing the proteins from chemically bonding to the pan. Mastering these simple thermodynamic principles will transform your daily meals without adding stress to your routine.
The Truth About Dish Soap
Let’s kill another pervasive myth right now: you can, and absolutely should, wash your seasoned carbon steel pan with dish soap.
Decades ago, dish soaps were heavily formulated with lye (sodium hydroxide). Lye is highly caustic and will absolutely strip a polymerized oil matrix. However, modern dish soaps (like Dawn) do not contain lye. They are formulated with gentle surfactants that are designed to bind to loose, unpolymerized grease and wash it away. A surfactant cannot break the covalent bonds of a fully cross-linked plastic polymer. Wash your pan with soap and warm water. Leaving rancid, unpolymerized grease in your pan is disgusting and will only create a sticky, gummy surface that ruins your next meal.
After washing, dry the pan thoroughly on the stove over low heat, wipe a microscopic drop of oil over the cooking surface, and let it cool. That is it. That is your entire weekday maintenance routine.
Troubleshooting Polymerization Failures
Even with a perfect protocol, the realities of a busy kitchen mean that mistakes happen. If you are serious about breaking your takeout habit, you need reliable cookware, which means you need to know how to diagnose and fix a failing patina without throwing the pan out the window.
The Sticky Pan Syndrome
If your pan feels sticky or tacky to the touch after seasoning or cooking, you have an incomplete polymerization issue. The oil has begun to cross-link, but it hasn’t finished the process. This is almost always caused by either applying the oil too thickly (blocking oxygen) or not leaving the pan in the oven long enough.
The Fix: Do not add more oil. Simply place the sticky pan back into the oven at your target polymerization temperature for another hour. The heat will re-initiate the radical process and force the remaining liquid lipids to cross-link into a hard, dry surface.
The Flaking Pan Syndrome
If your pan is shedding black flakes, you have suffered a structural matrix failure. As we discussed, this is caused by one of three things: you used a brittle, high-iodine oil like flaxseed; you heated the oil past its smoke point and carbonized it into ash; or you shocked the pan with rapid temperature changes, causing the steel to expand faster than the polymer could stretch.
The Fix: You must remove the compromised layer. Grab your bench scraper, the kitchen’s unsung hero, to gently lift away the loose debris. Scrub the flaking areas aggressively with coarse salt and a rigid brush until all the loose polymer is gone. You do not need to strip the pan down to bare metal, just remove the unstable flakes. Then, execute one round of the Definitive Seasoning Protocol using a moderate-iodine oil to patch the matrix.
The Rust Spot Syndrome
If you see a flash of orange rust on your pan, your polymer matrix has been chemically breached. This usually happens when you cook highly acidic foods (like tomatoes, wine, or vinegar) for an extended period in a newly seasoned pan. The acid eats through the thin polymer layer and oxidizes the raw iron underneath.
The Fix: Do not panic. Scrub the rust spot away with a splash of white vinegar and a scouring pad. Once the rust is gone, wash the pan, dry it immediately on the stove, and rub a microscopic drop of oil over the bare spot. The pan will look a little patchy, but the patina will naturally even out as you continue to cook with it.
Conclusion
Carbon steel is not a fragile, mysterious artifact that requires a degree in alchemy to maintain. It is a highly durable, incredibly efficient tool that simply demands a basic respect for thermal physics and lipid chemistry.
When you stop treating your pan like a magical heirloom and start treating it like a thermodynamic instrument, all of the frustration melts away. You do not need toxic, peeling chemical coatings to make a perfect omelet. You just need the right oil, the right temperature, and the patience to let the molecular cross-linking do its job.
Throw away the flaxseed oil. Ignore the people telling you to burn your pans into a smoking, ashy oblivion. Wipe the oil out until it is bone dry, respect the thermal expansion of the metal, and trust the science. Your weeknight dinners are about to get a whole lot better, and your carbon steel pan will finally become the bulletproof kitchen workhorse it was always meant to be. Now, go pour yourself another glass of wine and get to cooking. You’ve got this.


