Listen, we all love the idea of a massive, overflowing, heavily curated grazing board. It screams, “I have my life together,” and, “I effortlessly entertain on weekends.” But let’s cut the pretentious nonsense for a second. If you have ever actually tried to assemble one of these sprawling culinary masterpieces on the day of your event, you know the dark, ugly truth: it is a frantic, sweat-inducing race against the clock.
You find yourself frantically slicing apples, pears, and avocados as your guests are walking up the driveway, praying you can get the cheese unwrapped before the fruit turns into a sad, brown science experiment. While I am all about maximizing efficiency for simple weeknight dinners, the weekend is when we have the luxury to be absolute perfectionists. And perfection does not include serving your friends oxidized produce that looks like it has been sitting in a damp basement since Tuesday.
We are going to fix this. You do not need a culinary degree to create a pristine, professional-level platter, but you do need to understand a little bit of food science. We are going to dive deep into the chemical mechanisms that ruin your fruit, and I am going to give you foolproof, scientifically validated strategies to pause time. By neutralizing the enzymes responsible for this visual decay, you can prep your entire grazing board twenty-four hours in advance. No stress, no day-of bottlenecks, just you, a glass of wine, and a flawlessly vibrant platter.
The Science of the Slice: Understanding Enzymatic Browning
Before we can defeat the enemy, we have to understand the enemy. Enzymatic browning is the absolute bane of the prep-ahead host. It is not rot, and it does not mean your fruit is unsafe to eat, but it completely destroys the aesthetic integrity and crisp texture of your produce. To stop it, we have to look at what is actually happening on a cellular level when you take a knife to an apple.
Meet the Culprit: Polyphenol Oxidase (PPO)
Picture your apple as a bustling, highly organized microscopic city. Inside the plant cells, you have phenolic compounds hanging out in the vacuoles, perfectly isolated from an enzyme called polyphenol oxidase (PPO), which is chilling over in the cytoplasm and chloroplasts. They are kept strictly apart by cellular membranes. But the moment you slice into that fruit, you act as a culinary wrecking ball, tearing down those protective walls.
The phenols and the PPO rush together. Add oxygen from the ambient air into the mix, and a rapid chemical reaction kicks off. The PPO catalyzes the oxidation of those phenolic compounds, transforming them into o-quinones. Now, o-quinones are highly reactive, unstable little molecules. Left to their own devices, they rapidly undergo non-enzymatic reactions, polymerizing into large, dark structural pigments called melanins. Yes, melanin—the exact same class of pigment that gives human skin its color. In an apple or a potato, however, it just manifests as a highly unappetizing, muddy brown bruise.
This entire reaction is actually a brilliant evolutionary defense mechanism by the plant to protect itself against pests and pathogens when damaged. Unfortunately for us, PPO does not care about your dinner party aesthetic. To maintain the bright, fresh color of your produce, we have to interfere with this chemical pathway by either removing the oxygen, altering the pH, or directly denaturing the PPO enzyme itself.
Why Your Knife Skills Matter (And Why Your Dull Knife is Ruining Everything)
We need to have a very serious talk about your kitchen equipment. I have zero patience for cheap, toxic kitchenware, and this is exactly where bad gear actively ruins your food. If you are using a dull, peeling, non-stick mystery-metal blade, you are not just making your prep work harder—you are actively bruising your produce. This is why I am so relentlessly passionate about banishing toxic kitchen gear from your home once and for all.
When you use a high-quality, razor-sharp steel knife, the blade cleanly severs the plant cells directly in its path. The damage is highly localized, meaning only a small amount of PPO is released to react with oxygen. However, when you hack away at an apple with a blunt, cheap knife, you are not slicing; you are crushing. The blunt force trauma ruptures surrounding cells deep into the flesh of the fruit, causing a massive, widespread release of PPO. More enzyme release means faster, deeper browning.
Furthermore, reactive metals found in cheap knives can actually accelerate the oxidation process. Iron and copper ions can act as catalysts for the browning reaction. A high-carbon stainless steel blade, kept meticulously sharp, is your first and most vital line of defense against enzymatic browning. Stop sabotaging your own ingredients before they even hit the cutting board.
Strategy 1: The Acid Test (Acidulation)
The most common advice you will hear for preventing browning is to toss your fruit in lemon juice. This is known as acidulation. PPO is highly sensitive to its environment and operates best at a neutral pH. When you drastically lower the pH of the fruit’s surface by introducing a strong acid, you effectively slow down the enzyme’s activity. But while acidulation works chemically, it is fraught with culinary pitfalls that can ruin the flavor of your board.
The Citrus Approach: Lemon, Lime, and Beyond
Lemons are packed with citric acid, which drops the pH, and a small amount of ascorbic acid (Vitamin C), which acts as an antioxidant. It is a decent quick fix in a pinch. However, let’s be brutally honest: drenching an expensive, perfectly sweet Honeycrisp apple in harsh, astringent lemon juice is one of the most common beginner cooking mistakes, as it completely destroys the nuanced flavor profile of the fruit.
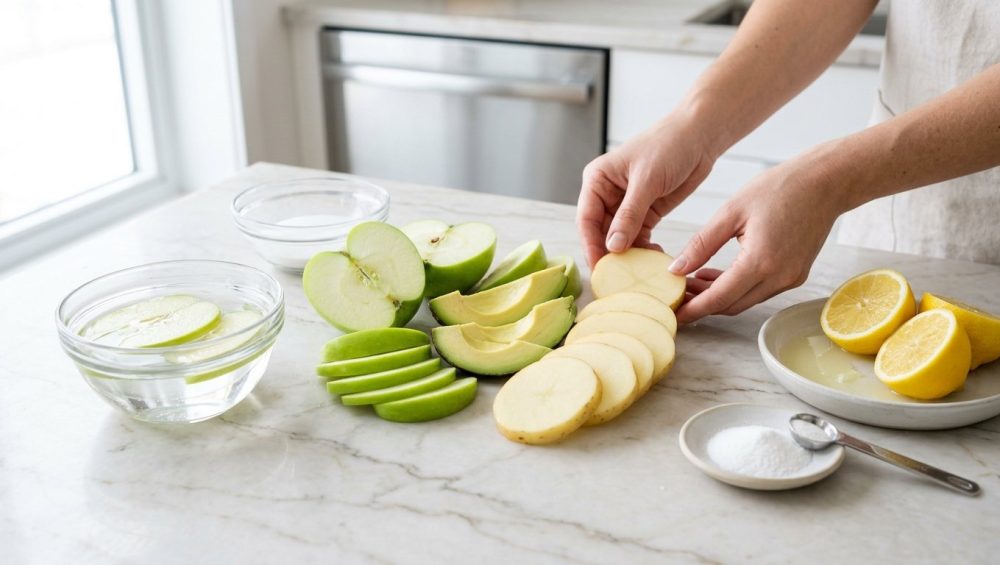
If you are going to use citrus, do not apply raw, undiluted juice directly to your fruit. Instead, create an acidulated water bath. Mix three tablespoons of fresh lemon juice into one quart of cold water. Submerge your sliced apples or pears in this mixture for three to five minutes, then drain them thoroughly. This provides enough of a pH drop to stall the PPO without making your fruit taste like a sour cocktail garnish. Still, this method is best reserved for fruits that naturally pair well with citrus, like avocados or berries.
The Pineapple Hack: Bromelain and Citric Acid
If you want to use a juice-based acidulation method that actually tastes good, reach for pineapple juice. Pineapple juice contains its own natural blend of citric and ascorbic acids, but it also contains bromelain, a powerful enzyme that can help break down proteins.
More importantly, pineapple juice is naturally sweet and highly complementary to the flavor of apples, pears, and bananas. A quick dip in a mixture of half pineapple juice and half cold water will protect your fruit from browning while imparting a subtle, tropical sweetness that enhances, rather than masks, the natural flavor of your grazing board components.
Vinegar Solutions: When to Use Them and When to Step Away
Vinegar is highly acidic and will absolutely stop PPO in its tracks. But unless you are actively trying to make your guests question your sanity, keep the vinegar far away from your fruit platter.
There is, however, one specific application where vinegar acidulation is brilliant: potatoes and savory root vegetables. If you are prepping a massive board of crudités or preparing potatoes for a make-ahead roasting platter, dropping them into a bowl of cold water with a splash of white vinegar will keep them perfectly pristine for hours. The vinegar prevents the potatoes from turning that ghastly shade of gray-black, and the savory application means the slight acidic tang will cook off or blend perfectly with your eventual seasonings.
Strategy 2: The Vitamin C Miracle (Ascorbic Acid)
If you want the absolute gold standard of browning prevention—the method used by high-end caterers and food scientists—you need to utilize pure ascorbic acid. This is the secret weapon that allows you to prep fruit days in advance without altering its flavor one bit.
What is Ascorbic Acid and Why Does it Work?
Ascorbic acid is simply the chemical name for Vitamin C. Unlike citric acid, which merely lowers the pH to annoy the PPO enzyme, ascorbic acid attacks the browning process at the chemical level. It acts as a sacrificial antioxidant.
When PPO oxidizes phenols into those nasty, reactive o-quinones, ascorbic acid steps in and immediately reduces the o-quinones back into colorless diphenols. As long as there is ascorbic acid present on the surface of the fruit, the o-quinones cannot polymerize into brown melanins. The browning process is literally reversed in real-time. Much like the strategies we use to conquer weeknight cooking anxiety, preparing your ascorbic acid water baths in advance is all about front-loading the work with smart, reliable science.
Commercial Powders vs. Crushed Vitamin C Tablets
You can purchase pure ascorbic acid powder online or at specialty grocery stores (often sold under brand names like Fruit-Fresh, though be aware some commercial blends cut the ascorbic acid with sugar or citric acid). Pure ascorbic acid powder is tasteless, odorless, and dissolves instantly in water.
If you cannot find the pure powder, do not panic. You can simply go to your local pharmacy and buy standard 500-mg Vitamin C tablets. Ensure they are unflavored and chewable-free. You don’t need a molecular gastronomy kit to pull this off; standard beginner kitchen tools like a reliable mortar and pestle are all you need to crush those vitamin tablets into a fine, easily dissolvable powder. The tablets contain binders that might make your water look slightly cloudy, but this is completely harmless and will not affect the fruit.
The Ideal Ratios for Platter Perfection
Precision is key here. If you use too much ascorbic acid, your fruit will take on a slightly metallic, tart flavor. If you use too little, the o-quinones will eventually win the battle.
For a standard holding bath designed to keep fruit pristine for 24 hours in the fridge, the ideal ratio is one teaspoon of pure ascorbic acid powder (or six finely crushed 500-mg tablets) dissolved completely into one gallon of cold water.
Once the powder is dissolved, drop your freshly sliced apples, pears, or bananas into the solution. Let them soak for exactly ten minutes. This gives the cellular surface of the fruit enough time to absorb the antioxidant shield. Drain the fruit thoroughly in a colander, pat it completely dry with a lint-free towel, and store it in an airtight container in the fridge. Your fruit will look like it was sliced five seconds ago, even a full day later.
Strategy 3: The Oxygen Barrier (Water Submersion and Syrups)
If you do not have ascorbic acid on hand and refuse to subject your fruit to lemon juice, your next best strategy is to physically block oxygen from reaching the surface of the cut cells. Remember the golden rule: Enzymatic browning requires phenols, PPO, and oxygen. Remove the oxygen, and the reaction cannot proceed.
The Cold Water Plunge: Simple but Flawed?
The most basic barrier method is simply dropping your sliced produce into a bowl of plain, ice-cold water. The water physically shields the fruit from the oxygen in the air. This works decently well for a quick hold—say, if you are slicing apples and need them to wait twenty minutes while you finish arranging the cheeses.
However, plain water is a deeply flawed long-term strategy. Thanks to the principles of osmosis, soaking fruit in plain water for extended periods will cause the cells to absorb excess liquid, turning your crisp apples into a waterlogged, soggy disaster. Consider this your essential kitchen survival guide to water submersion: never leave delicate fruits soaking in plain tap water for more than twenty minutes unless you want an unappetizing mess.
Salt Water Submersion: The Savory Fruit Secret
This is where we level up the water bath. By introducing salt to the equation, we completely change the game. The culinary team at Serious Eats extensively tested browning prevention methods and found that a highly dilute saltwater soak outperformed almost everything else for maintaining both color and texture.
Here is the science: The chloride ions in the salt actually act as a direct inhibitor to the PPO enzyme. Furthermore, the slight salinity of the water alters the osmotic balance, preventing the fruit from becoming waterlogged while forming a microscopic barrier that blocks oxygen.
To execute this, dissolve exactly one-half teaspoon of kosher salt into one cup of cold water. Do not use iodized table salt; it contains anti-caking agents and iodine that will leave a harsh, chemical aftertaste. Submerge your sliced apples or pears in the saltwater bath for five to ten minutes.
Once the time is up, drain the fruit and give it a very quick, gentle rinse under cold running water. This removes the surface sodium, ensuring your fruit does not taste like seawater. Pat the slices completely dry. This method will keep your fruit shockingly crisp and vibrantly white for hours, if not days.
Honey and Agave Syrups: The Sweet Sealant
If the idea of putting salt anywhere near your fruit gives you anxiety, there is a sweeter, equally scientific alternative. The brilliant minds at Cook’s Illustrated and America’s Test Kitchen discovered that a highly dilute honey-water bath is an absolute powerhouse for preventing browning.
Honey is much more than just sugar; it is a complex biological product. It contains a specific peptide compound that actively inhibits the activation of polyphenol oxidase. When you combine this enzymatic deactivation with the physical oxygen-blocking properties of a viscous syrup, you get a bulletproof preservation method.
Mix two tablespoons of honey into one cup of water. Whisk aggressively until the honey is completely dissolved (using slightly warm water helps it dissolve, but chill the mixture before adding the fruit). Dunk your freshly sliced fruit into the honey water for just thirty seconds to a few minutes. Remove the slices, drain them, and store them.
The honey leaves a microscopic, oxygen-impermeable seal on the fruit, and the peptide compound shuts down the PPO. The result? Fruit that stays bright, crisp, and fresh for up to 24 hours, with a very subtle, complimentary hint of floral sweetness. When you prepare your produce a full day in advance using these barrier methods, you truly unlock the art of effortless hosting, leaving you free to actually enjoy your own party.
Advanced Techniques for the Overachieving Host
For the home cooks who refuse to settle for anything less than absolute scientific domination over their ingredients, there are a few advanced techniques borrowed from industrial food processing that you can easily replicate in your home kitchen.
Blanching: The Heat Treatment for Vegetables
While we have spent a lot of time talking about chemical inhibition, we cannot ignore thermal deactivation. Enzymes are proteins, and like all proteins, they denature (unravel and lose their function) when exposed to high heat.
For fruits like apples and pears, heat is a non-starter because it cooks the flesh and ruins the crisp, raw texture. But for hearty vegetables that prone to browning—like sweet potatoes, artichokes, and carrots—blanching is your best friend.
Dropping these vegetables into rapidly boiling, heavily salted water for just 60 to 90 seconds, followed immediately by a plunge into a freezing ice bath, completely destroys the PPO enzyme. The ice bath instantly halts the cooking process, leaving the vegetable crisp and raw-tasting, but permanently immune to enzymatic browning. You can blanch your crudité vegetables three days before your event, and they will remain flawlessly vibrant.
Modified Atmosphere Storage (At Home)
In the commercial food industry, pre-sliced apples are sold in bags pumped full of nitrogen gas to completely displace oxygen. While you probably do not have a nitrogen tank in your pantry, you can replicate this concept using a vacuum sealer.
If you are prepping high-risk, high-fat items like avocados, chemical dips often ruin their creamy texture. Instead, slice your avocados, brush them very lightly with olive oil (which creates a lipid barrier against oxygen), and place them in a vacuum-seal bag. Pull a gentle vacuum just enough to remove the ambient air without crushing the delicate fruit.
If you do not have a vacuum sealer, the “direct contact” cling wrap method is mandatory. Place your prepped produce in a glass container and press a sheet of high-quality plastic wrap directly against the surface of the food, ensuring absolutely no air bubbles remain between the wrap and the fruit, before sealing the container with its rigid lid.
The Make-Ahead Grazing Board Workflow: Putting it All Together
Knowing the science is only half the battle; executing it in a logical, time-saving workflow is what separates the stressed-out amateur from the flawless host. Implementing these scientific food staging techniques ensures that your kitchen remains an oasis of calm rather than a chaotic disaster zone. Here is your definitive timeline for prepping a massive grazing board without a single brown apple in sight.
24 Hours Out: What to Prep and How to Store
The day before your event is when the heavy lifting happens. Wash and thoroughly dry all of your produce. Prepare your chosen anti-browning solution—I highly recommend the 10-minute ascorbic acid soak or the 5-minute Serious Eats saltwater bath for maximum longevity and zero flavor alteration.
Slice your apples, pears, and hearty fruits using your sharpest, non-toxic steel knife. Process them in batches through your soaking solution. Do not overcrowd the bowl; every surface of the fruit must be exposed to the liquid.
Once soaked, drained, and patted meticulously dry, storage technique becomes critical. Do not just throw them in a zip-top bag. Line a glass, airtight storage container with a very lightly dampened paper towel. Place the fruit inside, layering with dry parchment paper if you need to stack them. The damp paper towel maintains the ambient humidity in the container, preventing the fridge from dehydrating the fruit, while the airtight seal limits new oxygen exposure.
12 Hours Out: The Danger Zone
The morning of your event, your fridge is going to be packed, and cross-contamination of flavors becomes a real threat. A perfectly crisp, white apple slice that tastes like the raw red onions sitting on the shelf below it is a culinary tragedy. Ensure all your prepped, soaked fruit is sealed in glass or high-quality, non-porous containers.
This is also the time to prep your cheeses and cured meats. By having the fruit already processed and scientifically stabilized, you have completely eliminated the most time-sensitive bottleneck of the entire board. The goal here is to give yourself the mental space to host a meaningful dinner party, rather than spending the evening hyperventilating over a cutting board while your guests awkwardly mingle in the living room.
The Final Assembly: No Sweating Allowed
Two hours before your guests arrive, pull your cheeses and meats from the fridge to allow them to come to room temperature (cold cheese is flavorless cheese). However, leave your scientifically shielded fruit in the fridge until the very last possible moment. Cold temperatures continue to suppress any lingering enzymatic activity.
Thirty minutes before showtime, pull your fruit containers. Open them up and marvel at the pristine, vibrant colors. With your pristine, un-browned fruit ready to go, you can finally focus on the art of food plating without racing against the clock. Arrange your apples in beautiful, sweeping fans. Tuck your pears elegantly next to the brie. Because you utilized ascorbic acid, salt water, or honey water, those slices are going to look just as stunning three hours into the party as they did when you first laid them down.
Conclusion: Reclaiming Your Party
You do not need a brigade of sous-chefs to pull off a flawless, magazine-cover-worthy grazing board, and you certainly do not need to accept brown, oxidized fruit as an inevitable casualty of hosting. By understanding the biological mechanics of polyphenol oxidase and deploying simple, scientifically proven barriers—whether that is a precise ascorbic acid bath, a highly dilute saltwater soak, or a honey-water sealant—you take complete control over your ingredients.
Stop settling for frantic, day-of prep that leaves you exhausted before the first bottle of wine is even popped. Treat your kitchen like a laboratory, respect the chemistry of your produce, use sharp, high-quality tools, and reclaim your weekend. Now go prep those apples, pour yourself a drink, and enjoy your own party for once. You’ve earned it.


