
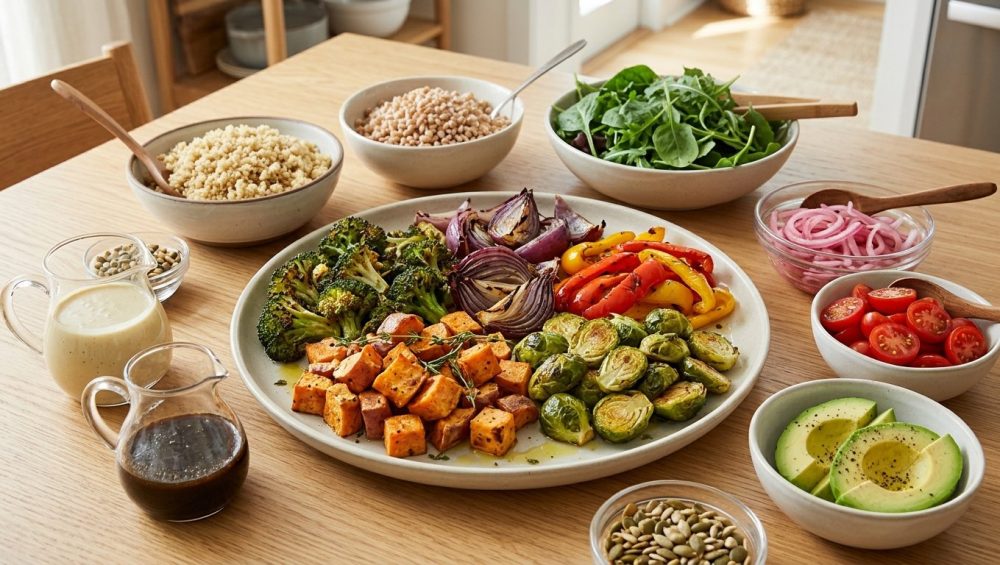
Listen, nobody invited sad, gray, limp broccoli to the dinner party. You know exactly the kind of vegetable I am talking about. You spent good money at the farmer’s market, chopped up a beautiful, vibrant medley of root vegetables and squash, tossed them onto a baking sheet, and forty-five minutes later, you pulled out a tragic, watery pile of mush. It is a culinary heartbreak that happens in home kitchens every single night, but it absolutely does not have to be your reality.
You do not need a Michelin star, a culinary degree, or a trust fund to roast a carrot properly. What you need is a basic understanding of heat, moisture, and pan spacing. Today, we are going to break down the exact science of why your vegetables are turning to mush and how you can harness the raw power of your oven to achieve perfectly caramelized, crispy-edged roasted vegetables. We are doing all of this with a specific endgame in mind: setting up a fresh, interactive, and entirely stress-free mindful grain bowl bar for your next weekend gathering. We are prepping smart so you can actually drink that wine you poured for yourself.
The Science of the Mush: Why Bad Things Happen to Good Produce
Let’s get one fundamental truth straight before we do anything else: vegetables are basically just crunchy water balloons. When you understand this biological reality, you immediately understand why your roasting attempts usually end in a steaming disaster.
Every single plant cell in that zucchini or floret of broccoli contains a massive central vacuole filled with water, all held together by rigid cell walls made of cellulose, hemicellulose, and pectin. To put this into perspective, zucchini is packing a staggering 95% water content by weight, while broccoli sits right around 91%. Even denser vegetables like white potatoes are still composed of about 79% water. When you apply heat to these vegetables, the water inside those cells expands, the pectin holding the cell walls together begins to break down, and the moisture bursts out.
If your oven environment is not optimized to handle that sudden release of moisture, you are no longer roasting; you are steaming.
The ultimate goal of roasting is to trigger the Maillard reaction. This is the beautiful, complex chemical process that occurs between amino acids and reducing sugars when they are subjected to high heat, resulting in hundreds of new flavor compounds and that gorgeous golden-brown crust. However, the Maillard reaction is notoriously picky. It only kicks into high gear at temperatures around 280°F (140°C).
Here is where the physics ruin your dinner: water boils and turns to steam at 212°F (100°C). If your vegetables are releasing water faster than your oven can evaporate it, that water pools on the bottom of the pan and creates a localized micro-climate of steam. Because liquid water and steam cannot exceed 212°F (100°C) at normal atmospheric pressure, the surface temperature of your vegetables is physically capped. It will never reach the 280°F (140°C) required for the Maillard reaction. Instead of browning, your vegetables just sit there, boiling in their own juices until they collapse into a mushy, unappetizing mess.
The Gear Check: Banish the Toxic Junk and Buy Real Pans
I have zero patience for cheap, peeling non-stick cookware, and neither should you. If you are trying to roast vegetables on a scratched-up Teflon pan that you bought at a discount store five years ago, we need to have a serious intervention.
Polytetrafluoroethylene (PTFE), commonly known by the brand name Teflon, is an absolute nightmare for high-heat roasting. While it might be fine for gently scrambling an egg on a Sunday morning, it has no business being inside a 425°F (220°C) oven. When PTFE is heated past 500°F (260°C), the chemical coating begins to rapidly decompose and release toxic fluorocarbon fumes into the air. This isn’t just a pretentious culinary faux pas; inhaling these fumes causes a very real, documented medical condition known as “polymer fume fever” or the “Teflon flu”. Symptoms include severe chills, fever, body aches, and chest tightness that typically hit you four to ten hours after exposure. Oh, and those exact same fumes are notoriously lethal to pet birds, causing immediate respiratory failure.
If you care about your respiratory system, the structural integrity of your food, or your parakeet, you need to start banishing toxic kitchen gear from your cabinets immediately. We only use safe, durable, heavy-duty equipment in this kitchen.
Furthermore, cheap, thin baking sheets are actively sabotaging your meals. Have you ever been in the other room and heard a terrifying, violent BANG coming from your oven? That is the sound of thin metal warping under thermal stress. When your baking sheets keep warping, the flat surface becomes a distorted landscape of hills and valleys. The cooking oil and the vegetable juices immediately pool in the sunken corners. The vegetables stranded on the high ground dry out and burn to a crisp, while the vegetables trapped in the valleys drown in a bubbling puddle of grease and water.
Do yourself a massive favor and invest in heavy-duty, uncoated, commercial-grade aluminum half-sheet pans. They are incredibly inexpensive at restaurant supply stores, they boast fantastic thermal conductivity, and their thick gauge ensures they will remain perfectly flat no matter how much heat you throw at them.
Temperature and Thermodynamics: Your Oven is a Liar
Your oven dial is a polite suggestion, not a scientific fact. Most home ovens are wildly inaccurate, often running anywhere from 25°F to 50°F hotter or cooler than what the digital display claims. If you want to take your cooking seriously, buy a cheap internal oven thermometer and figure out what is actually happening inside that metal box.
For the vast majority of vegetables, the absolute sweet spot for roasting is between 400°F and 450°F (200°C – 230°C). If you drop the temperature below 400°F, the ambient heat is simply not aggressive enough to evaporate the escaping vegetable moisture quickly, leading straight back to the steaming problem. If you push it past 450°F, the natural sugars and the cooking oil will scorch and turn bitter before the dense interior of the vegetable has had a chance to soften.
But setting the right temperature is only half the battle. We need to talk about thermal mass and the single greatest roasting hack you will ever learn.
When you open your oven door to put your food inside, you lose a massive amount of ambient heat. When you slide a cold, heavy metal pan loaded with wet, room-temperature vegetables into that oven, the internal temperature plummets even further. The oven has to work overtime just to recover its heat. During those crucial first ten minutes of recovery time, your vegetables are slowly warming up and leaking water, creating—you guessed it—more steam.
The solution is brilliantly simple: preheating the pan changes everything. Place your heavy aluminum sheet pan in the oven while it preheats. Let it sit in there for a good ten to fifteen minutes so it absorbs a massive amount of thermal energy. When you finally toss your oiled vegetables onto that blazing hot surface, you will immediately hear a violent, aggressive sizzle. That sound is the surface moisture evaporating on contact. You are jumpstarting the Maillard reaction the very second the food hits the pan, ensuring a spectacular crust and completely bypassing the mushy steaming phase.
The Preparation Phase: Cut, Dry, and Oil
Great cooking is mostly just great prepping. If you butcher the prep work, no amount of oven magic is going to save your meal.
The Geometry of the Chop
Uniformity is everything. If you are hacking away at a butternut squash and ending up with pieces ranging from the size of a delicate marble to the size of a golf ball, your roast is doomed from the start. The small pieces will turn into blackened carbon while the massive chunks remain raw and crunchy in the center. Take your time and cut your vegetables into identically sized pieces. This ensures an even, predictable cooking time across the entire pan. If you find yourself struggling to make clean, precise cuts, or if you are constantly tearing the flesh of the produce, the culprit is your dull knife. Get it sharpened. A sharp knife is a safe knife, and it is the most important tool in your entire kitchen.
The Crucial Drying Step
Remember our enemy, surface moisture? You have to eliminate it before the oil even touches the vegetables. If you wash your broccoli and immediately toss it onto a pan, you are dragging tablespoons of excess tap water into the oven. Use a salad spinner for leafy greens and florets, or aggressively pat your root vegetables dry with a clean kitchen towel or paper towels. The surface must be bone dry so the oil can actually adhere to the vegetable rather than sliding off a slick layer of water.
The Science of the Oil Coating
You need fat to roast. Oil acts as a thermal conductor, filling the microscopic gaps between the uneven surface of the vegetable and the flat surface of the pan, transferring heat efficiently and promoting browning. However, you must choose the right oil and apply it correctly.
Do not use extra virgin olive oil for high-heat roasting; its smoke point is too low, and its delicate, expensive flavor compounds will be entirely destroyed by the heat, leaving behind a bitter, acrid taste. Instead, reach for oils with high smoke points like avocado oil, grapeseed oil, or refined olive oil.
When it comes to application, never just blindly drizzle oil over a pan of vegetables. You will inevitably drown half of them and leave the other half completely dry. Place your perfectly dried, uniformly chopped vegetables into a large mixing bowl. Add a modest splash of oil—just enough to give them a glossy sheen, not a heavy coat—and toss them vigorously with your hands or a spatula. Every single surface of every single piece should be lightly lubricated. This is also the perfect time to season aggressively with kosher salt and freshly cracked black pepper.
The Geography of the Sheet Pan: Give Them Space
You have chopped perfectly. You have dried meticulously. You have oiled flawlessly. Now, you are going to ruin it all by dumping three pounds of vegetables onto a single sheet pan.
Overcrowding is the absolute death of a good roast. When vegetables are packed shoulder-to-shoulder, the humidity escaping from them becomes trapped in the narrow crevices between the pieces. You create a localized steam bath. To achieve crispy, caramelized edges, you must obey the two-finger rule: there should be enough empty space between every single piece of vegetable to fit at least one to two fingers. They need breathing room so the hot oven air can circulate around them and whisk the evaporating moisture away. If you have too many vegetables, do not force them onto one pan. Swallow your pride, grab a second sheet pan, and roast in batches.
Master the Art of Zone Roasting
Not all vegetables are created equal, and they certainly do not cook at the same rate. Dense, starchy root vegetables like carrots, potatoes, and parsnips are going to take significantly longer to soften than high-water, delicate vegetables like zucchini, bell peppers, or asparagus.
If you throw them all onto the same pan at the same time, you are guaranteeing failure. Instead, practice zone roasting or staggered roasting. Start your dense root vegetables first. Let them roast for fifteen to twenty minutes to get a head start. Then, carefully pull the hot pan out, add your softer, quicker-cooking vegetables to the empty spaces, and return the pan to the oven. This ensures everything finishes at the exact same time, with perfect textures across the board.
Curating the Mindful Grain Bowl Bar: The Ultimate Hosting Hack
Now that you have mastered the complex thermodynamics of roasting vegetables, it is time to put them to use. Recent industry statistics reveal that a whopping 93% of Americans expect to cook as much or more at home in the coming year, driven by a desire for better health, economic savings, and deeper social connections. People are craving communal, at-home dining experiences over crowded, overpriced restaurants.
But hosting a dinner party can be incredibly intimidating. If you are a beginner and feel like you barely know how to cook, attempting a perfectly timed, multi-course plated dinner is a one-way ticket to a nervous breakdown.
Enter the mindful grain bowl bar.
This is the ultimate weekend gathering hack. It is interactive, effortlessly accommodates every single dietary restriction (vegan, gluten-free, dairy-free), and most importantly, 90% of the work is done before your guests even ring the doorbell. You simply lay out a beautiful spread of components and let everyone build their own culinary masterpiece. Here is how you construct the perfect station.
The Foundation: Getting the Grains Right
The base of the bowl provides the satiating, complex carbohydrates that ground the meal. You want to offer at least two options: perhaps a nutty, chewy farro and a fluffy, protein-packed quinoa. However, grains require respect. If you boil them into oblivion and your quinoa gets mushy, the entire bowl loses its structural integrity and feels like baby food. Always rinse your grains thoroughly to remove the bitter saponins and excess starch, and consider toasting them in a dry skillet for three minutes before adding your cooking liquid. It deepens the flavor exponentially.
The Star of the Show: The Roasted Vegetables
This is where your newfound roasting prowess shines. Arrange beautiful, separate platters of your deeply caramelized sweet potatoes, your charred, crispy-edged broccoli florets, and your blistered bell peppers. Because you preheated your pans and gave the vegetables plenty of space, they will hold their shape and texture beautifully, even as they cool to room temperature on the buffet table.
The Protein Element
You need a solid protein to make the bowl a complete meal. Sliced, pan-seared chicken breast or a beautiful flank steak are crowd-pleasers, but you must include a robust plant-based option. Tofu is a fantastic sponge for flavor, but its high water content makes it notoriously difficult to crisp up. If you want a truly meaty, chewy texture, press your tofu, slice it, and remember that freezing it first changes everything. The freezing process expands the water inside the tofu, creating porous, sponge-like pockets that aggressively soak up whatever marinade you throw at it.
The Crunch Factor
Texture is what separates a good meal from a great one. Provide small bowls of toasted pumpkin seeds, slivered almonds, crispy roasted chickpeas, or sesame seeds. This gives the guests the ability to add a necessary auditory crunch to their bowls, contrasting the softer grains and vegetables.
The Sauce: Tying It All Together
A grain bowl without a sauce is just a dry, depressing salad. The sauce is the unifying liquid that brings all the disparate components together. You should offer a bright, acidic vinaigrette and a creamy, rich sauce (like a tahini-lemon dressing).
When making a vinaigrette, you are forcing oil and water (vinegar/citrus) to mix, creating a temporary emulsion. If your dressing keeps separating into a sad layer of oil floating on top of a puddle of vinegar, you need an emulsifier to bind the molecules together. Never underestimate the power of dijon mustard. Just one teaspoon of mustard contains enough natural emulsifying compounds to hold your vinaigrette in a tight, creamy suspension for hours.
Troubleshooting Common Vegetable Disasters
Even with the best intentions, things can occasionally go sideways. Let’s troubleshoot some of the most common issues you might face when preparing the components for your grain bowl bar.
The Broccoli Dilemma: If your broccoli florets are burning into bitter ash before the thick stalks are even remotely tender, your pieces are disproportionate. You must either trim the stalks down significantly, slice them much thinner, or toss the broccoli with a tiny splash of water in the bowl before oiling it, which provides a brief, protective steam shield before the roasting begins.
The Zucchini Disaster: Zucchini is 95% water. It desperately wants to turn into mush. To prevent this, you must roast it at a blistering 450°F (230°C) for a very short amount of time. Alternatively, you can slice the zucchini, toss it with kosher salt, and let it sit in a colander for twenty minutes. The salt will draw out a massive amount of the internal moisture via osmosis. Pat it completely dry before oiling and roasting.
The Sticking Protein: If you are searing chicken or steak for your bowl, and the meat stubbornly sticks to your stainless steel skillet, you made a fatal thermodynamic error. You did not let the pan get hot enough before adding the oil and the meat. You must wait for the pan to reach the Leidenfrost point—where a drop of water dances and glides across the surface like a mercury bead—before adding your fat. This creates a microscopic vapor barrier that prevents the proteins from permanently bonding to the metal.
The Aftermath: Storing Your Masterpiece
The absolute best part of hosting a mindful grain bowl bar is the meal prep dividend. You are going to have a refrigerator full of perfectly cooked grains, roasted vegetables, and sauces that will feed you for the next three days.
However, you must store them correctly. Never put warm roasted vegetables into a plastic container and immediately snap the lid on. The residual heat will generate condensation inside the container, raining down on your vegetables and instantly destroying all the crispy edges you worked so hard to build. Let everything cool completely to room temperature before sealing.
And when it comes time to clean up, dealing with oily, turmeric-stained plastic storage containers can be infuriating. If they still feel covered in a slick film after a trip through the dishwasher, you need to learn how to actually clean them. Do not use hot water first; hot water melts the fat and drives it deeper into the porous plastic. Instead, use cold water, a heavy squirt of dish soap, and a piece of ripped-up paper towel. Seal the lid, shake it violently for thirty seconds, and watch the mechanical friction and cold soapy water strip the grease away completely.
The Final Bite
Cooking beautiful, vibrant, restaurant-quality food at home does not require magic, and it certainly does not require stress. It simply requires a mindful approach to the basic rules of heat and moisture.
By ditching the toxic pans, preheating your heavy baking sheets, giving your vegetables the breathing room they deserve, and embracing the effortless brilliance of the customizable grain bowl bar, you are setting yourself up for total culinary victory. You are no longer a victim of mushy, steamed produce. You are the master of the Maillard reaction. Now go preheat that oven, sharpen your knife, and invite some friends over. You’ve got this.






