Listen, we need to have a serious, brutally honest conversation about the state of your grains. You’re standing at the stove, lifting the lid off your saucepan after what you thought was a foolproof simmering session, fully expecting to be greeted by a pot of light, fluffy, perfectly separated quinoa pearls. Instead, you are staring down into a waterlogged, gummy paste that looks less like a vibrant, ancient superfood and more like industrial spackling compound. It is a universal kitchen tragedy that has ruined countless weeknight dinners, and honestly, it is not entirely your fault. You have been lied to by the back of the package.
But fear not. As your resident culinary truth-teller, I am going to show you exactly how to fix this textural nightmare once and for all. We are going to break down the simple, undeniable science of proper grain hydration, and then we are going to use those flawless, fluffy results to build the ultimate, low-stress Buddha bowl station. Because you deserve a dinner that doesn’t make you want to throw your spatula across the room and order expensive takeout in a fit of rage.
The Anatomy of a Quinoa Disaster: Why You Are Eating Mush
The Great Water Ratio Lie
If there is one thing that boils my blood more than a dull chef’s knife or a warped frying pan, it is the standard cooking instructions printed on almost every commercial bag of quinoa. For years, the industry standard has confidently instructed home cooks to use a 2:1 ratio of water to quinoa. That means two full cups of liquid for every one cup of dry grain. Let me be unequivocally clear: this is a culinary trap.
Let’s dive into the thermodynamics and starch gelatinization process that occurs inside your saucepan. When you boil a starch-heavy seed like quinoa, the heat causes the tightly packed starch granules inside the endosperm to absorb water, swell, and eventually burst—a process known as gelatinization. If you use the dreaded 2:1 ratio, there is simply too much free water available in the pot. The grains absorb the liquid rapidly, swell beyond their structural capacity, and rupture violently. The excess amylose (a type of starch) spills out into the surrounding water, creating a thick, gluey paste that binds the individual seeds together into a solid, unappetizing mass. The 2:1 ratio is a myth perpetuated by outdated conventional wisdom, and it is the primary reason your grain bowls lack that satisfying, distinct chew.
The Saponin Situation: A Lesson in Plant Chemistry
Beyond the texture, there is the issue of flavor. If your quinoa tastes bitter, earthy in a bad way, or distinctly like dish soap, you have fallen victim to saponins. Quinoa is a pseudocereal, meaning it is technically a seed rather than a true grass grain like wheat or oats. Because it grows in the harsh, high-altitude climates of the Andes mountains—where it has been cultivated by indigenous populations for over 5,000 years—it had to develop a robust evolutionary defense mechanism to survive.
Enter the saponins. These complex chemical compounds, specifically pentacyclic triterpenes, naturally coat the exterior hull of the quinoa seed. In the wild, these chemicals act as the plant’s natural pesticide, deterring birds, insects, and microbial pathogens like fungi with their intensely bitter flavor. The word “saponin” is actually derived from the Latin word “sapo,” which translates to soap. This is not a coincidence; these compounds have strong detergent-like properties and will literally froth and foam when agitated in water.
In fact, the saponins found in quinoa are so potent that indigenous populations historically used the rinse water as a natural laundry detergent, and the compounds are known to cause hemolysis (the destruction of red blood cells) in cold-blooded animals like fish. While modern agricultural processing involves mechanical scarification to remove the outer husk and the majority of these bitter compounds, the process is rarely perfect. A fine dust of saponin residue almost always clings to the seeds that end up in your grocery store aisle. If you do not physically wash this residue away, the heat of the cooking water will dissolve the saponins, infusing your entire batch of grains with a distinctly soapy, metallic flavor that no amount of salt or expensive dressing can mask.
The Masterclass: How to Cook Flawless, Fluffy Quinoa Every Single Time
Step 1: The Mandatory Rinse and Toast
You must rinse your quinoa. This is a non-negotiable rule of my kitchen. Measure out your dry grains, place them in a fine-mesh metal strainer, and run them under cold tap water. You will likely see a soapy white foam begin to develop—those are the saponins washing away. Keep rinsing and agitating the seeds with your fingers until the water runs completely clear and the bubbles disappear. If you want to elevate this from a mundane chore to a peaceful daily habit, take a moment to appreciate the transformation happening in your sink.
After rinsing your grains, let them drain thoroughly to remove excess moisture. To build incredible depth of flavor, heat a small drizzle of high-quality olive oil in your saucepan over medium heat. Add the damp quinoa and toast it for about two to three minutes, stirring constantly. This brief toasting step evaporates the remaining surface water and gently roasts the seed, bringing out a rich, nutty aroma that boiling alone simply cannot achieve.
Step 2: The Golden Ratio of Hydration
We are officially throwing the 2:1 rule out the window. The scientifically backed, chef-approved golden ratio for perfect, fluffy quinoa is exactly 1.25 parts liquid to 1 part quinoa. That means for every one cup of dry quinoa, you will use exactly one and a quarter cups of water or broth. If you prefer a slightly softer, more tender bite, you can safely push this ratio to 1.5 parts liquid, but you must never go beyond that threshold.
By restricting the liquid, you are limiting the amount of free moisture available for absorption. The quinoa seeds absorb just enough water to hydrate the starches and soften the proteins, but not enough to cause catastrophic structural failure. The remaining cooking process relies heavily on the ambient steam trapped inside the pot rather than direct submersion in boiling water.
Step 3: The Simmer, The Steam, and The Towel Trick
Once you have added your precisely measured liquid to the toasted grains, bring the pot to a rolling boil. The second it reaches a boil, immediately drop the heat to the absolute lowest setting your stove can manage, and cover the pot with a tight-fitting lid. Let it simmer completely undisturbed for exactly 15 minutes. Do not lift the lid. Do not stir it. Just leave it alone.
When the 15 minutes are up, remove the pot from the heat entirely. Now comes the secret weapon of professional kitchens: the towel trick. Quickly remove the lid, place a clean, dry, lint-free dish towel flat over the top of the open pot, and firmly press the lid back down over the towel. Let the pot sit undisturbed for another 10 minutes. Why? Because as the quinoa rests, residual steam rises from the hot grains. Without the towel, that steam hits the relatively cooler lid, condenses into water droplets, and rains right back down onto your perfectly cooked food, ruining the texture. The towel acts as a moisture trap, absorbing that condensation and guaranteeing a fluffy, separated final product.
Step 4: The Fluff and The Rest
After the 10-minute resting period, remove the lid and the towel. Take a fork—never a spoon, which will crush the delicate seeds—and gently fluff the quinoa, scraping from the bottom up. You will notice that the tiny, spiral-shaped germ—the nutrient-dense embryo of the seed—has gracefully detached and wrapped around the exterior of the grain. This is the visual indicator of perfectly cooked quinoa, providing that signature, satisfying pop and crunch.
A Brief History and the Economics of the Buddha Bowl
From Monastic Alms to the Modern Superfood Trend
Before we start throwing roasted sweet potatoes and tahini into a bowl, let’s talk about where this brilliant concept actually comes from. The “Buddha bowl” isn’t just a trendy hashtag invented by modern wellness influencers. The origin of the concept traces back centuries to the story of Buddha himself. According to tradition, Buddha lived a simple, ascetic life and would carry a small, empty bowl—known as a bikshapatra—through local villages during his morning alms. The generous villagers would offer whatever small portions of food they had to spare, placing a scoop of rice, a handful of vegetables, or some legumes into his bowl. At the end of the day, he would sit down to eat this varied, nutritionally diverse, single-bowl meal.
The modern terminology, however, has much more recent roots. While variations of “macro bowls” and “hippie bowls” existed for decades in health food circles, lifestyle magnate Martha Stewart is widely credited with popularizing the specific term “Buddha Bowl” in her 2013 cookbook, Meatless. Since then, the concept has exploded into a global culinary phenomenon, celebrated for its aesthetic appeal and balanced macronutrient profile—typically aiming for a split of roughly 30% protein, 40% complex carbohydrates, and 30% healthy fats.
The Exploding Global Quinoa Market
The rise of the Buddha bowl has run parallel to the meteoric rise of quinoa itself. Once a localized staple cultivated exclusively in South America, quinoa is now a global agricultural powerhouse. The global quinoa market was valued at over $1.08 billion in 2024 and is projected to reach a staggering $2.78 billion by the year 2034, expanding at a compound annual growth rate (CAGR) of 10.7%. This explosive growth is driven by a massive consumer shift toward plant-based diets, gluten-free alternatives, and nutrient-dense superfoods. Whether you are buying standard white quinoa (which cooks the fastest and has the mildest flavor), earthy red quinoa, or the slightly crunchier black quinoa, you are participating in a multi-billion-dollar global food movement.
The “No-Go” Rule: Banish Toxic Gear from Your Grain Bowls
The Hidden Dangers of Cheap Non-Stick Coatings
I need to pause for a moment and address a critical issue. You can have the most perfectly cooked, scientifically hydrated quinoa in the world, but if you are roasting your Buddha bowl vegetables on a scratched, warped, peeling non-stick baking sheet, we have a major problem. I have a strict, zero-tolerance policy for toxic kitchenware.
Let’s talk about the chemistry of cheap non-stick coatings, specifically polytetrafluoroethylene (PTFE), commonly known by brand names like Teflon. When these synthetic polymers are heated above 500°F (260°C)—a temperature remarkably easy to reach when roasting vegetables in a hot oven—the coating begins to break down at a molecular level. This thermal degradation releases invisible, odorless, and highly toxic fumes into your kitchen air. But the danger isn’t just airborne. As these cheap pans age, the cyclical stress of heating and cooling causes the thin non-stick layer to blister, peel, and flake directly into your food.
When you are taking the time to source organic vegetables, meticulously rinse your ancient grains, and prepare a health-conscious Buddha bowl, the absolute last thing you want to do is garnish your meal with microplastics and synthetic chemical flakes.
Investing in Safe, High-Quality Roasting and Simmering Tools
If you want to avoid ruining your nonstick pans and compromising your health, you must upgrade your equipment. Throw away the flimsy aluminum sheets that sound like a gunshot when they warp in a 400-degree oven. Replace them with heavy-duty carbon steel, thick multi-clad stainless steel, or high-quality, lead-free ceramic bakeware. These durable, safe materials are absolute beginner cooking essentials that will last a lifetime, provide vastly superior heat distribution, and ensure that your food remains pure and untainted.
Building the Ultimate, Low-Stress Buddha Bowl Bar
The “Prep Once, Eat Twice” Weekday Philosophy
As a busy professional who values both my time and my palate, I firmly believe that weekday cooking needs to be ruthlessly efficient. The beauty of the Buddha bowl is that it perfectly aligns with the “prep once, eat twice” philosophy. By batch-cooking your components on a Sunday afternoon, you can assemble mind-blowing, restaurant-quality meals in less than five minutes on a chaotic Tuesday evening. Time is money, and a well-organized fridge is the ultimate currency.
Component 1: The Flawless Quinoa Base
Every great structure needs a solid foundation. Your freshly cooked, perfectly fluffed, saponin-free quinoa is the anchor of the bowl. It provides a robust, nutty flavor profile and a complete source of plant-based protein, containing all nine essential amino acids. Because we used the 1.25:1 water ratio and the towel trick, your quinoa will remain distinct and chewy in the fridge for up to five days, never devolving into a solid, gelatinous brick.
Component 2: The Perfectly Roasted Veggies (Crisp, Not Sad)
A Buddha bowl without roasted vegetables is just a sad salad. But if you want to stop eating mushy veggies, you need to respect the science of heat transfer and the Maillard reaction. Toss your broccoli florets, sweet potato cubes, and bell peppers in olive oil, salt, and pepper. Spread them out on a heavy, non-toxic baking sheet. Do not crowd the pan! If the vegetables are touching, they will trap moisture and steam each other, resulting in a limp, soggy texture. Give them space to breathe, and roast them at a high temperature—ideally 400°F to 425°F (200°C to 220°C)—until the edges are deeply caramelized and crispy.
Component 3: The Protein Punch
While quinoa is protein-rich on its own, a true Buddha bowl features an additional, dedicated protein component. This could be a scoop of spiced, crispy roasted chickpeas, a beautifully jammy soft-boiled egg, or cubes of deeply marinated, pan-seared tofu. When searing proteins like tofu or chicken for your bowls, using a proper, heavy-bottomed stainless steel skillet is key. Mastering temperature control is the absolute secret to preventing protein adhesion, allowing your ingredients to release naturally from the pan with a gorgeous, golden-brown crust.
Component 4: The Crunch Factor and Fresh Herbs
Texture is the unsung hero of culinary satisfaction. A bowl composed entirely of soft grains and tender vegetables will quickly become monotonous. You must introduce a contrasting crunch. Toasted pumpkin seeds (pepitas), slivered almonds, sesame seeds, or crispy fried shallots are excellent choices. Follow this up with a generous handful of fresh, vibrant herbs—cilantro, parsley, or torn mint leaves—to cut through the richness of the roasted elements and brighten the entire dish.
Component 5: The Liquid Gold (Dressings and Sauces)
A Buddha bowl without a sauce is a dry, disjointed collection of ingredients. The dressing is the unifying force that ties the entire bowl together, acting as a functional lubricant that adds necessary moisture and mouthfeel to the complex carbohydrates.
Let’s talk about the emulsion science behind a great dressing. If you simply pour straight oil and vinegar over your food, the liquids will separate, leaving some bites aggressively acidic and others unpleasantly greasy. You need an emulsifier. In a classic tahini dressing, the ground sesame paste acts as a powerful mechanical emulsifier. When you whisk tahini with fresh lemon juice, you will initially notice the mixture seizing up and becoming incredibly thick and clumpy. Do not panic; this is a natural reaction. Keep whisking vigorously while slowly drizzling in warm water, one tablespoon at a time. The mechanical shearing force of your whisk, combined with the gradual addition of water, will suddenly transform the seized paste into a brilliantly smooth, pourable, velvety sauce. Add a pinch of ground cumin, a dash of smoked paprika, and perhaps a teaspoon of high-quality maple syrup to balance the sharp acidity. This dressing is the liquid gold that elevates a simple bowl into a cohesive culinary masterpiece.
Hosting the Buddha Bowl Bar: A Masterclass in Chill Gatherings
Staging the Station for Flow and Logistics
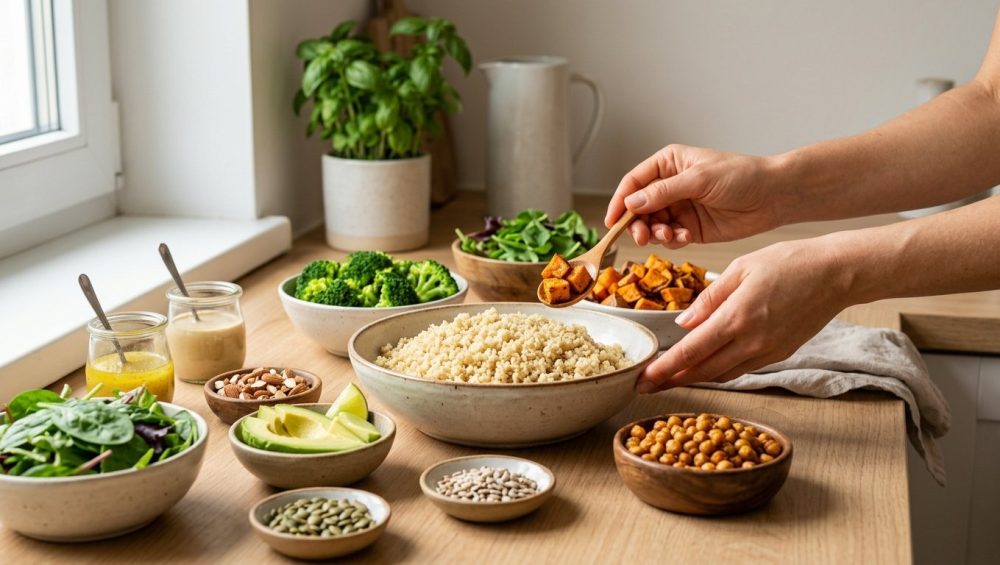
Here is a secret: you don’t need to spend six hours sweating over a hot stove to impress your friends. If you want to host a relaxed dinner party, the DIY Buddha bowl bar is the ultimate hosting hack. There is a profound psychological benefit to this setup. Traditional dinner parties often place an immense amount of pressure on the host to deliver a perfectly plated, synchronized meal. This chaotic, high-stress environment entirely defeats the purpose of inviting people into your home.
By utilizing a staging system and a buffet-style setup, you shift the burden of assembly from the chef to the guests, completely eliminating the plating bottleneck. Set up your kitchen island or dining table as a linear buffet. Start with a stack of wide, shallow bowls. Next, present your large vessel of warm, fluffy quinoa. Follow this with platters of your roasted vegetables, bowls of your chosen proteins, and finally, a dedicated “garnish station” featuring your crunchy seeds, fresh herbs, and squeeze bottles of dressings. This logical flow prevents traffic jams and allows guests to move seamlessly down the line. The host is freed from the kitchen and can actually participate in the conversation.
Temperature Control and Thermal Mass in Serving Ware
When setting out food for a communal gathering, temperature control is paramount. You want your hot components to stay warm and your cold components to stay crisp. This is where the concept of thermal mass comes into play. Serve your hot quinoa and roasted vegetables in heavy, thick-walled ceramic or stoneware bowls. These dense materials absorb and retain heat far better than thin glass or cheap plastic, keeping your food at a safe, pleasant serving temperature for the duration of the meal. Keep your fresh greens and dressings in separate, chilled vessels to maintain their bright, refreshing bite.
The Joy of Customizable, Communal Eating
The true magic of the Buddha bowl bar is its inherent inclusivity. In an era of diverse dietary restrictions—from gluten-free and vegan to keto and nut allergies—a customizable station ensures that every single guest can build a meal that suits their specific needs without requiring you to cook five different entrees. Serving simple meals does not mean serving boring meals; it means stripping away the pretense and focusing on the joy of sharing good, wholesome food with people you care about.
A Buddha bowl is inherently visual, a literal feast for the eyes. Even if your guests are just throwing together a mix of simple, pre-prepped ingredients, applying the basic art of food plating—grouping ingredients in distinct, colorful sections around the edge of the bowl rather than mixing them into a chaotic, muddy pile—will make the casual meal feel like a high-end luxury experience.
Final Thoughts: Reclaiming Your Kitchen Sanity
Cooking should never be a source of anxiety or dread. It should be an empowering, creative outlet that nourishes both your body and your mind. Avoiding rookie kitchen mistakes—like blindly following the terrible water ratios printed on the back of a grain bag or cooking on toxic, flaking pans—is simply a matter of understanding the basic science behind your ingredients.
By taking the time to rinse away those bitter saponins, respecting the 1.25:1 golden hydration ratio, and deploying the brilliant towel trick, you have officially conquered the mushy quinoa curse. You now possess the foundational knowledge to batch-cook like a professional, turning a handful of humble ingredients into a vibrant, nutrient-dense Buddha bowl that looks like it belongs on the cover of a culinary magazine.
So, step away from the takeout menu. Reclaim your kitchen. Throw out that warped, scratched non-stick pan that has been haunting your cabinets since college. Embrace the simple, undeniable power of a perfectly cooked grain, and start building bowls that actually make you excited for dinner. You’ve got this, chef. Now go rinse your quinoa.


