
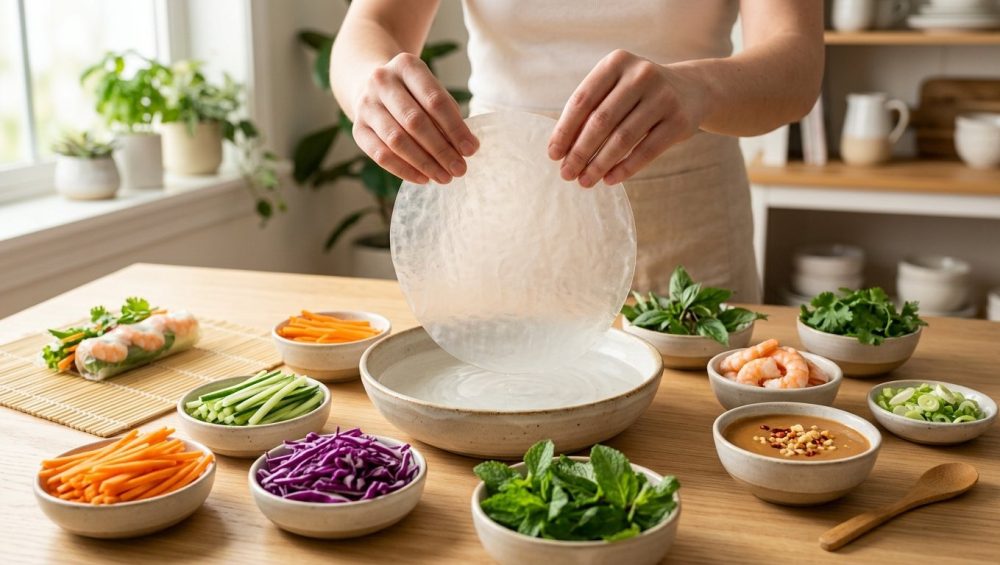
Picture this: It’s a beautiful Saturday evening. You’ve decided to host a relaxed dinner party for a few friends. You’ve meticulously julienned your carrots, poached your shrimp perfectly so that your shrimp tastes like rubber no more, and arranged a vibrant platter of fresh herbs. You dip your delicate rice paper into a bowl of hot water, lay it on your board, pile it high with goodies, and attempt to roll it up.
RIP.
The wrapper tears. A rogue carrot stick pierces the side. The entire thing collapses into a sticky, gummy, translucent mess that looks less like an elegant Vietnamese summer roll and more like a sad, deconstructed salad trapped in a used bandage. You sigh, toss it in the trash, and try again. And again. By the fourth torn wrapper, you’re ready to order takeout and call it a night.
Listen to me, weekend culinary warriors: it is not your fault. You are not fundamentally incapable of wrapping a summer roll. You have simply been lied to by the back of the rice paper packaging, which offers vague, unhelpful instructions that practically guarantee failure.
As your resident Sassy Sous-Chef, I am here to tell you that you don’t need a culinary degree to make mind-blowing food. You just need to understand a tiny bit of food science, ditch the cheap tools, and learn the actual, foolproof technique for handling delicate wrappers. By the end of this masterclass, you will know exactly how to tame the notorious bánh tráng (rice paper) so you can host a stress-free, engaging, and healthy communal meal.
Let’s dive into the secret to a mindful summer roll bar, and why your wrappers have been betraying you all along.
The Anatomy of Bánh Tráng: It’s Not Just Rice
Before we can fix the tearing, we need to understand what we are actually working with. Most people assume that rice paper is, well, 100% rice. But if you flip that package over and look at the ingredient list, you will likely see a blend of rice flour, tapioca starch, water, and salt.
The Tapioca Starch Advantage
The ratio of tapioca starch to rice flour is the secret defining factor of your wrapper’s structural integrity. Traditional, old-school Vietnamese rice paper was made almost entirely of rice flour. While delicious and authentic, 100% rice flour wrappers are incredibly fragile, opaque, and prone to shattering if you look at them wrong.
Modern wrappers—especially the ones exported to Western supermarkets—rely heavily on tapioca starch. Tapioca is a hydrocolloid powerhouse. When hydrated, it provides that signature elasticity, chewiness, and sheer, translucent appearance. A wrapper with a higher tapioca content is significantly more forgiving for a home cook. It stretches before it snaps.
If you are constantly battling wrappers that shatter or turn into mush, check your brand. I always recommend looking for a brand that proudly features a strong tapioca-to-rice-flour ratio. If you buy a brand that is purely rice flour, you are playing on hard mode. Save the hard mode for when you aren’t trying to feed a table full of hungry guests.
The Temperature Trap: Why Hot Water is the Enemy
This is the number one rookie mistake that ruins summer roll nights across the globe. Somewhere along the line, a rumor started that you need to soak rice paper in hot—or even boiling—water to soften it.
I need you to banish this thought from your kitchen forever.
The Science of Gelatinization
When you plunge a thin sheet of dried tapioca and rice starch into hot water, you trigger rapid, uncontrolled starch gelatinization. The hot water violently forces the starch granules to swell and burst, releasing their sticky contents all at once. The result? The wrapper instantly turns into a gummy, unmanageable, ultra-sticky web that folds in on itself. Once the edges of a hot-water-soaked wrapper touch, they fuse together permanently. You cannot unstick them without tearing the delicate sheet.
Furthermore, hot water degrades the structural integrity of the wrapper so rapidly that it loses all of its tensile strength. The moment you try to pull it tight around a pile of vermicelli noodles, it ruptures.
The Lukewarm Solution
The ideal water temperature for hydrating rice paper is room temperature to lukewarm. We are aiming for roughly 70°F to 80°F (21°C to 26°C).
Using cooler water slows down the hydration process. It gives you control. It allows the starches to absorb water gently and evenly without instantly turning to glue. Yes, it takes a few seconds longer for the wrapper to soften, but that extra time is the buffer that prevents your dinner party from turning into a sticky disaster.
If you are hosting a summer roll bar where guests are rolling their own meals, set out wide, shallow bowls of room-temperature water. You will never have to worry about the water cooling down, and your guests won’t burn their fingers or destroy their wrappers.
The “Al Dente” Soak: Timing is Everything
The second biggest mistake home cooks make is leaving the wrapper in the water until it feels completely soft and floppy.
If your rice paper feels like a wet jellyfish when you pull it out of the water bowl, you have already lost the battle. It is over-hydrated, and it will tear the moment you try to roll it.
The Five-Second Rule
Here is the golden rule of the Sassy Sous-Chef: You are not soaking the wrapper; you are merely dipping it.
Submerge the wrapper in your lukewarm water, rotate it quickly to ensure the entire surface gets wet, and pull it out immediately. The entire process should take no more than 5 to 10 seconds.
When you remove the wrapper from the water, it should still feel stiff, textured, and slightly rigid. It should hold its shape. This is the “al dente” stage of rice paper.
The Residual Hydration Phase
Why do we pull it out while it’s still stiff? Because hydration doesn’t stop the moment you take it out of the water. As you lay the wrapper on your work surface and begin piling on your ingredients, the residual water clinging to the surface of the wrapper continues to soak into the starches.
By the time you have finished arranging your shrimp, your vermicelli, and your herbs, the wrapper will have perfectly softened into a pliable, stretchy, tear-resistant sheet. This delayed softening gives you a sturdy canvas to build on, and a flexible wrapper to roll with.
Setting Up Your Battle Station: The Anti-Stick Surface
You have the right wrapper, the right water temperature, and the right soaking time. Now, where are you putting this thing?
If you lay a wet, sticky sheet of starch onto the wrong surface, it will cement itself to the board, and you will be scraping it off with a spatula.
The “No-Go” on Dry Wood
Do not, under any circumstances, place wet rice paper on a dry wooden cutting board. Wood is naturally porous and hydrophilic. It will instantly suck the moisture right out of the wrapper, causing the rice paper to adhere to the wood grain like superglue. I know that bamboo cutting boards look incredibly aesthetic for a dinner party setup, but keep them far away from your wet wrappers.
The Ideal Rolling Surfaces
You need a surface that will not aggressively absorb moisture or grip the sticky starch. Here are the three best options for your summer roll station:
- The Damp Towel Method: This is a classic trick used in many Vietnamese kitchens. Lay a clean, lint-free, slightly damp kitchen towel flat on your counter. The damp towel provides a non-stick surface that also helps gently hydrate the wrapper from the bottom up.
- The Plastic or Ceramic Board: A smooth, non-porous plastic cutting board or a large ceramic dinner plate works wonders. If you find the wrapper is still sticking slightly, lightly moisten the surface of the plate or board with a few drops of water before laying the wrapper down.
- The Silicone Mat: If you have a high-quality, food-grade silicone baking mat, this is an excellent, naturally non-stick surface for rolling.
A quick note on toxic gear: If you are using plastic boards, ensure they are high-quality, BPA-free, and not deeply scarred with knife cuts. Deep grooves harbor bacteria and grab onto the rice paper. And please, do not try rolling these on peeling, scratched non-stick baking sheets. You know my rule: if the coating is flaking, throw it in the trash. You wouldn’t want to be ruining your nonstick pans further by aggressively scraping off stuck rice paper. Invest in safe, durable, non-toxic gear.
Anatomy of a Tear-Free Summer Roll: The Fillings
You have mastered the wrapper. Now we must address the cargo. Even a perfectly hydrated, high-tapioca wrapper will tear if you assault it with sharp objects and excessive bulk.
The Lettuce Shield Technique
This is the single greatest hack for preventing your summer rolls from tearing from the inside out.
Think about your fillings: julienned carrots, crispy cucumbers, crunchy bell peppers. These ingredients are essentially tiny, delicious spears. If you place them directly against the delicate rice paper and pull tight, they will poke right through.
The solution is the “Lettuce Shield.” Take a piece of soft, pliable lettuce—butter lettuce or Boston bibb lettuce works best—and remove the stiff, crunchy rib down the center. Lay the soft lettuce leaf on the lower third of your rice paper. Pile your sharp, crunchy vegetables, your slippery rice noodles, and your flyaway herbs inside the lettuce leaf. Roll the lettuce leaf around the fillings to create a neat, compact bundle.
Now, when you roll the rice paper over the bundle, the wrapper is pressing against a smooth, soft layer of lettuce, rather than a jagged pile of carrots. No more punctures.
Prepping Your Ingredients for Success
A mindful summer roll bar requires impeccable prep. You cannot be chopping vegetables while your guests are trying to roll.
- The Noodles: Use thin vermicelli rice noodles. Boil them until tender, drain them, and immediately rinse them thoroughly under cold water. If you skip the rinse, the surface starches will turn the noodles into a giant, unmanageable clump. (It’s exactly why your rice is always mushy if you don’t rinse it before cooking). After rinsing, toss the noodles with a tiny drop of toasted sesame oil to keep them separate.
- The Proteins: Shrimp is classic. Slice cooked shrimp in half lengthwise. This not only makes the shrimp go further, but it creates a flat surface that lays beautifully flush against the wrapper, making for a stunning presentation. If you are using tofu, press it well, slice it into thin strips, and pan-fry it so it holds its shape.
- The Herbs: Fresh herbs are non-negotiable. Mint, cilantro, and Thai basil elevate the roll from a boring salad wrap to a vibrant, aromatic masterpiece. Wash them gently and dry them completely. If you toss wet herbs into your rolls, they will turn to mush. And if you buy them days in advance, store them properly in a damp paper towel in the fridge so you never have to worry that your fresh herbs get slimy before the party even starts.
- The Veggies: Julienne everything as finely as possible. Thick, chunky vegetables are harder to chew and more likely to break the wrapper. Use a sharp knife. If your onions make you cry and your carrots look hacked to pieces, it is time to sharpen your blade or perhaps realize you need a bench scraper to safely clear your board instead of dragging your delicate knife edge across it.
Portion Control: Less is More
The greedier you are, the more likely your roll is to fail. An overstuffed summer roll is impossible to seal and awkward to eat.
For a standard 8.5-inch wrapper, you want no more than a small handful of filling. A pinch of noodles, a few strips of veggies, a couple of herb leaves, and three shrimp halves. That is it.
The Rolling Technique: The Burrito Fold
Rolling a summer roll is exactly like rolling a tiny, translucent burrito.
- Lay your wrapper on your damp towel or plastic board.
- Place your shrimp (cut side up) in a horizontal line across the middle of the wrapper. (When you finish rolling, the pink exterior of the shrimp will show beautifully through the top).
- Place your lettuce shield (filled with noodles and veggies) on the bottom third of the wrapper, closest to you.
- Lift the bottom edge of the wrapper and pull it snugly up and over the lettuce bundle. Gently pull back on the bundle to tighten the roll.
- Fold the left and right sides of the wrapper inward, closing off the ends.
- Continue rolling tightly upward, rolling over the shrimp, until the roll is completely sealed. The sticky nature of the hydrated tapioca will naturally glue the seam shut.
If you mess up your first one, eat the evidence and try again. The beauty of the DIY roll bar is that nobody expects perfection on the first try.
Designing the Ultimate Mindful Summer Roll Bar
Now that you possess the technical knowledge, let’s talk about the vibe.
In 2026, the era of the stressed-out, sweating host who spends the entire dinner party trapped in the kitchen is officially dead. The modern dinner party is all about interactive, communal, low-pressure dining. We want to spend time with our guests, not cooking for them while they awkwardly sip wine in the living room.
A DIY summer roll bar is the pinnacle of mindful, experiential gathering. It breaks the ice, gives people something tactile to do with their hands, and allows everyone to customize their meal to their exact dietary preferences.
The Setup and Flow
To make this work seamlessly, you need to treat your dining table like a highly organized culinary assembly line.
1. The Hydration Stations:
Do not force eight people to share one bowl of water. Set up multiple “hydration stations” down the center of the table. Use wide, shallow vessels—pie dishes or large pasta bowls work perfectly. Fill them with room-temperature water.
2. The Platter Presentation:
Group your ingredients logically.
- The Base Platter: A large platter containing the butter lettuce leaves and the cooked vermicelli noodles.
- The Rainbow Board: A beautifully arranged board of your julienned vegetables (carrots, cucumbers, bell peppers, purple cabbage).
- The Herb Garden: Small bowls or a dedicated plate featuring your washed and dried mint, cilantro, and Thai basil.
- The Protein Plate: Your sliced shrimp, pan-fried tofu, or perhaps some thinly sliced lemongrass pork. (Just make sure you cook your poultry properly if you offer it; nobody likes when a chicken breast turns out dry and stringy inside a delicate roll).
3. The Rolling Real Estate:
Ensure every guest has a large enough plate or a personal plastic/ceramic board to roll on. Provide everyone with a damp cloth napkin if they prefer the towel-rolling method.
4. The Sauce Flight:
A summer roll is essentially a vehicle for sauce. Do not skip this step. Offer at least two options:
- Classic Nước Chấm: A bright, funky, sweet, and sour Vietnamese dipping sauce made from fish sauce, lime juice, sugar, garlic, and bird’s eye chilies. It cuts through the richness and adds a massive punch of umami.
- Rich Peanut Sauce: A creamy, savory blend of natural peanut butter, hoisin sauce, soy sauce, a splash of sesame oil, and a little warm water to thin it out.
5. The Pre-Party Prep:
The absolute best part of a summer roll bar is that 100% of the food prep can be done before the doorbell rings. You can julienne your veggies, make your sauces, and cook your noodles hours in advance. Just cover everything tightly and keep it in the fridge.
A quick tip for the veggies: if you prep your cucumbers and carrots early, don’t let them sit in a puddle of their own water. You can stop eating mushy veggies by storing them with a dry paper towel in their container to absorb excess moisture. Crisp vegetables are the key to a satisfying textural crunch inside the soft rice paper.
Embracing the Imperfection
When your guests arrive, pour the drinks, turn on a great playlist, and gather everyone around the table.
Take a moment to demonstrate the “Al Dente Soak” and the “Lettuce Shield” technique. Show them how to lay the shrimp down first so it looks pretty. And then? Let them loose.
Some guests will overstuff their rolls. Some will tear their wrappers. Some will make giant, misshapen burritos that fall apart on the first bite. That is entirely the point. The joy of the mindful summer roll bar isn’t about achieving Michelin-star perfection; it is about the laughter, the shared experience, and the simple pleasure of building a meal together.
The Sassy Sous-Chef’s Final Word
Cooking for friends should never feel like a high-stakes performance that leaves you exhausted. By understanding the simple food science behind tapioca hydration, ditching the boiling water, and setting up an interactive prep station, you transform a notoriously frustrating dish into an effortless, engaging centerpiece.
You don’t need fancy equipment, and you certainly don’t need a culinary degree. You just need a little bit of know-how, some fresh ingredients, and the confidence to let your guests do the rolling.
So grab a pack of high-tapioca rice paper, fill up those pie dishes with lukewarm water, and invite your friends over. Your tear-free, stress-free, totally mindful summer roll era starts right now. Now get out of here and go chop some carrots!






