Welcome to another weekend. You are standing in your kitchen, coffee in hand, staring down at a plate of dense, rubbery discs that vaguely resemble cardboard coasters rather than the towering, fluffy diner-style flapjacks you promised your friends. Listen, I have ruined enough Sunday mornings with sad, flat pancakes to know exactly how demoralizing it is to watch your guests politely chew through a mouthful of culinary disappointment.
But here is the brutal, liberating truth: cooking—yes, even pouring batter onto a hot griddle—is a science. It is not magic, and you absolutely do not need a pretentious culinary degree to make mind-blowing food. What you do need is a basic understanding of kitchen chemistry and the willingness to stop making the same rookie mistakes every weekend. Today, we are going to tear down everything you thought you knew about breakfast. We are going to dissect the anatomy of a pancake disaster, explore the molecular magic of gluten and leavening, and finally, I will hand you the ultimate blueprint for hosting a stress-free, prep-ahead mindful pancake bar. Because the only thing worse than eating bad pancakes is sweating over a hot stove all morning while your guests have all the fun without you. Grab your spatula, pour another cup of coffee, and let’s get to work.
The Anatomy of a Pancake Disaster: Why Your Flapjacks Are Flat
Before we can build the perfect pancake, we need to understand why your current recipe is failing you. The difference between a light, airy cloud and a dense, chewy hockey puck comes down to how you handle your ingredients on a microscopic level.
The Gluten Trap: Step Away from the Whisk
Let’s talk about flour. Standard all-purpose flour contains two crucial proteins: glutenin and gliadin. When they are sitting dry in your mixing bowl, they do absolutely nothing. But the exact second you add a liquid—like milk, water, or eggs—these proteins wake up, link together, and form an elastic network called gluten. Now, gluten is a beautiful thing if you are baking a chewy bagel, a rustic sourdough loaf, or a sturdy pizza crust. It provides structure and chew. However, gluten is the mortal enemy of a tender, fluffy pancake.
When you whisk your batter vigorously, you are actively developing and tightening that web of gluten. A fascinating 2026 food science laboratory trial mapped this out perfectly: pancake and muffin batters mixed for just 90 seconds with a flat beater developed over three times the elastic modulus of a gently folded batter. The researchers noted that if your batter becomes stringy and rope-like, stretching more than five centimeters off your spatula without breaking, you have reached advanced gluten polymerization. If you aggressively stir out the lumps, you are essentially kneading bread dough. The result? A tough, rubbery disc that refuses to rise. You must treat your batter like it is a delicate, temperamental soufflé. Fold the wet ingredients into the dry ingredients with a gentle hand. Leave the lumps alone! I repeat: step away from the bowl and leave the lumps. They will naturally hydrate and disappear during the resting phase.
Leavening Agent Lifespans: Baking Soda vs. Baking Powder
If gluten is the structural villain, your leavening agents are the chemical heroes. To get that lofty rise, you rely on baking soda, baking powder, or a combination of both. But you have to know how they work. Baking soda is pure sodium bicarbonate. It requires an acidic wingman—like buttermilk, yogurt, or a squeeze of lemon juice—to activate and produce the carbon dioxide gas bubbles that lift the batter.
Baking powder, on the other hand, is a complete package. It contains both the alkaline base and a powdered acid. Most modern baking powders are “double-acting,” meaning they undergo two distinct chemical reactions: once when they are hydrated by the wet ingredients in the bowl, and a second time when they are exposed to the heat of the griddle.
Here is where home cooks mess up: they use expired leaveners. If your baking powder has been sitting in the back of your pantry since 2022, it is dead. Toss it in the trash. Furthermore, if you overmix your batter, you are literally beating those trapped carbon dioxide bubbles right out of the mixture. You are popping your own balloons before the party even starts.
The Magic of the Rest Period
This is the hill I will absolutely die on. I promise you, letting the batter rest for just fifteen to twenty minutes will fundamentally change your breakfast game. When you let the bowl sit undisturbed on the counter, a few magical things happen behind the scenes. First, the gluten strands that you accidentally agitated get a chance to relax, ensuring a tender crumb.
Second, a process called starch gelatinization begins. The dry starches in the flour slowly absorb the liquid, swelling up and thickening the batter naturally. Skipping this crucial hydration phase guarantees rubbery and flat pancakes that taste intensely like raw, powdery flour. A comprehensive 2026 food physics test revealed that a precise 15-minute rest period resulted in a massive 22% increase in the physical rise of the cooked pancake compared to a batter that was cooked immediately. However, do not let it sit for over 30 minutes at room temperature, or those delicate leavening gases will escape, leaving you with a deflated, sad batter.
The Science of the Perfect Batter (A Masterclass in Fluff)
Now that we know what ruins a pancake, let’s talk about the specific ingredients that elevate it from mediocre to extraordinary. It is all about managing hydration, acidity, and temperature.
Hydration and Buttermilk Chemistry
If you are still using regular milk and water for your pancakes, we need an intervention. Buttermilk is the undisputed king of pancake liquids. Traditional milk provides hydration, but buttermilk provides a complex, acidic environment that completely transforms the chemistry of your batter.
The lactic acid in buttermilk does two critical things. First, it aggressively reacts with the baking soda, creating a massive burst of carbon dioxide bubbles for maximum lift. Second, that same acid works to break down and tenderize the tough gluten strands we talked about earlier, resulting in a melt-in-your-mouth texture that regular milk simply cannot achieve. If you don’t have buttermilk on hand, do not panic. You can easily hack it by adding one tablespoon of white vinegar or fresh lemon juice to a cup of whole milk and letting it sit for five minutes until it curdles.
Temperature Matters: The Cold Ingredient Conundrum
Baking is an exercise in thermal management. One of the most common mistakes weekend cooks make is combining ice-cold milk and eggs straight from the fridge with warm, melted butter. What happens when hot liquid fat hits a freezing cold liquid? It seizes. The melted butter instantly solidifies into tiny, hard pebbles of fat.
Instead of an evenly dispersed lipid network that coats the flour and shortens the gluten strands, you end up with a greasy, uneven batter. To fix this, simply pull your eggs and buttermilk out of the fridge twenty minutes before you start mixing. If you are in a rush, place your uncracked eggs in a bowl of warm tap water for five minutes, and gently microwave your buttermilk in ten-second bursts until it is barely room temperature.
Gear Check: Banish the Toxic Griddles
You can have the most scientifically perfect batter in the world, but if you pour it onto a terrible piece of equipment, you are going to fail. We need to have a serious conversation about the pans lurking in your kitchen cabinets.
The Problem with Cheap Non-Stick
Don’t roll your eyes at me. You know exactly what pan I am talking about—the scratched-up, peeling, lightweight Teflon nightmare that you bought for fifteen dollars five years ago. As someone deeply committed to banishing toxic kitchen gear from your home, I am begging you to throw it in the trash immediately.
Traditional non-stick coatings are made of PTFE (polytetrafluoroethylene), which is part of the infamous PFAS family of synthetic “forever chemicals”. While manufacturers claim PTFE is stable at low temperatures, it begins to rapidly break down and release highly toxic, invisible fumes at temperatures above 500°F (260°C). These fumes can literally cause polymer fume fever—colloquially known as “Teflon flu”—in humans, and are notoriously lethal to pet birds.
Even worse, when you use metal spatulas or aggressively scrub a cheap pan, you scratch the fragile coating, creating micro-abrasions where the polymer degrades and flakes directly into your food. That microscopic degradation is exactly why your cheap aluminum skillets are always losing their slip after barely three months of weekend use. It is a massive waste of your hard-earned money and a completely unnecessary hazard to your health. Do not fall for the “PFOA-free” marketing trick, either; many brands simply replaced PFOA with newer, under-tested forever chemicals like GenX.
The Best Pans for Golden-Brown Perfection
If you want professional, diner-quality pancakes, you need cookware with serious thermal mass and safe, natural non-stick properties. Cast iron is a fantastic option, though it can be heavy and slow to respond to temperature changes.
Personally, I believe well-seasoned carbon steel pans are practically magic for this exact scenario. Carbon steel offers the slick, effortless release of a brand-new Teflon pan, but without the terrifying chemical off-gassing. It heats evenly, holds its temperature beautifully, and lasts for generations.
The ideal griddle surface temperature for cooking pancakes is precisely 375°F (190°C). At this exact temperature threshold, you trigger the Maillard reaction—a beautiful, complex chemical cascade where amino acids and reducing sugars rapidly brown and caramelize. This reaction is what creates that iconic, slightly crispy, golden-brown edge and deep, complex flavor profile.
Troubleshooting Common Pancake Emergencies
Even with the right batter and the right pan, things can go sideways once the heat is on. Let’s troubleshoot the two most common disasters home cooks face at the stove.
The “Burnt on the Outside, Raw on the Inside” Dilemma
We have all been there. You flip the pancake with a confident flick of the wrist, only to discover that the bottom is a dark, charred mahogany, while the center jiggles ominously like a water balloon. Nobody wants a flapjack that is beautifully browned on the edges but completely raw in the middle.
This is a classic, textbook symptom of a pan that is entirely too hot. When your griddle surface temperature exceeds 400°F, the exterior sugars caramelize and burn in less than a minute. This burnt crust acts as a dense insulating layer, preventing the ambient heat from penetrating the liquid core of the batter. The fix is simple: lower your heat to medium, let the pan stabilize for a few minutes, and use a digital infrared thermometer to verify you are sitting in that 350°F to 375°F sweet spot.
The “Sad, Pale Pancake” Syndrome
Conversely, if your pancakes look like anemic, rubbery ghosts with zero color or crunch, your pan is either too cold, or you didn’t use enough cooking fat. You absolutely need a microscopic layer of lipid to conduct heat evenly from the metal surface into the batter.
Do not use whole butter directly on a hot griddle; the milk solids will burn and turn black long before the pancake is cooked. Instead, use clarified butter (ghee), which has a much higher smoke point, or a tiny splash of a neutral, high-heat oil like avocado oil. Wipe the excess oil out of the pan with a paper towel before pouring the batter—you want a glistening surface, not a deep fryer.
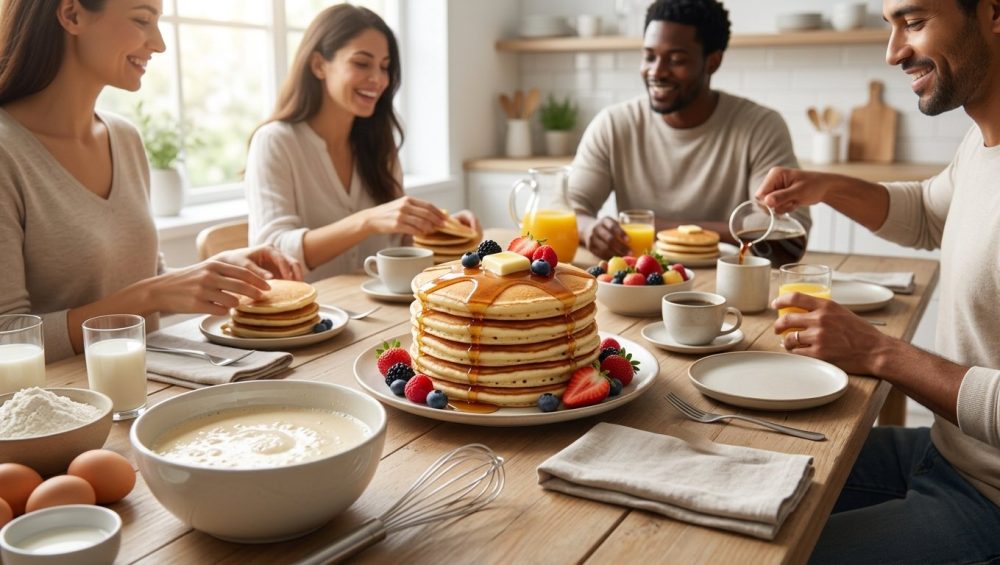
The Mindful Pancake Bar: Hosting Without the Sweat
Now that you have mastered the chemistry and the equipment, it is time to talk about execution. Making pancakes for yourself is easy. Making them for six hungry friends on a Sunday morning is a logistical nightmare if you don’t have a game plan.
What the Heck is a “Mindful” Pancake Bar?
I absolutely despise the traditional model of hosting weekend brunch. You know the one: the cook is chained to the stove, frantically flipping flapjacks and sweating through their apron, while everyone else drinks mimosas and laughs in the dining room. That is not hospitality; that is culinary martyrdom.
A mindful pancake bar is about slowing down, prepping ahead, and creating a communal, interactive dining experience where the host actually gets to enjoy the party. If you want to truly master the art of effortless hosting, you need a prep-ahead system that physically removes you from the cooking zone once the guests arrive.
The Prep-Ahead Blueprint (Because Sleep is Precious)
Do not attempt to measure flour, baking powder, and salt at 8:00 AM on a Sunday when you are barely caffeinated. The night before your gathering, whisk all of your dry ingredients together in a large glass bowl and cover it.
In a separate container in the fridge, measure out your buttermilk and crack your eggs. You can even pre-melt your butter and leave it on the counter. When your guests arrive, all you have to do is pour the wet ingredients into the dry ingredients, fold it gently until just combined, and let it rest for that magical 15 minutes while you pour the coffee and catch up with your friends.
Curating the Ultimate Toppings Spread
A pancake bar is only as good as its toppings. Do not just throw a plastic bottle of fake maple syrup on the table and call it a day. You want to curate a spread that allows your guests to customize their plates with contrasting textures and flavor profiles.
The Core Four Categories
To build a balanced topping bar, hit these four core categories:
- The Base Liquids: Real, 100% pure maple syrup is non-negotiable. Warm it up gently in a small saucepan before serving. Offer a secondary option like a tart lemon curd or a rich fruit compote.
- The Rich Fats: High-quality, room-temperature salted butter. If you want to be fancy, whip the butter with a little cinnamon and honey.
- The Fresh Elements: Macerated strawberries, fresh blueberries, or sliced bananas cut through the heavy carbs and bring a much-needed acidic brightness to the plate.
- The Textural Crunch: This is where people fail. Pancakes are soft. You need crunch. Toasted pecans, sliced almonds, or a high-quality chunky granola will add a phenomenal textural contrast that elevates the entire dish.
Temperature Control for Toppings
Cold syrup poured over a hot pancake instantly ruins the thermal dynamic of the meal, congealing the butter and making the crumb dense. Keep your syrups warm in a small insulated carafe, and ensure your compound butters are sitting out at room temperature for at least an hour before serving so they melt effortlessly on contact.
Cooking for a Crowd: The Warm Oven Strategy
You are going to be cooking in batches, which means the first pancake off the griddle needs to stay hot and fresh while you finish the last one.
The Wire Rack Trick
When you cook pancakes in batches, the single biggest mistake you can make is stacking them high on a dinner plate while you wait. The residual steam escaping from the piping hot cakes gets trapped between the layers, turning your perfectly crisp, Maillard-browned edges into a soggy, weeping sponge.
Instead, utilize a warm oven strategy by placing the freshly cooked batches in a single layer on a wire cooling rack set inside a rimmed baking sheet. Keep this setup in an oven preheated to 200°F (90°C). The gently circulating dry heat will keep the pancakes piping hot and preserve their crispy edges without continuing to cook the tender interiors.
Pacing the Party
Set up your topping stations on a separate kitchen island, a buffet credenza, or the dining room table. By physically moving the plates, silverware, and toppings away from the stove, you naturally direct foot traffic out of your workspace. This simple spatial staging trick will eliminate kitchen bottlenecks and keep the food flowing smoothly, preventing guests from hovering over your shoulder while you flip.
Once the final batch is off the griddle and resting in the warm oven, turn off the stove, take off your apron, and join your friends. You have successfully engineered the perfect pancake batter, dodged the toxic cookware trap, and hosted a beautiful, mindful morning gathering without losing your sanity. Now, pour yourself a mimosa. You’ve earned it.


