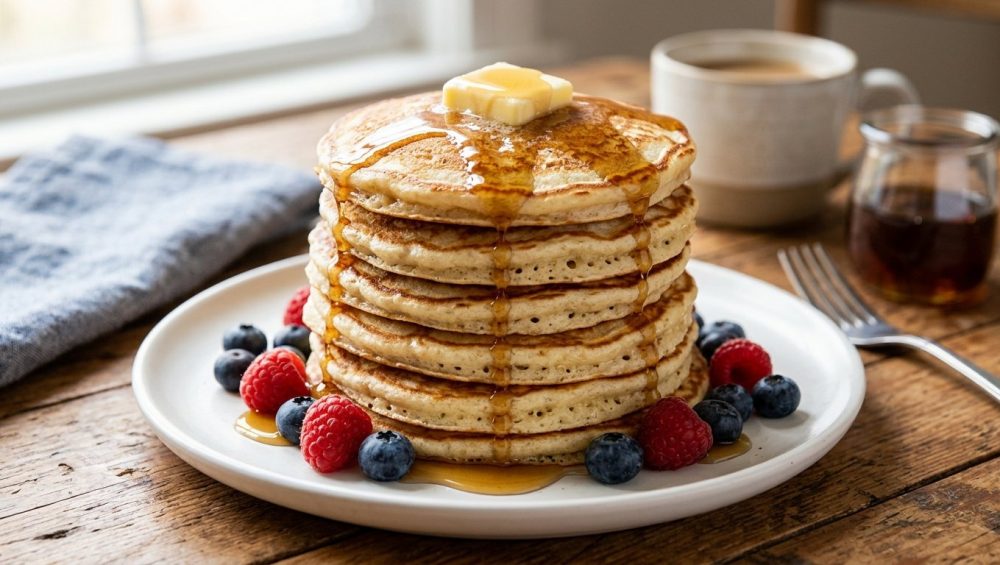
Listen, I love you, but we need to have a serious intervention about your weekend breakfast habits. I know exactly how the typical Saturday morning goes in most households. You wake up, brew a pot of coffee, and decide to treat yourself and your family to a homemade breakfast. You pull out a bowl, aggressively whisk together some flour, milk, and eggs, and immediately ladle that watery batter onto a hot griddle. Ten minutes later, you are sitting at the dining table, chewing your way through a stack of sad, dense, beige disks that have the structural integrity of a neoprene mousepad. It is a culinary tragedy, and frankly, you deserve better.
I have been exactly where you are. As a busy professional who learned to cook through sheer trial, error, and setting off the smoke detector more times than I care to admit, I used to think that diner-style pancakes—the kind that are impossibly tall, airy, and melt in your mouth—required some sort of closely guarded restaurant secret. I assumed you needed commercial griddles, hard-to-find ingredients, or a culinary degree to achieve those fluffy clouds. But I am here to tell you that anyone can cook like an absolute expert in a standard home kitchen.
The secret to mind-blowing pancakes does not cost a single dime. It requires zero special equipment, zero obscure ingredients, and zero extra effort. In fact, the secret is literally doing absolutely nothing. It is the simple, everyday food science of resting your batter. Today, we are going to dive deep into the chemistry of your breakfast, banish the bad habits holding you back, and equip you with a foolproof masterclass on achieving the ultimate stack. Pour yourself a cup of coffee (or a mimosa, I’m not judging), and let’s get to work.
The Anatomy of a Kitchen Tragedy: Why Your Pancakes Are Currently Rubbery
To understand how to fix your food, you first have to understand how you are breaking it. When you mix up a batch of pancake batter, you are not just combining ingredients; you are initiating a complex series of chemical and physical reactions. The primary culprit behind your chewy, rubbery pancakes is a microscopic protein network known as gluten.
Wheat flour contains two specific proteins called glutenin and gliadin. When these proteins are dry, they are completely harmless. But the moment you introduce a liquid—like milk, water, or buttermilk—and begin to agitate the mixture, these two proteins bond together to form gluten. Gluten is an incredibly elastic, highly structured microscopic web. In the world of bread baking, gluten is your best friend. It is what gives a sourdough loaf its chewy crumb and sturdy structure. But in the world of pancakes, cakes, and pastries, gluten is your absolute worst enemy.
When you aggressively whisk your pancake batter, you are rapidly developing that gluten network. The more you mix, the tighter and stronger the web becomes. If you find yourself obsessively trying to stir out the lumps, you are committing a cardinal breakfast sin. You are essentially turning your delicate pancake batter into bread dough. When that overworked batter hits the hot pan, the tight gluten strands seize up, resulting in a dense, tough pancake that requires a steak knife to cut through.
Furthermore, when you immediately cook a freshly mixed batter, you are denying the ingredients the opportunity to properly harmonize. The flour has not had time to absorb the liquid, meaning the batter is likely too thin and runny. When a runny batter hits the griddle, it spreads out rapidly into a thin puddle before the leavening agents even have a chance to lift it. The result? A flat, chewy crepe masquerading as a pancake.
The Everyday Food Science Behind the Perfect Stack
So, how do we combat the gluten monster and prevent the dreaded batter spread? We enforce a mandatory time-out. Resting your pancake batter for just a few minutes before cooking triggers three distinct, highly beneficial scientific processes that fundamentally transform the texture and flavor of your final dish. We are going to break down the science, without the pretentious chef-speak, so you know exactly why this zero-cost technique works.
The Magic of Starch Hydration
Flour is a remarkably dry ingredient. It consists of tightly packed starch granules that need time to absorb moisture. When you first mix your wet and dry ingredients, the liquid simply coats the outside of these starch granules. It takes time for the liquid to penetrate the center of the starch molecules.
During the resting period, a process called starch hydration occurs. The starches act like microscopic sponges, slowly drinking up the milk, buttermilk, and eggs. As they absorb the liquid, the starch granules swell and expand. This naturally thickens the batter without requiring you to add any extra flour. A thicker, properly hydrated batter holds its shape when ladled onto the griddle, resulting in a taller, more substantial pancake that doesn’t spread out into a sad, thin puddle. Additionally, those pesky lumps of dry flour that you were so worried about? They naturally dissolve on their own as the moisture permeates them during the rest.
Gluten Relaxation: Sending Your Proteins to the Spa
Remember that elastic gluten network we accidentally created by mixing the batter? Resting gives those tight, stressed-out protein strands a much-needed spa day. When you leave the batter alone, the gluten network begins to relax. The strands lose their rigid elasticity and become more plastic and extensible.
Think of it like a rubber band. If you stretch a rubber band to its absolute limit and then poke it, it snaps back aggressively. That is your freshly mixed batter. But if you let that rubber band sit in the sun and warm up, it becomes loose and flexible. When the gluten strands in your batter relax, they become flexible enough to stretch and expand when the leavening gases are released during cooking, rather than snapping back and creating a dense texture. This relaxation is the key to achieving a tender, melt-in-your-mouth crumb.
The Double-Acting Baking Powder Miracle
The number one objection I hear from home cooks when I tell them to rest their batter is: “But Sassy Sous-Chef, won’t the baking powder lose its fizz? Won’t my pancakes go flat?” It is a valid concern, but it fundamentally misunderstands modern leavening agents.
Almost all commercially available baking powders today are “double-acting”. This means they contain baking soda combined with two different powdered acids. The first acid dissolves and reacts the moment it comes into contact with a liquid, creating an initial burst of carbon dioxide bubbles in your mixing bowl. This is the fizz you see when you first mix the batter.
However, the second acid is entirely heat-activated. It will not react until it hits the hot griddle. Therefore, resting the batter does not kill your leavening power. In fact, it improves it. The initial bubbles created during the mixing phase are trapped by the relaxing gluten network. As the batter rests and thickens, it forms a sturdy but flexible balloon around these microscopic air pockets. When the batter finally hits the heat, the second acid activates, creating a massive secondary burst of gas. Because the batter is thicker and the gluten is relaxed, the pancakes puff up beautifully and hold their towering shape.
The Sassy Sous-Chef’s Golden Rule: Time is the Ultimate Ingredient
As someone who rigorously prioritizes efficiency during the workweek, I understand that time is money. When it comes to a Tuesday night dinner, I am all about shortcuts. But weekend breakfasts are a different beast entirely. Weekends are when we slow down, romanticize our kitchens, and embrace the process. Turning your chaotic morning rush into a peaceful daily habit requires a slight shift in mindset, and learning to respect the resting phase is step one.
So, exactly how long should you rest your batter?
The absolute minimum resting time to see a noticeable difference in texture and fluffiness is 10 to 15 minutes,. If you are incredibly impatient, 15 minutes is enough time for the starches to begin hydrating and the gluten to slightly relax.
However, the golden sweet spot for the perfect diner-style pancake is 30 minutes. A 30-minute rest allows for complete starch hydration, total gluten relaxation, and the perfect thickening of the batter. This half-hour window is the perfect amount of time to clean up your mixing bowls, wipe down the counters, set the table, and preheat your griddle properly.
Can you rest the batter overnight? Absolutely. Refrigerating your pancake batter overnight is a fantastic strategy for those who want to wake up and immediately start cooking. An overnight rest allows the flour to fully absorb the liquid, producing an incredibly velvety texture. It also allows the flavors to meld and develop, resulting in a slightly more complex, almost sourdough-esque tang, especially if you are using buttermilk. If you choose the overnight route, just remember that the initial cold reaction of the baking powder will be spent. You will still get the heat-activated lift, but some perfectionists prefer to hold back the baking powder and gently fold it into the batter right before cooking to maximize the leavening power.
Whichever timeline you choose, implementing this zero-effort waiting period will completely transform your daily meals and elevate your weekend brunch from mediocre to magnificent.
The “No-Go” Gear Warning: Stop Cooking Your Breakfast on Toxic Pans
Before we get into the step-by-step masterclass of making the batter, we need to have a very serious conversation about the hardware you are using. I have a strict, non-negotiable rule in my kitchen, and I am enforcing it in yours right now: I absolutely despise cheap, toxic kitchenware.
If you are currently cooking your family’s breakfast on a flimsy, lightweight non-stick pan you bought for ten dollars at a discount store five years ago, and the coating is visibly scratched, peeling, or flaking off into your food—throw it in the trash immediately. I have zero patience for mystery metals and degrading chemical coatings.
Recent research published in late 2025 and early 2026 has brought the dangers of cheap non-stick coatings back into the spotlight. Studies from institutions like the UNC and the Ecology Center have highlighted that thousands of consumers are unknowingly exposing themselves to PFAS—widely known as “forever chemicals”—every time they cook on degraded Teflon (PTFE) pans,,. These synthetic compounds, which are used to create that slick, water-resistant coating, do not break down in the environment or the human body. Prolonged exposure to PFAS has been linked to a terrifying laundry list of health issues, including liver damage, thyroid disease, and compromised immune systems,.
When you heat a cheap, thin non-stick pan over a high flame to make pancakes, the pan heats unevenly and rapidly. If the temperature exceeds safe limits (which is incredibly easy to do on a standard residential gas burner), the chemical coating begins to break down and off-gas toxic fumes. Furthermore, if you use metal spatulas to flip your pancakes, you are scratching that coating, creating microscopic pathways for those chemicals to leach directly into your food,.
We are officially banishing toxic kitchen gear from our lives. You do not need a chemical coating to make pancakes that don’t stick. You need proper temperature control and high-quality, durable materials that offer real, generational value.
If you want the ultimate pancake griddle, invest in carbon steel or cast iron. Yes, they require a little bit of maintenance to build up a natural, polymerized seasoning layer, but once properly seasoned, a carbon steel griddle is as slick as ice and will literally outlive you. Cast iron also offers unparalleled thermal mass. It takes a while to heat up, but once it is hot, it holds that temperature beautifully, ensuring an even, golden-brown crust on your pancakes without the hot spots that plague cheap aluminum pans. If you absolutely must have a modern convenience pan, seek out high-quality, independently verified clean ceramic cookware that explicitly states it is 100% free of PFAS, lead, and cadmium.
And while we are on the subject of pan maintenance, please remember that aerosol cooking spray is the enemy. Commercial cooking sprays contain soy lecithin, which burns at low temperatures and polymerizes onto the surface of your cookware, creating a sticky, impossible-to-remove residue that actually ruins the non-stick properties of your pans over time. Use real butter, clarified butter (ghee), or a neutral oil to grease your griddle. Treat your cookware with respect, and it will reward you with perfect breakfasts for decades.
The Definitive Masterclass: Step-by-Step to Fluffy Clouds
Now that we understand the science and we have thrown our toxic pans in the garbage, it is time to execute. This is my foolproof, step-by-step protocol for achieving the perfect stack of pancakes. You do not need to decipher any pretentious recipe jargon to pull this off. Just follow these simple rules.
Step 1: The Dry Mix and the Wet Mix
Baking is a science, and precision matters. Always whisk your dry ingredients (flour, sugar, baking powder, baking soda, and salt) together in a large bowl first. This ensures that the leavening agents and salt are evenly distributed throughout the flour. If you skip this step, you risk biting into a concentrated pocket of baking soda, which tastes like a metallic battery.
In a separate bowl, whisk your wet ingredients (eggs, milk or buttermilk, melted butter, and vanilla extract). Crucial tip: Ensure your eggs and milk are at room temperature. If you pour freezing cold milk into melted butter, the butter will immediately solidify into tiny, hard clumps, ruining the smooth texture of your wet mix.
Step 2: The Fold (And Why We Embrace Lumps)
Create a well in the center of your dry ingredients and pour in the wet mixture. Now, put down the aggressive wire whisk and pick up a gentle silicone spatula.
You are going to gently fold the wet ingredients into the dry. Use a scooping motion, scraping the bottom of the bowl and folding the batter over itself. Stop mixing the absolute second you no longer see streaks of dry, white flour. The batter should look shaggy, messy, and full of lumps. I repeat: Leave the lumps alone! As we learned earlier, those lumps will hydrate and dissolve on their own. Overmixing here is the death of fluffiness.
Step 3: The Mandatory Rest Period
Step away from the bowl. Set a timer for 20 to 30 minutes. Do not touch the batter. Do not stir it “just one more time.” Let the starches hydrate. Let the gluten relax. Let the chemical leaveners build their initial bubble structure. Use this time to prep your toppings, brew more coffee, and preheat your pan.
Step 4: Temperature Control and the Cook
Place your heavy-bottomed cast iron or carbon steel skillet over medium-low heat. Let it preheat slowly for at least 5 to 10 minutes. You want the heat to evenly saturate the metal. If the pan is too hot, the outside of the pancake will burn before the inside cooks. If it is too cold, the pancake will absorb the cooking fat and become greasy.
To test the heat, flick a tiny drop of water onto the skillet. It should sizzle and dance immediately. If it instantly evaporates into a puff of steam, the pan is too hot.
Add a small pat of butter and a splash of neutral oil to the pan. The oil raises the smoke point slightly, preventing the milk solids in the butter from burning and turning black. Wipe out the excess fat with a paper towel; you want a microscopic layer of lubrication, not a deep-frying pool.
Use a dedicated, heat-resistant silicone or wooden spatula to flip your pancakes. Do not use the same utensil that you used to make dinner last night, unless you want a breakfast that smells like garlic and onions.
Ladle the rested, thickened batter onto the skillet. Now, watch closely. You are looking for two visual cues. First, bubbles will form on the surface of the batter. Second, and more importantly, the edges of the pancake will begin to look dry and set. When the bubbles pop and leave little open craters that do not immediately fill back in with wet batter, it is time to flip.
Slide your spatula completely under the pancake, and flip it with confidence and a gentle flick of the wrist. Do not slap it down aggressively, and for the love of all things culinary, do not press down on the pancake with your spatula after you flip it! Pressing down squeezes out all the beautiful air pockets you just spent 30 minutes cultivating. Let it cook for another minute or two until the bottom is golden brown, then remove it to a warm plate.
Troubleshooting Your Stack: When Good Batters Go Bad
Even with the best intentions, things can occasionally go sideways in the kitchen. If your pancakes aren’t coming out perfectly, don’t panic. Cooking is about adjusting and learning. Here are the most common pancake pitfalls and exactly how to fix them.
The Burnt Exterior and Raw Interior
If your pancakes are turning dark brown or black on the outside within a minute, but the inside is still a gooey, raw mess, your heat is simply too high. It is a common mistake to crank the stove to medium-high to speed up the process. Pancakes require patience. Lower the heat to medium-low and let the pan cool down for a minute before cooking the next batch. You want a gentle, sustained heat that penetrates to the center of the batter without scorching the exterior, ensuring your pancakes don’t burn on the outside.
The Flat as a Crepe Problem
If you rested your batter properly, didn’t overmix, and your pancakes are still coming out totally flat and lifeless, your leavening agents are dead. Baking powder and baking soda lose their potency over time, especially if stored in a humid environment. To test your baking powder, drop a half-teaspoon into a cup of hot water. It should immediately fizz and bubble vigorously. If it just sits there looking cloudy, throw it away and buy a fresh canister.
The Metallic Aftertaste
If your pancakes have a sharp, bitter, or metallic taste, you have an imbalance of leavening agents. This usually happens when you use too much baking soda without enough acidic ingredients (like buttermilk or lemon juice) to neutralize it. Baking soda is highly alkaline, and unreacted baking soda tastes terrible. Always measure your leaveners precisely with measuring spoons, never by eyeballing it.
The Chewy, Tough Texture
If your pancakes require serious jaw strength to chew, you ignored my warnings. You overmixed the batter, developing too much gluten, and you likely skipped the resting period. Don’t let impatience be the thing ruining your dinners—or your weekend breakfasts. Respect the flour, respect the gluten, and let the batter rest.
The Final Flip
Making incredible food at home does not require professional training, industrial equipment, or expensive ingredients. It simply requires an understanding of the basic, everyday science happening inside your mixing bowl. By resisting the urge to overmix and giving your batter the time it needs to hydrate and relax, you are unlocking the secret to diner-style perfection.
The next time Saturday morning rolls around, I want you to approach the kitchen with confidence. Mix your dry ingredients, gently fold in your wet ingredients, embrace the shaggy lumps, and then walk away. Drink your coffee. Enjoy the morning. Let the chemistry do the heavy lifting. When you finally ladle that thick, luxurious batter onto a properly heated, non-toxic skillet, you will be rewarded with a towering stack of perfectly fluffy pancakes that are tender, golden-brown, and utterly delicious. You’ve got this. Now go make breakfast.


