We have all been there. You are at a casual get-together, a tray of towering, glorious nachos is pulled from the oven, and for exactly three minutes, life is perfect. The cheese is bubbling, the jalapeños are vibrant, and the chips are crisp. But then, the inevitable happens. By the time you excavate past the top layer, you are no longer eating nachos. You are eating a tragic, lukewarm, papier-mâché mess that disintegrates the moment you try to lift it.
I do not know who originally convinced the culinary world that piling a pound of wet, heavy ingredients on top of fragile, porous chips was a good idea, but I would like to have a stern word with them. As a busy professional who learned to cook through sheer stubbornness, trial, error, and setting off the smoke detector more times than I care to admit, I have zero patience for meals that turn into mush before you can even pour a glass of wine.
You do not need a culinary degree to fix this problem. You just need a basic understanding of food physics and a willingness to rethink how you serve food to your friends. Today, we are tearing down the nacho mountain. We are going to look at the exact science of why your chips get soggy, how to use melted cheese as a literal waterproof shield, and how to translate this simple food science into an actionable, stress-free blueprint for a deconstructed DIY nacho bar.
The Science of the Sog: Why Your Nachos Are Doomed from the Start
To understand why nachos fail, we have to look at the anatomy of the tortilla chip itself. A high-quality tortilla chip is a marvel of food engineering. It starts as masa harina (corn treated with an alkaline solution in a process called nixtamalization) mixed with water. When this dough is rolled thin, baked, and then deep-fried, the rapid expansion and evaporation of water creates microscopic voids throughout the structure.
What you are left with is a highly porous, rigid starch matrix. In simpler terms? It is a delicious, salty sponge.
In the realm of food science, there is a crucial measurement known as water activity, or Aw. This metric describes how much free, unbound water is available in a food product to migrate, react, or breed bacteria. The scale goes from 0.0 (bone dry) to 1.0 (pure water). A freshly fried tortilla chip has an incredibly low water activity, usually hovering around 0.20 to 0.35.
Now, let us look at what you are dumping on top of those chips. Fresh salsa, sour cream, guacamole, and juicy seasoned meats have remarkably high water activity levels—often sitting at 0.95 or higher.
Here is where the laws of thermodynamics ruin your dinner party: moisture will always migrate from an area of high water activity to an area of low water activity until equilibrium is reached. It is an unavoidable law of physics. When you dump wet salsa onto a dry chip, capillary action immediately begins sucking the free water from the tomatoes directly into the microscopic voids of the fried masa. The water plasticizes the rigid starch matrix, causing it to swell, soften, and eventually collapse.
This is why the traditional “mountain” method of building nachos is fundamentally flawed. You are taking a highly porous sponge and burying it under a landslide of water-dense ingredients. No amount of oven-baking can save you from the physics of moisture migration. The moment the nachos leave the heat, the clock starts ticking, and you have roughly five minutes before structural failure occurs.
The Hydrophobic Hero: Using Cheese as a Waterproof Sealant
If moisture migration is the enemy, how do we stop it? We cannot change the laws of physics, but we can introduce a barrier. We need a sealant that prevents the water in the salsa from ever reaching the starch matrix of the chip.
Enter melted cheese.
Cheese is essentially a complex matrix of casein proteins holding onto water and milk fat. When you apply heat to cheese, fascinating things happen to its molecular structure. At around 90°F (32°C), the milk fat begins to liquefy. As the temperature climbs past 130°F to 150°F (54°C to 65°C), the calcium bonds holding the casein proteins together begin to break down, allowing the protein matrix to collapse and the cheese to flow into a viscoelastic state.
Why does this matter for your nachos? Because fat is hydrophobic—meaning it violently repels water.
When you melt a high-fat cheese directly onto a tortilla chip, that liquefied milk fat seeps into the microscopic pores of the chip, while the protein structure drapes over the top. As it cools slightly, it forms an impenetrable, hydrophobic lipid barrier. If you put a dollop of wet salsa on top of a properly cheese-sealed chip, the water cannot penetrate the fat layer. The chip stays miraculously crunchy.
However, there is a massive caveat here, and it is a hill I will absolutely die on: you must step away from the pre-shredded bagged cheese.
Commercially shredded cheese is coated in anti-caking agents like cellulose powder or potato starch to keep the shreds from clumping together in the bag. These powders are desiccants; they are literally designed to absorb moisture. When you melt pre-shredded cheese, those powdery additives prevent the milk fat and proteins from forming a smooth, continuous barrier. Instead of a waterproof shield, you get a grainy, porous, broken mess that allows water to seep right through to your chips.
If you want to protect your nachos, you must buy a block of high-quality, high-moisture cheese (like Monterey Jack, sharp Cheddar, or Asadero) and grate it yourself. If you prefer to make a liquid queso dip to pour over the chips, you have to stabilize the emulsion so the fat does not separate from the water. Using evaporated milk prevents separating when you melt the cheese, ensuring that your liquid queso remains a silky, cohesive, and perfectly hydrophobic blanket.
The “No-Go” Rule: Banishing Toxic Gear from Your Setup
Before we get into the logistics of hosting, we need to have a serious talk about your equipment. I firmly believe that anyone can cook like an expert in a standard home kitchen, but you cannot do it if you are relying on cheap, toxic garbage.
When people decide to host a buffet-style meal, they often panic and buy those flimsy, $20 electric warming trays with the mystery non-stick coatings. I absolutely despise these things. Within three uses, the cheap Teflon coating starts to blister, peel, and flake directly into your food. If you are inviting people you love into your home to share a meal, you cannot serve them food heated on a scratched chemical surface. It is my strict “No-Go” rule.
Furthermore, cheap, thin metals have terrible thermal mass. They heat unevenly, creating scorching hot spots that will burn your queso in the center while leaving the edges congealed and cold. You need to ditch those cheap warped baking sheets and flimsy aluminum warmers.
Instead, invest in safe, high-quality materials that offer incredible thermal retention. Enameled cast iron is the undisputed king of the buffet table. Cast iron is dense; it takes a while to heat up, but once it is hot, it stays hot for a remarkably long time, radiating a gentle, even heat that keeps proteins and sauces perfectly warm without scorching them. Plus, cleaning enameled cast iron is incredibly stress-free, as the glass-like coating naturally releases food and requires no seasoning.
If you want an electric option, look for warming trays made with tempered glass tops. They are non-toxic, incredibly easy to wipe down, and provide a safe, consistent ambient heat to keep your deconstructed nacho bar at the optimal serving temperature.
The Psychology of the Mindful Nacho Bar: Curing Dinner Party Anxiety
Let us talk about why you are actually reading this. You want to have friends over, but the thought of hosting makes you want to hide under your bed. You are not alone. According to the American Time Use Survey, the amount of time Americans spend attending or hosting parties has plummeted by a staggering 50 percent between 2003 and 2024.
Why are we avoiding gathering? Because we have turned hosting into a high-stakes performance. Recent consumer data from Circana in 2025 revealed that 43% of hosts experience significant stress worrying that their food will not come out as planned. Another report from Upgraded Points highlights that nearly half of hosts feel intense pressure to overspend and strain their budgets just to impress people.
We are stressing ourselves out trying to plate intricate, simultaneous meals. The hospitality industry is already shifting away from this stiff, formal dining style; trend reports for 2025 show a massive move toward the “Belonging Economy,” where the focus is on emotional inclusion and interactive, shared experiences rather than rigid, plated service.
It is time to bring that philosophy into your home kitchen. The deconstructed DIY Nacho Bar is the ultimate antidote to hosting anxiety. By separating the wet ingredients from the dry ingredients, you completely eliminate the ticking time bomb of soggy chips. But more importantly, you shift the labor of plating from yourself to your guests.
You provide the beautifully prepped, high-quality components, and your guests get to build their own customized, structurally sound nacho masterpieces. It is interactive, it accommodates picky eaters and dietary restrictions effortlessly, and it allows you, the host, to actually pour a drink and enjoy your own party, especially if you are entertaining in small spaces where guests are mingling and eating at their own pace.
The Step-by-Step Blueprint for the Ultimate DIY Nacho Bar
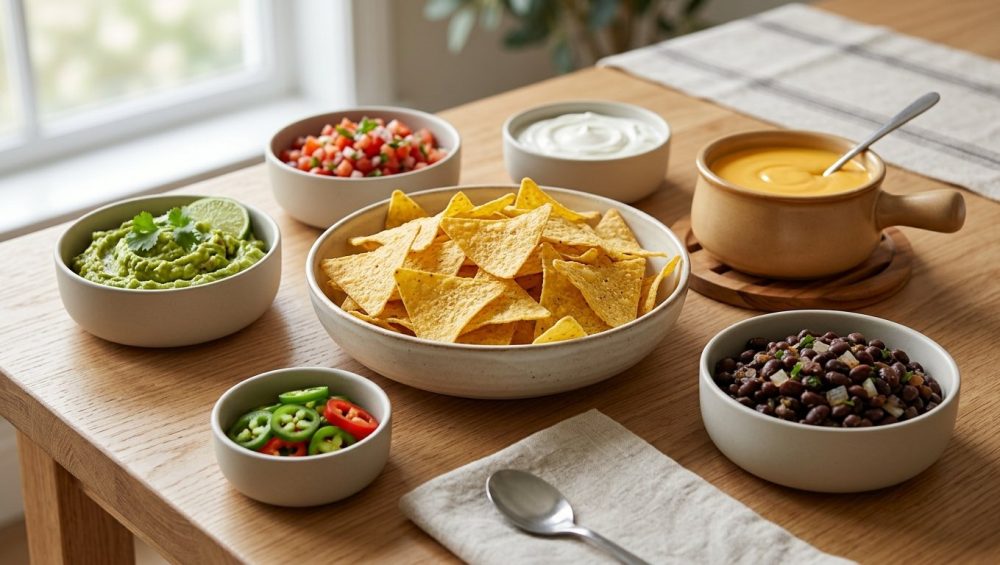
To pull this off flawlessly, you need to set up your stations in a very specific, logical order. We want to guide the guests through the architecture of a perfect nacho plate: Foundation, Sealant, Protein, Moisture, and Acid.
Station 1: The Foundation (The Chips)
Do not serve cold chips straight out of a plastic bag. It is depressing. Gently warming your tortilla chips revitalizes the stale starches and brings the natural corn oils to the surface, vastly improving their flavor and aroma.
Spread out thick, restaurant-style tortilla chips (thin ones will snap under the weight of the toppings) on a heavy-duty bare aluminum sheet pan. Warm them in a 250°F (120°C) oven for about 10 minutes. Much like preheating your baking sheet guarantees a crispy result for vegetables, starting with a warm, dry environment ensures your chips are at peak crunch-capacity. Transfer them to a large, wide wooden bowl or a ceramic platter just before guests arrive.
Station 2: The Hydrophobic Sealant (The Cheese)
This is the most critical station. The cheese must go on the chip before any wet ingredients to create that hydrophobic barrier. You have two options here, and both are excellent.
Option A: The Queso Fountain. Make a homemade, stabilized queso using freshly grated pepper jack, sharp cheddar, a splash of milk, and sodium citrate (or evaporated milk). Keep it warm in a small enameled cast iron Dutch oven set over a low-heat warming tray. Provide a ladle so guests can pour the liquid gold directly over their dry chips.
Option B: The Melted Shreds. If you prefer traditional melted cheese, you can set up a “broil station” if you have a small toaster oven on the counter, but that requires too much active hosting. Instead, offer bowls of freshly grated, high-moisture block cheeses and instruct guests to build their base on a heat-safe plate.
Station 3: The Hot Proteins
Your meats need to be hot, heavily seasoned, and most importantly, drained of excess liquid. If your meat is swimming in a watery broth, it will overwhelm the cheese barrier.
Whether you are serving slow-roasted pork carnitas, shredded chicken tinga, or classic spiced ground beef, keep them in pre-warmed enameled cast iron skillets on your glass warming tray. If you are making chicken, ensure you are using proper cooking techniques, because nobody wants to eat dry and rubbery chicken on their nachos.
Also, pay attention to your aromatics. Sauté your onions until sweet and translucent, but be careful with your heat management, because burnt garlic ruins the flavor of your seasoned beef and leaves a bitter aftertaste that no amount of sour cream can mask. Use a slotted spoon for serving so any residual fat or juice stays in the pan, not on the chips.
Station 4: The Wet and Cold Toppings
Now that the chips are sealed with cheese and topped with protein, it is safe to introduce the high-water-activity ingredients. This station should be kept completely separate from the hot items to maintain temperature contrast.
You need fresh pico de gallo, a smooth salsa roja, cooling sour cream, and guacamole. To stop guacamole from browning before guests arrive, make sure you protect the surface from oxygen exposure during your prep phase.
Serve these in heavy ceramic or glass bowls. If you have leftovers (which is rare, but it happens), you can easily snap lids onto glass storage bowls without permanently staining your plastic storage containers neon orange from the tomato and chili oils.
Station 5: The Acid and Crunch Finishers
This is where good nachos become great nachos. Rich, fatty cheese and heavy meats will exhaust the palate quickly. You need sharp, biting acidity to cut through the lipids and refresh the taste buds.
Set out small bowls of quick-pickled red onions, sliced pickled jalapeños, fresh cilantro leaves, sliced radishes, and plenty of lime wedges. Embracing the culinary secret of cutting rich fats with acid will elevate your casual nacho bar into a meal that tastes like it came from a high-end modern taqueria. The fresh crunch of a radish or the sharp tang of a pickled onion provides the perfect textural and flavor contrast to the warm, heavy base.
Weekday Efficiency: Prepping the Bar Without Losing Your Mind
I am a massive advocate for elaborate weekend cooking projects, but if you are hosting a casual Friday night get-together after a 40-hour work week, your time is money. You need to be ruthless about efficiency. The beauty of the deconstructed nacho bar is that 90% of it can be prepped in advance.
Two Days Before:
Make your pickled red onions and jalapeños. They actually taste better as they sit in the fridge and the flavors meld. You can also cook your proteins (like a slow-cooker pork shoulder) ahead of time. Meats braised in spices always taste deeper and more complex on the second or third day.
The Night Before:
Grate your cheese. Yes, it takes five minutes of elbow grease, but it is the single most important step for the hydrophobic barrier. Store it in an airtight container. Wash and prep your garnishes (cilantro, radishes, limes).
30 Minutes Before Guests Arrive:
This is your final staging phase. Reheat your proteins gently on the stove and transfer them to your cast iron serving skillets. Turn on your non-toxic glass warming tray. Make your liquid queso (if using). Pull the cold dips from the fridge and give them a final stir. Throw the chips in the oven to warm.
By the time the doorbell rings, your kitchen is clean, your food is perfectly staged, and you are holding a beverage, ready to actually enjoy the company of your friends.
The Final Bite
You do not have to settle for soggy, disappointing food just because you are cooking at home. By understanding a tiny bit of food science—respecting the porosity of a tortilla chip, acknowledging the ruthless nature of moisture migration, and harnessing the hydrophobic power of melted fat—you can completely engineer the perfect bite.
More importantly, by ditching the pretentious pursuit of perfectly plated dinners and embracing the interactive, communal nature of a deconstructed nacho bar, you eliminate the stress that keeps so many of us from opening our homes to others.
So throw away that peeling Teflon warming tray, grate your own cheese, and let your guests build their own masterpieces. Your chips will stay crunchy, your sanity will remain intact, and your dinner parties will actually be fun again. Now, if you will excuse me, I have some pickled onions to make.