Listen, let’s skip the part where I tell you a whimsical, meandering story about a summer spent eating rustic bread in the Tuscan countryside. You don’t care, and frankly, neither do I. I survive the grueling weekday grind by cutting culinary corners so sharp I practically drift through my kitchen. But weekends? Weekends are sacred. Weekends are for uncompromised, unapologetic perfection. And right now, you are here because your highly anticipated weekend baking project—your glorious, herbaceous focaccia—came out of the oven looking and tasting like a dense, pale floor tile.
Before you throw your hands up in absolute frustration and go back to ordering takeout, let’s get one thing straight: baking extraordinary bread at home does not require a culinary degree. It does not require a commercial steam oven, and it certainly does not require you to be a naturally gifted dough whisperer. It requires a basic understanding of hydration, a little bit of patience, and a zero-tolerance policy for terrible kitchen equipment.
The culinary world is currently experiencing a massive focaccia renaissance. According to recent industry data analyzing bakery trends for 2026, sourdough focaccia alone has seen a staggering 141% increase in popularity. The bread has evolved from a simple Italian staple into the ultimate blank canvas for home bakers and chefs alike. But as its popularity surges, so does the rate of spectacular home-kitchen failures.
Today, we are going to meticulously dissect exactly why your dough refuses to bubble, why your crumb is tight and gummy, and how you can transform this frustrating process into a flawless, therapeutic communal activity. Welcome to the definitive masterclass on focaccia.
The Anatomy of a Focaccia Fail
If your focaccia resembles a thick, heavy cracker rather than a buoyant, airy cloud, you have fundamentally misunderstood what this bread is supposed to be. Focaccia is not sandwich bread. It is not a baguette. It is a highly hydrated, heavily fermented, oil-drenched flatbread that relies on a very specific set of physical and chemical reactions to achieve its signature texture.
When a home cook pulls a dense, flat focaccia out of the oven, the culprit usually falls into one of three categories: hydration starvation, fermentation rushing, or gluten panic.
First, people are terrified of wet dough. They see a sticky, shaggy mess in their mixing bowl and immediately start dumping in extra handfuls of flour to make it manageable. The moment you do that, you have murdered your bubbles. Second, people are impatient. Yeast is a living organism, not a microwave setting. If you do not give it the time it needs to consume starches and expel carbon dioxide, you will not get an airy crumb. Lastly, people overwork the dough. They attack it like they are kneading a tough pizza crust, completely destroying the delicate gluten network that traps the air.
To fix these catastrophic errors, we have to look at the science of what is actually happening in your mixing bowl.
Hydration Station: The Science of Wet Dough
In the world of bread baking, everything revolves around “baker’s math,” which expresses every ingredient as a percentage of the total flour weight. If a standard sandwich loaf sits around 60% to 65% hydration, a proper focaccia demands a hydration level of anywhere from 75% to 90%.
Why High Hydration is Non-Negotiable
Water is the vehicle that allows yeast to move, feed, and produce gas. More importantly, water turns into steam when it hits the intense heat of your oven. That sudden burst of internal steam is what rapidly expands the tiny pockets of carbon dioxide created by the yeast, resulting in those massive, cavernous bubbles in your finished bread. If you starve your dough of water, there is no steam. If there is no steam, there is no expansion. You end up with a brick.
The Measurement Trap
This brings us to the most common amateur mistake in the kitchen. If you are still scooping your flour directly out of the bag with a measuring cup, you are actively sabotaging your bread. Depending on how tightly packed the flour is, a single cup can vary in weight by up to 30 grams. If a recipe calls for four cups of flour and you over-pack each one, you have just unknowingly dropped your hydration percentage from a lofty 80% down to a dense 65%.
If you want to bake like a professional, you must weigh your ingredients. Buying a highly accurate digital kitchen scale is the single most important upgrade you can make for your baking game. Exactly 500 grams of bread flour and 425 grams of water will give you a perfect 85% hydration dough every single time, regardless of the humidity in your kitchen or how aggressively you scooped.
Handling the Swamp
When you mix an 85% hydration dough, it will look like a swampy, terrifying disaster. It will stick to your fingers, your bowl, and your spatula. Your instinct will be to add flour. Do not do it. The secret to handling high-hydration dough is not adding flour; it is using water and oil. When it is time to manipulate the dough, keep a bowl of water nearby and wet your hands. Wet hands glide smoothly over wet dough without sticking.
The Yeast Whisperer: Mastering Time and Temperature
You can have the perfect hydration ratio, but if you do not understand how to manage your fermentation, your focaccia will remain flat and flavorless. Yeast is a microscopic fungus. When it consumes the complex starches in your flour, it produces two vital byproducts: carbon dioxide (which creates the bubbles) and alcohol/organic acids (which create the complex, tangy flavor).
The Crime of the Quick Bake
Many beginner recipes promise a “quick and easy two-hour focaccia.” While technically possible, these recipes rely on dumping massive amounts of commercial yeast into warm water and forcing the dough to rise at breakneck speed. The result is a bread that looks like focaccia but tastes like a bland, yeasty sponge. True culinary artistry requires time.
The Magic of Cold Fermentation
To achieve that mind-blowing, bakery-level flavor and a wildly open crumb, you must utilize cold fermentation. This involves mixing your dough, letting it sit at room temperature just long enough to kickstart the yeast activity, and then immediately moving it into the refrigerator.
By chilling dough, you drastically slow down the yeast’s production of carbon dioxide. However, the enzymes and bacteria in the flour continue to break down complex starches into simple sugars at a normal rate. This slow, cold process allows the dough to develop an incredibly deep, nuanced, almost sourdough-like flavor profile. Furthermore, the excess simple sugars created during this long rest will caramelize beautifully in the oven, giving your focaccia a deeply browned, crispy crust.
For the absolute best results, your focaccia dough should spend anywhere from 18 to 48 hours in the refrigerator. Yes, it requires you to plan ahead, but the actual hands-on time is less than fifteen minutes. The refrigerator does the heavy lifting while you sleep.
Gluten Relaxation: Stop Fighting the Dough
Gluten is the structural matrix that traps the carbon dioxide bubbles. In traditional bread baking, we build this matrix by aggressively kneading the dough on a floured counter. If you attempt this with an 85% hydration focaccia dough, you will end up covered in a gluey paste, crying in your kitchen.
The Stretch and Fold Technique
Instead of traditional kneading, high-hydration doughs rely on time and a gentle technique called “stretching and folding.” After you initially mix your flour, water, yeast, and salt into a shaggy mess, you let it rest for 30 minutes. This resting period, known as autolyse, allows the flour to fully absorb the water and the gluten strands to naturally align without any physical effort on your part.
After the rest, you simply wet your hands, grab one side of the dough, stretch it up toward the ceiling until you feel resistance, and fold it over itself. You rotate the bowl and repeat this on all four sides. You do this a few times over the first two hours of your bulk fermentation. This gentle stretching organizes the gluten into a strong, elastic web that can expand like a balloon to hold massive air pockets.
Because the dough is so incredibly wet and sticky, you will absolutely need a bench scraper to help release the dough from the sides of the bowl or to clean your work surface. A bench scraper is the unsung hero of the home bakery, acting as an extension of your hand that wet dough refuses to stick to.
The Pan Problem: A Brutally Honest Soapbox
We need to have a serious conversation about the vessel you are using to bake this bread. Focaccia is essentially shallow-fried in a pool of olive oil while it bakes. This process requires a pan that can conduct heat efficiently and withstand high oven temperatures (usually between 425°F and 450°F) to create that iconic, shatteringly crisp bottom crust.
The Toxic Truth About Non-Stick Bakeware
If you are pouring beautiful, cold-pressed olive oil into a cheap, scratched, peeling non-stick baking pan, we have a major problem. I have a strict, zero-tolerance policy for toxic kitchenware. According to comprehensive research by the Ecology Center, a shocking 20% of tested non-stick baking pans are coated with PTFE (polytetrafluoroethylene), a polymer form of PFAS, commonly known as “forever chemicals”.
When these cheap non-stick coatings are subjected to the high heat required for focaccia, they can degrade, releasing toxic fumes and leaching chemicals directly into your food. Even if a pan proudly markets itself as “green” or “ceramic,” you aren’t necessarily safe. Independent research has shown that many of these supposedly safe sol-gel ceramic coatings contain questionable substances like titanium dioxide and siloxanes, which can break down at high temperatures.
The Upgrades You Actually Need
You are putting 48 hours of love and patience into this dough; you are not going to ruin it by baking it on a sheet of chemical hazards. The first step to taking your weekend baking seriously is banishing toxic kitchen gear from your house entirely.
For the ultimate focaccia, you need a heavy-duty, uncoated pan. A thick, commercial-grade aluminum half-sheet pan is fantastic for heat conductivity. A well-seasoned cast iron skillet will give you the crispiest edges you have ever experienced. Personally, I swear by blue carbon steel pans for my focaccia. Carbon steel possesses incredible thermal mass, ensuring that the bottom of your bread fries evenly in the olive oil without burning, and it develops its own natural, completely safe non-stick patina over time.
The Olive Oil Pool and the Dimpling Magic
Once your dough has finished its long, cold slumber in the refrigerator, it is time for the final proof. You will gently transfer the dough into your generously oiled, high-quality pan. Do not try to stretch it to the corners immediately; the cold gluten will fight you and snap back. Let it rest in the pan at room temperature for two to four hours. As it warms up, the gluten will relax, and the dough will naturally spread to fill the pan, becoming a jiggly, bubbly, aerated pillow.
Fat as Flavor and Function
Focaccia is an unapologetic celebration of olive oil. Do not skimp here. The oil serves three crucial purposes: it prevents the dough from sticking to the pan, it fries the bottom crust to a golden crisp, and it provides a rich, fruity flavor to the crumb. Pour a generous glug of high-quality extra virgin olive oil over the top of the fully proofed dough.
The Art of the Dimple
Now comes the moment you have been waiting for: the dimpling. This is where most beginners ruin their crumb. You are not aggressively punching the dough to deflate it. You want to coat your fingers in olive oil to prevent sticking, spread your hands wide, and press your fingertips straight down into the dough until you feel the bottom of the pan.
Think of it like playing a gentle chord on a piano. As you press down, the trapped gases will be forced outward, creating massive, beautiful bubbles that rise up around your fingers. The dimples you leave behind act as tiny reservoirs, catching and holding pools of olive oil, flaky sea salt, and the juices of whatever toppings you choose to add.
The Mindful Bread Art Night: A Masterclass in Hosting
Now that you understand the rigorous science and technique behind the dough, let’s talk about application. Focaccia is not just a side dish; it is an event. Because the dough requires all of its hands-on preparation days in advance, it is the absolute perfect centerpiece for a relaxed, communal gathering.
Your friends do not want to sit in your living room while you sweat profusely over a complicated, multi-course meal in the kitchen. They want an engaging, tactile activity. If you want to plan mindful gatherings that people will actually remember, you need to invite them into the process. A “Bread Art Night” is the ultimate low-stress, high-reward hosting hack.
Setting the Stage
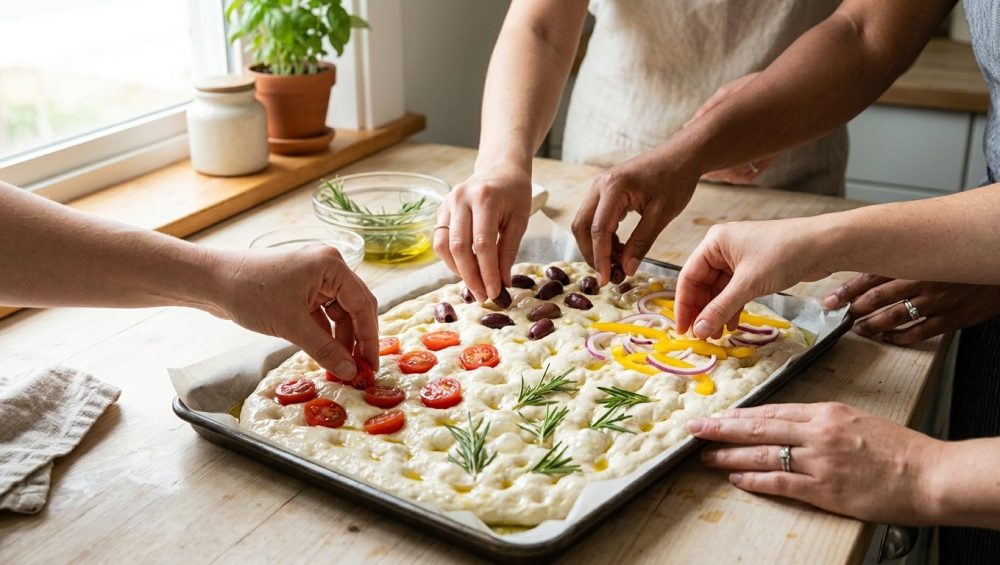
When your guests arrive, your dough should already be fully proofed in its pan, jiggly and ready to be dimpled. Set the pan in the center of your kitchen island or dining table. Around it, arrange a vibrant, colorful mise en place of toppings. This is where the “art” comes in. The dimpled surface of the dough is a literal canvas, and your toppings are the paint.
Curating the Toppings
You want to provide a variety of textures and moisture levels. Cherry tomatoes, pitted Kalamata olives, capers, thinly sliced red onions, bell peppers, fresh rosemary, thyme, and roasted garlic are all phenomenal options.
However, you must be strategic about water content. If you load the top of the dough with thick slices of raw zucchini or massive chunks of raw tomato, the water will leach out during baking, leaving you with a soggy, unbaked surface. To avoid mushy veggies ruining your crust, make sure high-moisture ingredients are sliced paper-thin or lightly pre-roasted to remove excess water before they hit the dough.
The Communal Creation
Hand your guests a glass of wine, instruct them to oil their hands, and let them take turns dimpling the dough. It is an incredibly satisfying, sensory experience that instantly breaks the ice. Once the dough is dimpled, encourage them to create edible landscapes. Sliced bell peppers can become the petals of a flower; chives can act as the stems.
If you are prepping the ingredients beforehand, remember that chopping onions with a razor-sharp chef’s knife minimizes the cellular damage to the onion, drastically reducing the release of the irritating gas that causes you to tear up. Keep your prep clean, sharp, and organized.
As they press the vegetables and herbs gently into the dimples, the olive oil coats everything, ensuring the toppings will roast beautifully in the oven rather than burning to a crisp. Finish the entire masterpiece with a heavy shower of flaky sea salt.
The Bake and The Reveal
Slide the heavy pan into a preheated 425°F oven and let the thermodynamics do their work. Within 25 to 30 minutes, your kitchen will smell like an artisanal Italian bakery. The high hydration of the dough will create a massive oven spring, puffing the bread up around the vegetables. The cold fermentation will ensure the crust caramelizes into a deep, rich mahogany brown, while the bottom fries in the olive oil.
When you pull that pan out of the oven, the collective gasp from your guests will be worth every single minute of preparation. You have successfully transformed a simple mixture of flour and water into a meaningful dinner party. Let the bread cool on a wire rack for at least thirty minutes so the crumb can set—cutting into it while it is piping hot will turn the delicate interior into a gummy mess.
The Final Slice
Mastering focaccia is a rite of passage for the home cook. It forces you to respect the ingredients, understand the science of hydration, and practice the lost art of patience. It demands that you throw away your toxic, peeling pans and invest in gear that actually works.
But most importantly, it proves that you do not need to be a professional chef to create something mind-blowingly delicious in your own kitchen. By trusting the cold fermentation process, respecting the high-hydration gluten network, and turning the final assembly into a shared, creative experience, you elevate a basic weekend project into a culinary triumph. So go buy a digital scale, throw away your scratched non-stick sheets, and let your dough rest. Your perfect, bubbly focaccia is waiting.


