The Cold, Hard Truth About Your Gloppy Fried Rice
Let us get one thing straight right out of the gate: you are not a bad cook, but you are likely a deeply impatient one. We have all been there. It is a Tuesday night, you are exhausted, and you have a fierce craving for that smoky, savory, perfectly separated takeout fried rice. So, you dutifully boil a fresh batch of jasmine rice, chop up whatever sad vegetables are languishing in your crisper drawer, and toss it all into a hot skillet.
Ten minutes later, instead of a culinary masterpiece, you are staring down a gummy, clumped, sticky mass of starch that looks less like a vibrant Asian street food and more like spackle. It tastes like boiled sadness. You chew your glutinous paste, wonder why you even bother, and reach for the takeout menu.
I have zero patience for the myth that you need a roaring, jet-engine commercial wok burner to make restaurant-quality food at home. You do not need a culinary degree, and you certainly do not need to settle for mush. What you actually need is a fundamental, no-nonsense understanding of food science. Cooking is not magic; it is applied physics and chemistry.
When you attempt to fry fresh, hot rice, you are completely ignoring the biological structure of the grain and the thermodynamic reality of your kitchen equipment. You are setting yourself up for failure before you even turn on the stove. If you want to salvage your gummy rice disasters, you have to stop treating fried rice like a hot, spontaneous side dish. It is a calculated, deliberate process of moisture management.
Today, we are going to completely dismantle your chaotic weeknight routine. We are going to look under the microscopic hood of a rice grain, break down the exact temperature thresholds required for flavor development, and I am going to teach you a brilliant, scientifically verified fifteen-minute hack that will save your dinner. Grab a notebook, pour yourself a glass of wine, and let us fix your food.
The Food Science of Mush: Why Fresh Rice Fails
To understand why your dinner is currently resembling wallpaper paste, we have to talk about what happens inside a grain of rice when it meets boiling water. I promise to keep the science tight and actionable, but decoding pretentious culinary terminology is the only way you will actually learn how to control your ingredients.
The Moisture Problem: 70% Water is a Recipe for Disaster
A raw grain of rice is hard, brittle, and packed with complex carbohydrates. When you simmer it in water, the starch granules absorb the liquid, swell up, and eventually burst, releasing a sticky gel. This process is called starch gelatinization. By the time your rice cooker dings, that perfectly fluffy, steaming bowl of fresh rice is holding approximately 70% moisture by weight.
Think about that for a second. Seventy percent water.
When you scoop that fresh, hot, water-logged rice directly into a frying pan, what do you think happens? Water boils and turns into steam at 212°F (100°C). As soon as that damp rice hits the hot oil, the intense heat of your pan is entirely hijacked. Instead of searing the exterior of the grain, the thermal energy is wasted on rapidly evaporating that massive 70% water payload. Your pan temperature plummets, the oil cools down, and your rice ends up aggressively steaming in its own residual moisture.
You are not frying rice. You are boiling it twice. And because the grains are hot and swollen, the mechanical action of your spatula simply smashes them together, creating a singular, unbreakable clump of starch.
Demystifying Amylose Retrogradation (Without the Chef-Speak)
So, how do we fix the moisture problem? We have to force the starch to change its physical state. Enter the most important scientific concept in your weeknight cooking arsenal: amylose retrogradation.
It sounds like a terrible 1990s alternative rock band, but retrogradation is simply the process of starch molecules firming up as they cool down. Rice starch is made of two main molecules: amylose (which is long and straight) and amylopectin (which is highly branched). When rice is hot and freshly cooked, these molecules are loose, disorganized, and suspended in water, which makes the rice soft and sticky.
However, as the rice cools, those long amylose chains begin to violently snap back together. They realign, form tight hydrogen bonds, and crystallize into a rigid, solid structure. This crystallization process physically hardens the exterior of the rice grain, transforming it from a fragile, sticky water balloon into a sturdy, resilient little pebble.
Here is the crucial data point: this chemical firming process does not happen effectively at room temperature. Amylose retrogradation accelerates drastically when the rice is chilled to at least 39°F (4°C). That is the exact temperature of a standard home refrigerator.
When you leave rice in the fridge overnight, two magical things happen simultaneously. First, the 39°F (4°C) environment forces the starches to crystallize and lock into place. Second, the dry, circulating air of the refrigerator wicks away the surface moisture, dropping the overall hydration level of the grain. The result? Cold, dry, individual grains of rice that will hit a hot pan, repel each other, and fry perfectly without turning to mush.
The 15-Minute Sheet-Pan Freezer Hack (Your Weeknight Lifesaver)
Now, in a perfect, highly organized world, you would always remember to cook a batch of rice on Monday so you could fry it on Tuesday. But let us be brutally honest: you are a busy human being, and weeknight cravings do not adhere to a twenty-four-hour prep schedule.
If you realize at 5:30 PM that you desperately want fried rice, you do not have time to wait for the refrigerator to slowly do its job. We need to aggressively manipulate the thermodynamics of your kitchen. We need to force amylose retrogradation, and we need to do it right now.
Step-by-Step: Forcing Starch Crystallization Fast
This is my verified, foolproof method for hacking the food science of fried rice when you are out of time.
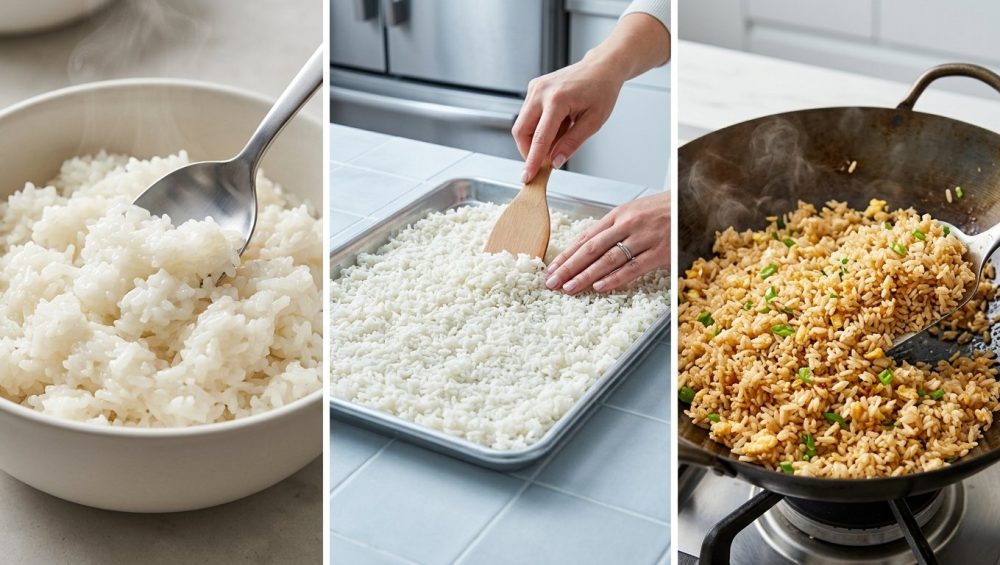
- Cook the Rice Slightly Dry: When making your fresh batch of rice, reduce the water by about 10% to 15%. If the package calls for 1 cup of rice to 1.5 cups of water, drop the water to 1.25 cups. We want to intentionally shortchange the gelatinization process so the grains start out slightly firmer than usual.
- The Sheet Pan Spread: The moment the rice is done, do not leave it in the pot to steam. Dump the screaming hot rice directly onto a large, unlined aluminum baking sheet. Aluminum is an incredible conductor of heat. Spread the rice out into the thinnest, most even layer possible using a spatula. You want maximum surface area exposure.
- The Freezer Shock: Place that steaming sheet pan directly into your freezer, completely uncovered, for exactly 15 to 20 minutes. Do not leave it in there long enough to freeze solid—we are not making rice ice cubes. We are simply weaponizing the extreme sub-zero environment.
Why the Freezer Beats the Fridge for Emergency Prep
Why does this 15-minute hack work so brilliantly? It comes down to the physics of extreme temperature differentials.
When you put a massive, thin layer of hot, wet rice into a 0°F (-18°C) freezer, the rapid drop in temperature acts as a shock to the starch molecules. It forces the amylose to instantly begin its crystallization process, bypassing the slow, hours-long wait of the refrigerator.
More importantly, a freezer is an incredibly arid, dry environment. As the intense cold hits the hot rice, the massive amount of surface moisture rapidly sublimates—it converts from liquid to vapor and is instantly wicked away by the dry freezer air. When you pull that pan out 15 minutes later, the rice will be cool to the touch, noticeably hardened, and the surface will be entirely dry. You have successfully simulated day-old rice in the time it takes to chop your garlic and whisk your eggs.
Heat Management: The Maillard Reaction in a Standard Home Kitchen
We have fixed the rice. Now we have to fix your stove. The second biggest reason your fried rice fails is a fundamental misunderstanding of how heat interacts with food.
The Myth of the Commercial Wok Burner
If you watch a professional chef in a restaurant kitchen, you will see them tossing rice over a literal pillar of fire. Commercial wok burners output anywhere from 100,000 to 150,000 BTUs of heat energy. Your standard home gas or electric range? It struggles to push out 10,000 to 15,000 BTUs.
Because of this massive power discrepancy, home cooks often panic. They assume that because they lack a jet engine, they cannot achieve the deep, savory, smoky flavor known as “wok hei” (the breath of the wok). This is nonsense. You absolutely can achieve professional browning at home; you just have to be significantly smarter about how you manage your pan’s thermal mass.
Preheating and the 300°F+ Threshold
The flavor of fried rice does not come from the ingredients themselves; it comes from a chemical transformation called the Maillard reaction. This is a complex cascade of non-enzymatic browning where amino acids (proteins) and reducing sugars violently collide under high heat to create hundreds of entirely new, deeply savory flavor compounds. It is the exact same reaction that gives a seared steak its crust or a loaf of bread its golden exterior.
Here is the absolute, non-negotiable rule of the Maillard reaction: it does not begin to occur in earnest until the surface temperature of the food reaches approximately 300°F (140°C to 165°C).
Remember our earlier conversation about water? Water boils at 212°F (100°C). As long as there is liquid water present in your pan, the temperature of the food’s surface cannot physically exceed 212°F. The heat energy from your stove will constantly be diverted to boiling the water rather than browning the food.
This is why drying your rice in the freezer was so critical. By removing the surface moisture, we allow the rice grain to immediately bypass the 212°F boiling point and rocket straight up to the 300°F+ threshold required for the Maillard reaction.
To achieve this on a weak home stove, you must preheat your skillet aggressively. You need to let your pan sit over medium-high heat until it is ripping hot before you even think about adding oil. If you are testing your pan’s heat level properly, a drop of water should instantly bead up and dance across the surface (the Leidenfrost effect). Only then is your pan holding enough stored thermal energy to recover from the temperature drop that occurs when you add cold ingredients.
Ditch the Toxic Non-Stick: Choosing the Right Pan for the Job
I am going to get a little preachy here, but it is for your own good. The gear you use matters just as much as the ingredients. If you are trying to make high-heat fried rice in a cheap, scratched-up Teflon skillet you bought at a big-box store five years ago, you are not just ruining your dinner—you are actively poisoning yourself.
The Danger of Peeling Teflon at High Heat
I have a strict “no-go” rule on toxic kitchenware. Traditional non-stick coatings (PTFE, commonly known as Teflon) are fantastic for gently scrambling an egg on a Sunday morning. They are an absolute disaster for the 300°F+ searing temperatures required for fried rice.
When PTFE is heated above 500°F (which can happen in mere minutes on a preheating stove), the chemical coating begins to break down, releasing toxic polymer fumes. Worse, the aggressive mechanical tossing, scraping, and stirring required for fried rice will inevitably scratch the delicate synthetic surface. You are literally shaving microplastics and toxic chemicals directly into your food. You are ruining your cheap nonstick pans and compromising your health. Throw them in the garbage immediately.
Carbon Steel: The Undisputed King of Fried Rice
If you want to cook like an expert, you need to use the material that has been the backbone of Asian wok cooking for centuries: carbon steel.
Carbon steel is the perfect hybrid between the heat retention of cast iron and the lightweight maneuverability of stainless steel. It can withstand blistering, incredibly high temperatures without warping or releasing toxic fumes. More importantly, when properly cared for, the oil bonds with the metal at a molecular level to create a naturally slick, non-toxic patina.
Yes, seasoning a carbon steel skillet requires a tiny bit of maintenance, but the payoff is immense. A thick carbon steel wok or flat-bottomed skillet will absorb the heat from your weak residential burner, hold onto it like a thermal battery, and rapidly transfer that energy into your dry, chilled rice to trigger an explosive Maillard reaction.
The Anatomy of Perfect Fried Rice: Ingredient Breakdown
Now that we have the science, the temperature, and the equipment sorted out, we need to talk about the actual components of the dish. Great fried rice is an exercise in minimalism. It is not a garbage disposal for every random vegetable in your fridge.
Choosing the Right Grain (Long vs. Short)
Not all rice is created equal. Short-grain rice (like sushi rice or arborio) is naturally packed with a higher ratio of amylopectin. Because amylopectin is highly branched, it creates a sticky, creamy, cohesive texture. That is wonderful for risotto, but it is a death sentence for fried rice.
You must use a long-grain variety, such as Jasmine or Basmati. Long-grain rice has a much higher percentage of straight-chain amylose. As we learned earlier, amylose is the molecule that crystallizes and firms up during cooling. The higher the amylose content, the drier, firmer, and more separate your final grains will be.
The Rinsing Mandate: Washing Away Surface Starch
If you take raw rice straight from the bag and throw it into a pot, you are making a massive rookie mistake. The milling process leaves a heavy coating of ultra-fine starch dust on the exterior of every single grain. If you do not wash this dust off, it turns into a thick, gluey paste the moment it hits boiling water.
You must rinse your raw rice under cold running water until the water runs completely clear. This mechanical friction removes the loose starch, ensuring that the grains do not glue themselves together during the boiling phase. By washing away excess surface starch, you are laying the groundwork for perfectly separated fried rice later on.
Aromatics, Proteins, and the “Staging” Technique
The biggest mistake home cooks make is dumping everything into the pan at the exact same time. On a commercial wok burner, the heat is so intense that you can get away with this. On a home stove, crowding the pan drops the temperature so drastically that the food begins to steam.
You must cook your ingredients in stages.
- The Aromatics: Garlic, ginger, and scallion whites are your flavor base. They contain volatile oils that need to be coaxed out gently, not incinerated.
- The Proteins: Whether it is chicken, shrimp, or tofu, it needs to be seared hard and fast, then immediately removed from the pan so it doesn’t overcook.
- The Vegetables: You are preventing sad and soggy vegetables by cooking them quickly in the residual fat, ensuring they retain their vibrant crunch before setting them aside.
By staging your ingredients—cooking them individually and removing them to a waiting plate—you ensure that your pan remains ripping hot for the main event: the rice.
The Step-by-Step Masterclass to Flawless Fried Rice
We have arrived at the execution phase. Put your phone away, tie your apron, and focus. Fried rice moves fast. If you are chopping onions while the oil is smoking, you have already lost. You must have all of your ingredients prepped, chopped, and sitting in little bowls next to the stove (a process the French call mise en place).
When you are scooping ingredients off the board, make sure everything is cut to a uniform, tiny size. You want every spoonful of rice to contain a perfect harmony of flavors, without damaging your delicate knife blades by hacking wildly at large chunks of meat mid-cook.
Phase 1: The Prep and the Chill
- The Rice: You have already rinsed your long-grain jasmine rice, cooked it with slightly less water, and executed the 15-minute sheet-pan freezer hack. The rice is now cool, dry to the touch, and the amylose has crystallized. Using your hands, gently break up any clumps so that the grains are completely separated.
- The Sauce: In a small bowl, mix 1 tablespoon of high-quality soy sauce, 1 teaspoon of toasted sesame oil, and a dash of white pepper. Do not use a massive glug of liquid; remember, adding too much moisture at the end will ruin the dry texture we have worked so hard to achieve.
Phase 2: The Sizzle and the Sear
- Heat the Steel: Place your carbon steel skillet or flat-bottomed wok over medium-high heat. Let it sit there until it is uncomfortably hot. You want it smoking slightly.
- The Oil: Add 2 tablespoons of a high-smoke-point oil (like peanut, canola, or avocado oil). Swirl it around to coat the entire surface of the pan.
- The Egg: Pour in two beaten eggs. Because the pan is ripping hot, the eggs will instantly puff, bubble, and fry in the oil. Do not scramble them into a fine dust. Let them set for a few seconds, then fold them over gently. While they are still slightly runny in the center, remove them to a plate.
- The Aromatics and Veg: Add another tiny splash of oil. Toss in your minced garlic, ginger, and scallion whites. Stir continuously for 15 seconds until the kitchen smells intoxicating. Immediately add your diced vegetables (carrots, peas, etc.) and your pre-cooked proteins. Toss for one minute until heated through, then remove everything to the same plate as the eggs.
Phase 3: The Toss and the Seasoning
- The Main Event: Your pan is now empty but coated in heavily flavored, aromatic oil. Turn the heat up to absolute maximum. Add your chilled, separated rice.
- The Press and Sear: Do not immediately start wildly stirring. Press the rice down into a flat, even layer against the hot carbon steel. Let it sit completely undisturbed for 30 to 45 seconds. We are allowing the bottom layer of rice to hit that 300°F (140°C) threshold, triggering the Maillard reaction and developing a deeply savory, toasted crust.
- The Toss: Now, grab your spatula and toss the rice aggressively, bringing the toasted bottom grains to the top. Break up any remaining clumps.
- The Reintegration: Dump the eggs, vegetables, and proteins back into the pan. Toss everything together.
- The Final Seasoning: Drizzle your soy sauce and sesame oil mixture around the edges of the hot pan, not directly onto the rice. Pouring it on the hot metal instantly vaporizes the water in the soy sauce, leaving behind only the concentrated, smoky flavor compounds to coat the grains.
- The Finish: Toss for another 30 seconds, garnish with fresh scallion greens, and immediately remove from the heat.
Troubleshooting Common Fried Rice Disasters
Even with the science on your side, the chaotic environment of a home kitchen can sometimes throw you a curveball. Here is how to diagnose and fix the most common issues.
“My Rice is Sticking to the Pan!”
If your rice is aggressively cementing itself to the bottom of your skillet, you have committed one of two cardinal sins. First, your pan was not hot enough before you added the oil. If the metal is not properly expanded by heat, the proteins and starches will bond directly to the microscopic pores in the steel. Second, your rice was still too wet. If you skipped the freezer hack or did not let the rice cool sufficiently, the excess moisture created a gluey starch paste that instantly welded to the metal. Next time, ensure the pan is smoking hot and the rice is bone dry.
“It Tastes Boiled, Not Fried!”
If your final dish looks pale, tastes flat, and lacks that signature smoky, savory punch, you overcrowded the pan. By dumping the rice, vegetables, and cold proteins into the skillet all at once, you crashed the temperature of your carbon steel well below the 212°F (100°C) boiling point. The Maillard reaction never had a chance to start. You effectively steamed your dinner in soy sauce. Staging your ingredients and cooking in batches is the only way to maintain the 300°F+ (140°C+) heat required for true browning.
Conclusion: Reclaiming Your Takeout Independence
Cooking is not an innate talent bestowed upon a lucky few by the culinary gods. It is a mechanical, scientific process that anyone can master. Once you understand that freshly cooked rice is a 70% moisture water-balloon waiting to ruin your pan’s temperature, everything changes.
By utilizing the 15-minute freezer hack, you force the amylose molecules to rapidly crystallize, dropping the hydration level and transforming the grain into a sturdy, fry-ready ingredient. By managing your heat and respecting the 300°F (140°C) threshold of the Maillard reaction, you bypass the dreaded steam phase and unlock deep, complex, restaurant-quality flavors. And by ditching cheap, toxic non-stick gear in favor of high-heat carbon steel, you protect your health while drastically improving your sear.
You no longer have to settle for sad, gummy, wallpaper-paste dinners. Overcoming your weeknight cooking anxiety is simply a matter of respecting the chemistry of your ingredients. So, put down the takeout menu, wash your long-grain rice, and get that skillet smoking hot. You have got this.


