Listen up, because we need to have a serious, brutally honest conversation about what happened in your skillet last night. You tried to make fried rice. You had the absolute best intentions. You diligently chopped your vegetables, you scrambled your egg, you poured in a splash of expensive soy sauce, and you dumped a steaming, freshly cooked batch of white rice straight from the rice cooker directly into the pan.
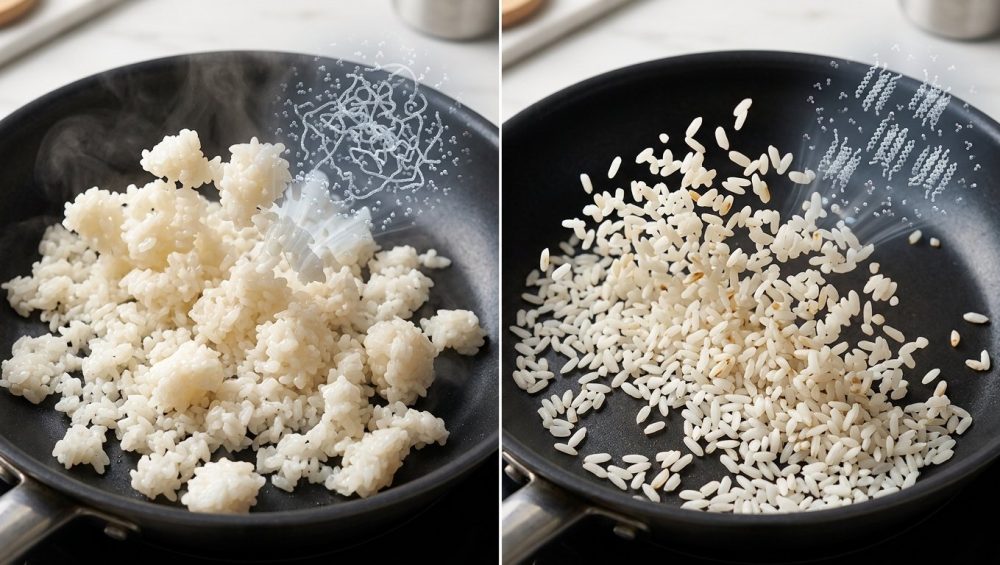
And what did you get? A sad, gummy, spackle-like clump of culinary despair. A dense, sticky mass that tasted more like a savory, soy-sauce-flavored rice pudding than the glorious, individual, wok-charred grains you get from your favorite takeout joint. It stuck to your spatula, it glued itself to the bottom of your pan, and it left you questioning your abilities as a functioning adult in the kitchen.
I know exactly how frustrated you are. I know you are currently tempted to just delete your grocery delivery app, throw your skillet out the window, and go back to paying exorbitant delivery fees for lukewarm takeout. But pour yourself a glass of wine, take a deep breath, and listen to me: You do not need a culinary degree to fix this. You do not need a commercial jet-engine wok burner in your kitchen, and you certainly don’t need to surrender to the takeout menus. You just need a little bit of patience and a fundamental understanding of food science.
Today, we are leaving absolutely no stone unturned. We are diving deep into the microscopic, thermodynamic, and chemical realities of what makes fried rice actually fry instead of violently steam. By the end of this definitive masterclass, you will understand exactly why tossing fresh, moisture-heavy rice into a hot pan is a catastrophic rookie mistake, and why chilling your grains at 39°F (4°C) for at least 12 hours changes absolutely everything.
The Microscopic Anatomy of a Rice Grain: A Tale of Two Starches
To truly comprehend why your dinner turned into wallpaper paste, we first have to look at what rice actually is on a molecular level. We can’t just treat “rice” as a single, uniform ingredient.
Rice is predominantly composed of carbohydrates, specifically starch. But “starch” isn’t just one monolithic substance. It is a complex matrix made up of two entirely distinct types of molecules: amylose and amylopectin. The precise ratio of these two molecules dictates absolutely everything about how a grain of rice behaves when it is heated, hydrated, cooled, and ultimately fried.
Amylose: The Structural Backbone
Amylose is a long, straight, linear polymer. Because of its rigid, straight-chain structure, amylose molecules can pack tightly together in dense, highly organized crystalline formations. Think of them like dry, uncooked spaghetti noodles neatly stacked in a box. Grains with a high amylose content—like long-grain basmati or traditional jasmine rice—tend to cook up fluffy, firm, and separate. They have a sturdy internal architecture that resists breaking down into a mushy paste.
Amylopectin: The Sticky Culprit
Amylopectin, on the other hand, is a highly branched, bushy, chaotic molecule. Imagine a tangled ball of yarn or the sprawling branches of an unkempt shrub. Because of this heavily branched structure, amylopectin molecules physically cannot pack tightly together. When they are exposed to water and heat, they trap moisture effortlessly and become incredibly sticky, viscous, and gelatinous. Short-grain rice varieties, like Japanese sushi rice or Italian arborio, are packed to the brim with amylopectin. This is exactly why they naturally clump together—which is perfect for eating with chopsticks or making a creamy, luxurious risotto, but an absolute nightmare for the frying pan if not handled with scientific precision.
If you are trying to make fried rice with a high-amylopectin grain without utilizing the cooling techniques we are about to discuss, you are essentially trying to fry glue. Jasmine rice, with its medium-high amylose content and floral aroma, is the undisputed gold standard for this dish because it strikes the perfect balance between tenderness and structural integrity.
The Gelatinization Process: What Happens When You Cook Rice
When you take hard, raw rice and boil it in a pot of water, you are initiating an endothermic chemical process called starch gelatinization.
At room temperature, raw starch granules are hard, semi-crystalline structures that completely resist dissolving in water. But as the temperature of the cooking water rises above 140°F (60°C), the hydrogen bonds holding the starch molecules together begin to rapidly weaken and break apart. Water aggressively rushes into the granules, causing them to swell up like microscopic water balloons.
As the temperature continues to climb toward boiling, the granules swell to such an extreme degree that they eventually burst. When they rupture, they spew their internal starches—particularly that sticky, highly branched amylopectin—out into the surrounding environment. This molecular explosion is what transforms a hard, tooth-shattering pellet into a soft, edible, tender grain.
But here is the critical, fundamental problem for our weeknight dinners: Freshly cooked rice is essentially a swollen, fragile, highly compromised water balloon covered in a thin coating of sticky starch glue. Its internal moisture content is at its absolute peak.
If you take this fragile, water-logged, glue-covered grain and throw it directly into a hot skillet, the mechanical friction of your spatula will instantly tear the delicate grains apart. The remaining internal starches will violently bleed out, binding all the individual grains together into a massive, gummy lump. Congratulations, you’ve just made savory mochi.
The “Anti-Browning Heat Shield”: The Thermodynamics of Wet Rice
Let’s step away from the chemistry for a second and talk about the brutal physics of your frying pan. The ultimate goal of fried rice is to achieve the Maillard reaction—the complex chemical reaction between amino acids and reducing sugars that occurs at high temperatures (typically above 285°F or 140°C). This reaction is responsible for the deep, savory, browned flavors that make restaurant takeout so incredibly irresistible.
But there is a massive, unavoidable catch. The Maillard reaction physically cannot happen in the presence of liquid water. Water boils at 212°F (100°C), and under normal atmospheric pressure, it cannot get a single degree hotter than that. As long as there is liquid water evaporating on the surface of your food, the temperature of that surface is permanently capped at 212°F.
When you dump freshly cooked, steaming rice into a hot pan, you are introducing a colossal amount of surface moisture. According to basic thermodynamic principles, it takes roughly five times more energy to evaporate a drop of water than it does to heat that same drop from freezing to boiling.
This excessive surface moisture creates what I like to call an “anti-browning heat shield.” Instead of searing, blistering, and frying, the intense thermal energy of your pan is entirely consumed by the monumental task of boiling off the water. The temperature of your pan plummets instantly. Your rice isn’t frying; it is violently steaming in its own residual moisture. By the time enough water has finally evaporated to allow the pan’s temperature to climb back up to Maillard-reaction levels, your rice has been cooking for far too long, its delicate structure has collapsed, and it has dissolved into an irreversible mush.
The Magic of Starch Retrogradation: Why Day-Old Rice Changes Everything
This brings us to the absolute core of our masterclass: Starch Retrogradation. This is the scientific phenomenon that separates the weekend amateurs from the seasoned pros.
When you take that freshly cooked, swollen, gelatinized rice and place it in the refrigerator, a miraculous, entirely natural chemical transformation occurs. As the temperature drops—ideally to around 39°F (4°C)—the kinetic energy of the starch molecules dramatically slows down.
Without the intense heat of the cooking process to keep them agitated and moving, the linear amylose molecules and the branched amylopectin molecules begin to cool, settle, and realign themselves. They form new hydrogen bonds and literally begin to recrystallize.
This recrystallization process is called retrogradation. It is the exact same process that causes a fresh loaf of bread to go hard and stale on your counter. In bread baking, staling is considered a tragic flaw. But in the world of fried rice, this structural “staling” is your single greatest weapon.
The 12-Hour Reconfiguration
A recent 2026 physicochemical study from Jiangsu University on overnight cooked rice confirmed exactly what professional chefs have inherently known for centuries. Researchers analyzed rice that had been stored at 4°C for 12 hours using advanced Scanning Electron Microscopy (SEM) and X-ray diffraction (XRD). What they found was staggering.
During that 12-hour chilling period, the moisture content of the rice drops significantly, but more importantly, the structural morphology of the grain fundamentally changes. The recrystallized starches form a hard, rough, polyhedral exterior. The hardness and chewiness of the grain increase dramatically, while its adhesiveness (its stickiness) plummets. Differential scanning calorimetry (DSC) confirmed a higher retrogradation enthalpy, proving that the starch had successfully rebuilt its crystalline order.
In plain English: The harsh, cold environment of the refrigerator forces the rice to build a protective armor of crystallized starch around itself, while simultaneously shedding its excess surface moisture.
The Ultimate Frying Grain
When you finally toss this 12-hour-chilled, retrograded rice into a hot pan, everything works in perfect, harmonious synchronization.
- No Heat Shield: Because the surface moisture has evaporated, the pan’s thermal energy isn’t wasted on boiling water. The temperature stays roaringly high, allowing the Maillard reaction to trigger instantly.
- Structural Integrity: The newly formed crystallized starch armor protects the delicate grain from the mechanical friction of your metal spatula. The grain refuses to rupture, meaning no sticky amylopectin bleeds out into the pan.
- Individual Separation: Because the adhesiveness has plummeted, the grains naturally separate from one another, allowing the hot oil to coat every single grain individually, resulting in that highly coveted, chewy, distinct texture.
This is exactly how you achieve those distinct, chewy, perfectly browned grains that characterize true restaurant-quality meals.
The Bonus Benefit: Resistant Starch and Your Metabolism
I know we are primarily here to talk about culinary perfection and achieving the perfect sear, but I have to drop a quick, highly relevant nutritional truth bomb on you. Starch retrogradation doesn’t just improve the physical texture of your dinner; it actually fundamentally changes how your body digests it.
When amylose and amylopectin recrystallize in the refrigerator, a significant portion of the digestible starch converts into what is known in the medical and nutritional fields as resistant starch. As the name implies, resistant starch entirely resists digestion in the small intestine. Instead of being rapidly broken down into glucose enzymes and aggressively spiking your blood sugar, it travels fully intact to your large intestine, where it acts as a highly beneficial prebiotic fiber.
Clinical studies have consistently shown that cooling and reheating white rice can reduce its glycemic index by 10% to 15%. The resistant starch feeds the beneficial bacteria in your gut microbiome, producing short-chain fatty acids that support long-term gut health. Furthermore, because resistant starch digests much more slowly, it dramatically increases satiety, keeping you fuller for longer.
And here is the best part: The resistant starch remains intact even when you reheat the rice in a blazing hot wok! So, not only does day-old rice prevent your dinner from turning into a gluey disaster, but it also provides a slower, much more stable release of energy. It is the ultimate culinary and nutritional win-win.
The Pan and The Heat: Conquering the Frying Environment
Okay, so you have your perfectly chilled, scientifically retrograded rice. You are exactly halfway there. But we absolutely need to talk about the vessel you are cooking it in.
I am going to be brutally honest with you: If you are trying to make high-heat, restaurant-quality food in a scratched, peeling, lightweight Teflon pan you bought for ten dollars at a discount supermarket, you are setting yourself up for guaranteed failure. I have zero patience for toxic kitchenware. Not only do cheap non-stick pans degrade rapidly and release highly questionable, forever-chemical fumes into your food when exposed to high heat, but they physically cannot handle the thermal mass required for this job.
The Pursuit of Wok Hei
In professional Chinese restaurant kitchens, seasoned chefs use massive carbon steel woks over specialized jet-engine burners. They employ an incredibly taxing tossing technique that subjects the food to ambient temperatures up to 2,200°F (1200°C). The wok toss is a precise, mathematically complex kinematic motion—a 0.3-second cycle of translation and rotation—that throws the rice high into the air, allowing it to sear intensely without burning. This extreme heat vaporizes microscopic oil droplets as they catch the edge of the flame, creating a smoky, complex, slightly charred flavor profile known as wok hei, or “the breath of the wok”.
You probably do not have a 100,000 BTU commercial jet burner installed in your apartment kitchen. And that is perfectly fine. We can accurately replicate the effect of wok hei by maximizing the thermodynamics of carbon steel or high-quality cast iron.
Carbon steel is the undisputed, heavyweight king of the home stir-fry. It heats up incredibly fast, it can withstand roaring high temperatures without off-gassing toxic fumes, and when properly seasoned, it builds a naturally non-stick patina that rivals any synthetic coating on the market. Understanding the carbon steel wok seasoning process—where microscopic layers of polymerized oil permanently bond to the metal—is exactly what will allow your retrograded rice to glide effortlessly across the surface without sticking.
If you are using a heavy-bottomed stainless steel skillet instead, you must properly preheat it to manipulate its physical properties. You need to utilize the water drop test—heating the dry pan until a drop of water beads up and dances across the surface like liquid mercury (a phenomenon known as the Leidenfrost effect)—before adding your oil and your rice. This creates a microscopic vapor barrier that completely prevents the proteins and starches from bonding to the hot metal.
The Masterclass: A Step-by-Step Guide to Perfect Fried Rice
We have thoroughly covered the science, the chemistry, and the thermodynamics. Now, let’s put it into actionable practice. Here is your foolproof, step-by-step methodology for ensuring you never eat mushy, disappointing rice again.
Step 1: The Pre-Wash
Before you even think about boiling water, you absolutely must remove the excess surface starch from your raw grains. If you lazily skip this step, you are leaving a thick layer of loose amylopectin powder on the exterior of the rice that will instantly turn into a thick glue in the cooker. Put your raw rice in a fine-mesh strainer or a dedicated Japanese wash bowl, and run it under cold water. Gently agitate the grains with your fingers. The water will initially run a thick, milky white. Keep washing, draining, and repeating until the water runs mostly clear.
Step 2: The Controlled Cook
Cook your rice with slightly less water than you normally would for a standard side dish. If your package instructions call for a 1:1.5 ratio of rice to water, pull it back to a strict 1:1.25. We want the grains to be fully hydrated and tender on the inside, but we want to give them a significant head start on the dehydration process.
Step 3: The 12-Hour Chill (The Retrogradation Phase)
As soon as the rice is done cooking and the machine beeps, immediately fluff it with a fork or a wooden rice paddle to release the initial burst of trapped steam. Do not, under any circumstances, leave it clumped in the bottom of the cooker to sweat.
Spread the hot rice out in a thin, even layer on a large, rimmed metal baking sheet. This drastically maximizes the surface area, allowing the steam to escape rapidly into the air. Let it sit at room temperature for about 20 to 30 minutes until it stops actively steaming.
Then, place the baking sheet uncovered directly into the refrigerator. Leave it there for a minimum of 12 hours, and ideally up to 24 hours. The cold, dry, circulating air of the fridge will initiate the starch crystallization process and aggressively pull out the excess surface moisture.
Step 4: The Break-Up
When you pull your baking sheet out of the fridge the next day, the rice will feel hard, dry, and slightly crumbly to the touch. This is exactly what you want. Before you start cooking, use your clean hands to gently break up any large clumps. You want individual, distinct grains ready to hit the hot oil. If you try to break up clumps with a spatula while the rice is in the pan, you will smash the grains and ruin the texture.
Step 5: Prep Your Mise en Place
High-heat wok cooking waits for absolutely no one. Once the oil is smoking in the pan, you do not have time to start chopping onions, peeling ginger, or whisking eggs. The process moves in seconds, not minutes. Have all your aromatics (minced garlic, ginger, scallions), your diced proteins, your blanched vegetables, and your liquid sauce mixtures prepped in small bowls right next to the stove.
And please, for the love of all things culinary, use a properly honed, sharp blade. There is nothing more dangerous or frustrating in a fast-paced kitchen than watching your knives get dull so fast because you are hacking away at a rock-hard bamboo cutting board with poor technique.
Step 6: The High-Heat Sear
Place your carbon steel wok or heavy skillet over the absolute highest heat your stove can muster. Let the dry pan get screaming hot. Add a high-smoke-point oil (like peanut, grapeseed, or avocado oil—never extra virgin olive oil for this) and swirl it aggressively to coat the sides of the pan.
Add your aromatics and let them sizzle for just a few seconds until fragrant. Push them to the side, pour in your beaten eggs, and scramble them rapidly. You want the egg to cook quickly and dry out slightly, acting as a flavor primer.
Now, introduce your chilled, retrograded rice. Toss it vigorously. You will immediately notice the difference. The dry, crystallized grains will not stick to the pan or to each other. They will absorb the flavored oil, and as they hit the 400°F+ (200°C+) surface of the metal, they will begin to toast, blister, and aggressively brown.
Step 7: The Liquid Finish
Only after the rice is thoroughly heated, separated, and visibly toasted should you add your liquid seasonings (soy sauce, dark soy sauce for color, toasted sesame oil, and maybe a splash of Shaoxing cooking wine).
Here is the ultimate pro tip: Pour the liquids around the bare outer edge of the hot pan, not directly onto the pile of rice. This technique allows the liquid to instantly vaporize and caramelize upon hitting the scorching hot metal, infusing the rice with a deep, smoky flavor without making the grains soggy.
Toss everything together one last time, garnish with fresh scallion greens, and serve immediately. If you happen to have any deeply caramelized fond stuck to the bottom of the pan later, don’t panic—turning burnt bits into sauce is a fantastic trick for pan-seared meats, but for a seasoned wok, just a quick deglaze with hot water and a bamboo brush will clean it right up.
Troubleshooting: What If I Don’t Have 12 Hours?
Look, I get it. We do not live in a perfect world. Sometimes it is 5:30 PM on a frantic Tuesday, you are starving, and you didn’t have the culinary foresight to cook a batch of rice on Monday night. I am all about efficiency, realism, and time-saving weekday hacks. If you absolutely must make fried rice on the exact same day, you have two emergency workarounds to simulate the retrogradation process. They won’t be as perfect as a 24-hour chill, but they will save your dinner.
The Fan Hack
Cook your rice with slightly less water. Spread it out on the rimmed baking sheet as described above. Set up a desk fan or a strong kitchen exhaust fan and blow room-temperature air directly over the exposed rice for about 45 minutes to an hour. This rapid airflow won’t give you the deep, molecular crystallization of a 12-hour fridge rest, but it will rapidly evaporate the surface moisture, effectively eliminating the anti-browning heat shield.
The Freezer Hack
Spread the hot, freshly cooked rice on a metal baking sheet and place it directly into the freezer for 20 to 30 minutes. The extreme, shocking cold will rapidly accelerate the cooling process and kickstart the starch retrogradation, while the low humidity of the freezer environment will pull out the surface moisture. Just keep a very close eye on it—you want the grains chilled and dehydrated, not frozen solid into an impenetrable ice block.
The Final Word on Kitchen Mastery
Cooking is not magic. It is just applied chemistry, thermodynamics, and physics disguised as art. The moment you stop blindly following recipes and start deeply understanding the why behind the techniques, you stop being a passive, stressed-out participant in your kitchen and start becoming the undisputed master of it.
You now know that the secret to perfect, distinct, restaurant-quality grains isn’t a secret ingredient, a magical spatula, or an expensive culinary degree. It is the simple, thermodynamic reality of starch retrogradation. It is the patience to let amylose and amylopectin molecules realign and crystallize in the cold, dark environment of your refrigerator. It is the wisdom of banishing toxic kitchen gear and trusting the intense, dry, unforgiving heat of a proper carbon steel pan.
So the next time you find yourself craving takeout, don’t reach for your phone to pay a ridiculous delivery fee. Reach for that Tupperware of day-old rice in the back of your fridge. Get your pan screaming hot, toss in your ingredients, and watch the science happen right before your very eyes. You’ve got this. Now go make something incredible.


