Picture this: It is Saturday afternoon. You have spent the last three hours meticulously butchering, brining, and dredging a beautiful, pasture-raised chicken. You have heated your oil to the perfect temperature, dodging rogue splatters of hot grease like a culinary ninja. You pull those glorious, golden-brown pieces from the Dutch oven, and they look like they belong on the cover of a high-end food magazine. You set them down, proud and victorious, anticipating the ultimate comfort food experience. But ten minutes later, when you finally sit down at the dining table, you take a bite and… squish. The crust is flabby, limp, and sliding right off the meat.
Congratulations. You just committed a culinary crime.
If you are draining your gorgeous, freshly fried chicken on a flat layer of paper towels, you are actively destroying your own hard work. I love you, but we need to have a serious intervention. As a home cook who has set off the smoke detector more times than I care to admit, I completely understand the instinct to soak up that excess grease. We have all watched our grandmothers line a plate with paper towels and pile the chicken high. But nostalgia does not make for good food science.
Today, we are going to dive incredibly deep into the thermodynamics of frying, the physics of moisture migration, and why a simple, inexpensive tool—the stainless steel wire cooling rack—is the absolute non-negotiable secret to preserving restaurant-quality crunch. We are also going to talk about why you need to start banishing toxic kitchen gear from your home, because if you are using a cheap, peeling, mystery-metal wire rack, you are doing significantly more harm than good. Grab a glass of wine, pull up a stool, and let’s fix your fried food forever.
The Thermodynamics of a Perfect Crust
To understand why your fried chicken fails on a plate, you first need to understand the complex science of why it succeeds in the pot. Frying is not actually a process of boiling food in oil; it is, in reality, a violent, high-speed dehydration process.
When you drop a piece of room-temperature, breaded chicken into a vat of 350°F (175°C) oil, a chaotic and beautiful scientific reaction occurs. The surface moisture of the chicken and the water trapped inside the batter instantly vaporize into steam. Those thousands of tiny, aggressive bubbles you see rolling around the chicken the second it hits the fat? That is not the oil boiling. Oil does not boil at 350°F. That bubbling is the water rapidly escaping from the food.
As the water violently exits the batter, it leaves behind microscopic, empty cavities in the crust. The hot oil rushes in to fill those newly formed voids, crisping the starches and proteins. This process is known in culinary science as starch gelatinization and dehydration. The flour or cornstarch in your dredge absorbs the initial moisture from the chicken, swells up, and then rapidly dries out in the hot oil, creating a glass-like, rigid matrix of crispy perfection.
Simultaneously, the Maillard reaction kicks into high gear. The amino acids and reducing sugars present in the flour and the chicken undergo a complex chemical dance under the intense heat, browning the crust and creating hundreds of new, savory flavor compounds. This is what gives fried food its irresistible, deeply savory aroma.
But here is the thermodynamic catch: while the outside of the chicken is a dehydrated, crispy shell, the inside of the chicken is still packed with moisture. Chicken meat is roughly 75% water by weight. As the chicken cooks, that internal water heats up and turns into steam, pushing outward toward the crust in an attempt to escape. This moisture migration is the natural, unavoidable enemy of crunch. If you do not manage that escaping steam correctly the exact second the chicken leaves the hot oil, your crust will rapidly rehydrate from the inside out, and you will be left wondering why your breading always falls off the meat in soggy, greasy sheets.
The Paper Towel Tragedy: Why You Are Sabotaging Your Dinner
Let’s talk about the exact moment everything goes wrong in a standard home kitchen. You pull the chicken out of the hot oil with your tongs and set it down on a ceramic plate lined with three layers of paper towels. You think you are doing the right thing by absorbing the excess grease so your meal does not feel heavy. Instead, you have just created a literal steam trap.
Here is the physics breakdown: The chicken is still incredibly hot when it leaves the fryer, meaning it is still actively expelling steam from its core. When you place that chicken on a flat, non-porous surface (like a plate or a cutting board) covered in a dense layer of paper towels, the steam escaping from the bottom of the chicken has absolutely nowhere to go. It hits the plate, condenses rapidly back into liquid water, and is immediately absorbed by the paper towel.
Now, you have a paper towel that is soaked not just in cooling cooking oil, but in hot, steaming water. Thanks to the physics of capillary action, that moisture is wicked straight back up into the bottom of your perfectly fried crust. The rigid starch matrix you worked so hard to dehydrate in the fryer acts exactly like a sponge, soaking up the water and turning instantly to mush. This is the hidden trap of paper towels.
Even celebrity chefs have tried to hack this fundamentally flawed system over the years. You may have seen the popular television trick where cooks crumple up paper towels into loose balls before resting the chicken on top of them. The idea is that the crumpled paper creates uneven surface heights, allowing a tiny bit of air to flow underneath the food and distributing the weight so the grease drains better. While this is a cute, desperate attempt to mitigate the damage, it is still a band-aid on a bullet wound. The paper is still trapping localized humidity, and the direct points of contact will still turn soggy. If you want true, professional-level results in a home kitchen, you need to abandon the paper products entirely and use the right tool for the job.
The Genius of the Wire Cooling Rack: 360-Degree Airflow
If you want to keep your fried chicken shatteringly crisp from the moment it leaves the oil to the moment it hits your plate, you must embrace the magic of 360-degree airflow. This brings us to the unsung hero of the culinary world: the wire cooling rack.
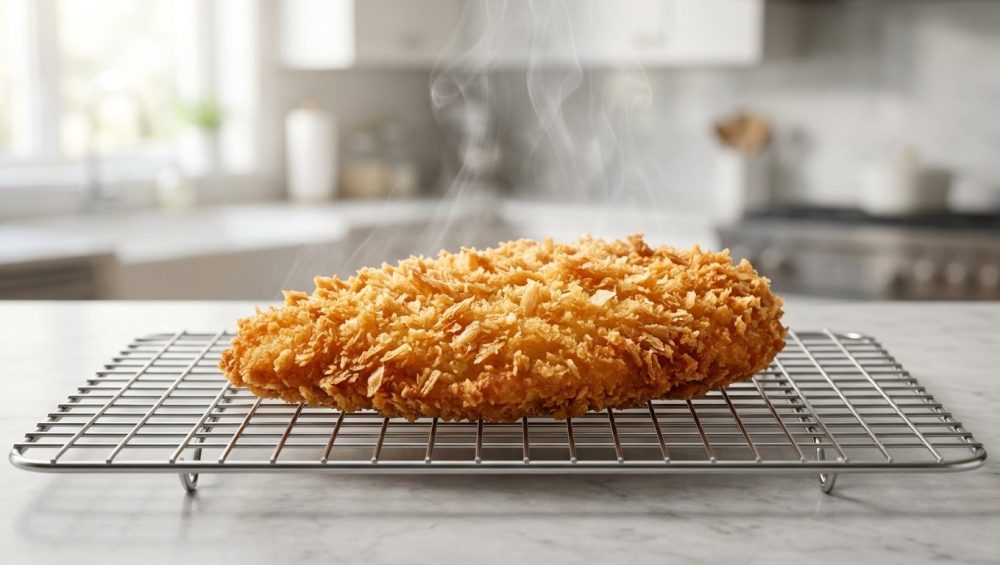
When you place hot, fried food on an elevated wire rack (ideally set inside a rimmed aluminum baking sheet to catch the drips), you completely eliminate the steam trap. The steam escaping from the bottom of the hot chicken flows freely through the open wire grid and dissipates harmlessly into the open air of your kitchen. Because the food is suspended an inch or two above the bottom of the sheet pan, the condensation never touches the crust.
Furthermore, the elevated rack promotes convection cooling. As the hot air rises off the chicken, cooler, drier air is pulled in underneath it. This continuous circulation of air actively helps to dry out the residual surface oil, preventing the dreaded greasy mouthfeel. If you have ever wondered why your fried food sometimes turns out greasy, it is almost always because it was left to marinate in its own cooling oil on a flat plate.
This airflow principle does not just apply to fried chicken. It is the exact same thermodynamic reason why resting baked goods on a rack prevents soggy bottoms, and why you should never let a hot loaf of sourdough bread sit directly on a wooden cutting board. Airflow is the ultimate preserver of texture.
The “No-Go” Rule: Why Your Current Rack is Probably Toxic Garbage
Now, before you go digging through your cabinets to pull out that ancient, wobbly cooling rack you bought at a discount store ten years ago, stop. We need to talk about my strict “No-Go” rule on toxic kitchen gear. I have zero patience for cheap, poorly manufactured equipment that poisons your food and ruins your dinners.
Most budget cooling racks on the market are made of cheap carbon steel coated in a thin layer of chrome plating. They look shiny and professional when you first take them out of the packaging, but they are a ticking time bomb. Under the stress of high heat (like when you use them in the oven for roasting) or the abrasive, high-temperature environment of a modern dishwasher, that chrome plating expands, contracts, and eventually cracks.
Once the chrome cracks, two terrible things happen. First, microscopic flakes of metallic plating peel off and stick directly to your food. You might not even notice them hidden in the crust of your fried chicken, but you are absolutely ingesting them. Second, the exposed carbon steel underneath instantly begins to rust the moment it touches moisture. The next time you use that rack, you are resting your beautiful, pristine food on a bed of oxidized iron and flaking chemical coatings.
Even worse are the racks coated in cheap non-stick materials. The same peeling issues apply, but with the added danger of toxic synthetic polymers leaching into your hot food. And do not even get me started on pure aluminum wire racks. Aluminum is a highly reactive metal. If you place anything even remotely acidic on it—like a piece of chicken hit with a squeeze of lemon or a splash of hot sauce—the acid reacts with the metal, creating a foul, metallic taste and transferring aluminum compounds into your meal.
If your current cooling rack is magnetic, if it has dark spots at the wire joints, or if it has ever seen a single speck of rust, throw it in the trash immediately. It is garbage, and you deserve better.
Metallurgy 101: How to Buy a Rack That Will Outlive You
You do not need a culinary degree to cook like a pro, but you do need to know how to buy the right tools. When shopping for a wire cooling rack, there is only one material you should ever accept: 100% uncoated 304-grade stainless steel.
Also known as 18/8 stainless steel, the 304 grade is the undisputed gold standard in the commercial food processing industry. The numbers 18/8 refer to its specific metallurgical composition: 18% chromium and 8% nickel. The chromium gives the steel its legendary strength and heat resistance, while the nickel provides an impenetrable shield against corrosion, pitting, and rust. This means a 304 stainless steel rack can survive endless trips through the dishwasher, exposure to acidic marinades, and oven temperatures up to 575°F (300°C) without ever warping, peeling, or rusting.
You might come across cheaper racks labeled as 430-grade stainless steel. These are less expensive to manufacture because they contain zero nickel. While 430 is technically food-safe, its lack of nickel makes it far more susceptible to corrosion over time, especially in humid or salty environments. If a magnet sticks strongly to the rack, it is likely 430-grade or a lower-quality metal. Stick to 304.
Beyond the metallurgy, pay close attention to the physical design. You want a rack with a tight, cross-wire grid pattern where the gaps are no wider than half an inch. This ensures that smaller pieces of food don’t slip through the cracks and that delicate items have plenty of structural support. It should also have at least three thick crossbars welded underneath for structural integrity so that it does not bow under the weight of a heavy roast. Finally, size matters. Buy a rack that is specifically designed to fit perfectly inside a standard half-sheet pan (18 x 13 inches). This exact combination is the ultimate kitchen workhorse.
The Sassy Sous-Chef’s Step-by-Step Fried Chicken Masterclass
Alright, now that you have thrown away the mystery metal and acquired a proper 304 stainless steel rack, let’s put it to work. We are going to execute a flawless weekend frying project. I am going to walk you through my personal, highly-tested technique for achieving an unbreakable, shatteringly crisp crust.
Step 1: The Dry Brine
If you want juicy meat and crispy skin, you must dry brine. At least 12 to 24 hours before you plan on frying, generously salt your chicken pieces on all sides and place them bare on your wire cooling rack, set over a sheet pan. Put the whole setup uncovered in the fridge. The salt will slowly penetrate the meat through osmosis, seasoning it all the way to the bone, while the cold, circulating air of the fridge dries out the surface of the skin. If you skip this crucial step, you will end up wondering why your chicken breast turns out dry and utterly bland.
Step 2: The Dredge Upgrade
Standard all-purpose flour is fine for beginners, but it forms gluten when it gets wet, which can create a heavy, spongy, bread-like crust. To achieve a glass-like, professional crunch, cut your all-purpose flour with 50% cornstarch or potato starch. Starch does not form gluten, meaning it fries up incredibly light and crispy.
And here is a master-level pro-tip: add a teaspoon of baking powder to your dry mix. The baking powder reacts violently with the hot oil to create tiny carbon dioxide bubbles in the batter, expanding the surface area for the ultimate crispy chicken skin. Toss your dry-brined chicken in a buttermilk bath, let the excess drip off, and coat it thoroughly in your upgraded starch mixture, pressing firmly so it adheres.
Step 3: The Double Fry Technique
This is where we separate the weekend amateurs from the culinary legends. We are going to fry the chicken twice.
First, heat your oil (peanut or canola oil work best due to their high smoke points) to a steady 325°F (165°C). Fry the chicken pieces in small batches so you don’t drop the temperature of the oil. Cook them for about 8 to 10 minutes until the meat is cooked through to a safe internal temperature and the batter is set and pale gold. Remove the chicken and place it on your wire rack. Let it rest for at least 5 to 10 minutes. During this mandatory rest, the internal steam will push to the surface, slightly softening the crust. This is exactly what we want to happen.
Now, crank the heat under your Dutch oven and bring the oil up to 375°F (190°C). Drop the rested chicken back into the screaming hot oil for just 2 to 3 minutes. This high-heat flash fry instantly vaporizes that residual surface moisture that migrated outward during the rest, locking the crust into a rigid, impenetrable shell of crunch.
Step 4: The Final Rest
Pull the chicken from the hot oil and place it immediately onto your clean wire rack. Do not cover it with foil. Do not stack the pieces on top of each other. Let the 360-degree airflow do its job. The excess oil will drip away into the pan below, the steam will dissipate harmlessly into the room, and your chicken will remain perfectly crispy for hours.
Beyond the Bird: Other Ways Your Wire Rack Pays Rent
The absolute beauty of a high-quality stainless steel wire rack is that it does not just sit in a drawer waiting for your biannual fried chicken craving. It is a daily driver that will drastically improve almost everything you cook.
When you aren’t frying, use your rack and sheet pan combo to oven-bake bacon. The fat renders down into the pan below, leaving you with perfectly flat, crispy strips without the greasy stovetop splatter or the need to stand over a popping skillet. Use it as a roasting rack for whole chickens or pork loins; elevating the meat ensures the bottom doesn’t boil in its own juices, and allows the hot oven air to crisp the underside perfectly. If you notice that your old, flimsy baking sheets warp under high heat, pairing a sturdy stainless rack with a heavy-gauge commercial aluminum pan adds significant structural integrity.
Are you a baker? A wire rack is absolutely mandatory. Hot cookies, cakes, and breads must be transferred to a rack immediately after baking to halt the residual cooking process and prevent condensation from ruining the crumb. It also serves as the perfect glazing station for donuts, eclairs, or bundt cakes, allowing the excess icing to drip cleanly away for a professional finish.
Care and Maintenance of Your Stainless Steel Rack
Even the toughest 304 stainless steel needs a little love to stay pristine. After a heavy frying or roasting session, your rack might be coated in baked-on grease, sticky glazes, or polymerized oil.
Do not waste your time scrubbing aggressively with harsh steel wool, which can leave behind tiny iron particles that will eventually rust. Instead, fill your sheet pan with hot water and a generous squirt of grease-cutting dish soap. Invert the wire rack into the soapy water and let it soak for 30 minutes. The baked-on grime will loosen significantly. For stubborn spots, make a paste of baking soda and water, apply it with a stiff nylon brush, and gently scrub along the grid lines.
Because you followed my advice and bought a 304-grade rack, you can absolutely throw it in the dishwasher for high-heat sanitization without fear of rust or degradation. Just make sure it is completely dry before storing it away. Proper maintenance means your food never sticks to stainless steel unnecessarily, and your tools will last a lifetime.
The Final Word on Flavor and Texture
Cooking is fundamentally an exercise in controlling variables. You spend good money on high-quality ingredients, you take the time to season everything properly, and you monitor your temperatures closely. But if you fail at the finish line by ignoring the basic physics of moisture migration, you are cheating yourself out of a great meal.
Sometimes, the difference between a frustrating kitchen failure and a triumphant success isn’t years of expensive culinary school; it is simply having the correct equipment and knowing exactly why you are using it. For example, if you don’t understand the science of heat transfer, you might wonder why your meat thermometer is lying to you, or why your soggy roasted veggies refuse to brown in the oven. The kitchen is a laboratory, and you are the mad scientist in charge of the results.
So, do yourself a massive favor. Take those rolls of paper towels and save them for wiping down your countertops and cleaning up spills. Upgrade your hardware, respect the thermodynamics of a crispy crust, and let your food breathe the way it was meant to. Your weekend culinary projects—and your dinner guests—will thank you. Now go heat up some oil, and show that chicken who is boss.