
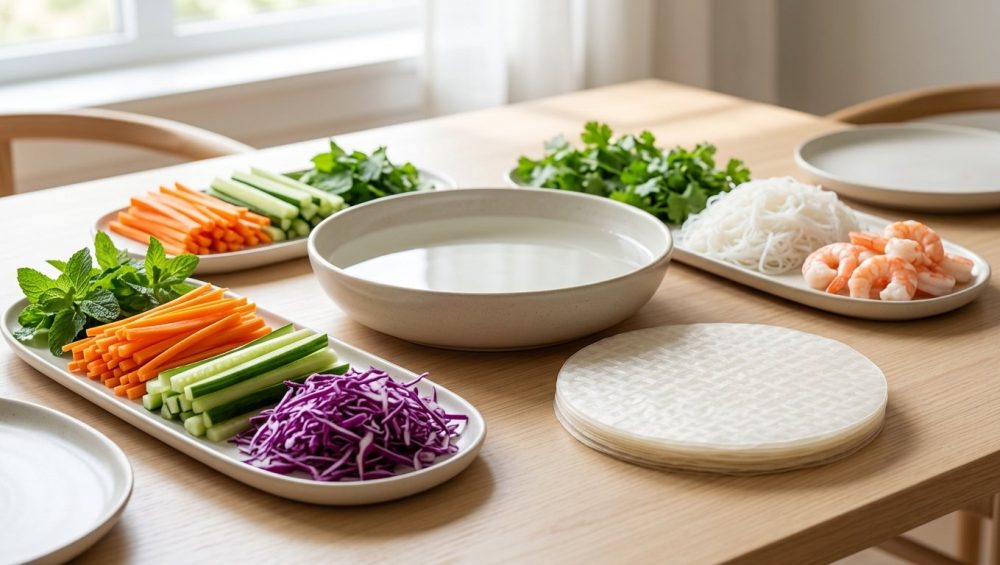
Listen up, weekend culinary warriors. We need to have a serious talk about the absolute tragedy happening in your kitchens on Friday nights. You invite your friends over, you chop a mountain of beautiful, vibrant vegetables, you lay out a gorgeous spread, and you confidently announce that you are doing a DIY fresh spring roll bar.
And then, the chaos begins.
Within ten minutes, your kitchen looks like a culinary crime scene. Your guests are aggressively wrestling with sticky, translucent blobs that resemble burst tires more than they do elegant Vietnamese gỏi cuốn. The rice paper is tearing, the shrimp is falling out, the noodles are everywhere, and everyone is secretly wishing you had just ordered a pizza.
I know this because I used to be that host. I learned to cook through sheer trial, error, and setting off my smoke detector enough times to be on a first-name basis with the local fire department. But here is the brutal, honest truth: your spring rolls aren’t tearing because you lack some innate, mystical chef talent. They are tearing because you are fighting the fundamental laws of food science, and honestly, your technique is a mess.
If you want to host a relaxed dinner party that actually lives up to your aesthetic Pinterest board expectations, you need to understand exactly how starch hydration works. Today, we are leaving the pretentious recipe jargon at the door and diving deep into the science, the gear, and the foolproof techniques required to master the mindful spring roll bar.
The Food Science of Rice Paper: Why Your Rolls Look Like Burst Tires
Before we can fix your disastrous rolling technique, we need to understand what you are actually working with. You cannot bully ingredients into submission; you have to understand their chemistry.
The Anatomy of Bánh Tráng
What we casually call “rice paper” in the West is traditionally known as bánh tráng in Vietnam. If you look at the ingredient list on a high-quality package, you will notice it is not just made of rice. A standard, structurally sound sheet is composed of roughly 70% to 75% milled white rice flour, 20% to 25% tapioca starch, and a tiny bit of water and salt.
This specific ratio is a masterclass in food engineering. The rice flour provides the structural backbone and the opaque, slightly chewy bite. But rice flour alone would be incredibly brittle. That is where the tapioca starch comes in. Tapioca provides the elasticity, the glutinous stretch, and that beautiful translucent sheen.
Starch Hydration and the Gelatinization Window
Here is where 99% of home cooks ruin their spring rolls before they even start assembling them: they fundamentally misunderstand how dried starch hydrates.
When you submerge dried bánh tráng in water, the starch granules begin to absorb liquid and swell. In the culinary science world, this is known as gelatinization. Tapioca and rice starches have a very specific peak viscosity temperature, usually around 62°C to 65°C (143°F to 149°F). If you expose these starches to temperatures higher than this, or if you leave them in the water for too long, they undergo what is known as hydration hysteresis.
In plain English? You overcook the starch. The microscopic structure of the paper suffers irreversible microfractures. It loses all of its tensile strength, turns into a gummy, sticky nightmare, and tears the second you try to stretch it over a piece of lettuce. You are essentially trying to build a house out of wet toilet paper.
The Golden Rules of Hydrating Rice Paper (Stop Using Boiling Water!)
Now that we know why your wrappers are failing, let’s fix your workflow. Throw out everything you thought you knew about prepping rice paper, because the traditional “home cook hacks” floating around the internet are completely wrong.
The Precise Water Temperature You Actually Need
If a recipe tells you to use boiling hot water to soften your rice paper, throw that recipe in the trash.
Hot water accelerates the gelatinization process so rapidly that you have zero margin for error. The second the paper hits hot water, it turns into a flaccid, sticky jellyfish. Instead, you need to use room temperature or slightly warm water (around 70°F to 80°F).
Yes, it takes a few seconds longer for the paper to soften in cooler water, but that is exactly what you want. You are buying yourself time. Slower hydration means the starches swell evenly without rupturing, giving you a wrapper that is pliable, stretchy, and incredibly strong.
The “Spin and Flick” Dipping Technique
Do not leave your wrapper in the water until it feels soft. I repeat: do not wait for it to get soft in the bowl.
If the wrapper feels perfectly soft and ready to roll while it is still submerged, it is already over-hydrated and will tear on your cutting board. The optimal submersion time for a standard sheet of rice paper in room-temperature water is exactly 5 to 8 seconds.
Use the “Spin and Flick” method:
- Hold the dry rice paper by the edge.
- Submerge the bottom half into your bowl of water.
- Spin it rapidly like a steering wheel so the entire surface gets wet.
- Pull it out of the water immediately. It should still feel completely stiff and rigid.
- Give it a firm flick over the bowl to shake off the excess water.
The Resting Phase: Let the Board Do the Work
Once you have flicked off the excess water, lay the stiff, damp rice paper flat on your rolling surface.
This is where the magic of capillary rebound happens. The residual water clinging to the surface of the paper will continue to absorb into the starches over the next 30 to 45 seconds. While you are busy piling on your shrimp, noodles, and herbs, the paper is silently doing the work for you. By the time you are ready to fold, the wrapper will have magically transformed from a stiff plastic-like disc into a perfectly pliable, stretchy, tear-resistant canvas.
Essential (And Safe) Gear for a Flawless Spring Roll Station
You know my absolute biggest pet peeve? When home cooks try to execute delicate culinary tasks using cheap, toxic garbage gear. We are banishing toxic kitchen gear from our lives today, because you cannot achieve professional results with equipment that actively fights against you.
Ditch the Toxic Plastics: Safe Water Bowls
Do not use those cheap, brightly colored melamine or flimsy plastic bowls to hold your dipping water. Not only are they an eyesore for your beautiful communal table, but many cheap plastics leach endocrine-disrupting chemicals and phthalates when exposed to moisture and varying temperatures.
Instead, invest in a wide, shallow ceramic bowl, a glass pie dish, or a dedicated stainless steel rice paper water bowl. They are heavy enough that they won’t tip over when your guests are aggressively spinning their wrappers, and they are completely inert and food-safe.
The Ultimate Rolling Surface: Wood vs. Plastic
This is the most critical gear choice you will make for your spring roll bar. What surface are you rolling on?
If you are using a flexible plastic cutting board, a silicone mat, or a synthetic rubber board, stop immediately. A terrifying 2023 study published in Environmental Science and Technology revealed that a single plastic cutting board can shed up to 50.7 million microplastic particles into your food every single year.
When you lay wet, sticky rice paper onto a heavily scored plastic cutting board, the glutinous tapioca starch acts like a magnet, pulling those microscopic plastic shards right out of the grooves and into your dinner. Nobody wants a side of high-density polyethylene with their peanut sauce.
Furthermore, plastic and silicone create too much surface tension. The rice paper will glue itself to the synthetic material, and when you try to lift the edge to roll it, it will tear.
You need a solid, high-quality hardwood cutting board—preferably edge-grain maple, walnut, or cherry. Wood is naturally antimicrobial, meaning it traps and deactivates bacteria deep within its cellular structure. More importantly for our spring rolls, wood is slightly porous. It absorbs just enough of the excess surface moisture from the rice paper to prevent food from sticking, while keeping the wrapper perfectly hydrated and intact.
Prepping the Fillings: Texture, Moisture, and Architecture
A spring roll is a masterclass in textural contrast. You need the chew of the wrapper, the snap of fresh vegetables, the slippery comfort of noodles, and the savory punch of a great protein. But if you prep these ingredients incorrectly, your roll will turn into a soggy, structural disaster.
The Protein Foundation: Shrimp, Pork, and Tofu
Your protein needs to be flavorful, but it also needs to be structurally sound.
If you are using shrimp, do not just boil them until they curl into tight, rubbery little tires. Nobody enjoys it when their shrimp tastes like rubber. Gently poach them in water flavored with a smash of ginger and a pinch of salt just until they turn pink. Once cooled, you must slice them in half horizontally (along the spine). This does two things: it gives you two pieces of shrimp for the price of one, and it ensures the shrimp lies completely flat against the rice paper, eliminating sharp edges that could puncture the wrapper.
If you are using pork, opt for thin slices of boiled or roasted pork belly, or heavily marinated lemongrass pork shoulder.
For a plant-based option, extra-firm tofu is mandatory. Press it well, slice it into long, thin matchsticks, and pan-fry it in a little sesame oil and soy sauce until the edges are deeply caramelized and chewy.
Noodles and Greens: Managing Moisture
Moisture is the enemy of a tightly wrapped spring roll. If your fillings are dripping wet, they will dissolve the rice paper from the inside out.
Use fine rice vermicelli noodles. Boil them according to the package directions, but as soon as they are tender, drain them and immediately rinse them under freezing cold water to stop the cooking process and wash away excess surface starch. Shake the strainer aggressively. Let them sit in the strainer for at least 15 minutes to air dry.
The same rule applies to your greens. Butter lettuce or soft bibb lettuce is ideal because the leaves are pliable. Wash them, but put them through a salad spinner until they are bone dry.
The Crunch Factor: Carrots, Cucumbers, and Herbs
This is where your knife skills are put to the test. Your crunchy vegetables—carrots, cucumbers, bell peppers—must be julienned into impossibly thin matchsticks.
If your knives get dull so fast because you’ve been abusing them on glass cutting boards, you are going to end up with thick, jagged chunks of carrot. Those chunky vegetables will act like little spears, poking right through your delicate rice paper the second you apply tension. Sharpen your chef’s knife, take your time, and cut uniform, elegant matchsticks.
Fresh herbs are non-negotiable. Mint, cilantro, and Thai basil are the holy trinity here. If you open your fridge and find that your herbs are looking a little limp and pathetic, do not panic. Snip the stems and submerge the leafy tops in a bowl of ice water for ten minutes to shock them and bring them back to life. Dry them thoroughly before adding them to your prep station.
The Architecture of a Perfect Roll (Step-by-Step)
You have hydrated your wrapper correctly. Your fillings are prepped, dry, and uniform. Now, it is time to build. Rolling a spring roll is an exercise in restraint and spatial awareness.
Layering for Visuals and Structural Integrity
The most common rookie mistake is overfilling the wrapper. You are making a delicate appetizer, not a massive San Francisco-style burrito.
Imagine your circular rice paper is divided into three horizontal zones. You are going to build your roll in the bottom third, closest to you.
- The Presentation Layer: The first thing you put down will be the most visible part of the final roll. This is the beautiful art of food plating translated into a wrapper. Lay three shrimp halves, cut-side up, in a neat row across the middle of the paper.
- The Structural Base: Moving to the bottom third of the paper (closest to your body), lay down a single, dry leaf of butter lettuce. This lettuce leaf acts as an internal moisture barrier, protecting the rice paper from the wet ingredients.
- The Core: Inside the little cup of the lettuce leaf, add a small pinch of sticky vermicelli noodles.
- The Crunch and Flavor: Top the noodles with a few matchsticks of cucumber and carrot, and a generous pile of fresh mint and cilantro leaves.
The Tuck and Roll Execution
Keep your hands dry.
- Lift the bottom edge of the rice paper (the side closest to you) and pull it tightly up and over the lettuce-wrapped core.
- Using your fingers, tuck the edge of the paper firmly under the filling, pulling back slightly to create tension. You want this core to be a tight, compact cylinder.
- Fold the left side of the wrapper in toward the center.
- Fold the right side of the wrapper in toward the center.
- Now, simply roll the tight cylinder forward, maintaining tension, until it rolls over the shrimp layer and seals itself at the top edge.
Because you used room-temperature water and allowed the paper to rest on a wooden board, it will have the perfect amount of sticky elasticity to seal itself without tearing.
Setting Up Your Mindful Spring Roll Bar
Now that you possess the technical knowledge, let’s talk about the vibe. We are moving away from the era of the stressed-out, sweating host who spends the entire dinner party trapped in the kitchen while the guests have fun without them.
The Communal Table Layout
According to the 2025-2026 HelloFresh State of Home Cooking report, a staggering 93% of Americans expect to cook as much or more at home in the coming year. The data shows a massive cultural shift: people are treating home cooking as a cure for the loneliness epidemic, prioritizing authenticity, flexibility, and shared experiences over rigid, artificially perfect dinner parties.
A DIY spring roll bar is the ultimate manifestation of this trend. It transforms dinner from a passive consumption event into an interactive, communal activity. hosting mindful gatherings means creating an environment where your guests feel involved and empowered.
To set this up successfully:
- The Hub: Place a large, gorgeous wooden cutting board in the center of your dining table. This will be the communal rolling surface.
- The Moat: Surround the board with small, aesthetic bowls containing your prepped, dry fillings. Group them logically: proteins together, crunchy veggies together, herbs together.
- The Hydration Stations: Depending on the size of your table, set up two or three shallow ceramic bowls filled with room-temperature water. Ensure everyone can reach a water bowl without having to stand up and reach across the table.
Pacing and Flow for a Relaxed Gathering
When your guests arrive, do not just throw them to the wolves. Pour everyone a glass of crisp, high-acid wine (a Sauvignon Blanc or a dry Riesling pairs beautifully with Vietnamese flavors), and perform a quick, confident demonstration.
Show them the “Spin and Flick” method. Show them how little filling to use. Let them watch you roll the first one. Then, sit back, sip your wine, and let the chaos unfold. Some guests will inevitably overfill theirs. Some will end up with weird, lopsided triangles. That is entirely the point. It sparks conversation, laughter, and a shared sense of accomplishment.
Dipping Sauces That Will Make You Cry Tears of Joy
A spring roll without a phenomenal dipping sauce is just a salad trapped in a raincoat. You need bold, aggressive flavors to cut through the fresh, raw vegetables. Do not buy the bottled stuff loaded with high-fructose corn syrup and preservatives. Making these sauces takes exactly five minutes.
The Ultimate Peanut Sauce
This is rich, savory, and dangerously addictive.
- 1/2 cup natural, unsweetened peanut butter (creamy)
- 2 tablespoons hoisin sauce
- 1 tablespoon low-sodium soy sauce
- 1 tablespoon fresh lime juice
- 1 teaspoon toasted sesame oil
- 1 clove garlic, finely grated
- 1 teaspoon freshly grated ginger
- Warm water to thin
Whisk everything together in a glass bowl. Slowly drizzle in warm water, one tablespoon at a time, whisking vigorously until the sauce reaches the consistency of heavy cream. Do not store the leftovers in cheap plastic tubs, because your plastic containers stay greasy forever when exposed to nut oils. Store it in a proper glass mason jar.
Nuoc Cham: The Sweet, Sour, and Funky Classic
If peanut sauce is heavy and comforting, nước chấm is the bright, acidic lightning bolt that wakes up your palate.
- 1/4 cup high-quality fish sauce (look for Red Boat or Three Crabs)
- 1/4 cup fresh lime juice
- 3 tablespoons warm water
- 2 tablespoons granulated sugar
- 2 cloves garlic, minced into a fine paste
- 1 or 2 Bird’s Eye chilies, thinly sliced (leave the seeds in if you want to sweat)
In a small bowl, combine the warm water and sugar, stirring until the sugar is completely dissolved. Add the fish sauce and lime juice, tasting as you go. You are looking for a perfect, aggressive balance of sweet, sour, and salty. Stir in the garlic and chilies right before serving so they stay fresh and pungent.
Troubleshooting Your Spring Roll Disasters
Even with the best instructions, things can go slightly sideways. Here is how to diagnose your failures on the fly:
Symptom: The rice paper is sticking to your fingers and tearing before you even add the filling.
Diagnosis: Your water is too hot, or you soaked it for far too long. Dump the water, refill it with room-temperature tap water, and limit your dip to 5 seconds.
Symptom: The wrapper splits open right down the middle while you are eating it.
Diagnosis: You got greedy. You overfilled the roll, placing too much tension on the wrapper. Reduce your filling volume by 30%.
Symptom: The roll is soggy and falls apart after sitting on the plate for five minutes.
Diagnosis: You didn’t dry your greens or noodles properly. Water pooled inside the roll and dissolved the starch from the inside. Buy a salad spinner and use it.
Symptom: The rolls are sticking to the serving platter and tearing when guests try to pick them up.
Diagnosis: Rice paper is incredibly glutinous. If you stack finished rolls on top of each other, they will fuse together permanently. Space them out on a lightly oiled platter, or wrap them individually in lettuce leaves. Having the essential tools every beginner needs—like a proper, wide serving platter that allows for spacing—prevents this entirely.
Wrap It Up (Pun Completely Intended)
Hosting a dinner party does not have to be a stressful, isolating experience where you are chained to the stove while your friends have all the fun in the living room. By embracing the communal nature of a DIY spring roll bar—and actually respecting the food science of the ingredients you are working with—you can create a memorable, interactive meal that feels effortless.
Stop boiling your rice paper. Stop rolling on toxic, microplastic-shedding synthetic boards. Prep your ingredients with respect, master the spin-and-flick, and let the starch hydration do the heavy lifting for you.
Now go pour yourself a glass of wine, set up that beautiful wooden board, and show your friends how a real weekend culinary hobbyist gets it done. Cheers.






