
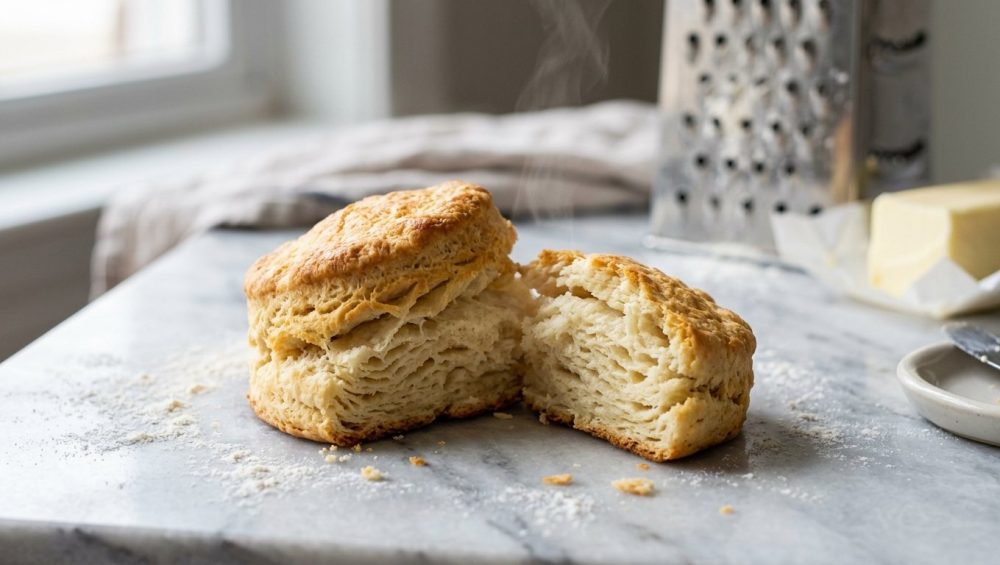
Look, we have all been there. You have made your fair share of rookie kitchen mistakes over the years, but pulling a tray of sad, dense, flour-tasting hockey pucks out of the oven on a Sunday morning is a special kind of culinary heartbreak. During the week, we are all about survival. We rely on clever shortcuts, thirty-minute skillet meals, and ruthless efficiency because time is money. But the weekend? The weekend is when we pour a cup of coffee, tie on an apron, and demand absolute perfection from our baking projects.
Baking is not just a chaotic mix of ingredients; it is a precise, unforgiving science. If you want to achieve bakery-level, sky-high, shatteringly flaky biscuits in a standard home kitchen, you cannot just throw some flour and fat into a bowl and hope for the best. You do not need a culinary degree to pull this off, but you absolutely need to understand the basic physics of what is happening inside your mixing bowl and your oven. Today, we are skipping the pretentious chef-speak and diving deep into the absolute magic of grating frozen butter. Grab your coffee, and let us fix your biscuits once and for all.
The Anatomy of a Biscuit Disaster: Why You Are Baking Hockey Pucks
Before we can build the ultimate biscuit, we have to understand why your previous attempts have failed so miserably. The truth is, biscuit dough is incredibly temperamental, and it will punish you for two very specific crimes: overworking the flour and melting the fat. If you can master these two variables, you will never bake a bad biscuit again.
The Gluten Trap: Overworking the Dough
Flour contains two vital proteins: glutenin and gliadin. When these proteins come into contact with a liquid—like buttermilk—they bond together to form a highly elastic network known as gluten. Now, if you are baking a chewy, artisan sourdough bread, gluten is your absolute best friend. You want to knead that dough aggressively to build a strong, stretchy structure.
But in the world of tender, flaky pastries? Gluten is your worst enemy. Every single time you stir, fold, knead, or even aggressively glare at your biscuit dough, you are developing more gluten. Over-mixing biscuit dough activates too much gluten development, resulting in a tough, chewy texture. If you treat your biscuit dough like bread dough, you will end up with a dense, heavy rock that requires a steak knife to cut through. You want just enough gluten to hold the ingredients together in a shaggy, ugly mess, and not a single strand more. This is also why accurate measurements matter; using a digital kitchen scale ensures you are not packing too much flour into the bowl, which would require more liquid and more mixing to hydrate.
The Butter Meltdown: When Warm Hands Ruin Everything
The second and arguably most devastating mistake home bakers make is allowing their butter to get warm. Your hands are essentially 98.6-degree meat heaters. When you use your bare hands to rub room-temperature butter into flour, the butter melts. When butter melts into flour before it hits the oven, it coats the flour particles entirely. This prevents the flour from absorbing the buttermilk properly and completely destroys any chance of creating distinct, flaky layers. Instead of a towering biscuit, you end up with a crumbly, greasy, shortbread-like disc. If your butter is soft enough to smear, you have already lost the battle.
The Thermodynamics of Pastry Fats: A (Painless) Science Lesson
To truly appreciate the frozen butter hack, we need to briefly talk about thermodynamics. I promise there will not be a pop quiz, but understanding the behavior of fat and water under high heat is the secret to unlocking professional-level pastries. I highly recommend picking up a simple oven thermometer before attempting this, because if your oven is running fifty degrees cooler than it claims, none of this science will work.
How Steam Creates Flaky Layers
Butter is not just pure fat; it is actually a delicate emulsion. In the United States, standard commercial butter is composed of roughly 80 percent butterfat, 16 to 18 percent water, and 1 to 2 percent milk solids. When cold, molecules of water, which are distributed amongst the fat molecules, are held firmly in place.
When you cut cold butter into your flour, you are creating tiny pockets of fat suspended throughout the dough. When that freezing cold dough is thrust into a blazing hot 425-degree oven, a violent and beautiful thermal reaction occurs. The fat immediately melts, separating the layers of flour. Simultaneously, at about 212 degrees Fahrenheit, the water in the dough turns into steam. Because water expands by roughly 1,600 times its volume when it converts to steam, this sudden burst of vapor violently pushes the layers of dough upward. That steam pushes the dough apart, creating the flaky, layered texture. If the butter was already warm and melted into the flour, there are no suspended water pockets, no steam expansion, and absolutely no flaky layers.
Water Content in Butter: European vs. American
You will often hear pretentious bakers insisting that you must use expensive European butter for all your baking. European butter typically contains 82 to 84 percent butterfat, meaning it has a lower water content than American butter. While European butter is undeniably superior for laminating croissants or baking rich brioche, standard American butter is actually the secret weapon for biscuits. That slightly higher water content (around 18 percent) provides a more aggressive burst of steam in the oven, resulting in a taller, fluffier lift. Save your expensive, high-fat cultured butter for spreading on top of the finished product, and use the standard supermarket sticks for the dough itself.
The Magic of Grating Frozen Butter: The Ultimate Weekend Hack
For generations, recipes have instructed home cooks to cut cold butter into flour using a pastry blender or two forks. Let me be brutally honest: this method is tedious, annoying, and wildly inefficient. By the time you finally manage to break the butter down into pea-sized pieces, the ambient temperature of your kitchen and the friction of the process have already started to soften the fat.
This is where the magic happens. Some bakers even freeze their butter and grate it directly into the flour using a box grater. This is not just a fun kitchen trick; it is a scientifically sound method for achieving flawless fat distribution while keeping the temperature of the emulsion as low as physically possible.
Why Grating Beats the Pastry Cutter
When you freeze a stick of butter solid and run it down the large holes of a box grater, you instantly produce hundreds of perfectly uniform, paper-thin shards of butter. Because the butter is frozen solid, it does not smear or melt into the flour. Because the shards are so thin, they distribute evenly throughout the dry ingredients in a fraction of the time it would take to use a pastry blender. You keep your warm hands out of the bowl, you cut your prep time in half, and you guarantee that the fat stays in its crucial solid state.
The Surface Area Equation
The genius of the grating method comes down to surface area. A solid cube of butter has a relatively small surface area, meaning it takes a lot of mechanical mixing to break it down and coat it in flour. Hundreds of grated shards, however, have a massive collective surface area. The moment you toss them into the bowl, they are instantly and perfectly coated in flour. You barely have to mix the dough at all. Less mixing means less gluten development. Less gluten development means a tender, melt-in-your-mouth biscuit. And please, for the love of all things holy, stop scooping your flour directly out of the bag with a measuring cup. Weigh your dry ingredients to ensure the hydration ratio is exactly right, allowing those butter shards to do their job without fighting through a dense, over-floured dough.
The Sassy Sous-Chef’s Masterclass: The Step-by-Step Grating Method
Now that you understand the thermodynamics and the physics behind the flake, it is time to put it into practice. This is my foolproof, step-by-step masterclass for building the ultimate biscuit. Follow these instructions exactly, and you will be pulling bakery-quality masterpieces out of your oven every single time.
Step 1: The Deep Freeze
Do not just put your butter in the refrigerator; it needs to be rock solid. Place your sticks of butter in the freezer for at least 45 minutes before you plan to bake. In fact, if I know I am making biscuits on a Sunday morning, I will toss the butter in the freezer on Saturday night. While you are at it, put your stainless steel mixing bowl and your box grater in the freezer for ten minutes, too. We are fighting a war against heat, and cold equipment is your best line of defense.
Step 2: The Grate and Toss
Whisk your dry ingredients together in your chilled bowl. Take your frozen butter out of the freezer. Work quickly. Grate about one-quarter of the stick of butter on the large holes of the box grater, then immediately toss those shards into the flour mixture so they are completely coated. Do not grate the entire stick at once, or the shards will clump together into a giant, frozen snowball of fat, completely defeating the purpose of the exercise. Grate, toss, grate, toss. Once all the butter is incorporated, the mixture should look like a bowl of flour with hundreds of tiny, distinct, butter-coated ribbons suspended throughout.
Step 3: The Buttermilk Bind
Make sure your buttermilk is straight out of the fridge. Do not let it sit on the counter. Buttermilk is not just for flavor; its acidity reacts violently with the baking soda in your dry ingredients, creating carbon dioxide gas that provides a secondary, chemical leavening lift to complement the steam. Pour the cold buttermilk into the center of the bowl. Using a fork or a wooden spoon, gently toss the mixture. Do not stir it like you are beating cake batter. Toss it just until the liquid is absorbed and the dough looks like a shaggy, dry, hideous mess. If it looks smooth, you have already ruined it.
Step 4: The Fold (Lamination for the Lazy)
Turn that shaggy mess out onto a lightly floured surface. If the dough is aggressively sticking to the counter, you desperately need a bench scraper to help lift and fold it without using your warm hands. Gently pat the loose dough into a rough rectangle. Now, fold it in half like you are closing a book. Pat it down into a rectangle again. Fold it in half again. Repeat this process three or four times.
This technique is a lazy version of lamination—the exact same process pastry chefs use to make croissants. By folding the dough over itself, you are physically stacking alternating layers of flour and butter. When that steam expands in the oven, those horizontal stacks will separate, giving you those glorious, pull-apart layers that you can peel off one by one.
Essential Gear: What You Need (And What Belongs in the Trash)
You cannot build a masterpiece with garbage tools. I am a firm believer that anyone can cook like a pro in a standard home kitchen, but you have to respect your ingredients by using the right equipment.
The Box Grater: Ditch the Rusty Mystery Metal
If your box grater is a flimsy, lightweight piece of aluminum that you bought for two dollars at a discount store ten years ago, throw it in the trash. I have absolutely zero patience for cheap, toxic kitchen gear that bends under pressure or flakes mystery metallic coatings into your food. Invest in a heavy-duty, professional-grade stainless steel box grater. It needs to be razor-sharp to slice through frozen butter without mashing it, and it needs to be made of non-reactive, food-safe steel that will not rust or degrade over time.
The Mixing Bowl: Why Heavy Stainless Steel Wins
Ditch the plastic mixing bowls for this project. Plastic is an insulator; it holds onto ambient room temperature and will actively work against your efforts to keep the butter cold. Glass is better, but it is heavy and takes a long time to chill. A heavy-gauge stainless steel mixing bowl is the ultimate vessel for biscuit making. It has excellent thermal mass, meaning when you stick it in the freezer for ten minutes, it gets ice cold and stays cold while you are working the dough. Just like how bamboo cutting boards are notorious for ruining the edge of an expensive chef’s knife, using the wrong material for your mixing bowl will subtly sabotage your baking process before you even begin.
The Biscuit Cutter: Stop Twisting!
This is the hill I will die on. When you are ready to cut your biscuits, use a sharp, metal biscuit cutter. Press it straight down into the dough, and pull it straight back up. If you take nothing else away from this entire masterclass, please stop twisting the biscuit cutter when you punch out your dough. When you twist the cutter, the friction physically seals the edges of the dough together. You are essentially locking the doors and trapping the steam inside. The steam cannot push the layers upward, and your biscuit will bake into a dense, lopsided lump. Press straight down, pull straight up, and let those layers breathe.
Troubleshooting Your Biscuit Woes
Even with the frozen butter hack, things can occasionally go sideways if your environment or your oven is fighting against you. Here is how to diagnose and fix the most common biscuit catastrophes.
Why They Spread Instead of Rising
If your biscuits spread out into flat, wide puddles instead of rising straight up, you have a temperature problem. Either your oven was not hot enough (which is why you need that independent thermometer), or your butter got too warm before the pan went into the oven. If your kitchen is particularly hot, or if the dough took you a little too long to fold, pop the entire baking sheet of cut biscuits into the freezer for ten minutes right before baking. This re-chills the fat and guarantees maximum steam expansion.
Why They Burn on the Bottom
If the tops of your biscuits are pale but the bottoms are charred black, your baking sheet is the culprit. Thin, flimsy, dark-coated non-stick baking sheets absorb heat far too aggressively. If you have ever heard your baking sheets pop violently in the oven, you know that cheap metal warps under high heat and conducts temperature unevenly. Switch to a heavy-duty, bare aluminum half-sheet pan. Aluminum reflects heat evenly, ensuring a perfectly golden-brown bottom without scorching. If your oven has a particularly aggressive bottom heating element, double-pan your biscuits (stack one baking sheet on top of another) to provide a layer of insulation.
Why They Taste Like Flour
If your biscuits have a chalky, raw flour taste, your hydration ratio is off. This almost always happens because you scooped your flour out of the bag, packing it down and accidentally adding twenty percent more flour than the recipe intended. The dough became too dry, the buttermilk could not hydrate all the starches, and the baking soda did not have enough liquid to react with properly. Weigh your ingredients. It takes exactly three seconds longer and eliminates this problem entirely.
Storing and Reheating: Respecting the Flake
Biscuits are ephemeral creatures. They are at their absolute, undeniable peak about ten minutes after they come out of the oven. If you are baking a batch for a weekend brunch, time it so they hit the table right as everyone is pouring their coffee. However, we do not waste good food in this house, so you need to know how to handle the leftovers.
Freezing Unbaked Dough
The absolute best way to have fresh biscuits on a random Tuesday morning is to freeze the raw dough. After you cut your biscuits, place the extras on a parchment-lined baking sheet and freeze them solid. Once they are frozen, transfer them to a heavy-duty freezer bag. When you want a fresh biscuit, do not thaw them. Just place the frozen dough directly onto a baking sheet and bake them at the standard temperature, adding about three to five extra minutes to the baking time. The frozen butter hack works beautifully here, as the extreme cold ensures an incredible rise.
Reviving Day-Old Biscuits
If you have already baked the biscuits and need to reheat them the next day, step away from the microwave. Microwaving a biscuit destroys the delicate structure of the starches, turning a tender pastry into a chewy, rubbery sponge. Instead, wrap the leftover biscuits tightly in aluminum foil and place them in a 350-degree oven for about ten minutes. The foil traps the residual moisture, gently steaming the interior back to life while the oven heat crisps up the exterior crust. And please, use a proper metal baking sheet for this. We all know someone whose glass baking dish shattered under high heat, and nobody wants to spend their morning cleaning up glass shards instead of eating breakfast.
The Final Verdict on Flaky Biscuits
Baking the perfect biscuit does not require a magical touch, a secret family recipe passed down through generations, or years of culinary school. It requires a fundamental respect for your ingredients and an understanding of the thermodynamics of fat and steam.
By freezing your butter and grating it directly into your dry ingredients, you are bypassing all the tedious, warmth-generating labor of traditional pastry blending. You are maximizing surface area, minimizing gluten development, and setting up the perfect environment for explosive, steam-powered lift in the oven.
So the next time you find yourself craving a sky-high, buttery, shatteringly crisp biscuit on a lazy weekend morning, do not reach for the canned dough in the refrigerated aisle. Grab your box grater, freeze your butter, and let the science do the heavy lifting. You will save your hands, you will save your sanity, and you will pull a tray of absolute perfection out of your oven every single time. Now go preheat that oven, and show that dough who is boss.






