
Picture this: It is a beautiful Sunday morning. You have decided to treat yourself and your family to a proper, bakery-level weekend breakfast. You have painstakingly sourced high-fat European butter. You have purchased real, full-fat cultured buttermilk. You have followed the recipe to the absolute letter, treating the dough with the reverence of a newborn child. You slide the baking sheet into the oven, anticipating towering, golden-brown skyscrapers of flaky perfection.
Twenty minutes later, you pull out… hockey pucks. Dense, squat, uninspired little discs that look more like savory coasters than the majestic, towering biscuits you were promised.
You are devastated. You blame the recipe. You blame your oven’s calibration. You might even blame the ambient humidity in your kitchen. But I am here to tell you, with all the tough love and snark in my culinary heart, that the recipe is fine. Your oven is fine. The weather is completely irrelevant. The problem, my friend, is your hands.
Specifically, the problem is that instinctual, seemingly harmless little flick of the wrist you execute when you punch out the dough.
You are twisting the biscuit cutter.
And in doing so, you are committing absolute culinary sabotage.
As a busy professional and a home cook who has set off the smoke detector more times than I care to admit, I know the profound frustration of a failed weekend baking project. I survive the chaos of weekday meals by ruthlessly prioritizing efficiency and clever shortcuts, which buys me the time to be an absolute, unapologetic perfectionist on the weekends. I firmly believe that anyone—and I mean anyone—can achieve mind-blowing, professional-level food in a standard home kitchen without a pretentious culinary degree. But to do that, we have to stop relying on blind luck and start understanding the actual physical mechanics of our food.
Today, we are going to dive deep into the anatomy of a biscuit. We are going to look at the microscopic structure of gluten, the thermodynamic power of steam, and exactly why that little twist of the wrist is ruining your breakfast. More importantly, I am going to teach you the straight-down pressing technique that will guarantee maximum structural height and tender, flaky layers every single time, without you having to alter a single chemical ratio in your favorite recipe.
Grab a cup of coffee. We have some dough to fix.
The Anatomy of a Flaky Biscuit: Architecture in the Kitchen
To understand why twisting the cutter is a federal crime in the baking world, we first have to understand what a biscuit actually is. A truly great biscuit is not a solid, homogenous mass of dough. It is an architectural marvel. It is a delicate, temporary high-rise built on the foundational principles of thermal dynamics, gluten management, and loose lamination.
The Matrix of Flour and Fat
When you mix biscuit dough, you are not aiming for a smooth, cohesive paste. If your biscuit dough looks like perfectly smooth play-dough, you have already failed. You are actually creating a delicate suspension. Tiny, distinct pockets of solid, ice-cold fat—usually butter, because we respect ourselves and our tastebuds in this kitchen—must remain suspended in a matrix of flour and liquid.
The flour provides the structural integrity. When wheat flour meets a liquid like buttermilk, two naturally occurring proteins called gliadin and glutenin link together to form a highly elastic web known as gluten. In bread baking, we want a strong, intensely developed gluten network, which is why we knead yeast dough aggressively. But in biscuit baking, gluten is a necessary evil. We need just enough of it to hold the biscuit together so it doesn’t crumble into dust upon taking a bite, but if we develop too much, the biscuit becomes incredibly tough and chewy.
The Magic of Loose Lamination
This brings us to the concept of lamination. In professional pastry kitchens, strict lamination is the grueling process used to make croissants and puff pastry. It involves pounding a solid block of butter, encasing it in a yeast or water-based dough, and meticulously rolling and folding it multiple times to create hundreds of alternating, microscopic layers of fat and dough.
Biscuits rely on a much faster, much more forgiving version of this process called “loose lamination.” By leaving the butter in discrete, pea-sized chunks (or choosing to grate your frozen butter directly into the dry ingredients), and then gently folding the dough over itself a few times, you create rough, alternating tiers of fat and flour. You are manually building the scaffolding for your biscuit’s vertical rise.
The Engine of Expansion: Steam
These layers of cold butter are the literal engines of your biscuit’s rise. When the raw dough hits the intense heat of the oven, the water trapped inside the butter (American butter is typically about 15% to 18% water) rapidly heats up. At 212°F (100°C), that water vaporizes into steam.
When water turns to steam, it expands to roughly 1,600 times its original liquid volume. Because the steam is trapped between the layers of the dough matrix, it pushes upward, physically lifting the layers apart. This violent vertical expansion, aided by the chemical reaction of your baking powder and baking soda, is what creates those glorious, flaky, pull-apart tiers.
But this entire miraculous thermodynamic process relies on one crucial, non-negotiable physical condition: the edges of the dough must remain open and unsealed so the layers can freely separate and rise.
The Crime: Why We Twist and What It Physically Does
If open edges are the secret to a towering biscuit, why do so many home cooks instinctively twist the cutter?
The Psychological Urge to Twist
I get it. The twist feels completely natural. It is an instinctual, deeply ingrained human habit. You press a round metal object into a yielding slab of dough, and your brain immediately tells you to give it a little spin. It feels satisfying. It feels like you are “securing” the cut, ensuring that the biscuit is completely severed from the surrounding scrap dough. It feels like a necessary flick of the wrist to release the dough from the cutter so you can transfer it to the pan.
But the kitchen does not care about what feels satisfying to your wrist. The kitchen operates on physics. And physically, that twisting motion is a disaster.
The Ziploc Bag Effect
Imagine a stack of individual post-it notes sitting on your desk. If you press a razor-sharp blade straight down through the stack, you cut the paper, but the individual sheets remain separate. You can easily fan them out with your thumb.
Now, imagine taking that same stack of post-it notes, pressing a dull blade into them, and fiercely twisting it. You would smear the edges of the paper together, mashing the fibers into a compressed, inseparable wall.
This is exactly what happens to your biscuit dough. When you twist the cutter, the friction of the metal (or worse, the plastic) drags the layers of dough horizontally. It takes the distinct, carefully laminated tiers of flour and butter and smears them together. You are essentially pinching the edges of the dough closed, sealing them shut much like you would seal the interlocking tracks of a Ziploc bag.
The Death of the Rise
By twisting the cutter, you have created a structural cage around the perimeter of your biscuit. You have physically fused the gluten strands and the fat layers together into an impenetrable wall.
When this sealed biscuit goes into the oven, the internal chemistry still happens. The butter still melts. The water still turns to steam. The baking powder still produces carbon dioxide gas. The interior of the biscuit desperately wants to expand upward.
But it can’t.
The sealed outer wall acts as a straightjacket. The expanding steam hits the fused edges, realizes it cannot push upward, and takes the path of least resistance. The biscuit spreads outward, becoming wide and squat, or the internal pressure builds until it violently ruptures out of one weak side, resulting in a lopsided, leaning tower of disappointment. You have robbed the dough of its vertical potential simply by rotating your wrist.
The Fix: The Straight-Down Press Technique
The solution to this widespread baking tragedy is shockingly simple, yet it requires a conscious rewiring of your muscle memory. You must master the straight-down press.
Flouring the Cutter
Before you make a single cut, you need to prepare your tool. Dip the cutting edge of your biscuit cutter into a small bowl of all-purpose flour, tapping off the excess. This creates a micro-barrier of dry powder that prevents the wet, sticky dough from adhering to the metal. You should re-flour the cutter between every single punch. If the dough sticks to the inside of the cutter, it will stretch and tear the gluten strands when you try to remove it, which damages the delicate layers you just spent time building.
The Punch and Pull
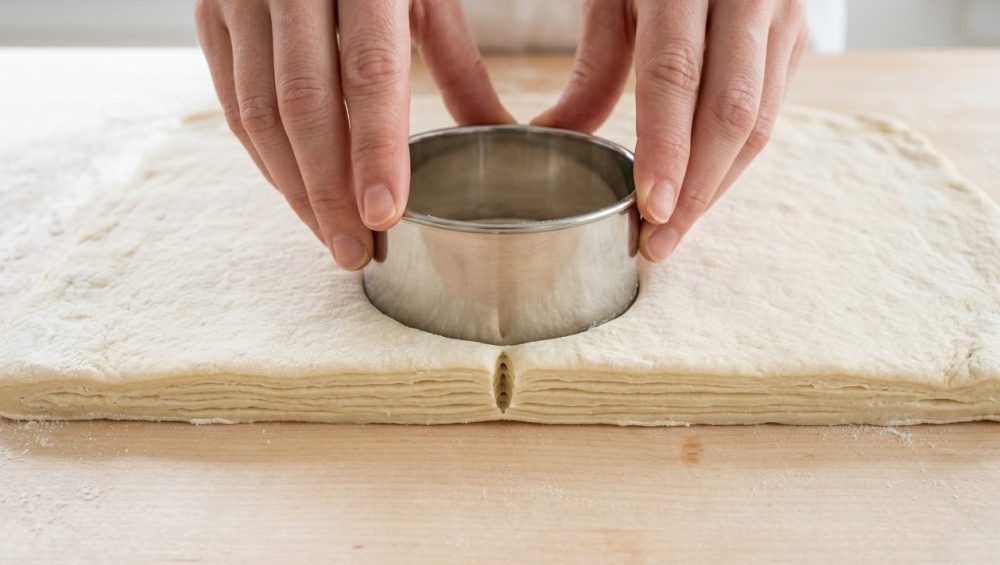
Position your floured cutter over the edge of the dough. Take a breath. Now, press the cutter straight down into the dough with firm, even pressure until you feel the distinct, hard resistance of your cutting board or countertop beneath it.
Do not hesitate. Do not wiggle. And absolutely, under penalty of a ruined brunch, do not twist.
Once you have made contact with the board, lift the cutter straight back up into the air. If the biscuit comes up with the cutter, gently tap the side of the metal or lightly push the dough out from the top using your fingers. If the biscuit stays on the board, perfect. Move on to the next cut, placing the cutter as close to the previous hole as possible to minimize scrap dough (because re-rolled scraps are always tougher than the first cut).
The Gear: Stop Using Garbage Cutters
I have a very strict, non-negotiable rule in my kitchen, and it applies to everyone who wants to cook like a pro: we do not use cheap, toxic kitchen gear that actively sabotages our efforts. I despise peeling non-stick coatings, mystery metal pans that warp when you look at them, and flimsy plastic tools that belong in a child’s sandbox, not a serious culinary workspace.
When it comes to biscuits, your tool of choice matters just as much as your technique.
The Problem with Plastic and Glass
If you are using a plastic biscuit cutter, throw it in the recycling bin immediately. Plastic cannot hold a truly sharp edge. Even if you press straight down without twisting, the dull, thick rim of a plastic cutter will naturally compress and pinch the edges of the dough as it forces its way through. It acts more like a blunt force instrument than a precision cutting tool.
The same goes for the old “drinking glass” trick. Yes, your grandmother might have used an inverted mason jar or a water glass to cut her biscuits. But unless you have your grandmother’s magical, decades-honed touch, a thick glass rim is going to smash your dough layers together, effectively sealing the edges just as badly as a twisting motion would.
The Superiority of Stainless Steel and Copper
You need a tool that shears cleanly through the dough matrix with zero drag. You want a heavy-duty stainless steel or copper biscuit cutter with a rolled top edge (so you don’t slice your own hand open when applying pressure) and a razor-thin cutting edge on the bottom.
Metal cutters are rigid, they hold a sharp edge indefinitely, and they do not flex under pressure. When you press a sharp metal cutter straight down, it acts like a guillotine, cleanly severing the gluten strands and butter layers without compressing them.
Furthermore, think about what you are baking them on. A high-quality, heavy-gauge aluminum or stainless steel baking pan is absolutely essential. Flimsy pans lead to poor heat retention. Also, while we are on the subject of baking surfaces, you should skip the silicone baking mats when making biscuits. Silicone is a thermal insulator. It prevents the rapid transfer of heat from the metal pan to the bottom of the dough. For biscuits, you want that intense, immediate conductive heat to crisp the bottom and shock the butter into steam. Bake them on unbleached parchment paper or directly on a lightly greased heavy metal pan.
The Lamination Masterclass: Beyond the Cut
Okay, so you have a sharp metal cutter and you have sworn a blood oath to never twist it again. You are ready to execute the straight-down press. But to get those towering, bakery-style layers, we have to make sure the layers actually exist in the dough before you even pick up the cutter.
The Envelope Fold
As we discussed, biscuits rely on loose lamination. You don’t need to spend three days folding dough like you would for a traditional French pastry. But you do need to introduce some intentional structure to the chaos.
Once your shaggy dough comes together in the bowl, turn it out onto a lightly floured surface. Pat it out gently with your hands into a rough rectangle. Do not use a rolling pin yet; rolling pins compress the dough too aggressively at this stage. Now, fold the dough into thirds, exactly like you are folding a business letter to put into an envelope. Bring the left third over the center, then fold the right third over that.
Turn the dough 90 degrees, pat it out gently again, and repeat the fold. Do this three or four times. You are manually stacking alternating layers of flour and butter.
To keep the dough from sticking to your counter and tearing those precious layers, use a metal bench scraper to cleanly lift and fold the dough. This simple, brilliant tool prevents the ambient heat of your hands from melting the butter and ensures sharp, clean folds without adding excess flour.
Temperature is Everything
Throughout this entire folding process, time is money, and temperature is your absolute master. The butter must remain solid. If your kitchen is hot, or if you take too long answering a text message, the butter will begin to soften and bleed into the flour.
If you are making pie dough, you might rely on the chilled vodka trick to inhibit gluten formation while keeping the dough hydrated and workable. For biscuits, we rely purely on speed and intensely cold buttermilk. If at any point the dough feels warm, greasy, or overly soft, stop what you are doing immediately. Put the entire slab of dough on a plate and place it in the refrigerator for fifteen minutes to firm up. You cannot fake cold butter.
Troubleshooting Other Flat Biscuit Culprits
You didn’t twist the cutter. You folded the dough beautifully. You used a razor-sharp stainless steel cutter. But your biscuits still came out looking like sad, anemic hockey pucks. What gives?
Baking is a science, and there are a few other variables that can easily sabotage your rise. Let’s troubleshoot the most common rookie mistakes.
The Flour Density Trap
Baking requires precision. Volume measurements (like standard measuring cups) are inherently flawed because flour is a highly compressible ingredient. If you dip your measuring cup directly into the bag of flour and pack it against the side to level it off, you are easily adding 20% to 30% more flour by weight than the recipe actually intended.
This excess flour completely throws off the hydration ratio. The dough becomes incredibly stiff, dry, and heavy. The steam generated by the butter simply doesn’t have the kinetic energy required to lift that dense, heavy matrix of extra flour. If you want fluffy, tender biscuits, you have to stop scooping your flour blindly from the bag.
The only way to guarantee consistent, professional results is by measuring your ingredients by weight. The absolute best investment you can make for your baking journey is a digital kitchen scale. It eliminates the guesswork, ensures a perfectly hydrated, tender crumb, and ironically, saves you time on washing multiple measuring cups.
Overworked Gluten
We touched on gluten earlier, but it bears repeating: handle the dough as little as humanly possible. Every single time you knead, press, or roll the dough, you are encouraging those gliadin and glutenin proteins to form stronger, tighter bonds.
An overworked dough becomes highly elastic. When you cut it, you will actually see the circles shrink back into smaller ovals. When you bake it, that tough, rubbery gluten network acts like a net, trapping the steam and preventing the biscuit from rising. The dough should look shaggy and slightly chaotic when you turn it out. Embrace the mess.
Warm Butter and Dead Leaveners
If your butter melts before it hits the oven, you lose your steam pockets entirely. The fat simply absorbs into the flour, resulting in a crumbly, dense texture rather than a flaky one. If your kitchen is sweltering in the middle of July, a brief stint of resting your dough in the freezer for ten minutes right before baking will re-solidify the butter and guarantee a massive rise.
Finally, check your expiration dates. Baking powder and baking soda lose their chemical potency over time. If your baking powder has been sitting open in the pantry since the last presidential election, it is dead. It will not produce the carbon dioxide gas needed for lift. Toss it in the trash and buy a fresh container.
The Oven Environment: Heat and Placement
The final piece of the puzzle is the baking environment itself. You have perfectly cut, unsealed biscuits. Now they need the right thermal shock to reach their full potential.
The Need for High Heat
Biscuits are not a low-and-slow food. They require a violent, immediate shock of thermal energy. You need a blast of high heat—usually between 425°F and 450°F (220°C to 230°C)—to instantly vaporize the water in the butter into steam and rapidly activate the baking powder before the gluten structure has a chance to set and harden.
If you bake biscuits at 350°F, the butter slowly melts and leaks out onto the pan before the steam can expand. The result is a flat, greasy biscuit sitting in a puddle of its own fat. Make sure your oven is fully preheated for at least twenty minutes before you slide the pan in. And if you are constantly dealing with warping your baking sheets the moment they hit a hot oven, you need to upgrade to a commercial-grade aluminum half-sheet pan that can handle the intense thermal shock without buckling and throwing your biscuits off-kilter.
The Buddy System
Here is a final pro-tip for maximum height: biscuits like to hold hands.
When you place your cut dough rounds onto the baking sheet, do not space them two inches apart like you would with chocolate chip cookies. Instead, place them so their edges are just barely touching each other.
As they bake and expand, they will push against one another. Because they cannot expand outward into their neighbor, they are forced to expand upward. This “buddy system” provides mutual structural support, helping the biscuits climb higher and straighter, resulting in incredibly soft, pull-apart edges that are shielded from the harsh, drying heat of the oven.
Go Forth and Bake
You now possess the scientific knowledge and the technical prowess to conquer the weekend biscuit. You understand the delicate architecture of lamination, the explosive power of steam, and the absolute necessity of open, unsealed edges.
Cooking is not magic. It is applied physics, chemistry, and a healthy dose of stubbornness. You do not need a culinary degree to make mind-blowing food in your home kitchen. You just need to understand the why behind the how.
So, throw away your flimsy plastic cutters. Chill your butter until it’s rock solid. Fold your dough with intention. And for the love of all things holy in the culinary world, when you press that sharp metal cutter into the dough, press it straight down and lift it straight up.
No twisting. No exceptions.
Now get into the kitchen, make a mess, and bake some biscuits that will make your weekend brunch guests weep with joy. You’ve got this.






