
The Breakfast Betrayal: Why Your Bacon Is Sabotaging You
Let’s set the scene. It is Saturday morning. You have finally managed to sleep past 6:00 AM, the coffee is brewing, and you are ready to treat yourself to a proper, diner-style breakfast. You pull a beautiful, expensive package of thick-cut bacon out of the fridge. You preheat your favorite skillet until it is screaming hot, just like you would for a steak. You toss the strips in, anticipating that glorious sizzle. But instead of laying flat and rendering into crispy, golden perfection, the strips immediately seize up. They contort, they twist, and they violently spit hot grease all over your stovetop and forearms. Ten minutes later, you are left nursing a grease burn and chewing on a sad, rubbery, U-shaped piece of meat with aggressively burnt edges.
Congratulations. You have just been betrayed by your breakfast. But here is the brutal truth: it is not the bacon’s fault. It is yours.
You are certainly not alone in this culinary struggle. As a nation, our obsession with this cured meat is practically a recognized religion. Americans consume roughly 18 pounds of bacon per capita every single year, driving a massive industry where domestic retail sales easily eclipse the $5 billion mark annually. We put it in our burgers, we crumble it over our salads, we wrap it around dates, and we even bake it into our donuts. Yet, despite this overwhelming national devotion, the vast majority of weekend culinary hobbyists are completely destroying it in the pan.
Why? Because we are impatient, and because we fundamentally misunderstand the food science of rendering fat. Cooking is not magic; it is applied thermodynamics. When you understand how heat interacts with different biological tissues, you stop hoping for good results and start guaranteeing them. It takes zero culinary school debt to master this. You just need to unlearn a few bad habits, embrace a little bit of patience, and learn why starting your breakfast in a cold skillet is the ultimate game-changer. Grab your coffee, and let’s get into the science of the perfect crisp.
The Anatomy of a Bacon Strip: A Tale of Two Tissues
To understand why your breakfast keeps curling up into a defensive posture, we have to look at what you are actually throwing into the pan. Bacon is not a uniform, homogenous block of protein like a chicken breast or a tofu slab. It is a highly complex, interwoven matrix of muscle, fat, and connective tissue, and each of these components reacts to heat in violently different ways.
When you look at a standard strip of streaky pork belly, you are looking at three primary elements. First, you have the lean muscle tissue (the pink or red meat). Second, you have the adipose tissue (the white fat). Third, you have a network of connective tissues holding it all together. From a chemical standpoint, a raw strip contains approximately 20% bound water that is physically trapped inside its myofibrillar proteins, roughly 35% triglyceride fat (primarily composed of oleic and palmitic acids), and about 3% connective tissue collagen.
When you apply heat to this complex biological matrix, a microscopic tug-of-war begins. The water wants to evaporate and escape as steam. The adipose tissue wants to melt and liquefy into a cooking oil. The lean muscle fibers and collagen want to seize, contract, and shrink.
If you force all three of these extreme physical reactions to happen simultaneously at high speed by tossing the meat into a scorching hot environment, you are essentially creating a chaotic thermal car crash. The different tissues cannot shrink and render at the same pace, which causes the physical structure of the strip to warp and buckle under the stress. To prevent the buckle, you have to control the speed of the chemical reactions.
The Grocery Store Gamble: Choosing the Right Bacon
Before we even touch a stove, we need to address the raw materials. You cannot achieve professional-level results if you are starting with paper-thin, water-logged meat.
When you walk into the grocery store, you will generally face two distinct categories of bacon: wet-cured and dry-cured. The vast majority of mass-market, budget-friendly brands utilize a wet-curing process. This means the pork belly was rapidly injected with a liquid brine solution containing water, salt, sodium nitrite, and liquid smoke to cure it as quickly and cheaply as possible. Because wet-cured bacon is heavily pumped full of excess water, it is highly prone to aggressive shrinking and violent splattering in the pan. When that injected water hits hot fat, it instantly turns to steam, expanding rapidly and launching hot grease into the air.
If you want the best results, you need to look for dry-cured bacon. Dry-curing is the traditional, artisanal method where the pork belly is rubbed with dry salt, sugar, and spices, and left to cure slowly over weeks before being naturally smoked over real hardwood. Because there is no excess water injected into the meat, dry-cured bacon shrinks significantly less, splatters less, and offers a much denser, more concentrated flavor.
Always opt for thick-cut slices over standard or thin cuts. Thick-cut slices have the structural integrity necessary to withstand the rendering process without turning into brittle, shattered shards. They provide that highly coveted textural contrast: a shatteringly crisp exterior giving way to a slightly chewy, meaty interior.
The Thermodynamics of a Hot Skillet (Or: How to Ruin Breakfast)
Let us dissect exactly what goes wrong when you preheat your skillet. You have a pan sitting on the burner at 350°F. You take a cold strip of pork belly straight from the 38°F refrigerator and drop it onto the hot metal.
Instantly, the thermal shock initiates a cascade of aggressive chemical reactions. The collagen network within the connective tissue begins to aggressively unfold and shrink the moment it hits 140°F (60°C). Simultaneously, the lean muscle fibers undergo a rapid transverse contraction, which typically occurs at temperatures between 104°F and 140°F (40°C to 60°C).
Here is the critical failure point: the lean meat and the collagen are seizing and shrinking in a matter of seconds, but the thick bands of white fat have not had any time to melt. The meat pulls tight, but the fat remains solid and rubbery. Because the two tissues are attached but shrinking at completely different rates, the physical tension forces the strip to contort. This uneven thermal assault is the exact scientific reason why your bacon curls up into a mangled mess.
Furthermore, because the strip is now wavy and curled, it no longer sits flat against the bottom of the pan. The parts of the meat that are touching the hot metal begin to burn rapidly, fueled by the added sugars in the cure caramelizing and scorching. The parts of the strip that are lifted away from the pan remain undercooked and flabby. You end up with a piece of food that is somehow burnt and raw at the exact same time. It is a tragedy of thermodynamics.
The Magic of the Cold Pan Technique
Enter the hero of our story. Once you embrace the undeniable power of a cold pan, your weekend breakfasts will transform from stressful chores into peaceful, foolproof victories.
By placing cold bacon into a completely cold pan and turning the burner to a gentle medium-low heat, you take total control of the thermal progression. You are no longer shocking the meat; you are coaxing it. Pork fat is highly sensitive to heat, and it begins to melt and render at remarkably low temperatures, specifically between 86°F and 113°F (30°C to 45°C).
As the pan slowly warms up, the fat gently liquefies and begins to pool in the bottom of the skillet. Because the temperature is rising gradually, the muscle fibers and the collagen network have time to relax and contract slowly, rather than seizing violently. The bound water inside the meat evaporates gently, meaning you experience almost zero grease splatter.
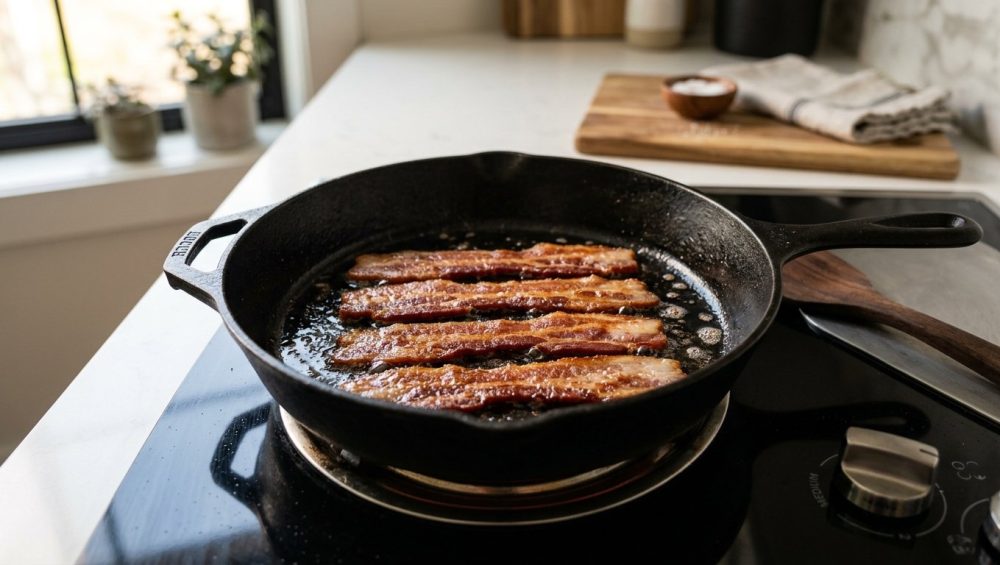
By the time the pan reaches the optimal temperature zone for the Maillard reaction—the complex chemical romance between amino acids and reducing sugars that gives browned food its deeply savory flavor, which proceeds rapidly between 280°F and 330°F (140°C to 165°C)—something magical has happened. Your bacon is now fully submerged in a shallow bath of its own rendered liquid fat. It is no longer searing directly against dry metal; it is shallow-frying. This liquid fat barrier conducts heat perfectly evenly across the entire surface of the strip, resulting in flawlessly flat, uniformly golden, edge-to-edge crispness.
The “No-Go” Gear: Banish Toxic Pans from Your Kitchen
Before we get to the step-by-step instructions, we need to have a serious conversation about your cookware. I have a strict “No-Go” rule in my kitchen, and if you want to cook like a pro without a culinary degree, you need to adopt it too.
I am fiercely passionate about banishing toxic kitchen gear from the home. Far too many home cooks are relying on cheap, lightweight, aluminum non-stick pans coated in PFAS, PTFE, and mystery chemicals. These pans are a crutch for people who refuse to learn basic heat control. When these cheap Teflon coatings overheat, they can release harmful invisible fumes, and when they inevitably scratch and peel, they flake forever-chemicals directly into your breakfast. They also lack the physical mass required to hold and distribute heat evenly, leading to hot spots that scorch your food. If your non-stick pan is scratched or peeling, throw it in the trash today. You deserve better.
For perfectly rendered fat, you need heavy, durable metals that offer serious thermal mass. I strongly advocate for a vintage cast iron skillet or professional-grade carbon steel pans. Both of these materials are exceptional at retaining heat and distributing it evenly across the cooking surface. As you use them, they develop a natural, polymerized seasoning layer that is completely non-toxic and virtually non-stick.
When you cook bacon in cast iron or carbon steel, you are actually doing the pan a favor. The rendered pork fat actively contributes to the seasoning layer, making the pan better, slicker, and more durable with every single use. It is a beautiful, symbiotic relationship between your food and your equipment.
The Step-by-Step Masterclass: Flawless Cold Pan Bacon
You have the right meat. You have the right pan. Now, let’s execute the technique flawlessly.
Step 1: The Cold Start
Take your heavy cast iron or carbon steel skillet and place it on the stove. Do not turn the burner on yet. Take your thick-cut bacon straight from the refrigerator and lay the strips flat in the cold pan. You want them to be close together, but not overlapping. If they overlap, the fat will not render properly in those spots, leaving you with chewy patches.
Step 2: The Gentle Heat Ramp
Turn your burner to medium-low. Do not get impatient and crank it to high. Cooking is about patience, and right now, you are acting as a fat-rendering scientist. Over the next five to eight minutes, you will notice the bacon begin to “sweat.” The white adipose tissue will turn slightly translucent, and a clear liquid pool of fat will begin to form around the edges of the strips. Soon, you will hear a gentle, rhythmic sizzle, and the fat will begin to foam slightly. This is exactly what you want.
Step 3: The Flip and Fry
Because you are raising the heat so gradually, the strips will remain perfectly flat against the bottom of the pan. You will not even need to use a heavy vented chef’s press to weigh the meat down. Once the bottom side develops a rich, mahogany-brown color (usually around the 8 to 10-minute mark), use a pair of tongs to gently flip each strip. You will notice that the bacon is now deep-frying in its own rendered fat. Let the second side cook until it reaches your desired level of crispness, usually another 3 to 5 minutes.
Step 4: The Drain and Rest
This is where many people fumble at the one-yard line. Do not pull your perfectly fried bacon out of the pan and dump it onto a plate piled high with paper towels. Hot meat resting directly on paper towels traps escaping steam, which immediately turns your shatteringly crisp crust into a soggy, chewy disappointment. Instead, use your tongs to transfer the strips onto a wire cooling rack set over a baking sheet. This allows the excess grease to drip away while allowing air to circulate completely around the meat, ensuring it cools down crisp and structurally sound.
The Weekday Shortcut: The Water Method
I am a realist. I know that on a leisurely Sunday morning, you have the time to stand over a skillet and lovingly render fat for fifteen minutes. But on a chaotic Tuesday morning when you are trying to get out the door for work, time is money. You need efficiency, but you still refuse to eat curled, burnt garbage.
If you need a shortcut that mimics the benefits of the cold-start technique in half the time, you can start it in water.
Place your strips in a cold pan just like before, but pour in just enough cold water to barely cover the bottom of the skillet (about a quarter cup). Turn the burner to medium-high. Here is the science behind the shortcut: water boils and evaporates at exactly 212°F (100°C). As the water comes to a simmer, it creates a temperature ceiling. The meat cannot exceed 212°F as long as the liquid water is present. This boiling phase rapidly plumps the meat and melts the fat without allowing the proteins to reach the high temperatures that cause violent seizing and burning.
Once the water fully evaporates, the temperature in the pan rapidly spikes. But because the fat has already been rendered out into the pan during the boiling phase, the bacon immediately begins frying in its own grease. You get perfectly flat, evenly cooked strips in a fraction of the time. It is the ultimate culinary hack for the busy home cook.
The Weekend Crowd-Pleaser: Cold Oven Baking
What happens when you are hosting a brunch party and need to cook a full pound (or two) of bacon at once? You cannot fit that much meat into a single 12-inch skillet without aggressively overcrowding the pan, which traps steam and causes the meat to boil rather than fry.
When cooking for a crowd, you apply the exact same cold-start thermodynamics to your oven. Line a heavy-duty, rimmed aluminum baking sheet with parchment paper or aluminum foil for easy cleanup. Place a wire roasting rack directly on top of the lined sheet. Lay your bacon strips flat across the wire rack, ensuring they do not overlap.
Place the baking sheet into a completely cold oven. Close the door, and set the temperature to 375°F. As the oven preheats, the fat will render slowly and drip down onto the foil below, leaving the meat suspended in the hot air to crisp up perfectly. Depending on the thickness of your cuts and the speed of your oven’s preheat cycle, it should take about 18 to 25 minutes to achieve flawless, flat, shatteringly crisp results for an entire crowd, with absolutely zero babysitting required on your part.
Liquid Gold: How to Save and Use Rendered Bacon Fat
If you pour the leftover rendered fat from your skillet down the kitchen sink, we can no longer be friends. Not only will that eventually destroy your plumbing by solidifying in the pipes, but you are also throwing away one of the most valuable, flavor-packed cooking fats on the planet. Our grandmothers kept a jar of bacon grease on the stove for a reason.
Once you have removed your bacon from the skillet, turn off the heat and let the liquid fat cool for about ten minutes so it is no longer dangerously hot. Take a fine-mesh strainer, line it with a piece of cheesecloth or a standard paper coffee filter, and set it over a clean glass mason jar. Carefully pour the warm fat through the strainer. This crucial step removes all the tiny, burnt bits of meat and carbon that would otherwise cause the fat to spoil or taste bitter over time.
Seal the jar and store it in your refrigerator. It will solidify into a beautiful, creamy white cooking fat that will easily last for up to six months. Use this liquid gold instead of butter or canola oil to fry your eggs, roast your potatoes, sear your steaks, or pop your stovetop popcorn. It adds an incredible depth of smoky, savory umami to everything it touches.
Troubleshooting Your Bacon Disasters
Even with the best techniques, home cooks sometimes run into issues. Let’s troubleshoot the three most common complaints I hear from weekend warriors.
Why is my bacon burning before it crisps?
If your edges are turning black and tasting like carbon while the fat remains white and rubbery, your heat is simply too high. You are rushing the process. Remember, the Maillard reaction happens beautifully at 300°F. If you crank your burner to medium-high, the sugars in the meat cure will scorch long before the fat has time to melt. Turn the dial down, take a breath, and let the pan do the work slowly.
Why is my bacon sticking to the pan?
Normally, when you are searing lean proteins like a chicken breast or a filet mignon, you rely on the water drop test to ensure the pan is hot enough to create the Leidenfrost effect, which prevents sticking. However, bacon is a completely different beast. Because it is roughly 35% fat, the cold-start method provides all the natural lubrication you could ever need. As long as you start cold and heat slowly, the fat will render before the proteins have a chance to bond with the metal. This works flawlessly, even if you are cooking on uncoated stainless steel pans. If your bacon is sticking, it means you either preheated the pan, or you are using an incredibly cheap, sugar-laden brand of meat that is essentially acting like glue.
Why is my bacon splattering everywhere?
Splattering is caused by one thing: water rapidly expanding into steam beneath a layer of hot fat. If your pan is violently popping, it means there is too much water in the environment, and the heat is too high. This is incredibly common if you are buying cheap, wet-cured bacon that has been pumped full of brine. Switch to a high-quality dry-cured brand, and ensure you are keeping the heat at a gentle medium-low.
The Sassy Sous-Chef’s Final Verdict
Cooking mind-blowing food at home does not require a massive budget, a pretentious culinary vocabulary, or a kitchen stuffed with single-use gadgets. It simply requires a basic understanding of how heat interacts with your ingredients.
A heavy, reliable skillet is one of those beginner kitchen tools that will completely revolutionize the way you feed yourself and your family. By ditching the toxic non-stick pans, upgrading your raw ingredients, and respecting the thermodynamics of fat rendering, you can eliminate the frustration of curled, chewy, burnt breakfasts forever.
The next time you pull a package of thick-cut pork belly out of the fridge, resist the urge to crank the dial to high. Treat the meat with a little bit of patience, start it cold, and let the science do the heavy lifting. Mastering this simple, foundational technique is a beautiful step forward in the art of the home kitchen. Now go make yourself a flawless BLT. You have earned it.






