
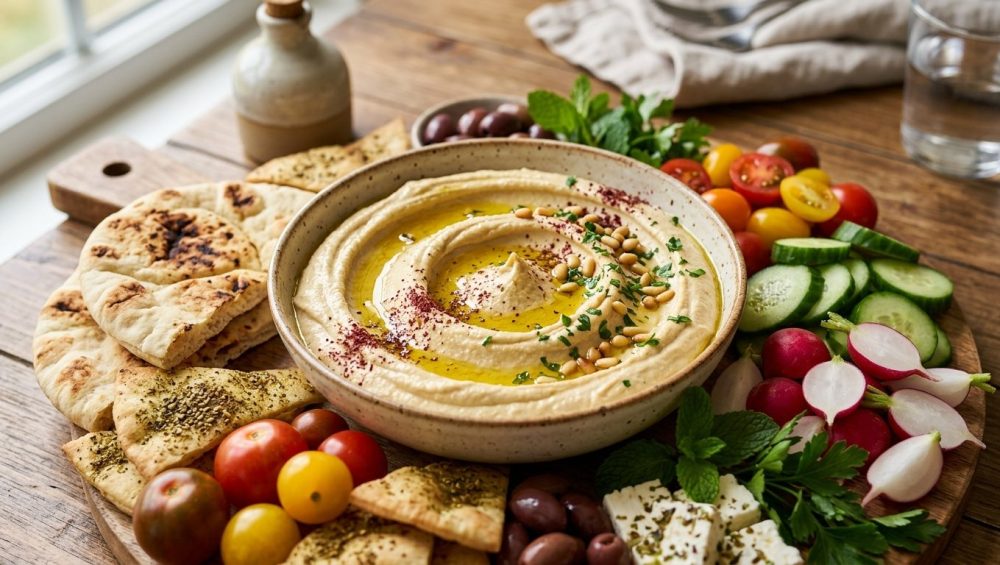
Picture this: It’s a beautiful Saturday evening. You’ve invited a few of your closest friends over for a casual, low-stress evening of wine, good conversation, and grazing. You wanted to create a mindful mezze board that looks like it belongs on the cover of a high-end culinary magazine. You decided to make homemade hummus because, let’s be honest, how hard can it actually be? It’s just beans and paste, right? You tossed a drained can of chickpeas, a glob of tahini, some raw garlic, and a heavy squeeze of lemon into a blender, hit the power button, and hoped for the best.
But when you finally swipe a piece of warm, toasted pita through your homemade creation, your heart immediately sinks. It doesn’t taste like the velvety, cloud-like dip you get at your favorite Mediterranean restaurant. It tastes like gritty, garlicky wet cement. It’s dense, it’s heavy, and it has the distinct, unpleasant mouthfeel of fine-grit sandpaper. You panic, contemplate dumping the entire bowl in the trash, and frantically consider ordering delivery while pouring yourself a very large, deeply necessary glass of Pinot Noir.
Hello, darling. I am your Sassy Sous-Chef, and I am here to tell you to put down the takeout menu, step away from the trash can, and take a deep breath. I have been exactly where you are. I have served the sad, gritty sand-dip to polite friends who chewed with forced smiles. I have set off my smoke detector more times than I care to admit while trying to figure out the stubborn mechanics of the kitchen. But through trial, error, and an absolute refusal to accept mediocre food in my own home, I learned the secrets.
Let’s get one thing straight right now: I firmly believe that absolutely anyone can cook like an expert without a pretentious culinary degree. I have zero patience for elitist chef-speak, molecular foam, or plating with tweezers. What I do have endless patience for is food science—the actual, practical mechanics of why food behaves the way it does. During the week, my kitchen motto is “time is money.” I will take every clever shortcut in the book to get a healthy, delicious dinner on the table because we all have lives to live. But on the weekend? When we are hosting? We have the time to be absolute perfectionists.
Today, we are going to completely deconstruct the science of hummus. We are going to talk about pH levels, pectin breakdown, and the thermodynamics of emulsification. By the time we are done with this masterclass, you will understand exactly why your previous attempts failed, and you will possess the knowledge to whip up the most extraordinarily smooth, restaurant-quality dip of your life.
The Anatomy of a Hummus Disaster
Before we can fix the problem, we have to understand the crime scene. Why does homemade hummus so frequently turn out grainy, heavy, and utterly disappointing? The answer lies in a fundamental misunderstanding of the ingredients and the physical processes required to transform them.
Most beginner recipes on the internet give you genuinely terrible advice. They tell you to drain a can of chickpeas, throw them into a food processor with raw garlic, tahini, olive oil, and lemon juice, and just let it rip until it looks like a paste. This is a recipe for an absolute disaster, and it completely undermines the art of effortless hosting.
Let’s look at store-bought hummus for a moment. Yes, it is smooth, but have you actually tasted it recently? It is often gummy, artificially thickened with guar gum, loaded with cheap seed oils instead of olive oil, and laced with potassium sorbate to keep it shelf-stable for months. It lacks the bright, nutty, fresh vitality of the real thing. We want restaurant-quality hummus—the kind that swoops beautifully on a plate and feels light and airy on the palate.
Achieving this requires respecting the physical properties of the chickpea and the delicate chemical emulsion of tahini. When you blend chickpeas with their skins still attached, those fibrous little jackets do not magically disappear. They shatter into thousands of microscopic, tough shards that your tongue instantly detects as “grit.” Furthermore, when you dump all your wet and fat ingredients into the bowl at the exact same time, you are completely ignoring the delicate laws of emulsification. Tahini is incredibly finicky. It wants to seize up. It wants to separate into a greasy, broken mess.
To achieve that ethereal, whipped-cloud texture, we have to intervene on a chemical level. We have to alter the pH of the cooking water to destroy the chickpea skins, and we have to manipulate the temperature of the tahini to force it into a stable emulsion.
The Science of the Soak: Why Baking Soda is Your Secret Weapon
Let’s talk about the humble chickpea, also known as the garbanzo bean. The absolute biggest hurdle standing between you and silky-smooth hummus is the chickpea skin.
The Chemistry of Pectin
Chickpea skins are composed of a highly rigid polysaccharide-protein matrix, which is heavily reinforced by pectin. Pectin is a structural acid that acts like the biological glue holding the plant cell walls together. When you boil chickpeas in plain, neutral tap water, that pectin remains relatively stable. The starchy inside of the bean might eventually get soft after hours of boiling, but the outer jacket remains tough, leathery, and fibrous.
If you try to blend these intact skins, your food processor will merely chop them into tiny, gritty pieces. Some overly enthusiastic food bloggers will tell you to pinch and peel every single chickpea by hand to solve this problem. Let me be perfectly clear: I would rather watch paint dry than stand at my kitchen counter peeling six hundred individual chickpeas. We simply do not have time for that nonsense, especially when you plan mindful gatherings and need to prioritize your sanity and your schedule.
The pH Manipulation
Enter our culinary hero: sodium bicarbonate, commonly known as baking soda. Baking soda is alkaline. When you add it to your soaking or cooking water, it raises the pH level from a neutral 7.0 to an alkaline state of around 8.2 to 8.5.
Why does this matter? Because pectin is highly sensitive to alkaline environments. When exposed to the higher pH of the baking soda water, the pectin cross-links begin to weaken and rapidly hydrolyze. The structural integrity of the chickpea skin completely collapses. The skins literally dissolve, slough off, and melt away into the boiling water. This isn’t just a fun kitchen hack; it is scientifically validated food chemistry that reduces the mechanical resistance of the chickpeas during blending by up to 70%.
The Perfect Simmer
Whether you are starting with dried chickpeas (the weekend perfectionist route) or canned chickpeas (the weekday survival shortcut), the baking soda treatment is absolutely non-negotiable for ultra-smooth results.
If you are using dried chickpeas, you toss them with a little baking soda before soaking them overnight, and then add a bit more to the cooking water the next day. You want to simmer them at a gentle 195–205°F. Do not subject them to a violent, rolling boil, which can degrade the soluble fibers and cause the beans to disintegrate unevenly, leaving hard chalky centers. You want them to cook until they are absolutely, unequivocally mushy. If they have even the slightest “bite” or al dente texture left in them, your hummus will be grainy. They need to yield completely when pressed between your thumb and forefinger, offering zero resistance.
If you are using canned chickpeas, you aren’t off the hook. Drain them, rinse them, and throw them into a pot with fresh water and a half-teaspoon of baking soda. Boil them for about 15 to 20 minutes. You will be horrified by the amount of scummy, fibrous skins that float to the surface. Skim that foam off, drain the exceptionally mushy beans, and rinse them incredibly well with warm water to remove any residual alkaline taste.
The Tahini Emulsion: Why Ice Water Changes Everything
Now that we have chemically obliterated the chickpea skins and achieved perfectly mushy legumes, we have to address the second pillar of hummus perfection: the tahini.
Tahini is a rich paste made from toasted, ground sesame seeds. From a physical standpoint, it is a suspension of heavy sesame solids floating in sesame oil. Left to its own devices in the jar, the heavy solids sink to the bottom and the oil pools at the top. When you scoop it out, it is dense, sticky, and heavy.
The Thermodynamics of Emulsification
To make hummus, we have to combine this fat-heavy tahini with water-based ingredients like lemon juice and chickpea cooking liquid. As any basic science class will tell you, oil and water fundamentally do not want to mix. When you force them together, you are creating an emulsion.
Here is where the tragedy usually occurs in home kitchens. Food processors are fantastic machines, but their rapidly spinning blades generate a significant amount of friction heat. Heat is the absolute enemy of a stable emulsion. If the tahini mixture gets too warm while blending, the emulsion will break. The oil will weep out, the solids will clump together, and you will be left with a greasy, heavy, separated mess that tastes metallic and bitter.
This thermodynamic reality is exactly why you need ice cubes or ice-cold water in your recipe.
Supercooling and Aeration
By adding ice water to the food processor while whipping the tahini, you accomplish two critical things. First, you supercool the fats in the sesame paste, counteracting the friction heat of the blades and preventing the emulsion from breaking. Second, the cold temperature increases the viscosity of the fats just enough so that as the blades whip the mixture, it traps tiny pockets of air.
It is the exact same mechanical principle as churning ice cream or whipping heavy cream. The ice water allows the tahini to aerate, transforming it from a dense, beige paste into a pale, fluffy, cloud-like mousse. This aerated tahini base is what gives restaurant hummus its signature light, luscious mouthfeel.
The Order of Operations
Because the tahini emulsion is so delicate and requires space to aerate, you must respect the order of operations. You absolutely must stop blending chickpeas first. If you throw the heavy, starchy chickpeas into the bowl at the beginning, the tahini will never have the mechanical freedom to whip and trap air properly.
You must whip the tahini, the fresh lemon juice, the garlic, and the ice water together entirely on their own for several minutes. Only when this base is incredibly pale, thick, and fluffy do you introduce the mushy chickpeas to the party.
The Ingredient Deep Dive: Quality Dictates Flavor
When a recipe has fewer than six ingredients, there is absolutely nowhere for bad ingredients to hide. Let’s talk about sourcing.
The Tahini: Do not buy the dusty jar of tahini that has been sitting on the bottom shelf of your grocery store since 2019. Oxidized, rancid sesame oil will ruin your hummus, and no amount of salt can mask that bitter, metallic flavor. Look for high-quality tahini made from Ethiopian sesame seeds, which are prized for their sweet, nutty flavor. The paste should be pourable, not rock-hard.
The Lemon: Bottled lemon juice is a culinary crime against humanity. It is oxidized and tastes like floor cleaner. You must use freshly squeezed lemon juice to provide the bright, acidic lift that hummus desperately needs to balance the heavy fats.
The Garlic: Raw garlic can be incredibly aggressive. If you just toss raw cloves into the blender, your hummus will taste sharp, and you will have garlic breath for three business days. We are going to use an acid-maceration trick (detailed in the masterclass below) to extract the sweet garlic flavor while neutralizing the harsh allicin compounds.
The Olive Oil: Notice how olive oil is not on the list of blended ingredients? That is not a mistake. Blending extra virgin olive oil aggressively in a food processor can cause the polyphenols to shear, turning the oil incredibly bitter. Furthermore, blending oil into the hummus makes the texture heavy and mayonnaise-like. Olive oil is a finishing garnish. It goes on top, pooling beautifully in the swoops of the plated hummus.
The “No-Go” Rule: Essential Gear for the Perfect Purée
I am going to take a brief, highly necessary detour to talk about your kitchen equipment, because I care about your health, your culinary success, and your sanity. I have a strict, uncompromising “no-go” rule when it comes to toxic, cheap kitchenware.
Ditch the Toxic Cookware
If you are currently boiling your chickpeas in a lightweight, scratched, peeling non-stick pot that you bought for ten dollars at a discount store five years ago, I need you to throw it in the garbage immediately. Boiling highly alkaline water (thanks to our baking soda trick) in a damaged non-stick pan is a fantastic way to leach forever chemicals, microplastics, and mystery metals directly into your food. I am absolutely militant about banishing toxic kitchen gear from my home, and you should be too.
You are likely ruining your nonstick pans with metal utensils and aerosol cooking sprays anyway, which degrades the coating and exposes the toxic core. For boiling beans, soups, and sauces, you need cookware with proper thermal mass. Invest in a heavy-bottomed, multi-clad stainless steel pot or a high-quality enameled cast-iron Dutch oven. These materials are non-reactive, safe, and will maintain the gentle, even simmer required to cook chickpeas perfectly without scorching them.
The Food Processor Mandate
Secondly, you cannot make restaurant-quality hummus in a cheap, underpowered blender. A low-wattage motor will struggle to break down the starches, and the blunt blades will just push the heavy mixture around, generating excess friction heat and breaking your delicate tahini emulsion.
Furthermore, standard blenders (even high-end ones like a Vitamix) create a deep vortex that requires a lot of liquid to keep the blades moving. If you use a blender, you will be forced to add too much water, resulting in runny, soup-like hummus. You need a robust, high-powered food processor with a wide base. It is an investment, yes, but it is the foundation of a beautifully organized dream kitchen. It does the heavy lifting so you don’t have to.
Assembling the Mindful Mezze Board: Stress-Free Entertaining
Now that we have mastered the science of the centerpiece, let’s talk about how to serve it. The culinary landscape is shifting rapidly. Recent market data shows the global hummus market is projected to reach over $10.14 billion by 2033, growing at a massive 10.2% CAGR. Why? Because the way we entertain has fundamentally changed.
As we move through 2026, the stiff, formal, multi-course dinner party is officially dead. Nobody wants to be trapped at a dining table making forced conversation while the host sweats over a hot stove in the other room, missing out on all the fun. The current trend is all about the global fusion grazing board. It is relaxed, it is highly interactive, and it encourages mindful, communal eating.
Prep-Ahead Strategies
The true beauty of a Mediterranean mezze board is that almost everything can—and absolutely should—be prepared in advance. Remember my weekday rule: time is money. Even on the weekend, you should not be actively cooking while your guests are in your home.
Hummus actually tastes significantly better on the second day. The sharp bite of the garlic mellows out, the lemon juice integrates fully with the fats, and the starches settle into a creamier consistency. Make your hummus up to three days in advance. Store it in the fridge. By the way, you will never have to clean your plastic containers with baking soda and vinegar again if you simply upgrade to high-quality glass food storage containers. They don’t hold onto pungent garlic odors, and they don’t stain.
Curating the Spread
A mezze board is essentially the Mediterranean cousin of the standard meat-and-cheese platter. It works just like a mindful charcuterie board, but with lighter, brighter, more vibrant flavors that won’t leave your guests feeling heavy and sluggish.
When styling your board, I like to use the “3-3-3 rule” for visual and textural balance: three dips, three carbs, and three fresh items.
- The Centerpiece: Spread your chilled, perfectly smooth hummus into a wide, shallow bowl or directly onto a rimmed platter. Use the back of a spoon to create deep, swooping craters. Drizzle a generous amount of high-quality, cold-pressed extra virgin olive oil into those craters. Dust with sumac or smoked paprika, and sprinkle with toasted pine nuts or fresh chopped parsley.
- The Dippers (Carbs): Warm, pillowy pita bread is mandatory. Cut it into neat wedges. Add a secondary crunch factor with homemade baked pita chips dusted with za’atar, or some sturdy seeded crackers.
- The Fresh Crunch: Break up the richness of the tahini with crisp, hydrating vegetables. Persian cucumbers cut into spears, bright pink radishes, colorful bell pepper strips, and crisp snap peas are perfect.
- The Briny Accents: You need acid to cut through the fat of the dips. Add small bowls of mixed marinated olives (Kalamata and Castelvetrano are a great mix), quick-pickled red onions, and perhaps some tangy pepperoncinis or artichoke hearts.
- The Extras: If you want to make the board robust enough to serve as a full meal, add some blocks of high-quality sheep’s milk feta drizzled with hot honey, a side of smoky baba ghanoush, or some crispy baked falafel.
The Sassy Sous-Chef’s Definitive Hummus Masterclass
Alright, grab your apron. Here is the step-by-step, no-nonsense masterclass to achieving the silkiest, most scientifically perfect hummus of your life.
The Ingredients
- Chickpeas: 1 cup of dried chickpeas (or two 15-ounce cans if you are taking the weekday shortcut).
- Baking Soda: 1 teaspoon total (divided) for dried, or 1/2 teaspoon for canned.
- Tahini: 3/4 cup of premium, roasted tahini. Stir it incredibly well in the jar before measuring to incorporate the oil and solids.
- Lemon Juice: 1/4 cup freshly squeezed.
- Garlic: 2 to 3 cloves, smashed with the flat side of your knife.
- Ice Water: 1/4 cup of ice-cold water, plus 2 actual ice cubes.
- Salt: 1 teaspoon of kosher salt, plus more to taste.
- Cumin: 1/2 teaspoon of ground cumin (optional, but highly recommended for earthy warmth).
- Olive Oil: High-quality extra virgin olive oil, for garnish only.
Step 1: The Acid-Garlic Soak (The Secret Flavor Hack)
Before you do anything else, smash your garlic cloves and drop them into a small bowl with the freshly squeezed lemon juice and the kosher salt. Let this sit undisturbed for 15 minutes. The high acidity of the lemon juice will chemically “cook” the garlic, neutralizing the harsh allicin compounds. After 15 minutes, strain the juice into your food processor bowl and discard the solid garlic pieces. You have extracted all the beautiful flavor you need without the harsh bite.
Step 2: Obliterate the Chickpeas
If using dried (The Weekend Way): Place the dried chickpeas in a large bowl, toss with 1/2 teaspoon of baking soda, and cover with several inches of cold tap water. Soak overnight at room temperature. The next day, drain and rinse them well. Place them in your heavy-bottomed stainless steel pot, add the remaining 1/2 teaspoon of baking soda, and cover with fresh water. Bring to a gentle boil, then lower the heat and simmer for 45 to 60 minutes until they are falling-apart mushy. Skim any floating skins. Drain and rinse thoroughly with warm water.
If using canned (The Weekday Way): Drain and rinse the canned chickpeas. Place them in a pot, cover with water, add 1/2 teaspoon of baking soda, and boil for 15 to 20 minutes. The skins will dissolve and float to the top as foam. Skim the foam, drain the incredibly soft beans, and rinse them well with warm water.
Step 3: Build the Fluffy Emulsion
Into your food processor (which already contains the garlic-infused lemon juice), add the 3/4 cup of well-stirred tahini. Turn the machine on and let it run for a full minute. The mixture will look seized, thick, and somewhat clumpy. Do not panic. With the motor running, slowly pour in the 1/4 cup of ice water, and drop in the ice cubes. Let the machine run for another 2 to 3 minutes. Stop and scrape down the sides with a silicone spatula. You will witness a thermodynamic miracle: the mixture will turn incredibly pale, light, and look exactly like whipped buttercream frosting.
Step 4: The Final Blend
Add your warm, mushy, skinless chickpeas and the ground cumin to the whipped tahini base. Turn the food processor on and walk away. Let it blend for a full 3 to 5 minutes. Do not rush this step. The machine needs time to obliterate every single microscopic particle of starch. If the hummus looks slightly too thick, drizzle in one more tablespoon of ice water while it runs. It should look glossy, smooth, and billowy.
Step 5: Chill and Serve
Taste your masterpiece for salt and adjust if necessary. Transfer your glorious, silky creation to a glass container and refrigerate it for at least an hour (or up to three days) to allow the starches to set up and the flavors to beautifully meld together. When you are ready to serve, spread it onto your mezze board, garnish heavily with your best olive oil, and prepare to graciously accept the endless compliments from your stunned guests.
Final Thoughts from the Kitchen
Listen to me: cooking does not have to be a source of constant anxiety, and you certainly do not need to rely on overpriced, preservative-laden store-bought tubs of dip to entertain your friends. By simply understanding the basic chemistry of your ingredients—manipulating the pH with a little baking soda and respecting the thermodynamics of your tahini emulsion with a splash of ice water—you can elevate a humble bowl of mashed beans into a luxurious, restaurant-quality culinary experience.
You have the tools, you have the science, and you have the sassy permission to banish bad hummus from your life forever. So pour yourself another glass of wine, crank up your favorite weekend playlist, and start soaking those chickpeas. You are officially ready to host the most spectacular, stress-free mezze gathering of the year. You’ve got this, darling. Now go make some absolute magic.






