
Picture this: You’ve spent the entire weekend prepping for a dinner party. The roast is perfectly rested, the gravy is a rich, shimmering liquid gold, and the wine is breathing nicely on the counter. You are in the home stretch. All that’s left to do is whip up a quick batch of mashed potatoes. You boil the spuds, drain them, toss them into a bowl with a cold stick of butter, and grab your trusty electric hand mixer to speed things up. You blast those potatoes on high speed, expecting a cloud-like, fluffy masterpiece.
Instead, you watch in sheer horror as your side dish transforms into a dense, sticky, translucent paste that clings to the beaters like wet cement. You try to fix it by adding more milk, but it only gets worse. Congratulations, you’ve just made potato-flavored wallpaper paste.
Listen to me: you do not need a culinary degree to make mind-blowing food, but you do need to respect the science of what you are cooking. If you have ever wondered why your mashed potatoes are gluey, the answer doesn’t lie in your lack of talent. The answer lies in a microscopic battlefield of ruptured plant cells and abused starches. I have absolutely zero patience for pretentious chef-speak, but we are going to dive deep into the food science of the humble spud today.
By the time you finish reading this masterclass, you will understand exactly why your current mashing technique is ruining your dinners, why you need to throw your cheap plastic tools in the garbage, and why a high-quality stainless steel potato ricer is the ultimate secret to achieving impossibly light, airy, restaurant-quality mashed potatoes in your own home kitchen.
The Food Science of a Potato: What Actually Happens When You Mash
To understand why mashed potatoes fail, we have to zoom in on a microscopic level. A potato isn’t just a solid lump of carbohydrates; it is a complex, living cellular structure.
Anatomy of a Spud: Starch Cells and Pectin
Like all living things, a potato is composed of millions of individual microscopic cells cemented together. The walls of these cells are made up of cellulose, hemicellulose, and a natural biological glue called pectin. Inside each of these microscopic cellular walls are thousands of tiny, tightly packed starch granules. When a potato is raw, these starch granules are hard, compact, and completely impervious to the water that fills the rest of the cell.
When you apply heat by boiling or steaming the potato, a magical process called gelatinization occurs. Around 140°F (60°C), the hard starch granules begin to absorb the surrounding water, and by the time they hit 160°F (71°C), they swell up to many times their original size. The pectin holding the cell walls together begins to dissolve, weakening the structure. You now have a potato made of millions of swollen, fragile, water-logged starch balloons, barely held together by weakened cell walls.
The Amylose and Amylopectin Dilemma
Not all starches are created equal. The starch inside a potato is primarily made of two distinct molecules: amylose and amylopectin. Amylose is a long, straight-chain molecule, while amylopectin is a highly branched, bushy molecule.
High-starch potatoes, like Russets, have a very high percentage of amylose. When cooked, these straight amylose chains don’t tangle easily, which is exactly why a baked Russet potato flakes apart into a dry, fluffy texture. However, because they are so swollen and delicate, these cells are incredibly vulnerable to physical damage.
The Breaking Point: How Mechanical Force Ruins Everything
Here is the absolute golden rule of mashed potatoes: your goal is to separate the cooked potato cells from one another without breaking the cell walls open. Separate, perfectly intact potato cells result in a smooth, fluffy, airy mash.
The moment you apply aggressive, high-speed mechanical force to these fragile, swollen cells, you tear the cell walls apart. When the cell walls rupture, they violently vomit their gelatinized starch (the amylose and amylopectin) directly into the surrounding liquid. Because starch is a natural thickener, it immediately binds with the water and dairy in your pot, creating a highly elastic, gummy matrix. The harder you mix, the more cells you destroy. The more cells you destroy, the more your side dish will turn into glue. It is a vicious, irreversible cycle, and it is one of the most common rookie kitchen mistakes that ruins holiday meals.
The Usual Suspects: Why Your Current Tools Are Sabotaging You
Now that we understand the microscopic warfare happening in your mixing bowl, let’s take a brutally honest look at the weapons you are currently using to commit these culinary crimes.
The Standard Wire Masher: A Recipe for Uneven Lumps
The traditional squiggly wire potato masher is the tool most of us grew up with. While it is certainly better than an electric appliance, it is wildly inefficient. A wire masher relies on blunt, downward force to crush the potatoes against the bottom of the pot. Because the gaps between the wires are large and irregular, you inevitably end up with uneven lumps. To get rid of those lumps, human nature dictates that you just keep mashing and mashing. By repeatedly crushing the same potatoes over and over again to chase down a few stubborn chunks, you end up overworking the starch and causing cellular rupture. You trade lumps for gumminess.
The Hand Mixer: A Weapon of Mass Destruction
If you want to save your sanity and your side dish, you need to ditch the hand mixer immediately. Electric hand mixers are designed to aerate cake batter and whip heavy cream; they are not designed to handle delicate gelatinized plant cells.
Food science laboratories have actually conducted rheology testing (the study of the flow of matter) on mashed potatoes. The results are horrifying. Using a high-speed hand mixer on cooked potatoes increases the viscosity (thickness and stickiness) of the mash by an astonishing 300% in under two seconds. In the blink of an eye, the rapidly spinning metal beaters slice through millions of potato cells, releasing a catastrophic flood of starch.
The Food Processor and Blender: The Ultimate Potato Sin
Let’s not even get started on the hidden danger of the blender or the food processor. Tossing boiled potatoes into a food processor is the single fastest way to create a batch of inedible, elastic sludge. The razor-sharp blades rotating at thousands of revolutions per minute will completely decimate the cellular structure of the potato in milliseconds. You will be left with a sticky, gummy paste that more closely resembles melted mozzarella cheese than a potato. Never, ever put a potato in a blender.
Enter the Stainless Steel Potato Ricer: Your Kitchen’s New Best Friend
We’ve established that crushing, whipping, and blending are the enemies of the potato. So, how do we achieve perfectly smooth, lump-free mashed potatoes without destroying the cells? You rely on the magic of a potato ricer.
What the Heck is a Potato Ricer?
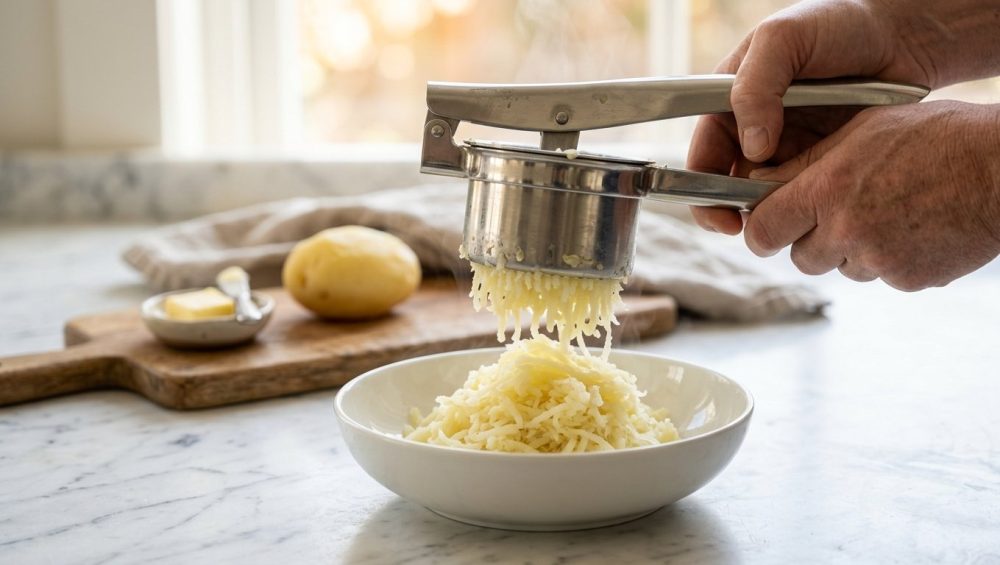
If you haven’t seen one before, a potato ricer looks like a gigantic garlic press on steroids. It consists of a large hopper (a basket) with a perforated metal base, and a flat plunger attached to a long lever handle. You place your cooked chunks of potato into the hopper, squeeze the handles together, and the plunger forces the potato through the small holes.
The Extrusion Method: Gentle, Loving, and Flawless
The reason a ricer is the undisputed champion of the kitchen is due to the mechanics of extrusion. The holes at the bottom of a standard ricer are typically between 1.5 to 3 millimeters in diameter. When you press the potato through these tiny, uniform holes, the potato is forced to separate into fine, delicate, rice-like strands.
Because the potato only passes through the hole exactly once, it experiences minimal mechanical shear. The extrusion process gently separates the potato cells from one another along their weakened pectin boundaries, rather than tearing the cell walls open. The starch remains safely locked inside the intact cells. Furthermore, as the thin strands of potato fall into your bowl, they trap air between them, resulting in a naturally light, fluffy, and voluminous pile of potato “rice”. There are no lumps, there is no glue, and the entire process takes seconds. I constantly test new equipment and share my latest kitchen discoveries with my readers, and a high-quality ricer remains one of the most vital, time-saving tools a home cook can own.
Why Material Matters: The Absolute Ban on Toxic Plastic and Cheap Metals
As your sassy sous-chef, I have a strict, non-negotiable rule when it comes to kitchen equipment: time is money, and cheap gear will always cost you more in the long run. I am absolutely relentless when it comes to banishing toxic kitchen gear from my countertops, and potato ricers are a prime offender in the cheap housewares market.
The Dangers of Flimsy Plastic and Peeling Coatings
Do not, under any circumstances, buy a plastic potato ricer. Ricing a hopper full of dense potatoes requires a significant amount of downward leverage and physical pressure. Flimsy plastic handles will flex, bend, and eventually snap under the strain, usually right in the middle of your Thanksgiving prep.
More importantly, you are dealing with boiling hot potatoes. Cheap plastics can warp under high heat and have the potential to leach microplastics and toxic endocrine-disrupting chemicals directly into your family’s food. Similarly, avoid any metal ricers that feature a mysterious “non-stick” coating. The friction of the potatoes and the scraping of spoons will inevitably cause that cheap chemical coating to flake off into your mash. No one wants a side of peeling Teflon with their gravy.
The Beauty of High-Quality Stainless Steel
You must invest in a heavy-duty, 100% stainless steel potato ricer. Consider this your essential kitchen survival guide mandate. High-quality culinary stainless steel is non-reactive, completely non-toxic, rust-proof, and virtually indestructible. A solid stainless steel ricer will not bend under pressure, it will not leach chemicals into your hot food, and it can be tossed straight into the dishwasher for effortless cleanup. It is a buy-it-for-life tool that respects both your time and your health.
The Ultimate Masterclass: Step-by-Step to the Fluffiest Mashed Potatoes of Your Life
Having the right tool is only half the battle. Now we are going to combine our new stainless steel ricer with flawless, science-backed culinary technique. Mastering these small foundational methods is truly the art of the home kitchen. Let’s make the best mashed potatoes you have ever tasted.
Step 1: Choosing the Right Potato (Yes, It Matters)
You cannot make fluffy mashed potatoes out of waxy potatoes. Waxy potatoes, like red potatoes or new potatoes, have a low starch content and a high moisture content. They are high in amylopectin, which makes them dense and helps them hold their shape in a potato salad. If you try to mash them, they will turn gummy and heavy.
For fluffy mash, you need high-starch or medium-starch potatoes.
- Russet Potatoes (High Starch): Russets contain roughly 20% to 25% starch and have very low moisture. Their high amylose content means their cells swell beautifully and separate easily, making them the absolute kings of light, airy, fluffy mashed potatoes.
- Yukon Gold Potatoes (Medium Starch): Yukon Golds contain about 15% to 20% starch. While slightly denser than a Russet, they have a naturally buttery flavor and a creamy, velvety texture.
Pro Tip: For the ultimate side dish, use a 50/50 blend of Russets (for airy fluffiness) and Yukon Golds (for rich, buttery flavor).
Step 2: The Prep and the Cook
Peel your potatoes and cut them into uniform 1.5-inch chunks. Uniformity is critical; if your chunks are different sizes, the small ones will overcook and waterlog before the large ones are tender.
Place your potato chunks into a large pot and cover them with cold water, then add a generous handful of salt. Why cold water? If you drop potatoes into boiling water, the outsides will rapidly overcook and turn to mush while the insides remain raw and crunchy. Starting in cold water ensures the temperature rises gently, cooking the starch cells evenly from edge to center. Bring the pot to a boil, then reduce to a gentle simmer. Boil until a paring knife slides into the largest chunk with absolutely zero resistance (usually 15 to 20 minutes). Do not overcook them, or the cells will burst in the water.
Step 3: The Drying Phase (The Secret Pro Trick)
This is the step that 90% of home cooks skip, and it ruins their dish. When the potatoes are tender, drain them thoroughly in a colander. Now, immediately return the naked, drained potatoes back into the hot, empty pot and set it over low heat for about two minutes.
Gently shake the pot. You will see steam rising from the potatoes. This is the drying phase. We are evaporating the excess surface water that the potatoes absorbed during boiling. If you don’t evaporate this water, your final mash will be watery, diluted, and sad. We want those starch cells thirsty so they absorb rich butter and cream, not murky tap water.
Step 4: The Ricing Ritual
Working quickly while the potatoes are still piping hot, load your stainless steel ricer. Do not overfill the hopper—fill it about three-quarters of the way. Hold the ricer over a large, warm mixing bowl and squeeze the handles together steadily.
Watch in awe as perfectly uniform, delicate strands of potato cascade into the bowl. There is no violent crushing, no aggressive whipping. Just a gentle, loving extrusion. Repeat until all the potatoes are riced. Do not pack the riced potatoes down. Leave them sitting in their airy, fluffy mound.
Step 5: Incorporating the Fats (Temperature is Everything)
If you take a block of freezing cold butter and a splash of ice-cold milk straight from the fridge and dump them into your hot riced potatoes, you are committing a massive scientific error.
Milk and cream contain casein micelles (milk proteins) and whey. When you introduce cold dairy to hot, swollen potato starch, you cause a rapid thermal shock. The sudden drop in temperature causes the swollen starch granules to aggressively contract, squeezing out the water they just absorbed and forming hard, grainy clumps. Furthermore, the cold temperature causes the casein micelles in the milk to cluster together, contributing to a lumpy, gluey texture.
You must warm your dairy! In a small saucepan, gently heat your whole milk, heavy cream, and butter until the butter is completely melted and the liquid is steaming (but not boiling). Melted butter contains fully liquefied triglycerides that will beautifully and evenly coat the potato starch granules, stabilizing the mash and creating a luxurious mouthfeel.
Gently pour the hot dairy mixture over your fluffy mound of riced potatoes. Using a silicone spatula, gently fold the liquid into the potatoes using a figure-eight motion. Stop mixing the exact second the liquid is absorbed. Season generously with salt and white pepper. You are done. Step away from the bowl.
Troubleshooting: How to Fix Common Mashed Potato Disasters
Even the best weekend warriors occasionally face a kitchen disaster. Let’s look at how to handle things when the side dish goes sideways.
Can You Un-Glue a Gummy Mash?
I’m going to give it to you straight: once starch cells have ruptured and released their amylose into the bowl, you cannot magically un-rupture them. You cannot reverse the chemical process of gluey potatoes. If your mash is slightly overworked, you can try gently folding in a few tablespoons of melted butter; the extra fat can sometimes coat the sticky starch and improve the mouthfeel.
However, if they are fully elastic and resembling melted cheese, do not serve them as a side dish. Pivot! Spread the gluey mash into a baking dish, top with cheddar cheese and breadcrumbs, and bake it into a casserole. Alternatively, chill the gummy mash in the fridge, form it into small patties, dredge them in flour, and pan-fry them in oil to make crispy potato croquettes. The sticky starch actually helps bind the croquettes together perfectly.
Why Are My Potatoes Watery?
If your mash is bleeding a puddle of milky water onto the plate, you committed two sins: you used a low-starch waxy potato, and you skipped the drying phase (Step 3). High-moisture potatoes cannot absorb heavy cream. Always use Russets or Yukon Golds, and always evaporate the excess water in the hot pot before ricing.
Beyond the Mash: Other Brilliant Uses for Your Ricer
If you are worried that a potato ricer is a “unitasker” taking up precious drawer space, let me put your mind at ease. A heavy-duty stainless steel ricer is an incredibly versatile workhorse.
- Flawless Gnocchi: The secret to light, pillowy Italian potato gnocchi is a dry, lump-free potato base. A ricer is mandatory for making authentic gnocchi dough without overworking the gluten and starch.
- Squeezing Greens: Frozen spinach is notorious for holding onto gallons of water, which ruins dips and casseroles. Load thawed spinach into your ricer and squeeze the handles to easily press out every last drop of excess moisture.
- Tomato Puree and Applesauce: You can use a ricer to crush soft, roasted tomatoes for a rustic marinara, or press stewed apples to make fresh, skin-free applesauce.
- Baby Food: A ricer makes quick work of steaming sweet potatoes, carrots, and peas, instantly transforming them into a safe, easily digestible puree for infants.
The Final Verdict: Reclaiming Your Holiday Dinner
Cooking should not be a stressful, chaotic chore that leaves you sweating over a bowl of ruined root vegetables. By simply understanding the basic biology of a potato cell and upgrading your gear to a safe, durable stainless steel ricer, you instantly eliminate the guesswork.
You no longer have to stand at the counter aggressively mashing, whipping, and praying for the lumps to disappear. The extrusion method respects the starch, saves you incredible amounts of time, and guarantees a fluffy, cloud-like texture every single time. So, throw away that bent wire masher, banish the electric mixer to the baking cabinet, and treat yourself to a proper potato ricer. Your sanity, your guests, and your holiday dinners will thank you. Now pour yourself that glass of wine—you’ve earned it.






