
Let’s be brutally honest for a second. We have all been there. It is 6:30 PM on a Tuesday, you are running on caffeine and sheer willpower, and you are staring down a package of boneless, skinless chicken breasts on your kitchen counter. You toss them into a hot skillet, cross your fingers, and hope for the best. Twenty minutes later, you are sawing through a piece of poultry that defies all laws of culinary decency: the tapered end is as tough and rubbery as a discount dog toy, while the bulbous center remains suspiciously pink, pulsating, and terrifyingly raw. It is a kitchen tragedy that plays out in millions of homes every single night.
But here is the absolute truth, poured straight from my glass of Pinot Noir to your cutting board: it is not your fault. You are not a bad cook, and you certainly do not need a culinary degree to fix this. You are simply a victim of thermodynamics and terrible kitchen equipment. If you have ever spent your evening frantically Googling why your chicken is dry, you are about to experience a massive paradigm shift. Today, we are going to dive deep into the physics of cooking poultry, banish the medieval torture devices you call “meat tenderizers,” and introduce you to the ultimate secret weapon for weeknight perfection: the flat, heavy-gauge stainless steel meat pounder.
The Anatomy of a Kitchen Disaster: Why Chicken Breasts Defy Physics
To understand why your dinner is failing, we first have to understand the biological and physical makeup of the ingredient itself. The modern chicken breast is an absolute nightmare of thermal dynamics, and cooking it whole without any physical modification is a fool’s errand.
The Biological Blueprint of Poultry Muscle
The chicken breast, scientifically known as the pectoralis major, is a muscle designed for short, intense bursts of energy (like flapping wings to escape a predator). Because chickens do not engage in sustained, long-distance flight, this muscle is primarily composed of fast-twitch, white muscle fibers. It contains virtually no myoglobin (the protein that gives dark meat its color) and, most importantly, it contains almost zero intramuscular fat.
In the culinary world, intramuscular fat—often referred to as marbling—is your safety net. When you cook a heavily marbled ribeye steak, the fat melts and bastes the muscle fibers from the inside out, providing a massive margin of error if you accidentally leave it on the heat for an extra minute. The chicken breast offers no such luxury. It is pure, unadulterated protein and water. Once the internal temperature of that meat crosses 155°F (68°C), the myofibrillar proteins begin to violently contract. They twist and shrink, squeezing out their bound water like a wet sponge being wrung out by a bodybuilder. Without fat to provide perceived juiciness, the margin between perfectly cooked and chalky sawdust is a matter of degrees.
The Wedge Shape: A Thermodynamic Nightmare
Biology aside, the true villain of this story is geometry. A chicken breast is shaped like a teardrop or a wedge. The top end is a bulbous, thick fortress of protein, often measuring over two inches thick in modern, commercially raised poultry. The bottom end tapers off into a paper-thin flap.
When you place this wedge into a hot skillet, you are asking physics to perform an impossible miracle. You are asking a 400°F pan to transmit heat all the way to the center of a two-inch-thick mass of meat, while simultaneously hoping that the quarter-inch-thick tail end somehow magically stops cooking. It doesn’t work. By the time the thickest part of the chicken reaches a food-safe temperature, the thin end has been subjected to lethal heat for ten minutes too long. It has surrendered all of its moisture, its proteins have completely denatured, and it has transformed into a culinary hockey puck.
The Science of Uneven Cooking: Thermal Dynamics in Your Skillet
If we want to cook like experts, we have to think like scientists. You do not need a lab coat, but you do need to understand how heat moves from your stove into your food.
Heat Transfer and the Maillard Reaction
When you drop a piece of meat into a skillet, heat is transferred through conduction. The metal of the pan transfers thermal energy directly to the surface of the meat. Your goal here is twofold: you want to raise the internal temperature to a safe, juicy 165°F (or 155°F with a proper resting period for carryover cooking), and you want to trigger the Maillard reaction on the surface. The Maillard reaction is the complex chemical dance between amino acids and reducing sugars that occurs around 285°F (140°C), creating that gorgeous, golden-brown crust and deeply savory flavor.
However, before that glorious crust can form, you have to deal with surface moisture. Water cannot exceed 212°F (100°C) before it turns into steam. If your chicken is wet, the heat energy from the pan is entirely wasted on boiling off that surface water rather than browning the meat. This is why you must always pat your chicken dry before it ever touches a hot pan. Furthermore, to ensure your pan is actually hot enough to sear rather than steam, you should always perform the water drop test. If a droplet of water dances and glides across your stainless steel skillet like a mercury bead, you are ready to cook.
The Conductivity Crisis: Edges vs. Centers
Here is where the wedge shape ruins your life. Heat conduction is governed by Fourier’s Law, which essentially dictates that heat travels from the hot exterior to the cold interior over time. The rate at which the center of the meat heats up is directly proportional to how far away it is from the heat source.
In a wedge-shaped chicken breast, the thin tail end has very little mass and a very short distance to its core. The heat penetrates it almost instantly. The thick end, however, has massive thermal inertia. The heat has to slowly battle its way through layers of cold, wet muscle fibers. If you leave the chicken in the pan long enough for the thick center to reach 165°F, the thin edge has likely reached an internal temperature of 210°F. The proteins at the edge have tightened so severely that they have expelled every single drop of moisture, leaving you with a rubbery, inedible mess.
The Spiked Mallet Myth: Why You Need to Throw Away Your Tenderizer
At this point, you might be thinking, “Okay, Sassy Sous-Chef, I know the wedge shape is bad. That is why I use my trusty meat mallet to smash it flat!” If you are currently holding one of those medieval, spiked, hammer-style meat tenderizers, I need you to walk over to your trash can and drop it in. We have a strict rule around here about banishing toxic kitchen gear, and the spiked meat mallet is public enemy number one.
The Mutilation of Meat Fibers
Let’s get one thing straight: you are cooking a chicken breast, not a piece of shoe leather. Spiked meat mallets were originally designed to mechanically tenderize incredibly tough, connective-tissue-heavy cuts of beef, like round steak or flank steak. The sharp, pyramid-shaped teeth are meant to physically sever tough muscle fibers and break down collagen.
A chicken breast does not have tough connective tissue. It is already inherently tender. When you take a spiked mallet to a chicken breast, you are not tenderizing it; you are mutilating it. The spikes tear the delicate myofibrillar proteins to shreds, reducing the cellular structure to a pulverized, mushy paste. When you cook this mutilated meat, the damaged cells cannot hold onto their moisture, resulting in a dry, stringy texture that feels like chewing on wet cotton.
The Hygiene Hazard of Textured Mallets
If the textural destruction wasn’t enough to deter you, let’s talk about food safety. According to 2025 and 2026 reports from global health organizations, including the CDC and the WHO, foodborne illnesses caused by Campylobacter and Salmonella remain a massive, persistent threat in home kitchens. Raw poultry is a primary vector for these pathogens.
When you strike raw chicken with a spiked mallet, you are driving surface bacteria deep into the core of the meat. If you happen to undercook that core even slightly, you are putting yourself at serious risk of food poisoning. But it gets worse. Those tiny, pyramid-shaped spikes on the mallet head are a microbiological nightmare. They create hundreds of microscopic crevices that are virtually impossible to clean with a standard kitchen sponge. Even the high heat of a dishwasher often fails to remove the microscopic proteins and fats wedged between the teeth. Over time, these crevices harbor dangerous bacterial biofilms—invisible layers of hardened bacteria that contaminate everything they touch.
The Toxic Truth About Cheap Aluminum Mallets
To add insult to injury, the vast majority of these spiked mallets are made from cheap, cast aluminum. I despise cheap aluminum kitchenware. When you place a cast aluminum mallet into a modern dishwasher, the highly alkaline detergents react violently with the metal. The aluminum oxidizes, pits, and begins to break down.
Have you ever pulled your meat mallet out of the dishwasher and noticed a dark, powdery grey residue rubbing off onto your hands? That is aluminum oxide. When you use that degraded mallet to pound your food, you are embedding toxic, metallic dust directly into your dinner. It is unsanitary, it is unsafe, and it is completely unacceptable in a modern home kitchen. Instead of ruining your nonstick pans and poisoning your food with cheap, degrading materials, it is time to upgrade to the tool the professionals use.
Enter the Hero: The Genius of the Flat Meat Pounder
If the spiked mallet is the villain, the flat meat pounder is the knight in shining armor. This is the tool that separates the stressed-out weeknight amateur from the confident, relaxed home cook.
The Physics of Uniform Thickness
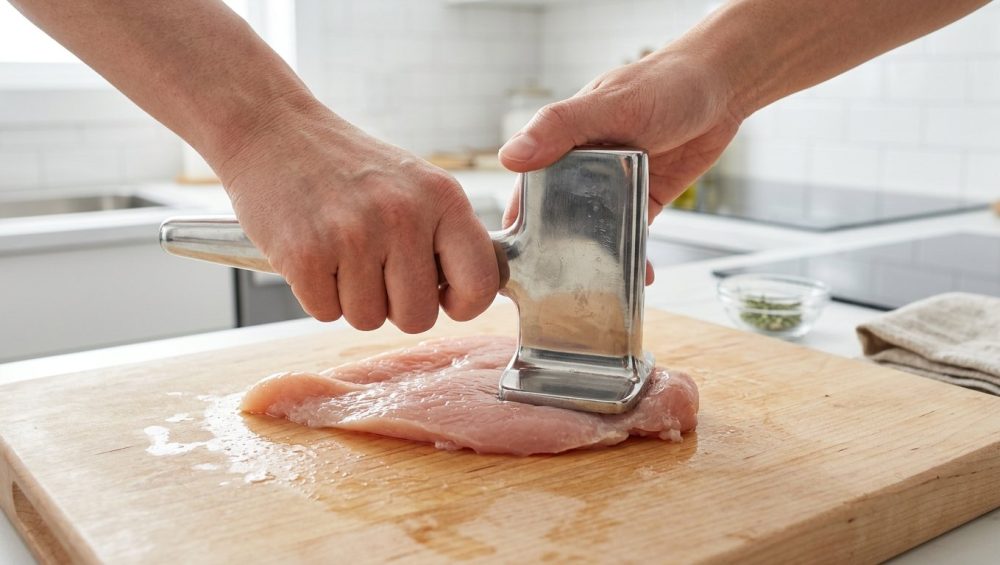
A flat meat pounder is exactly what it sounds like: a heavy, smooth-faced tool designed to flatten meat without piercing or tearing it. By gently coaxing the chicken breast into a uniform, standardized thickness (ideally about 3/4 of an inch thick from end to end), you completely eliminate the wedge shape.
When your chicken breast is a uniform thickness, the laws of thermodynamics suddenly start working in your favor. The heat from the skillet penetrates the meat at the exact same rate across the entire surface area. The edges reach 165°F at the exact same moment the center reaches 165°F. There are no dry ends. There are no raw middles. You achieve 100% perfectly even cooking, every single time.
Why Heavy-Gauge Stainless Steel is Non-Negotiable
When shopping for a flat meat pounder, material science matters. You want a tool made entirely from heavy-gauge, 18/10 stainless steel. Unlike cheap aluminum, high-quality stainless steel is non-reactive, non-porous, and completely impervious to the alkaline detergents in your dishwasher. It will never rust, pit, or shed metallic dust into your food.
Furthermore, stainless steel is incredibly dense. A good meat pounder should weigh between 1.5 to 2 pounds. It should feel like a solid, substantial weapon in your hand. This weight is crucial because it allows the tool to do the work for you. You do not need to swing it wildly; gravity and the mass of the steel will effortlessly flatten the meat with gentle guidance.
Ergonomics and the Transfer of Force
The best flat meat pounders do not look like hammers. They look more like a heavy, modern hockey puck with a sturdy, vertical handle rising from the center (often called a “pounder” or “press” style, rather than a mallet). This ergonomic design is brilliant because it aligns your wrist, elbow, and shoulder directly over the center of gravity. When you press down, the force is distributed perfectly evenly across the flat surface of the tool, preventing the meat from squishing out unevenly or tearing.
Just as you would take care to avoid cracking wooden cutting boards by treating them with respect and proper oiling, you must treat your poultry with respect by using a tool designed to preserve its structural integrity.
A Masterclass in Pounding: Technique Over Brute Force
Owning a flat, stainless steel meat pounder is only half the battle. Using it correctly is where the true kitchen artistry comes into play. Pounding chicken is not an excuse to take out your pent-up workplace frustrations. It requires finesse, technique, and a little bit of patience.
The Prep: Plastic Wrap vs. Parchment Paper
Never strike raw meat directly with your pounder. Doing so causes the meat to stick to the metal, tearing the delicate surface proteins and creating a massive mess that will send raw chicken juice flying across your pristine kitchen counters.
You must always create a barrier. Many people use standard plastic cling wrap, but I find that cheap plastic wrap tears too easily under the weight of a heavy steel pounder, completely defeating the purpose. Instead, I highly recommend using heavy-duty freezer bags (slit open at the seams to create a large, durable plastic sheet) or high-quality parchment paper. Place the chicken breast on your cutting board, lay the barrier flat over the top, and ensure there are no wrinkles that might fold into the meat.
The Motion: Gliding and Coaxing, Not Smashing
Here is the most important technique you will learn today: you are not smashing the chicken; you are coaxing it. If you bring the pounder down with massive, vertical force, you will simply crush the muscle fibers and destroy the texture.
Instead, use the “push and glide” method. Start at the thickest part of the chicken breast. Bring the heavy stainless steel pounder down with moderate force, but as it makes contact, angle your wrist slightly and push outward toward the edges of the meat. You want to strike and slide, coercing the muscle fibers to spread laterally. Imagine you are working with a piece of thick clay, and you are trying to smooth it out into a flat disc. Work methodically from the center outward, checking your progress frequently.
The Ideal Thickness for Skillet Success
Your goal is not to turn the chicken into paper-thin carpaccio (unless you are specifically making chicken schnitzel or milanese). For a standard, juicy, pan-seared weeknight chicken breast, you are aiming for a uniform thickness of exactly 3/4 of an inch.
At this thickness, the meat retains enough structural integrity to hold onto its juices, but it is thin enough that the heat from the skillet can penetrate to the center rapidly. And a quick pro-tip: always use a dedicated plastic cutting board for raw poultry. Save your beautiful wooden boards for vegetables and bread, and avoid dulling your knives by scraping them across the board when transferring the meat to the pan.
The Ripple Effect: How Uniformity Changes Everything Else
Once you master the art of the flat meat pounder, you will experience a ripple effect of culinary benefits that will completely transform your weekday cooking routine. The advantages of uniform thickness extend far beyond just avoiding a raw center.
Brining and Marinating Efficiency
When you flatten a chicken breast, you drastically increase its surface area relative to its volume. This is a massive advantage when it comes to flavoring the meat. A thick, wedge-shaped chicken breast takes hours for a marinade or a brine to penetrate effectively. By flattening it, you reduce the distance the salt and aromatics have to travel.
If you combine a perfectly pounded chicken breast with the magic of dry brining (liberally salting the meat and letting it rest uncovered in the fridge for a few hours), you will achieve a level of deep, seasoned flavor and moisture retention that rivals any high-end restaurant. The increased surface area means more of the meat comes into direct contact with your herbs, garlic, and spices, ensuring every single bite is packed with flavor.
Predictable Cooking Times (Time is Money!)
As a busy professional, I firmly believe that time is money. Standing over a hot stove for twenty minutes, poking and prodding a thick, uneven chicken breast while praying it cooks through, is a massive waste of your evening.
A chicken breast that has been pounded to a uniform 3/4-inch thickness cooks incredibly fast. In a properly preheated skillet, it will take exactly 3 to 4 minutes per side to reach a perfect, juicy 165°F. That is an 8-minute total cooking time. You can literally sear your protein in the time it takes to boil water for pasta. Just remember, preheating the pan is absolutely critical to achieving this speed; if you put the meat into a cold skillet, it will slowly steam in its own juices rather than searing.
The Pan Sauce Perfection
Finally, let’s talk about the crust. Because a flattened chicken breast has a large, even surface area, the entire face of the meat makes direct contact with the hot metal of your skillet. This maximizes the Maillard reaction, giving you a beautiful, edge-to-edge golden brown crust.
As that crust forms, it leaves behind fond—those incredibly flavorful, caramelized brown bits stuck to the bottom of the pan. Because you have so much surface area searing at once, you generate a massive amount of fond. If you properly manage your heat and stop food from sticking by using adequate oil and letting the meat release naturally, you can deglaze that pan with a splash of white wine, a pat of butter, and a squeeze of lemon juice to create a mind-blowing pan sauce in under sixty seconds.
Conclusion: Reclaiming Your Weeknight Chicken
Cooking a flawless, juicy, perfectly browned chicken breast on a random Tuesday night does not require a Michelin star, a sous-vide machine, or an act of divine intervention. It requires a basic understanding of thermal dynamics and the willingness to throw your toxic, spiked aluminum mallet into the garbage where it belongs.
By investing in a heavy-gauge, stainless steel flat meat pounder, you are taking control of the physics in your kitchen. You are standardizing your ingredients, eliminating the guesswork, and treating your food with the respect it deserves. So pour yourself another glass of wine, grab your stainless steel pounder, and show that chicken breast who is boss. Your dinners are about to get a whole lot faster, a whole lot safer, and infinitely more delicious. Happy cooking, and stay sassy.






