
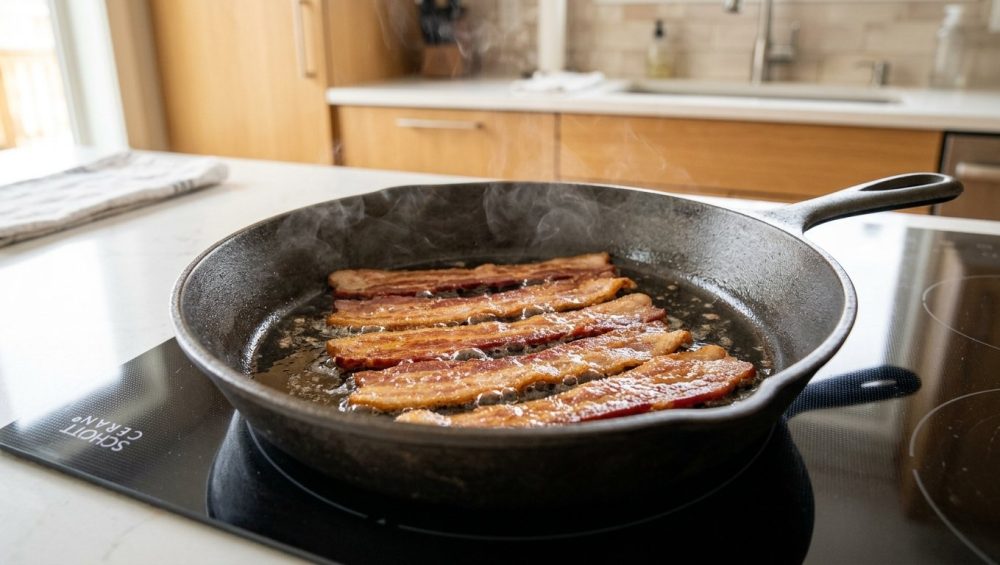
Let’s address the elephant in the kitchen, shall we? You love bacon. I love bacon. In fact, the entire world is seemingly obsessed with this crispy, salty, smoky miracle of cured pork. To put our collective obsession into perspective, the global bacon market was valued at a staggering $73.2 billion in 2024, and it is actively projected to reach $95.9 billion by 2033. We are eating a ridiculous amount of this stuff. In North America alone, bacon is a cultural institution, and across Europe, the average person is putting away over 30 kilograms of pork annually. But despite our global devotion to these glorious strips of fat and protein, the vast majority of home cooks are still preparing them completely wrong.
You know the drill. You wake up on a Sunday morning, craving a hearty breakfast. You toss a few cold strips of bacon into a hot frying pan. Within sixty seconds, your kitchen sounds like an active war zone. Hot grease is violently launching itself at your forearms, you are dodging microscopic missiles of boiling oil like you are trapped in the Matrix, and your smoke detector is aggressively singing the song of its people. When you finally manage to pull the bacon from the pan, you are left with a culinary tragedy: a strip that is burnt to a bitter crisp on the edges, yet somehow still flaccid, rubbery, and completely unrendered in the middle. It is one of the most frustrating rookie kitchen mistakes that plagues everyday weekend culinary hobbyists.
But what if I told you that you don’t need a culinary degree, a commercial deep fryer, or a protective hazmat suit to achieve perfectly flat, shatteringly crispy, evenly cooked bacon? What if I told you that the secret to flawless bacon—and the secret to saving your forearms from third-degree grease burns—involves doing the exact opposite of what your instincts tell you?
You need to cook your bacon in water.
Yes, you heard me correctly. I want you to drown your bacon. I know it sounds wildly counterintuitive. We have all been taught that water and hot oil are mortal enemies. But this scientifically backed, foolproof method—championed by the meticulous food nerds over at America’s Test Kitchen—is going to completely revolutionize your weekend breakfast routine. It is time to stop accepting burnt edges and rubbery fat. It is time to learn the actual food science behind your breakfast.
The Anatomy of a Strip of Bacon: Why It Is So Inherently Difficult to Cook
To understand why the water method works, we first need to understand why cooking bacon is such a structural nightmare. When you look at a strip of high-quality bacon, you are not looking at a uniform piece of meat. You are looking at a complex, striped matrix of two completely different biological materials: lean muscle and dense subcutaneous fat.
These two materials have radically different physical properties, and more importantly, they react to heat at completely different temperatures and rates. This is the fundamental reason why your bacon always cooks unevenly in a dry pan.
The Thermodynamics of Fat Rendering
The white, opaque sections of your bacon are composed of saturated animal fats trapped inside a network of connective tissue and collagen. In order for bacon to become crispy and delicious, this fat needs to “render.” Rendering is simply the culinary term for melting the solid fat out of the connective tissue, transforming it from a rubbery solid into a liquid oil.
According to food science, pork fat begins to slowly melt and render at a relatively low temperature, typically between 130°F and 140°F (54°C to 60°C). However, rendering is not an instantaneous process. It takes time. The fat needs sustained, gentle heat to fully break down the collagen and liquefy. If you blast the fat with high heat too quickly, the outside of the fat matrix sears and tightens up, trapping the unrendered fat inside. This leaves you with that unpleasant, chewy, gelatinous texture that ruins a good BLT.
The Maillard Reaction and Lean Muscle
On the other hand, the pink, lean muscle sections of the bacon behave entirely differently. This muscle tissue is packed with proteins and amino acids. When exposed to heat, the moisture inside the muscle evaporates, and the proteins begin to brown. This browning process is known as the Maillard reaction, and it is the chemical magic responsible for the deeply savory, caramelized, roasted flavors we associate with perfectly cooked meat.
Here is the catch: the Maillard reaction does not occur in earnest until the surface temperature of the meat reaches well above 300°F (150°C).
So, we have a massive thermodynamic conflict. The fat needs low, slow, sustained heat (around 140°F) to melt properly. The lean muscle needs high heat (over 300°F) to brown and crisp. When you throw a strip of bacon into a hot, dry skillet, the lean muscle rapidly hits 300°F and begins to brown and eventually burn, while the thick pockets of fat haven’t had nearly enough time at 140°F to render out. The result? What culinary scientists jokingly call “Schrodinger’s Strip”—bacon that is simultaneously burnt to a crisp and rawly flaccid. If you want to eliminate kitchen chaos, you have to find a way to bridge this massive thermodynamic gap.
The Flawed Traditional Methods You Need to Abandon
Before we dive into the elegant science of the water method, we need to brutally dissect the traditional cooking methods you have been relying on, and why they are actively sabotaging your breakfast.
The Dry Pan Method (A.K.A. Splatter City)
This is the default method for almost everyone who doesn’t know any better. You heat up a skillet, drop in the raw bacon, and pray. As we just discussed, the dry pan method forces the lean meat to cook far faster than the fat can render. But it also causes another massive issue: curling. As the lean muscle proteins hit the screaming hot metal, they instantly seize, contract, and shrink. The fat, however, does not shrink at the same rate. This differential in shrinkage causes the bacon strip to violently curl and buckle. Once the bacon curls, only the buckled edges remain in contact with the hot pan, ensuring that the strip will cook completely unevenly. You end up pressing it down with a spatula, burning your knuckles in the process.
The Oven Baking Method
Now, I will concede a minor point here: baking bacon in the oven on a wire rack over a rimmed baking sheet is a perfectly valid method if you are cooking for a massive crowd. If you are hosting a brunch for twelve people, the oven is your best friend. It applies ambient convection heat, which renders the fat more evenly than a dry skillet.
However, we are talking about everyday, practical home cooking. Time is money. If it’s a Tuesday morning and you just want three slices of bacon alongside your scrambled eggs, preheating a massive oven, dirtying a wire rack, and waiting 25 minutes is highly inefficient. Furthermore, cleaning baked-on, polymerized grease off a wire rack is a miserable chore that has no place in an organized dream kitchen. The oven method is a situational tool, not a daily driver.
The Microwave Abomination
I am only going to say this once. If you are cooking your bacon in the microwave between sheets of paper towels, we cannot be friends. The microwave excites water molecules to generate heat, effectively boiling the meat from the inside out in a matter of seconds. It bypasses the gentle rendering phase entirely, resulting in brittle, dry, flavorless shards of pork that shatter into dust when you bite into them. Respect the pig. Step away from the microwave.
The Counterintuitive Science of the Water Method
This brings us to the ultimate solution: adding cold water to your frying pan. It sounds like madness, but it is actually a brilliant manipulation of physics and thermodynamics. Here is exactly what happens when you submerge your raw bacon in a shallow pool of water and turn on the heat.
Phase 1: The Temperature Cap and Gentle Simmer
Water has a hard, immutable physical limit: at sea level, liquid water cannot exceed 212°F (100°C). No matter how high you crank your stove burner, as long as there is liquid water in that pan, the temperature of the environment will stall exactly at the boiling point.
When you place your bacon in the pan with water, you are effectively creating a thermal shield. The water caps the pan’s temperature at 212°F. This is the absolute perfect intermediate temperature. It is well above the 130°F-140°F required to melt and render the fat, but it is safely below the 300°F threshold where the lean muscle begins to quickly brown and burn.
During this simmering phase, the bacon is essentially poaching. The tough muscle fibers gently soften and tenderize, preventing them from seizing up and curling. Meanwhile, the solid white fat is given ample time to slowly, luxuriously melt out into the water. By the time this phase is over, the bacon strip will be perfectly flat, incredibly tender, and stripped of its rubbery fat reserves.
Phase 2: The Evaporation Transition
As the fat renders out, the water in the pan is steadily boiling off into steam. This transition is seamless. You don’t have to pour anything out or manage complex temperature dials. The water simply does its job and then gracefully exits the stage. It is crucial to note that you should never try to speed up the cooling down process later by splashing the hot metal with cold sink water, as thermal shock will instantly warp your favorite skillet. Just let the water in the pan evaporate naturally.
Phase 3: The Golden Crisp
Once the last drop of water evaporates, the thermal shield is lifted. The temperature in the pan is now free to rise above 212°F. But here is the beautiful part: the pan is now filled with the pure, liquid bacon fat that rendered out during Phase 1.
Your perfectly flat, tenderized strips of lean muscle are now shallow-frying in their own liquid gold. Because the fat has already been rendered, the bacon doesn’t need to stay in this high-heat zone for very long. The Maillard reaction kicks in quickly, deeply browning the meat and crisping the edges uniformly. You are left with a shatteringly crisp, perfectly flat, evenly cooked masterpiece.
The Physics of Splatter: Why Water Actually Stops the Mess
One of the most persistent myths in home cooking is that adding water to a pan of bacon will cause a catastrophic grease explosion. This fear is understandable, but it is based on a fundamental misunderstanding of why grease splatters in the first place.
Let’s look at the physics. Why does hot oil pop violently? It happens when liquid water droplets—which are naturally present inside raw meat—seep out of the food and become submerged in a pool of hot oil that is well over 212°F (100°C). Because water is denser than liquid fat, the water droplet sinks to the bottom of the hot pan. The moment that water droplet hits the blazing hot metal, it instantly boils and flashes into steam. Steam takes up exponentially more volume than liquid water. As the steam rapidly expands, it violently pushes the layer of hot oil above it out of the way, launching burning droplets of grease into the air.
If you’ve ever used the water drop test to check the heat of a stainless steel skillet, you’ve seen this rapid evaporation in action. But when that evaporation happens underneath a layer of hot grease, it creates a microscopic explosion.
So, why does the water method prevent this? Because we are completely reversing the timeline.
By starting the bacon in a pool of water, we are extracting the natural moisture from the meat before the pan ever gets hot enough to fry. The water boils off gently into the air while the temperature is safely capped at 212°F. By the time the water is completely gone and the temperature rises to the frying zone, the bacon is already dehydrated. There are no rogue water droplets left inside the meat to sink to the bottom and flash into steam. The result? A shockingly calm, quiet frying experience. No pops, no explosions, no grease burns on your forearms.
Choosing the Right Pan (And Banishing Toxic Gear)
Before I give you the step-by-step instructions, we need to have a serious talk about your cookware. As your sassy culinary guide, I have a strict, zero-tolerance policy for cheap, peeling, toxic non-stick pans. If you are cooking bacon in a scratched $15 aluminum skillet coated in mystery chemicals, you are doing yourself and your food a massive disservice.
When you fry bacon, you are dealing with high heat and abrasive cooking utensils. Cheap PTFE (Teflon) coatings degrade rapidly under these conditions. Once that coating gets scratched, it begins to flake off into your food, releasing potentially harmful PFAS chemicals into the air and your breakfast. This is exactly why your cheap pans are losing their slip after only a few months of use. It is a waste of money and a hazard to your health.
To execute the water method perfectly, you need a pan with excellent thermal mass and heat retention. Here are the only three acceptable options:
- Cast Iron: The undisputed king of bacon frying. Cast iron holds heat beautifully, ensuring an even sear once the water evaporates. Plus, frying bacon is one of the best ways to build up that coveted, naturally non-stick polymerized seasoning layer on your skillet.
- Carbon Steel: The lighter, more agile cousin of cast iron. Carbon steel offers the same excellent heat retention and natural seasoning capabilities, but responds slightly faster to temperature changes. It is a staple in professional kitchens for a reason.
- Heavy-Bottomed Stainless Steel: If you don’t want to deal with seasoning, a high-quality, multi-clad stainless steel skillet is fantastic. It provides incredibly even heat distribution. And don’t worry about the bacon sticking; because we are starting in cold water and rendering the fat slowly, the bacon will naturally release from the stainless steel once it crisps up. You don’t need artificial coatings, especially since cooking spray is the enemy of any decent cookware anyway.
Throw away the scratched non-stick. Invest in a pan that will outlive you.
The Masterclass: Step-by-Step Guide to the Water Method
Alright, class is in session. Let’s walk through the exact, foolproof process for executing the water method. Follow these steps, and you will never burn your bacon again.
Step 1: The Cold Start
Take your heavy skillet (cast iron, carbon steel, or stainless) and place it on the stove. Do not turn the heat on yet. Arrange your strips of bacon in the cold pan. It is perfectly fine if the strips are slightly touching or overlapping a tiny bit; as the fat renders and the muscle tenderizes, the bacon will shrink and make room for itself.
Step 2: The Water Bath
Pour cold or room-temperature tap water directly into the skillet. How much water? You do not want to submerge the bacon entirely like you are boiling pasta. You just want enough water to completely cover the bottom of the pan, coming about halfway up the sides of the bacon strips. For a standard 12-inch skillet, this usually equates to about 1/4 to 1/3 of a cup of water.
Step 3: The Simmer
Turn the burner to medium-high heat. Allow the water to come to a vigorous simmer. You will see the water turn slightly cloudy as the fat begins to melt and mix with the liquid. The bacon will start to look a little gray and unappetizing during this stage. Do not panic. Trust the process. Let it simmer, uncovered, until the water completely evaporates. You can use a pair of tongs to flip the strips once during this phase to ensure both sides get evenly tenderized, though it isn’t strictly necessary.
Step 4: The Sizzle and Crisp
Listen closely to your pan. The auditory cues are everything here. As the last of the water boils off, the sound in the pan will dramatically shift from a bubbling, rolling boil to a sharp, distinct sizzle. This is the sound of the rendered fat taking over.
Immediately reduce your burner heat to medium or medium-low. The thermal shield is gone, and the pan is going to get hot very quickly. Now, you are simply shallow-frying the tenderized strips in their own fat. Because the meat is already fully cooked and the fat is rendered, this crisping phase will happen much faster than you are used to. Flip the bacon frequently with your tongs to ensure even browning.
Step 5: The Drain
Once the bacon reaches your desired level of crispness (I prefer a deep mahogany brown with a shatteringly crisp texture), immediately remove the strips from the pan and transfer them to a plate lined with paper towels. The residual heat will continue to cook the bacon for a few seconds after it leaves the pan, so pull it just before it looks “done.”
The clean up is a breeze, though a chainmail scrubber helps with cast iron if you happen to get any caramelized fond stuck to the bottom.
Advanced Bacon Troubleshooting & FAQs
Even with a foolproof method, questions arise. Let’s address the most common concerns home cooks have when trying this technique for the first time.
Does Boiling the Bacon Dilute the Flavor?
This is the number one objection I hear from skeptics. They assume that by boiling the meat in water, you are washing away the smoky, salty flavor. This is scientifically false. As the water evaporates, it leaves everything behind. The salt, the smoke compounds, and the savory meat juices do not evaporate with the steam; they concentrate back down into the pan and re-coat the bacon as it fries,. Some culinary forums have debated this, with a few Quora users claiming they lost flavor, but rigorous testing by America’s Test Kitchen proves that the water method actually concentrates the flavor by ensuring the fat renders perfectly without burning,.
Does This Work for Thick-Cut Bacon?
Not only does it work for thick-cut bacon, it is practically mandatory for it. Thick-cut bacon is notoriously difficult to cook in a dry pan because the extreme thickness makes the “Schrodinger’s Strip” problem even worse. The outside burns long before the massive ribbons of interior fat can render. The water method gives that thick fat the extra time it desperately needs to melt down. If you are cooking exceptionally thick slab bacon, you may even want to add slightly more water to extend the simmering phase.
What About Sugar-Cured or Maple-Flavored Bacon?
If you buy bacon that has been heavily cured with brown sugar, maple syrup, or honey, you know how easily it burns. Sugar caramelizes and scorches rapidly at high temperatures. The water method is a lifesaver here. By rendering the fat at 212°F, you protect those delicate sugars from burning during the early stages of cooking. Once the water evaporates, you just need to keep the heat strictly on medium-low to gently caramelize the sugars without turning them into bitter, black carbon. It is much better to have perfectly glazed meat instead of turning burnt bits into sauce because you scorched your breakfast.
Liquid Gold: How to Save and Utilize Your Leftover Bacon Grease
Once you remove your perfectly cooked bacon from the skillet, you will be left with a generous pool of pristine, liquid bacon fat. Do not you dare pour that down the sink. Pouring hot grease down your plumbing is a guaranteed way to cause a catastrophic, expensive clog. More importantly, throwing away bacon grease is a culinary crime.
Because you used the water method, the leftover fat in your pan will be exceptionally clean. It won’t be tainted with the bitter, burnt, acrid flavor of scorched meat that usually accompanies the dry pan method. This rendered fat—often affectionately called “liquid gold” in the South—is one of the most versatile cooking fats you can keep in your kitchen.
Allow the grease to cool slightly in the pan so you don’t burn yourself, but pour it out while it is still in its liquid state. Pour the fat through a fine-mesh strainer (or a coffee filter if you want it exceptionally pure) into a heat-proof glass mason jar or a dedicated ceramic grease keeper. Never pour hot fat directly into cheap plastic storage, which is exactly why your plastic containers stay greasy and eventually warp or melt.
Store the sealed jar in the refrigerator. It will solidify into a beautiful, creamy white cooking fat that will last for months. Use a spoonful of this liquid gold to fry your eggs, roast potatoes, sear a steak, or even substitute it for butter in savory baking recipes like cornbread or biscuits. It adds an incredible depth of smoky, umami flavor to absolutely anything it touches.
The Final Word on Your Weekend Breakfast
Cooking should never be an exercise in dodging flying grease or anxiously waving a dish towel at a blaring smoke detector. Professional-level results are completely achievable in a standard home kitchen when you understand the basic food science behind your ingredients.
By simply adding a splash of water to your skillet, you are taking control of the thermodynamics in your pan. You are forcing the stubborn fat to melt on your terms, and you are creating an environment where the lean meat can crisp up beautifully without burning. It is a small, counterintuitive adjustment that yields massive, delicious results.
So this weekend, when you pull that package of cured pork out of the fridge, I challenge you to silence your doubts, grab a measuring cup of water, and trust the science. Your forearms, your smoke alarm, and your taste buds will thank you. Now get out of here and go make some mind-blowing breakfast.






