
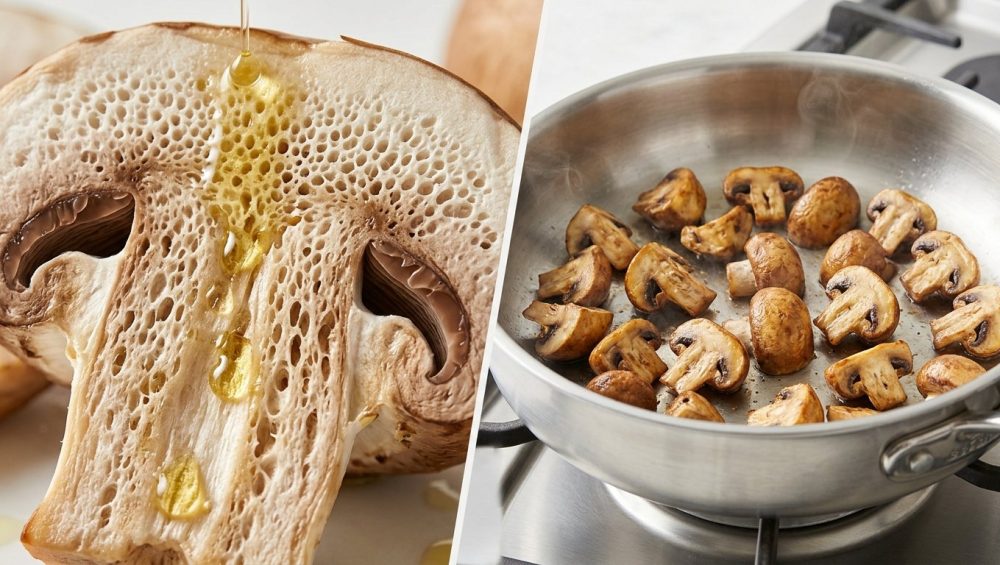
Listen, I know exactly how your typical Tuesday night goes. You have successfully navigated the chaotic hurdles of the workday, you are standing in your kitchen with a glass of aggressively poured Pinot Noir, and you decide you are going to whip up a nice, simple side of sautéed mushrooms to go with your dinner. You slice them up, heat some oil in a pan, and toss them in. And then, the magic trick happens. Within approximately four seconds, every single drop of that expensive extra-virgin olive oil you just poured into the skillet vanishes into thin air.
The pan is bone dry. The mushrooms look exactly the same, except now they are dry-rubbing against the hot metal, threatening to scorch and burn. Panic sets in. You grab the bottle of oil and generously glug more fat into the pan to save your side dish. Slurp. Gone again. You add half a stick of butter. Poof. Absorbed.
Fast forward ten minutes, and those same greedy little fungi finally decide to yield to the heat and release all their internal moisture, instantly flooding the pan. Now, you are left with a simmering, unappetizing jacuzzi of hot water, mushroom sweat, and a massive slick of regurgitated oil. Your beautiful, earthy side dish has turned into a steaming pile of gray, flabby, oil-logged erasers.
If this sounds like a personal attack, take a deep breath and take another sip of that wine. You are not a bad cook. You are simply fighting a losing battle against biology, cellular physics, and a fundamental misunderstanding of what a mushroom actually is. As someone who has ruined enough dinners to write a literal textbook on the subject, I am here to tell you that professional-level results are absolutely achievable in your standard home kitchen. You do not need a culinary degree from Le Cordon Bleu to make mind-blowing food, but you do need to understand the structural reality of the ingredients you are working with.
Today, we are going to completely dismantle everything you thought you knew about cooking fungi. We are going to explore the bizarre, sponge-like anatomy of the mushroom, and I am going to teach you a counterintuitive, scientifically-backed technique that will permanently end your greasy mushroom nightmares. Oh, and because I care deeply about your health and my own sanity, we are going to have a very serious chat about the toxic, peeling cookware you might be using to sear them.
Fungi 101: Why Mushrooms Are Not Vegetables
To understand why mushrooms act like bottomless pits for your cooking fat, we have to take a quick detour into high school biology. I promise to keep the pretentious chef-speak to an absolute minimum, but the hard science here is crucial for your culinary success.
First and foremost: mushrooms are not vegetables. They do not belong to the plant kingdom. They belong to the fungi kingdom, which means their cellular makeup is fundamentally different from the carrots, onions, and broccoli sitting in your crisper drawer. In fact, from an evolutionary and biological standpoint, fungi share more genetic similarities with the animal kingdom than they do with plants.
The Chitin Factor: A Lesson in Cellular Armor
When you cook a plant-based vegetable, you are using heat to break down cellulose and pectin, the structural compounds that give plants their rigidity. But fungi do not possess cellulose. Instead, the cell walls of a mushroom are reinforced with a tough, fibrous biopolymer called chitin.
If that word sounds vaguely familiar, it is because chitin is the exact same complex carbohydrate that makes up the hard exoskeletons of crabs, lobsters, shrimp, and insects. Yes, you read that correctly. On a microscopic, molecular level, you are cooking something structurally closer to a crab shell than a potato.
Chitin is incredibly heat-stable and stubbornly resilient. It does not easily break down, melt, or turn to mush when exposed to prolonged heat the way plant cell walls do. This unique structural armor is exactly why mushrooms maintain a meaty, chewy texture even if you simmer them in a heavy beef stew for three hours. If you want to avoid rubbery mushrooms that feel like pencil erasers, you have to understand how to manipulate this chitin network rather than fighting against it.
The Biological Sponge: Water and Air Pockets
But the resilient chitin cell walls are only half the story. The real culprit behind your oil-absorption woes is the internal, microscopic architecture of the mushroom cap and stem.
A fresh, raw mushroom is composed of roughly 80% to 90% water. The remaining 10% to 20% of its volume is made up of a loose, web-like network of those chitin-reinforced cells, separated by thousands of microscopic air pockets. Think of a standard, dry yellow kitchen sponge. It is full of empty space, right? When you run it under the kitchen faucet, those empty pockets immediately fill with liquid, expanding the sponge and making it heavy.
A raw mushroom is essentially a biological sponge. It is a highly porous matrix of air and water, just waiting to soak up whatever liquid it comes into contact with. When you take your knife and slice a raw mushroom, you are actively exposing thousands of these microscopic, empty air pockets to the open environment. They are primed, open, and ready to absorb. And unfortunately for your grocery budget and your waistline, they absolutely love to absorb dietary fat.
The Great Oil Disappearing Act: Anatomy of a Kitchen Disaster
Let us walk through the anatomy of a standard kitchen disaster so you can see exactly where things go wrong. You place a skillet on the stove, turn the heat to medium-high, and pour in a few tablespoons of your favorite cooking oil. The oil gets shimmering hot. You drop in your freshly sliced, porous, sponge-like mushrooms.
The Capillary Vacuum Effect
Instantly, the capillary action of those microscopic air pockets kicks into overdrive. The mushrooms act like dozens of little vacuums, sucking the hot oil straight out of the pan and pulling it deep into their cellular matrix. Within a matter of seconds, your pan is completely dry.
Because the pan is now dry, the thermal conductivity between the heat source and the food drops significantly. The mushrooms are no longer frying in fat; they are just sitting on hot, dry metal. As the ambient heat of the pan slowly penetrates the tough chitin walls, the massive amount of internal water hidden inside the mushrooms begins to heat up and turn into steam. The cell structure finally begins to collapse under the sustained heat, squeezing out all that liquid like a wringing hand.
The Thermodynamic Crash
Suddenly, the mushrooms expel all their internal water into the pan. If you have ever wondered why they get so soggy during the cooking process, this massive liquid purge is the reason. But remember all that oil they absorbed a few minutes ago? They expel that, too. Now, your skillet is filled with a murky, boiling emulsion of mushroom water and cooking fat.
Because the temperature of boiling water physically maxes out at 212°F (100°C) at sea level, the temperature of your pan plummets the moment that water is released. You cannot achieve the Maillard reaction—the complex chemical process between amino acids and reducing sugars that causes food to brown and develop deep, savory, complex flavors—at 212°F. Proper browning requires temperatures well over 300°F (150°C).
So, your mushrooms sit there, boiling in a greasy puddle, turning a sad, unappetizing shade of gray. By the time the water finally evaporates enough for the pan to get hot again, the mushrooms have taken on a rubbery, flabby texture, and they are hopelessly waterlogged with grease. It is a culinary tragedy that happens in thousands of kitchens every single night.
The Water-Simmer Method: A Counterintuitive Kitchen Miracle
If you want to stop wasting expensive olive oil and permanently eliminate soggy, greasy side dishes from your repertoire, you have to change your approach entirely. You have to collapse the biological sponge before you introduce the fat.
It sounds like absolute culinary heresy, but boiling them first is actually the smartest, most scientifically sound thing you can do. Food scientists and test kitchens have exhaustively proven this technique. We call this the water-simmer method, and it is the ultimate game-changer for the everyday home cook who wants professional results without the stress.
The Science of the Simmer
Here is the exact, foolproof physics of how the water-simmer method works: By adding a small amount of water to the pan first, you bring the mushrooms up to a gentle simmer. The heat from the boiling water penetrates the fungi evenly, causing the tough chitin walls to relax and the microscopic air pockets to physically collapse. As the structure compresses and shrinks, the mushrooms release their own internal moisture into the pan.
Because there is absolutely no oil in the pan yet, the mushrooms cannot absorb any fat. They are simply shrinking, condensing, and cooking in their own juices. Once the water (both the water you added and the water the mushrooms released) completely boils off and evaporates into the air, the pan goes dry.
But here is the magic: the mushrooms are no longer sponges. Their air pockets are completely gone. Their structure is sealed, dense, and firm. Now, and only now, do you add your oil or butter. Because the mushrooms have lost their porosity, the fat stays exactly where it belongs—in the pan, coating the exterior of the mushrooms, driving up the heat, and creating a spectacular, golden-brown crust.
Step-by-Step Guide to the Water-Simmer Method
Step 1: The Dry Start
Place your sliced or quartered mushrooms into a cold, dry skillet. Do not add a single drop of oil, butter, or cooking spray. Turn your stovetop burner to medium-high heat.
Step 2: The Water Addition
Add just enough water to barely cover the bottom of the pan—usually about a quarter cup for a standard 8-ounce punnet of mushrooms. If you want to build extra flavor right out of the gate, you can use chicken broth, rich beef stock, or even a splash of dry white wine instead of plain tap water.
Step 3: The Collapse
Let the liquid come to a rolling boil. Toss the mushrooms occasionally with a spatula. You will notice them start to shrink rapidly as the heat collapses their internal air pockets. They will begin to release their own liquid, adding to the bubbling pool in the pan. Let them boil. Do not rush this process. This is the crucial stage where the sponge is being destroyed.
Step 4: The Evaporation
Continue cooking over medium-high heat until every single drop of liquid has evaporated from the pan. You will hear the auditory cue when this happens: the sound of the pan will change from a wet, bubbling, rolling boil to a sharp, dry sizzle. The pan should be completely dry, and the mushrooms will be significantly smaller, incredibly dense, and fully cooked through.
Step 5: The Sear
Now is your moment to shine. Push the condensed mushrooms to the side of the pan and add your chosen cooking fat—a tablespoon of unsalted butter, clarified ghee, or a high-quality, high-smoke-point oil like avocado or grapeseed. Toss the mushrooms in the fat. Because they can no longer absorb it, they will begin to fry beautifully. Achieving perfectly browned mushrooms requires patience and a little bit of trust in the process, but within three to four minutes, you will have a gorgeous, deeply caramelized, grease-free side dish that rivals any high-end steakhouse.
The Toxic Cookware Rant: Stop Poisoning Your Food
Now that we have established the proper, scientifically sound technique, we need to have a very serious, brutally honest conversation about the equipment you are using to execute it. Getting a proper, aggressive sear on a batch of condensed mushrooms requires high heat. And if you are using a cheap, scratched-up, peeling non-stick pan from a discount big-box store, we have a massive problem.
As a culinary blogger and a fiercely practical home cook who values efficiency and health above all else, I have zero patience for the cookware industry’s lies. I absolutely despise cheap, toxic kitchenware. It is officially time to ditch your toxic kitchen gear and invest in durable, safe materials that will not off-gas invisible poisons into your family’s dinner.
The Dark History of Non-Stick Coatings
Traditional non-stick pans are coated with a synthetic plastic polymer called Polytetrafluoroethylene (PTFE), most commonly known by the trademarked brand name Teflon. Discovered by accident in 1938 by a chemist named Roy Plunkett, this incredibly slick material was initially used in military applications, including the Manhattan Project, before finding its way into consumer kitchens in the 1950s.
For decades, the manufacturing of these non-stick coatings involved Perfluorooctanoic Acid (PFOA), a toxic chemical linked to a horrifying laundry list of severe health issues, including thyroid disruption, reproductive issues, and certain types of cancers. While PFOA has largely been phased out of modern cookware manufacturing due to massive public outcry and lawsuits, the base PTFE remains the standard. And PTFE has its own dark side.
Polymer Fume Fever and the Canary in the Kitchen
Here is the dirty little secret the non-stick cookware industry spends millions of dollars trying to downplay: PTFE is entirely unstable at high temperatures. When a Teflon-coated pan is heated past 500°F (260°C)—a temperature that an empty or semi-empty pan can easily reach in just a few minutes on a standard residential gas or electric stovetop—the chemical coating begins to physically break down and decompose.
When this thermal decomposition happens, the pan releases a highly toxic cocktail of fluorinated gases and particulate matter into the air of your kitchen. Inhaling these invisible fumes causes a documented, acute medical condition known as Polymer Fume Fever, colloquially referred to as the “Teflon Flu.” Symptoms include severe chills, debilitating headaches, body aches, coughing, and chest tightness that mimic a severe viral infection.
If you think I am exaggerating the danger, just ask any avian veterinarian. Pet birds have incredibly highly efficient, sensitive respiratory systems. If you accidentally overheat a non-stick pan in a house with a pet parrot, cockatiel, or canary, the toxic fumes will literally kill the bird within minutes. If a frying pan is emitting gases lethal enough to drop a bird from its perch in the next room, why on earth are we using it to sear the food we put into our bodies?
Furthermore, you aren’t just ruining your non-stick pans when you blast them with high heat; you are creating a long-term chemical hazard. Once that synthetic coating begins to blister, scratch, flake, and peel, you are actively ingesting microplastics and “forever chemicals” (PFAS) with every single meal. You cannot get a hard, aggressive sear on mushrooms in a pan that cannot safely handle high heat. It is a fundamental mismatch of culinary technique and kitchen equipment.
The Right Gear for the Job: Safe, High-Heat Alternatives
If we are responsibly throwing those toxic, peeling pans into the garbage where they belong, what should we replace them with? For the dedicated home cook looking to elevate their weekend culinary projects, master high-heat searing, and protect their health, you have two primary, lifetime-lasting options: carbon steel and stainless steel.
The Magic of Carbon Steel
If you desperately want the slick, easy-release properties of a non-stick pan without the synthetic poisons and off-gassing, you need to look into carbon steel. Widely used in professional restaurant kitchens across Europe and Asia, carbon steel is essentially a lighter, smoother, more responsive cousin to traditional cast iron.
When you heat oil in a raw carbon steel pan, the fat undergoes a chemical process called polymerization, bonding tightly with the microscopic pores of the metal to create a natural, incredibly slick, and 100% non-toxic patina. This is exactly where carbon steel skillets shine, offering incredible heat retention and non-stick capabilities without the synthetic coatings. You can blast a carbon steel pan over a roaring high flame to sear your boiled-down mushrooms, and you will never have to worry about melting polymers or toxic fumes. It is a pan that actually gets better, darker, and more non-stick the more you use it.
The Indestructible Reliability of Stainless Steel
Your other fantastic, lifetime-guaranteed option is a heavy-bottomed, multi-clad stainless steel skillet. Stainless steel is virtually indestructible, completely non-reactive to acidic foods, and the absolute undisputed king of developing “fond”—those deeply flavorful, caramelized brown bits that stick to the bottom of the pan and form the base of incredible, restaurant-quality pan sauces.
Many amateur home cooks are terrified of stainless steel because they believe every single ingredient will aggressively stick to it, resulting in a nightmare cleanup scenario. But sticking is usually just a symptom of poor temperature management and impatience. If you are using stainless steel, simply rely on the water drop test to know exactly when your pan is hot enough to prevent sticking.
Heat the dry pan over medium heat, drop a tiny bead of water into it, and watch what happens. If the water aggressively sizzles and boils away instantly, the pan is too cold. But if the water forms a perfect little mercury-like ball that glides effortlessly across the surface without evaporating—a phenomenon known in physics as the Leidenfrost effect—your pan is perfectly preheated. Add your fat, add your condensed mushrooms, and watch them glide across the metal like they are on ice skates.
Flavor Maximization: Treating Your Fungi Like Premium Meat
Now that you deeply understand the cellular structure of your ingredients, you have mastered the counterintuitive water-simmer method, and you have upgraded to safe, high-quality cookware, it is time to focus on the fun part: flavor.
Because mushrooms possess such a dense, meaty texture (thanks to our resilient friend, chitin) and are naturally packed with high levels of glutamates (the chemical compounds responsible for the savory sensation of umami), you should treat them exactly like you would treat a premium cut of steak.
The Maillard Reaction in Fungi
The Maillard reaction is the holy grail of cooking. Discovered by French chemist Louis-Camille Maillard in 1912, this reaction occurs when amino acids and reducing sugars are subjected to high heat, creating hundreds of new, complex flavor compounds. Because mushrooms are surprisingly high in protein and amino acids compared to standard vegetables, they undergo the Maillard reaction beautifully—provided the pan is hot and dry enough. This is why the evaporation stage of our water-simmer method is so critical. You are setting the stage for a spectacular chemical reaction.
Timing Your Seasoning
Seasoning is not just about making food taste salty; it is about controlling moisture. Salt draws out water through osmosis. While the water-simmer method actually relies on drawing out moisture, you still want to hold back your heavy seasoning until the very end of the cooking process.
If you salt the mushrooms while they are still boiling in the water phase, the salt will just dissolve into the liquid and potentially evaporate away or end up steaming the fungi. Instead, aggressively salt them right as you add your searing fat. This ensures the salt crystals adhere directly to the exterior of the mushrooms, creating a savory, crunchy crust rather than just getting lost in the boil.
Aromatics, Basting, and the Acid Finish
Once your mushrooms have achieved that beautiful, deep mahogany-brown sear on all sides, drop the stove heat to medium-low. Toss in a generous knob of high-quality butter, a smashed clove of fresh garlic, and a sprig of fresh thyme or rosemary.
Take a moment to prep your aromatics properly—and please, for the love of all things holy, stop using a dull chef’s knife to hack your shallots and garlic to pieces. A sharp blade ensures clean, precise cuts that cook evenly without crushing the cell walls and releasing bitter, acrid sulfur compounds. When transferring your finely prepped ingredients from the cutting board to the hot pan, grab a basic bench scraper instead of dragging the sharp blade of your knife across the wood, which rolls the delicate edge and ruins your blade.
Tilt the hot pan slightly toward you and use a large spoon to continuously baste the seared mushrooms with the foaming, aromatic butter. The hot fat will act as a carrier, pulling the fat-soluble flavors of the garlic and woody herbs directly into the caramelized crevices of the mushrooms.
The final, absolutely non-negotiable step to achieving restaurant-quality mushrooms is a hit of acid. Mushrooms are earthy, deep, and incredibly rich. They desperately need a bright, acidic counterpoint to wake them up and balance the palate. Once your mushrooms are perfectly seared and basted, remove the pan entirely from the heat source. Deglaze the hot metal with a splash of dry sherry, a squeeze of fresh lemon juice, or a dash of high-quality aged balsamic vinegar. The acid will immediately cut through the heavy richness of the butter, elevate the umami flavor of the fungi, and scrape up any remaining fond from the bottom of your stainless or carbon steel pan. Toss in a handful of finely chopped flat-leaf parsley for a hit of herbal freshness, and you are done.
Advanced Variations: Adapting the Technique
Once you have mastered the basic water-simmer method, you can adapt this foundational technique to fit almost any flavor profile or cuisine. The cellular science remains exactly the same; only the finishing touches change.
The Wok Stir-Fry Adaptation
If you are making a weeknight stir-fry and want to include mushrooms, do not throw raw mushrooms into your wok along with your bell peppers and snap peas. The mushrooms will release their water and instantly ruin the high-heat wok hei (the “breath of the wok”) that gives stir-fries their signature smoky flavor. Instead, use the water-simmer method in a separate small skillet to collapse and sear the mushrooms beforehand. Once they are dense, browned, and sealed, you can toss them into your wok at the very end of the stir-fry process just to coat them in your soy and ginger sauce.
The Wine-Glazed Finish
For a more elegant weekend dinner party side dish, swap the initial boiling water for a mixture of half water and half dry red wine. As the liquid reduces and the mushrooms collapse, they will absorb the deep, fruity tannins of the wine. Once the pan goes dry, sear them in butter, and finish with a spoonful of demi-glace or heavy cream for an incredibly luxurious, steakhouse-style mushroom glaze.
Final Thoughts from the Sassy Sous-Chef
Cooking is not inexplicable magic. It is simply applied physics and organic chemistry disguised as art. When you stop fighting the natural, biological properties of your ingredients and start working with them, your time in the kitchen transforms from a stressful, chaotic chore into a genuinely enjoyable, empowering hobby.
By understanding that mushrooms are essentially chitin-walled sponges filled with water, you unlock the ultimate secret to cooking them perfectly every single time. The water-simmer method might feel completely backwards and wrong the first time you try it, but the spectacular results will speak for themselves. No more wasted bottles of olive oil. No more greasy, flabby, gray side dishes. Just deeply browned, intensely flavorful, perfectly textured mushrooms that taste like they were prepared by a seasoned executive chef.
And please, as a personal favor to me, throw away that scratched, peeling Teflon pan today. Your food, your lungs, and your imaginary pet parrot will thank you.
Now get out of here, go buy a pound of fresh creminis, and show that skillet who is the absolute boss of the kitchen. Happy cooking!






